Top 5 smartphones for Astrophotography in 2022

[ad_1]


Top 5 smartphones for Astrophotography in 2022

Nov 02, 2022, 05:25 am
4 min read

Top 5 smartphones for Astrophotography in 2022
Best smartphones for Astrophotography in 2022

The cameras on modern-day smartphones have significantly improved. With the right phone, you can now capture incredible photos of starry skies or the beautiful Moon.

The majority of top-tier flagship handsets have high-resolution cameras that perform well even in low lighting. They also come with dedicated night-time shooting modes.

So, if you want to try Astrophotography, one of these smartphones should serve you well.

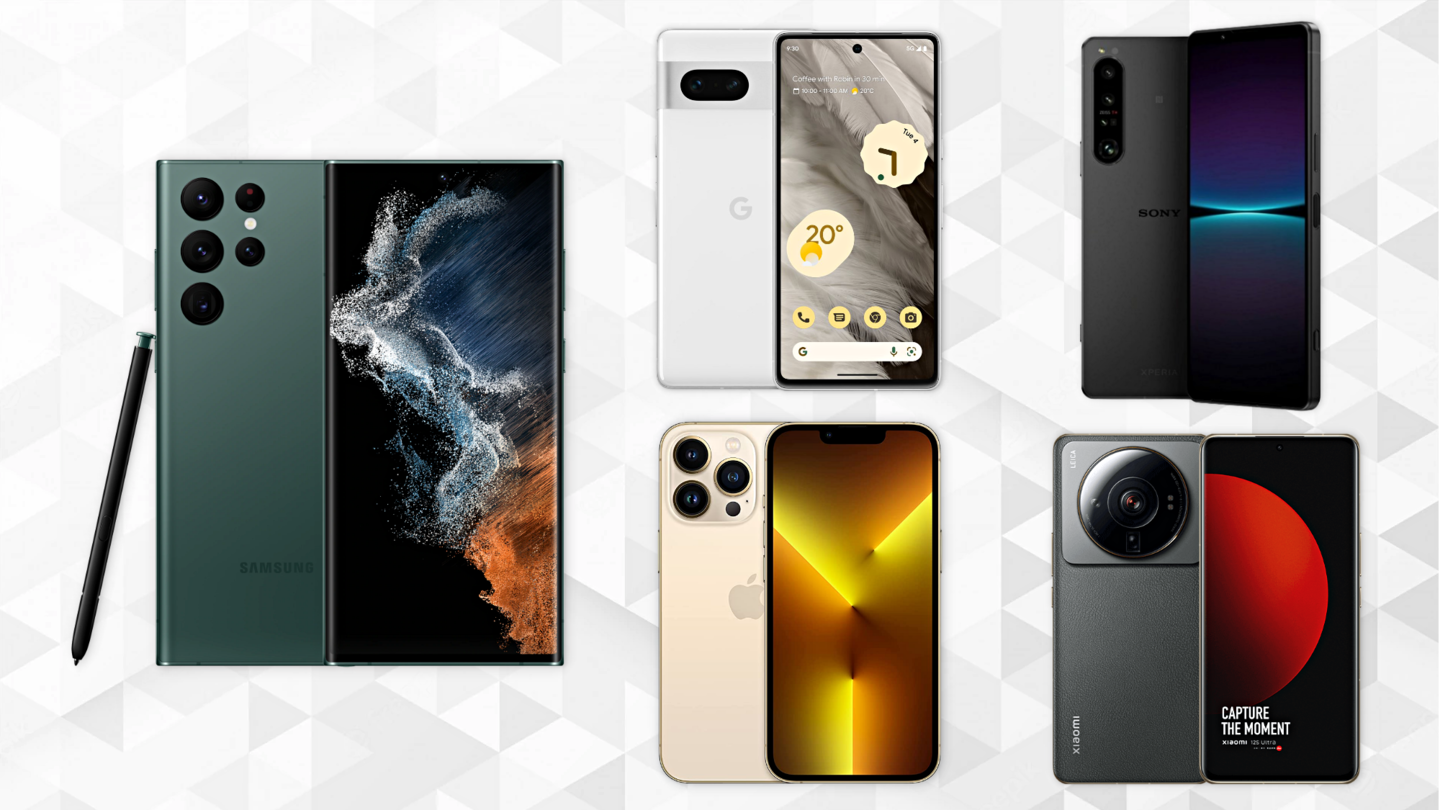
The Samsung Galaxy S22 Ultra gets a punch-hole cut-out, an in-display fingerprint sensor, and stylus support.

The device bears a 6.8-inch QHD+ (1440×3088 pixels) LTPO 2.0 AMOLED panel with a 120Hz refresh rate, 1,750-nits peak brightness, and HDR10+ certification.

It houses a Snapdragon 8 Gen 1 SoC, 12GB of RAM, up to 1TB of storage, and a 5,000mAh battery with 45W wired fast-charging

The device supports 10x zoom via periscope telephoto camera

The Samsung Galaxy S22 Ultra comes with a quad rear camera arrangement, that includes a 108MP (f/1.8, OIS) primary camera, 12MP (f/2.2) ultra-wide lens, 10MP (f/4.9, OIS) periscope telephoto shooter with 10x zoom, and 10MP (f/2.4, OIS) telephoto camera with 3x zoom.

On the front, it features a 40MP (f/2.2) selfie camera.

The device is capable of shooting 8K videos at 24fps.

The Xiaomi 12S Ultra sports a punch-hole cut-out and an in-display fingerprint sensor.

The handset boasts a 6.73-inch QHD+ (1440×3200 pixels) LTPO 2.0 AMOLED screen, with a 120Hz refresh rate, 1,500-nits peak brightness, Dolby Vision, and HDR10+ support.

It packs Snapdragon 8+ Gen 1 SoC, up to 12GB RAM, up to 512GB storage, and a 4,860mAh battery with 67W wired and 50W wireless fast-charging.

The handset boasts 1.0-inch Sony IMX989 primary sensor

On the rear, the Xiaomi 12S gets a LEICA-engineered camera system, which includes a 50MP (f/1.9, OIS) main camera with a 1.0-inch Sony IMX989 sensor, 48MP (f/2.2) 128-degree ultra-wide shooter, a 48MP (f/4.1, OIS) periscope lens with 5x zoom, and a 3D depth sensor.

For selfies, it offers a 32MP (f/2.4) camera.

The device shoots 8K videos at 24fps with the rear setup.

The Sony Xperia 1 IV has a rectangular body, slim top and bottom bezels, and a side-mounted fingerprint sensor.

The device packs a 6.5-inch 4K (1644×3840 pixels) OLED display with HDR and 120Hz refresh rate.

It is backed by a Snapdragon 8 Gen 1 SoC. It comes with 12GB of RAM, up to 512GB of storage, and a 5,000mAh battery with 30W fast-charging.

The device equips a 12MP telephoto camera with OIS

The Sony Xperia 1 IV’s ZEISS-engineered rear camera arrangement is headlined by a 12MP (f/1.7, OIS) main camera, accompanied by a 12MP (f/2.2) 124-degree ultra-wide sensor, a 12MP (f/2.3-2.8, OIS) telephoto snapper with 3.5x-5.2x continuous optical zoom, and a 0.3MP depth sensor.

Up front, the phone has a 12MP (f/2.0) camera.

It is capable of recording 4K videos at 120fps via the rear camera.

The Pixel 7 Pro features a top-centered punch-hole cut-out and an in-screen fingerprint scanner.

It sports a 6.7-inch QHD+ (1440×3120 pixels) LTPO AMOLED screen with a 10-120Hz variable refresh rate, HDR10+ certification, and 1,500-nits of peak brightness.

The device houses a Tensor G2 chipset, 12GB of RAM, up to 512GB of storage, and a 5,000mAh battery with 30W wired and 23W wireless charging.

It sports a 48MP telephoto snapper with OIS

The Pixel 7 Pro includes a triple rear camera module that features a 50MP (f/1.85, OIS) main camera, a 12MP (f/2.2) 126-degree ultra-wide shooter, and a 48MP (f/3.5, OIS) telephoto lens with 5x optical zoom.

On the front, it has a 10.8MP (f/2.2) snapper.

The device can shoot 4K videos at 60fps via its rear camera.

The iPhone 14 Pro flaunts a pill-shaped “Dynamic Island” housing the front camera and Face ID gadgetry.

The handset flaunts a 6.1-inch Full-HD+ (1179×2556 pixels) LTPO OLED display with a 120Hz adaptive refresh rate, HDR10, Dolby Vision, and 2,000-nits peak brightness

It is powered by an A16 Bionic chipset, paired with 6GB of RAM, up to 1TB of storage, and a 3,200mAh battery.

The handset boasts a 48MP main camera

In the rear camera department, the iPhone 14 Pro gets a 48MP (f/1.78, OIS) primary sensor, a 12MP (f/2.2) 120-degree ultra-wide shooter, a 12MP (f/2.8, OIS) telephoto camera with 3x zoom, and a 3D LiDAR scanner.

It features a 12MP (f/1.9, AF) camera on the front.

The device can record 4K videos at 60fps via the rear camera setup.


[ad_2]

Maker Faire Orlando celebrating 10th anniversary this weekend – Orlando Sentinel

[ad_1]

Creators, dreamers, artists and do-it-yourselfers of all ages and backgrounds will gather this weekend for a celebration of grassroots innovation and homegrown ingenuity.

Maker Faire Orlando celebrates its 10th anniversary during the two-day festival at Central Florida Fairgrounds Nov. 5-6. The event showcases the creativity of Florida’s maker community through hands-on demonstrations and activities for the entire family.

Cosplay, in particular, will take the spotlight at this year’s gathering with costume makers showing off their handmade props and attire.

Maker Faire Orlando features activities such as power racing.

“Especially for the artists in the cosplay community, what they like is the opportunity to show their craft more so than just exhibiting the final product,” said Ian Cole, the Orlando event’s founder. “There are a lot of mentors in our crowd, a lot of people who will help someone else get started and learn.”

Cole was inspired to create this forum for Orlando’s maker community after visiting a similar event in California.

“I took my oldest son, who was 11 at the time, to Bay Area Maker Faire in San Francisco in 2011, and we both left so pumped up and amazed and excited. There’s that feeling when you meet your tribe,” Cole said. “We thought 300 people would show up and it would be a fun party with our friends and 2,500 people showed up the first year.”

That’s when Cole became an “accidental event producer” and knew the festival would persist.

“Makers feel like everyone is a maker,” he said. “For us to connect different communities and have them show off their craft, and get new people into their communities, it’s just super rewarding.”

Maker Faire Orlando allows makers of all ages to learn with hands-on exhibits.
Things to Do

Things to Do

Weekly

A look at entertainment and sporting events in Orlando and around Central Florida.

Asher Adams remembers the first Orlando mini Maker Faire when he showcased a PVC instrument that resembled something the Blue Man Group might play. In recent years, his interest has pivoted to photography.

Asher Adams will showcase his astrophotography at Maker Faire Orlando Nov. 5-6.

“During the pandemic, I started taking interest in backyard astrophotography. It was something that was really easy and accessible to do from home,” Adams said. “I fell down that rabbit hole of learning everything you can do to capture the night sky from home, which was really cool.”

At Maker Faire Orlando, Adams will return for the first time in nearly a decade to display his astrophotography rig and answer questions for aspiring shutterbugs.

“Even if it’s just doing stuff with your iPhone, there are so many good resources between your camera, star charts and apps,” he said. “I’m excited to be back and excited to hopefully help people learn about the night sky.”

A decade into this festival’s Central Florida tenure, organizers anticipate 10,000 attendees and 250 exhibits including power racing, combat robots, learn to solder, take-it-apart and make-a-shirt. Other exhibits allow visitors to experience drones, daleks, belt sander racing and homemade creations of all kinds.

“Some people are looking for a hobby, some people are looking for their next business venture. It’s a great place to come feel the vibe where anything is possible if you set your mind to it,” Cole said. “You have this amazing group of creative, innovative people all in one space. You can’t go wrong with a crowd like that.”

Maker Faire Orlando features hands-on exhibits at the Central Florida Fairgrounds.
  • When: 10 a.m.-5 p.m. Nov. 5-6
  • Where: 4603 W. Colonial Drive in Orlando
  • Tickets: $15 for youth and students and $20 for adults in advance; $20 for youth and students and $25 for adults once the event begins. First responders, active military and veterans, employees of schools, colleges, universities, home-school educators and libraries receive free admission.
  • Parking: On-site parking is free.
  • Food: Vendors are available at the festival.
  • More information: makerfaireorlando.com

Find me @PConnPie on Twitter and Instagram or send me an email: [email protected]. For more fun things, follow @fun.things.orlando on Instagram, Facebook and Twitter.

Dreamy Lake Powell/Glen Canyon Dreamscape – David Lane Astrophotography

[ad_1]

Once upon a viewpoint dreamy. As Jimmy and I crested the hill that led to this Lake Powell overlook I was on the handsfree phone discussing some matter of import. I explained that I was driving up to the edge of a cliff. As the landscape in this image popped into view before me. I gasped and let out a cry, “Oh My Gawd! Holy Sh#t!!” Convinced I was about to fall to my death the reply “Should I call 911?” was answered with “No, OMG what a view!” It was hard to parse and describe in the English language. It was as if some watery Martain scene had just popped into existence. 

Check out the video below of this very spot at Glen Canyon/Lake Powell remembering that one it was very windy and two the sun was very bright and washes out the color in the video. In person, the coloration of this image is very close to what you would see at dusk. What I couldn’t see at the time was that Page Arizona just a few Miles to the Southwest was going to cast a ton of light pollution on the crags below me. Even at night as I sat there it wasn’t apparent that there was any light at all on the rock faces below me. 

The camera told a completely different story, however. Even with an in-camera light pollution filter that is very effective, the cliff faces shown with a neon yellow. I loved the photo in camera but I wasn’t certain I could deal with that level of intense light pollution. I managed to get it almost completely under control eventually, as a matter of fact, I added a bit back as it gave a very interesting bit of contrast.

If you look carefully, you can see little dots of light on the lake. These are not stars as the wind was still slightly breezy but the flashing lights of very distant boats. Apart from the stars, it was the only light you could perceive with your eyes. Distant disembodied blinking in what otherwise looked like a slightly luminescent outline of a lake.

I think I’m finally starting to get what I want with my images. I feel like I’m getting a handle on how to make images I’m proud to present to people as art. Art that shows a detailed scene and yet challenges the senses. I hope you will enjoy my evolution and journey to produce an ever better image to share with you, my friends. Clear skies and dark nights to us all. 


EXIF 80 images stitched 8×10 ISO 8000 f1.4 85mm (double panorama shot together.)


***WARNING LOTS OF WIND NOISE***


[ad_2]

Source link

Add your own keyboard shortcuts in PixInsight

[ad_1]

PixInsight has many keyboard short cuts build in right from the start (you can find an overview of them here.), some very useful while others won’t get used at all probably. One thing that bothered me though is that I can’t start processes using keyboard short cuts so I decided to look for a way around this. Luckily there is this great open source program called AutoHotkey that will let you define your own keyboard shortcuts and basically have them do anything you like. Even better; you can also program mouse buttons and movements!

Using AutoHotkey

You can download AutoHotkey for free here. As far as I’m aware, this only works on Windows at the moment. AutoHotkey will work with so called scripts, in which you can program the keystrokes or mouse behaviour it needs to react on and define what the program will need to do once it detected the particular keystroke(s).
This scripting can seem a bit complicated from the start, but there is a lot of great documentation and examples available. I’ll post some example code specificaly for PixInsight further down in this post.

Now let’s run briefly through the required steps to use AutoHotkey to add custom keyboard shortcuts to PixInsight:

  1. Download and install AutoHotkey
  2. Download AutoHotkey here and simply run the installer

  3. Add AutoHotkey to Startup
  4. It will be really convenient for AutoHotkey to always run in the background, so add it to Startup

  5. Create a script
  6. Now it’s time to start creating a script for AutoHotkey;

    1. Right-Click on your desktop.
    2. Find “New” in the menu.
    3. Click “AutoHotkey Script” inside the “New” menu.
    4. Give the script a new name. Note: It must end with a .ahk extension. Ex. MyScript.ahk
    5. Find the newly created file on your desktop and Right-Click it.
    6. Click “Edit Script”.
    7. A window should have popped up, probably Notepad.

    Now we can start editing the file to create some shortcuts for PixInsight.

  7. Special keys and their symbols
  8. First we need to be aware of the symbols we’ll need to use to define certain keys like Alt, Ctrl and Shift. AutoHotkey uses the following symbols for the keys:

    Symbol Key
    # Win (Windows key)
    ! Alt
    ^ Ctrl
    + Shift
    Use the left key of the pair. e.g.
    > Use the right key of the pair. i.e. >+a = right Shift + a

  9. Add a custom shortcut for an existing keyboard shortcut in PixInsight
  10. Let’s start really easy and simply use another keyboard shortcut to toggle the ScreenTransferFunction. The default shortcut for this is F12, which I don’t find convenient for frequent use. Let’s say we want to use Alt+S instead. We can do this with this simple line of code:
    !s::send, {F12}

  11. Save the script and run it
  12. Save the file and double click it on your desktop to run it. Now open up PixInsight and open an image on which you can test the ScreenTransferFunction Toggle. Hit Alt+S to toggle the ScreenTransferFunction!

Now you have your first script succesfully working, let’s dive in a bit deeper and use the PixInsight Console to open up Processes

Open up Processes with keyboard shortcuts

Most people probably won’t know this, but the PixInsight console is more than just a monitor for processes to output to and which you can keep an eye on to see what’s going on when you execute processes. It is also a really extensive input console which you can use to do really a lot of (complicated) stuff. This is very useful in this case because it is the console we will use to fire up Processes instead of mimicking mouse movements and menu clicks which are far less reliable. Luckily there is even a keyboard short cut to open up the Console in PixInsight, so scripting a custom keyboard shortcut in AutoHotkey for PixInsight is remarkably easy!
Basically we need to do 6 things when we want to open up a process;

  1. Define the keyboard shortcut that needs to trigger the opening of the process.
  2. Let’s open up the ScreenTransferFunction with Ctrl+Alt+Shift+S. We can do this by starting the script with ^!+s::
    Note: Please be aware of existing keyboard short cuts like Ctrl+S to save a file, and avoid using those.

  3. Open the Console
  4. We can open the console with ^!c

  5. Wait for the Console window to open
  6. We can’t start typing right away, we’ll need to wait till the window is opened. This can be done by using the sleep command and specifying the time in miliseconds that AutoHotkey needs to wait. sleep, 600 is what I use to make sure PixInsight has opened up the Console window.

  7. Type in the name of the process we want to open
  8. We can simply send keystrokes to mimick typing. To open up the interface window of a process from the console, all we have to do is add ‘–interface’ to the name of the process.

  9. Hit Enter
  10. To mimic hitting enter we can simply add; {enter}

  11. Tell AutoHotkey we are done with the actions for this particular shortcut
  12. If we use only one line of code like before, we don’t need to specify the end of the script and we can simply begin a new shortcut on a new line in the file. If we use multiple actions like we are doing now, we need to tell AutoHotkey when this collection of actions end so that we can start up a new shortcut after it.
    We do this by simply adding “Return”

If we combine this we’ll get the following code:

^!+s::
send, ^!c
sleep, 600
send, ScreenTransferFunction --interface {enter}
Return

Now save the file and right-click the AutoHotkey icon in the Taskbar and Reload the script.

Go to PixInsight and try it out!

Add more keyboard shortcuts in the same script file

You can just continu adding more shortcuts by placing the code for new keyboard shortcuts after the previous ones. We’ve seen two examples already, now let’s just add a third one to open another Process interface; Windows key + S for Starmask.

#s::
send, ^!c
sleep, 600
send, StarMask --interface {enter}
Return

It is usefull to add comments in the script file, so you can keep track of what everything means. You can do this by starting a line with “;”.
If we combine all three examples and add comments, our script file will look like this:


;ScreenTransferFunction - Toggle
!s::send, {F12}

;ScreenTransferFunction – Interface
^!+s::
send, ^!c
sleep, 600
send, ScreenTransferFunction –interface {enter}
Return

;Open StarMask interface
#s::
send, ^!c
sleep, 600
send, StarMask –interface {enter}
Return

Limit the keyboard shortcuts to only work in PixInsight

It is very useful to limit the keyboard shortcuts to only work in PixInsight. This enables you to use the same keyboard shortcuts again in other programs for instance.
You can do this by simply using the #ifWinActive statement with the title of the window. So in our case we’ll be adding the following to your script: #ifWinActive PixInsight 1.8 and place the keyboard shortcuts for PI between {}
So if we add this, now our script file looks like this:


#ifWinActive PixInsight 1.8
{
;ScreenTransferFunction - Toggle
!s::send, {F12}

;ScreenTransferFunction – Interface
^!+s::
send, ^!c
sleep, 600
send, ScreenTransferFunction –interface {enter}
Return

;Open StarMask interface
#s::
send, ^!c
sleep, 600
send, StarMask –interface {enter}
Return
}

Add more commands

In addition to opening up the process windows, you can also execute them with certain settings and do a lot more using the Console in PixInsight.
Just type in –help in addition to the process name to see all the things you can do in the Console with that particular process.
Please let us know in the comments below if you have any good ideas for more keyboard shortcuts!


[ad_2]

Source link

Ocultación de Marte por la Luna: 8 de diciembre [ESPAÑA]

[ad_1]

El próximo 8 de diciembre, de madrugada, podremos observar desde España la ocultación de Marte por la Luna, un fenómeno poco habitual que coincide además con la oposición del planeta rojo, el momento en que se encuentra más próximo a La Tierra.

Podemos decir que se produce un «eclipse marciano» ya que nuestro satélite natural tapará durante unos minutos a Marte aunque lo interesante de la ocultación son los momentos inmediatamente anteriores y posteriores a ésta, cuando podemos ver el planeta junto a la Luna, ser testigos de sus movimientos orbitales y hacernos una idea de sus diferentes tamaños aparentes ya que la Luna es más pequeña que Marte, pero está mucho más cerca que éste.

Concretamente en el momento de la ocultación la Luna estará a 397.703 kms de nosotros mientras que Marte se encontrará a 82.207.000 de kms.

Marte junto a la Luna justo antes de ser ocultado

La última vez que pudimos ver este fenómeno desde España fue el 6 de septiembre de 2020 y algunos astrónomos amateurs consiguieron algunas imágenes espectaculares de aquella ocultación.

El fenómeno de ocultación será visible únicamente desde parte de América del Norte, Groenlandia, Islandia, parte de Europa y parte del norte de África pero la conjunción de ambos astros si será visible desde todo el mundo.

Mapa de visibilidad de la ocultación de Marte por la Luna el 8 de diciembre de 2022.
Mapa de visibilidad de la ocultación de Marte (c) Dominic Ford https://in-the-sky.org

Horario de la ocultación de Marte

El inicio de la ocultación varía dependiendo de la posición geográfica desde la que se observe el fenómeno. Te recomendamos que consultes algún programa como Stellarium para comprobar a qué hora se observará desde tu localidad.

En Madrid el fenómeno comenzará a las 06:20UT a una altitud de 24,1º y la reaparición será a las 07:05UT a una altitud de 15,4º por lo tanto tendremos que buscar un lugar con horizonte despejado para poder ver el fenómeno completamente. Recordad que es la madrugada del 7 al 8 de diciembre.

¿Cómo observar la ocultación?

Para observar esta ocultación es recomendable el uso de un telescopio de bastante focal ya que Marte es un planeta con un tamaño aparente bastante pequeño. Podemos utilizar también prismáticos pero éstos no nos darán los mismos aumentos y tan solo veremos Marte como puntito brillante.

astrofotocanadiense
Una sesión de fotografía astronómica desde el campo.

Recomendamos que planifiquéis bien la observación y que madruguéis bastante. Se tarda un rato en montar el telescopio y aclimatarlo así que nos tocará levantarnos prontito y aguantar bajo temperaturas gélidas. Para evitar pasar frío os recomendamos que leáis este artículo que escribimos hace algún tiempo sobre ropa para observaciones astronómicas. También es recomendable que llevéis algo de comida y bebida caliente (un café, un caldo, etc…).

Buscad un lugar elevado con el horizonte despejado. El fenómeno se observará aquí en España con la Luna bastante baja en el horizonte, sobre todo al final. No hace falta que el sitio esté muy oscuro ya que no es un fenómeno astronómico al que le afecte demasiado la contaminación lumínica, se puede observar incluso desde la ciudad pero buscad un sitio donde los edificios no os tapen la Luna.

El fenómeno de ocultación y reaparición dura muy poco. Tanto Marte, como la Luna y La Tierra están en continuo movimiento así que estad muy atentos porque es todo un «visto y no visto». Si estáis atentos podréis llegar a ver a Marte desaparecer y aparecer entre las montañas y cráteres del relieve lunar.

Fotografiar la ocultación de Marte

Para fotografiar la ocultación también necesitaremos focales muy largas. Hay que tener en cuenta que la ocultación se produce en fase de Luna llena por lo que el brillo de la Luna saturará la imagen si queremos sacar a Marte bien expuesto. Necesitaremos una cámara con muy alto rango dinámico o bien hacer múltiples exposiciones para intentar hacer luego una composición HDR.

Además, en astrofotografía planetaria la mejor técnica es el «lucky imaging» que consiste en grabar vídeos, pero el diferente movimiento aparente de la Luna y el planeta nos obligará a hacer vídeos muy cortos para poder hacer posteriormente un apilado correcto.

En nuestro canal de Youtube tienes multitud de vídeos de procesado de imágenes planetarias que te pueden servir de ayuda.

¿Cuándo se producirán las próximas ocultaciones de Marte por la Luna?

Si no puedes ver esta ocultación podrás volver a intentarlo en cualquiera de las siguientes fechas.

04/1/2023 Sudáfrica y Madagascar
31/1/2023 México , Centroamérica, Colombia, Venezuela y Ecuador
28/2/2023 Noruega, Suecia, Finlandia y Rusia
17/09/2023 América del norte y central. Colombia, Venezuela y Brasil
16/10/2023 Antártida
05/5/2024 Tailandia, China y Japón
18/12/2024 España, Portugal, Francia, Alemania, Reino Unido, Noruega, Suecia e Islandia

Summary

Event

Ocultación de Marte por la Luna el 8 de diciembre

Location

España,

Starting on

08/12/2022

Ending on

08/12/2022

Description

La Luna ocultará el planeta Marte el próximo 8 de diciembre antes del amanecer. Esta ocultación será visible desde toda España.

[ad_2]

Source link

NEQ6 Modification Kit – Astroniklas

[ad_1]


May 25

And finally it’s here! I just received the final few pieces for modifying the whole mount. The kit was purchased from Rowan Astronomy, and I truly can’t wait to begin the modernization in my mount’s tracking capabilities. The NEQ6 Pro mount has served me faithfully for over 10 years now and it’s time it gets some tuning and new gears to keep up the new gadgets that its going to carry around while tracking.

I’ll try and post the steps in a guide/tutorial over time with lots of photos and “lessons learned” from this journey


The fascination of star gazing had already started during the very first years of my childhood. I was looking up at the night sky with my grandfather every summer night, studying constellations, the phases of the moon cycle, counting satellite passages and by using his binoculars to discover globular clusters of stars. Equipped with star maps from his home-library I was gradually discovering more and more of this fascinating world we call universe.
Even though years went by, the interest and fascination of cosmos had never left me… I found myself occupied with many other things before astronomy finally became my main hobby in recent years.

I was born in Stockholm, Sweden 1979 and grew for the most part of my childhood years in Greece. Later I’ve studied physics at Lund’s university and was hoping to continue with astronomy. At my free time I was an active amateur astronomer in South Sweden, Lund. At some point I was also appointed as chief of observatory for the Tycho Brahe Astronomy Society in Lund.

Circumstances in life led me to move with my family to California. Today I’m working as a sofrware developer within the aviation industry and weather systems for airports. During my off-time, I spend most of my time with my wife Melissa and our daughters.

My main hobbies are astronomy, astrophotography, game development and I was also a member of several astronomy societies in south Sweden but time was never enough to continue being an active member.

This blog is dedicated to my family (Melissa, Vanita and Lena Grace), our friends and to all of you who share the same fascination towards the beauty of this science and all the mysteries yet to be revealed by our constant discoveries!


[ad_2]

Source link

Sony A7S III review | Live Science

[ad_1]

Key specifications

Type: Mirrorless
Sensor: 12.1MP full frame CMOS
Lens mount: Sony E
ISO range: 80-102,400 (exp 40-409,600)
Viewfinder resolution: 9.44m dots
Video capability: 4K 120p / 1080p 240p
Weight: 1.35lbs
Size: 5.07 x 3.78 x 2.74 inches
Memory card type: 2x CFexpress A / SD

Sony’s Alpha 7 series cameras are split into three categories: the all-purpose A7, the resolution-focused A7R, and the video-oriented A7S. And it’s in the latest iteration of the latter, the Sony A7S III, that we find a camera that may be designed for ultimate video performance, but also offers virtually unparalleled stills performance when it comes to shooting in low light conditions. 

While the A7S III was designed as a specialist video device, a byproduct of its ingenious design also makes it one of the best astrophotography cameras (opens in new tab) on the market. That’s thanks to its low-resolution, back-side illuminated, 12.1MP image sensor and outstanding 80-102,400 ISO sensitivity (which is expandable to 40-409,600). 

[ad_2]

Source link

Save on Sigma and Tamron lenses during this early Black Friday sale

[ad_1]

We may earn revenue from the products available on this page and participate in affiliate programs. Learn more ›

Sigma and Tamron lenses already offer lower-cost yet quality alternatives to Canon, Sony, and Nikon lenses. And right now, they are even more affordable during an early Black Friday sale on Amazon. If you’ve been considering getting a new lens to fill out your arsenal of gear or are a generous soul and want an exciting gift for a photographer, it’s a great time to do so.

The Sigma 16mm f/1.4 DC DN Contemporary Lens is on sale on Amazon right now.

A good wide-angle lens is something every photographer should have available. Designed for Sony APS-C photographers, this lens offers a 35mm equivalent focal length of 24mm. It provides an extremely fast f/1.4 maximum aperture for strong low-light performance, making it a great tool for capturing wedding receptions or night skies. The wide aperture also helps to create separation between your subject and the background and even results in some attractive bokeh. It’s one of the best APS-C wide-angle lenses you can get for your Sony camera, and this price makes it even more enticing.

The TAMRON 11-20MM F/2.8 DI III-A RXD for Sony E APS-C is on sale on Amazon right now.

Sony APS-C users sure have a good selection of affordable wide-angle lenses to choose from during this early Black Friday sale. This Tamron lens offers a 16-30mm equivalent focal length, which is an ideal range for real estate, landscape, astrophotography, and even event coverage. It offers a lot of sharpness and quality in a very compact body, so it won’t feel out of place on the smaller APS-C cameras. And it’s moisture-resistant, giving you peace of mind if you get caught in bad weather.

Additional Tamron lens deals:

  • Tamron SP 150-600mvm F/5-6.3 Di VC USD G2 for Nikon Digital SLR Cameras $1,199.00 (was $1,399.00)
  • Tamron 17-28mm f/2.8 Di III RXD for Sony Mirrorless Full Frame/APS-C E Mount $799.00 (was $899.00)
  • Tamron 150-500mm f/5-6.7 Di III VC VXD Lens for Full Frame Sony $1,299.00 (was $1,399.00)
  • Tamron SP 70-200mm F/2.8 Di VC G2 for Canon EF DSLR $1,199.00 (was $1,299.00)
  • Tamron 70-180mm F/2.8 Di III VXD for Sony Full Frame/APS-C E-Mount $1,099.00 (was $1,199.00)
  • Tamron SP 150-600mm F/5-6.3 Di VC USD G2 for Canon Digital SLR Cameras $1,199.00 (was $1,399.00)
  • Tamron 17-70mm f/2.8 Di III-A VC RXD Lens for Sony E APS-C $749.00 (was $799.00)
  • Tamron 18-400mm F/3.5-6.3 DI-II VC HLD All-In-One Zoom For Nikon APS-Cv Digital SLR Cameras $599.00 (was $649.00)

Additional Sigma lens deals:


[ad_2]

Source link

White Pocket Arizona with Orion, Venus and the Zodiacal Light – David Lane Astrophotography

[ad_1]

On a pleasant evening at White Pocket Arizona during the new moon in April 2018, the zodiacal light reappeared over the desert southwest. Venus, which had been burning brightly in the sky after sunset dropped to just over the horizon after astronomical dark. The strong wind of the previous day had died down to an occasional cool breeze. Some dust still lingered in the atmosphere as evidenced by the ruddy horizon, but the Zodiacal Light showed forth with great effect.

It was surprisingly pleasant for April in the Southwest. Temperatures drifted in the low 50s and there was just a bit of occasional wind. Oddly frogs chorused from an area below me and center-left in the image. It was had to imagine as the temperature continued to drop that a multitude frogs were singing a loud and one assumes bawdy barupppp over and over.

By the time the shot was over (30-40 minutes), the temperature had dropped enough that I pulled my coat tight around me and zipped it up over my face. Holding still in the low 40s was getting nippy. The frog band stilled as well and I was left with just a great night sky to contemplate and watch as Orion slipped below the horizon. I sighed, gathered up my gear and headed to back to Jimmy.

Despite having been hurried to get this enormous shot finished before Venus slipped from view, I managed to capture what even in the camera was an impressive image. This image is an astounding 80 images stitched together. 40 images of the sky with tracking and 40 images of the ground.


Shot at 85mm, f1.3, ISO 8000 and various exposures. 3rd pano of water in star focus.


[ad_2]

Source link

Mosaic of M16, M17, M18 and NGC6604

[ad_1]

This is a 3 panel wide field mosaic of NGC6604, M16 and M17 in H-alpha, OIII and RGB. Also in the same field of view are M18 and IC4701, along with a view more open star clusters and nebulas. It was my main project on my astrotrip to Namibia this year and I spent the first 5 nights collecting the data for this. The end result is a highly detailed image of 20378 x 11160 pixels which contains a lot of very interesting objects and detailed features.

Mosaic of M16, M17 and NGC6604 in HaOIIIRGB
Click to view the full resolution version of the image

NGC6604 and Sh2-54
NGC 6604 is an open star cluster in the constellation Serpens. The associated nebula is a cloud of glowing hydrogen gas which known as SH2-54.

NGC6604 and Sh2-54 in HaOIIIRGB

M16
M16 in HaOIIIRGB
The Eagle Nebula, also known as the Star Queen Nebula, IC4703 and NGC6611 is a very famous emission nebula surrounding a young open star cluster. It became famous because of the iconic Hubble image of the so called ‘Pillars of Creation’ which is a region of gass where intense star formation is happening.

When you look in more detail into the center of the nebula, at the region around the Pilars of Creation you can discover more interesting features. Just at the base of the Pilars of Creation you can see Herbig-Haro object 216. (the more pinkish feature that is just beneath the 2nd pilar)
Within M16 you can also see some beautiful Bok Globules that really seem to be ‘floating’ there.

M17
The Omega Nebula or Swan Nebula is another famous HII region. This one lies in the constellation of Sagittarius at a distance of around 5,000 light-years from earth. M17 is actually considered to be one fo the brightest and most massive star-forming regions of our galaxy. Open star cluster NGC 6618 lies embedded in the nebulosity and is heating up the gases of the nebula.
M17 in HaOIIIRGB

M17 shows some very interesting features in it’s nebulosity. There seems to be a ‘blow out’ to the left where you can see 3 shockwaves in the gass if you look careful. Furthermore the OIII part is extending quite far to the lower left. Further down in the lower left corner there are a few very thin OIII ‘whisps’ (which remind me of veil nebula). I found out that there seems to be a Supernova Remnant behind M17, so this could be filaments belonging to that structure. It is called G16.05-0.57.
The HII region next to that however, seems to also be associated with a SNR, G015.1-01.6 so this could also be from that source. At least it’s quite clear that it is a SNR.

IC4701
Above M17 and M18 you can see another emission nebula which is IC4701. This fov also contains some interesting (not so) dark nebulas.
IC4701 in HaOIIIRGB

Throughout the whole field of view you can find more very interesting HII regions and dark clouds

Processing
I calibrated the RGB data in Astro Pixel Processor and NB data in PixInsight. Mosaic registration of all the panels for all channels was done using Astro Pixel Processor. I then took these results and processed them in PixInsight.
There I used a combination of PixelMath and LRGBCombination on the non-linear Ha and OIII frames to create a ‘natural’ bi-color for which I used a max(Ha, OIII) for the luminance. I then used a max from Ha, OIII and the CIE-L component of the real RGB image as Luminance for the SHO-AIP script. I used the real RGB, Ha, OIII and the resulting Luminance in this script to get a natural HaOIIIRGB image. As a final step I used a Luminance mask to combine the bi-color image with the HaOIIIRGB image.
In all this I did of course all kinds of processing to get the frames in the right state to use in the different channel combination methods.
One thing worth noting is that you should be very careful (or just avoid) using LinearFit to level images before combination. In this case this resulted in very unnatural cores every time I did so. Also, one can argue it doesn’t make sense in some cases to assume a same level of signal in different channels. Manual HistogramTransformation and other processes give you far greater control over the result in every step.

Acquisition details
Image taken with monochrome Nikon D600 on a APM107/700 with Riccardi reducer and modified Nikon D600 on a TS Quadruplet 480/80, mounted on Fornax 51 and guided with MGEN.

Panel I – NGC6604
Ha 29x12min ISO400
OIII 13x12min ISO400
RGB 27x12min ISO400

Panel II – M16
Ha 24x12min ISO400
OIII 16x12min ISO400
RGB 23x12min ISO400

Panel III – M17
Ha 25x12min ISO400
OIII 16x12min ISO400
RGB 35x12min ISO400

Location: Astrofarm Kiripotib, Namibia


[ad_2]

Source link