Nueva cámara planetaria QHY5III200M – Cielos Boreales

[ad_1]

QHY ha presentado esta cámara monocroma QHY5III200M de nueva generación (V2) dedicada a astrofotografía planetaria y guiado con una sensibilidad en el infrarrojo cercano similar a la QHY5III462C.

La 200M viene equipada con un sensor SC2210 con un tamaño de pixel de 4um y unas dimensiones de 1920*1080. Tiene un ruido de lectura de 0.75e – 3e y una profundidad de 12 bits. Gracias a sus 512MB de memoria DDR3 y su interfaz USB3.2 ofrece tasas de 96.5FPS a 8BIT o 60FPS a16BIT en resolución completa llegando hasta los 209 FPS a 8 bits o 130 FPS a 16 bits trabajando con ROI de 480 líneas.

especificaciones QHY5III200M

Pros y contras de la QHY5III200M

Aunque se trata de una cámara pensada para astrofotografía planetaria y guiado creemos que es en este último campo donde destacan sus fortalezas ya que el tamaño de pixel de 2.9um de la 462C es más favorable para astrofotografía planetaria que los 4um de la 200M.

Hay que destacar también que esta cámara funciona a 12V con alimentación mediante un cable USB3.2 de tipo C más resistente que el anterior de tipo B que era bastante delicado en su conexión.

Sabemos que la cámara viene con, al menos, un filtro IR840 para obtener imágenes IR y que incorpora un nuevo sistema de adaptación de filtros de tipo C y CS (un estandar en lentes de videovigilancia y laboratorio) , además de mantener la posibilidad de roscar filtros de 1,25″.

Por el momento no tenemos reseñas ni precio de la QHY5III200M en tiendas oficiales por lo que tendremos que mantenernos atentos y a la espera para conocer más detalles de esta nueva cámara de QHY.

[ad_2]

Celestron Power Tank 17 – Astroniklas

[ad_1]


Jan 10

Maintaining batteries can be tricky if the weather doesn’t permit us from practicing our hobby over extended periods of time. 2021 was an exceptionally bad year for astronomy. Wildfires, wet winter with lots of precipitation and snow in the mountains. Unfortunately deep cycle batteries need to be taken care of and not allow them discharge below 20% of their capacity. It should be enough letting them charge over a couple of hours once a month. Unfortunately, just like many other users, I forgot to follow that routine, ending up with a dead battery. The replacement process is easy when you follow this YouTube guide below from another fellow astronomer.

I ended up buying the Duracell (DURDC12-20NB) battery instead which made it of course an upgrade.

Celestron Power Tank 17 and its original battery on the left


The fascination of star gazing had already started during the very first years of my childhood. I was looking up at the night sky with my grandfather every summer night, studying constellations, the phases of the moon cycle, counting satellite passages and by using his binoculars to discover globular clusters of stars. Equipped with star maps from his home-library I was gradually discovering more and more of this fascinating world we call universe.
Even though years went by, the interest and fascination of cosmos had never left me… I found myself occupied with many other things before astronomy finally became my main hobby in recent years.

I was born in Stockholm, Sweden 1979 and grew for the most part of my childhood years in Greece. Later I’ve studied physics at Lund’s university and was hoping to continue with astronomy. At my free time I was an active amateur astronomer in South Sweden, Lund. At some point I was also appointed as chief of observatory for the Tycho Brahe Astronomy Society in Lund.

Circumstances in life led me to move with my family to California. Today I’m working as a sofrware developer within the aviation industry and weather systems for airports. During my off-time, I spend most of my time with my wife Melissa and our daughters.

My main hobbies are astronomy, astrophotography, game development and I was also a member of several astronomy societies in south Sweden but time was never enough to continue being an active member.

This blog is dedicated to my family (Melissa, Vanita and Lena Grace), our friends and to all of you who share the same fascination towards the beauty of this science and all the mysteries yet to be revealed by our constant discoveries!


[ad_2]

How To Take Amazing Photos of the Blood Beaver Moon and Meteor Showers

[ad_1]

With November’s Beaver full moon approaching and several meteor showers being active this month, skygazers have plenty to look forward to. But for the astrophotography enthusiasts, what is the best way to go about taking pictures of these events?

Newsweek spoke to award-winning Hungarian astrophotographer Rafael Schmall who provided some of his top tips for imaging and preserving the full moon and meteor showers.

Full moons are a lunar phase that occurs roughly once every month when our natural satellite is located opposite the sun in space, with the Earth in between.

Technically, the moon turns full only at a specific moment—which this month will be 6:02 a.m. Eastern Time on November 8. But the moon will appear full to most observers for the entire evening of November 7-8.

The first thing Schmall does before taking images of the full moon is check out The Photographer’s Ephemeris desktop web app, which contains several free features, although registration is required.

This app is a planning tool that enables you to plan the natural light of the sun and moon for outdoor photography purposes.

Schmall told Newsweek he recommends using the app to plan where and when the moon will rise or set in your location. Once you know this you can think about planning what the foreground of your picture will be to add some interesting features to the image.

Around sunrise or sunset is a particularly good time to observe the moon because it may appear larger than it really is and have an orange hue. This is due to a phenomenon known as the “moon illusion,” which can be explained by a trick of the mind.

In terms of equipment, Schmall said he recommends using DSLR or mirrorless cameras, but some bridge cameras with powerful zoom lenses are also capable of shooting the rising or setting moon.


The big exclamation mark moon. This image is composed of several pictures taken every 30 seconds with a Samyang 135mm lens on a Canon 6D camera. Rafael Schmall


© Rafael Schmall
The big exclamation mark moon. This image is composed of several pictures taken every 30 seconds with a Samyang 135mm lens on a Canon 6D camera. Rafael Schmall

Bridge cameras are cameras that fill the gap between simple point-and-shoot cameras and those with interchangeable lenses, such as DSLRs and mirrorless. They tend to be similar in size and weight to the smallest DSLRs but are not equipped with interchangeable lenses.

For full moon pictures, Schmall said he uses a DSLR with a Samyang 135mm, aperture f2 lens. But he sometimes uses a 200-500mm lens, which is also good for capturing the full moon. A light but strong “travel” tripod is also necessary, according to Schmall.

The photographer said taking a pictures of the full moon does not require a full aperture because it is bright.

“I usually take pictures of it at f8. There are older telephoto lenses that work at f8-f11 and you can take good shots with them too,” Schmall said. “A wider aperture is necessary when there is a moonrise or moonset because then it may not be as bright.”


Super Buck Moon in the summer of 2022 imaged with a 135mm telephoto lens. Every shot in this image was taken with shorter exposure and shorter exposure. Rafael Schmall


© Rafael Schmall
Super Buck Moon in the summer of 2022 imaged with a 135mm telephoto lens. Every shot in this image was taken with shorter exposure and shorter exposure. Rafael Schmall

“The ISO sensitivity can be changed, but if the moon is very bright, it is worth staying around ISO100. For moonrise sequences, it can be ISO800 or ISO1600.”

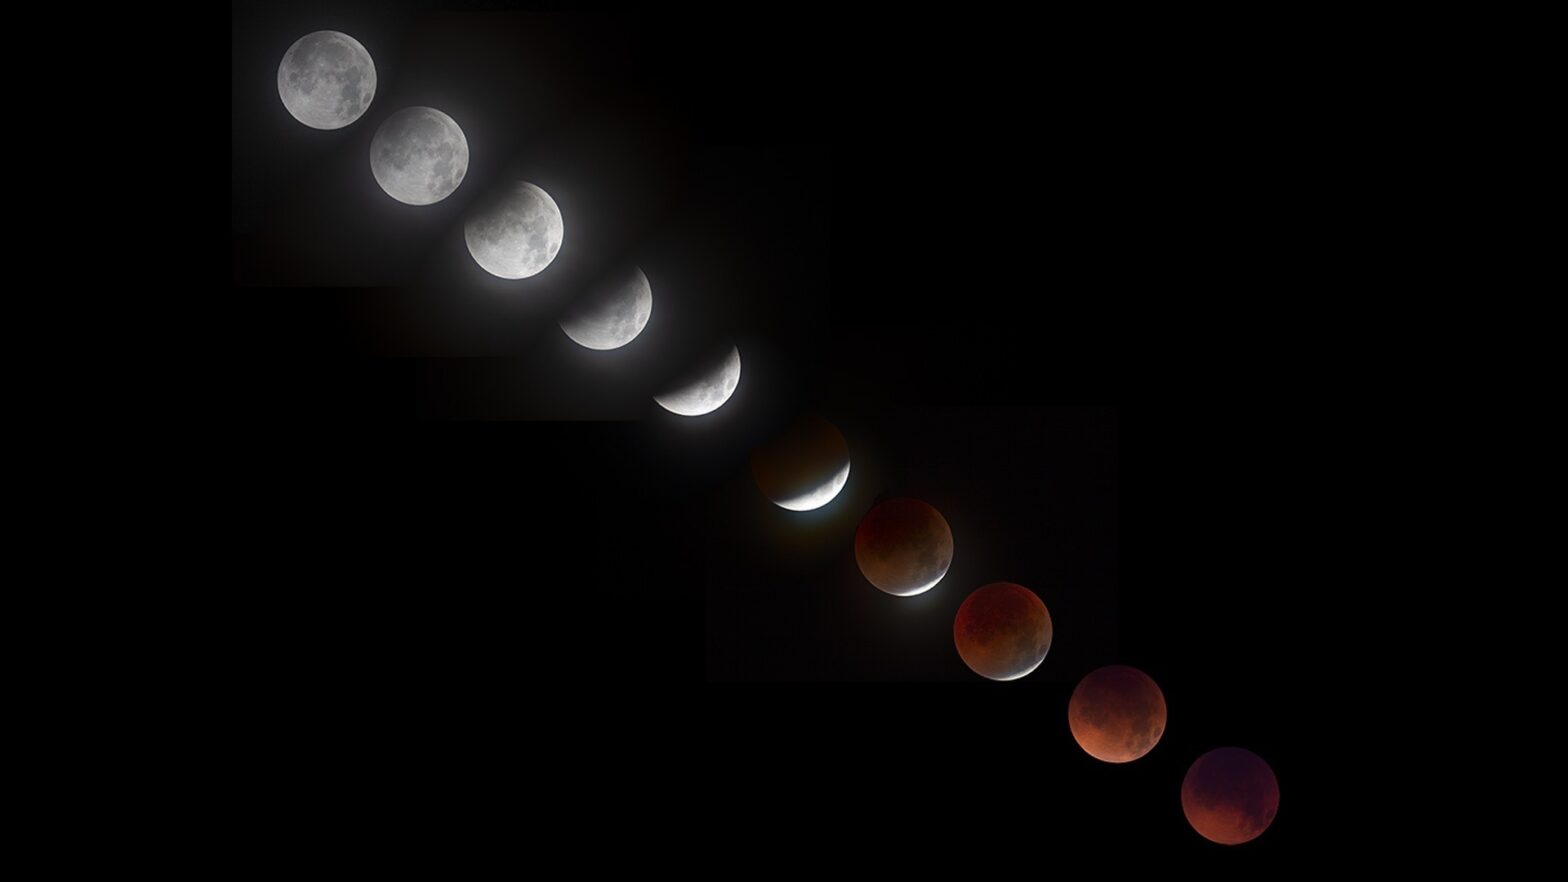
To create a “moon-trail” image—one in which a series of shots of our natural satellite are stacked next to each other—the camera needs to take a photo roughly every three minutes without the tripod moving, Schmall said.

In order to ensure that the tripod does not move, the photographer recommends using a wireless application that enables you to control your camera remotely—ideally with the capability to adjust exposure time—or a programmable remote.

As the full moon rises, the sky becomes darker and our natural satellite become brighter, so you will need to adjust the exposure time—from longer to shorter.

To align the photos for the moon-trail image easily, Schmall uses a free online program called Startrails. But for those with the relevant knowledge, the same effect can be achieved with Photoshop using blending mode.


A bright meteor from a timelapse scene. This image was taken using a Canon 6D camera equipped with a Samyang 24mm f1.4 lens. Rafael Schmall


© Rafael Schmall
A bright meteor from a timelapse scene. This image was taken using a Canon 6D camera equipped with a Samyang 24mm f1.4 lens. Rafael Schmall

Capturing images of meteor showers is somewhat trickier, given the fleeting nature of shooting stars, according to Schmall. But it is still possible.

Meteor showers are celestial events that occur when the Earth passes through streams of cosmic debris left behind by comets and, in some rare cases, asteroids. During these events, numerous meteors can be seen streaking across the sky, appearing to originate from a single point—known as the radiant.

Meteors—colloquially referred to as shooting stars—are the streaks of light we see in the sky when tiny fragments of space debris burn up in the Earth’s atmosphere at high speed.

“To capture a meteor shower, you need hundreds, or thousands of images to capture some meteors—or the brighter ones,” Schmall told Newsweek.

Unlike taking pictures of the full moon, snapping pictures of meteors requires a dark sky. The light from even just a quarter moon reduces the visibility of meteors significantly.


Perseid meteors. This image was created using images taken with a Sigma 8mm f3.5 fisheye lens on a Canon 6D and edited with photoshop. Rafael Schmall


© Rafael Schmall
Perseid meteors. This image was created using images taken with a Sigma 8mm f3.5 fisheye lens on a Canon 6D and edited with photoshop. Rafael Schmall

Schmall recommends using a short exposure time when imaging meteors, ideally with a wide aperture lens (f2-2.8) and low ISO settings. But it is possible to capture meteors with longer exposure times and higher ISO settings.

For capturing meteors during a shower, the camera must be in continuous shooting mode with locked shutter release in order to capture the unpredictable shooting stars, Schmall said.

The photographer recommends using a battery grip or a dummy battery because the camera will gather hundreds of photos over a period of several hours.

This month, the Orionid meteor shower is still active until November 22, although it has already passed its period of maximum activity, according to the American Meteor Society.

Meanwhile, the Northern Taurid meteor shower, will reach its peak on the night of November 11-12, although the moon will be fairly bright, likely significantly hampering observations.

Another opportunity to see meteors is the Leonid shower, which peaks later in the month on the night of November 17-18—when the moon will only be 36 percent full—and is active for almost all of November.

Related Articles

Start your unlimited Newsweek trial

[ad_2]

Image Doctor: The critiques! – Australian Photography

[ad_1]

A regular part of Australian Photography magazine for more than a decade, the Image Doctors, photo educator Saima Morel and professional photographer Anthony McKee, can give constructive feedback on your images, with a selection of their favourite submissions appearing in print in AP mag every month.

If you want feedback on your images (it’s free!), you can find out the details for submission here. Our winner each month will receive a fantastic prize thanks to our amazing sponsors SanDisk. 

This month’s winner

TITLE: Self Portrait
PHOTOGRAPHER: Tiago De Almeida
DETAILS: Nikon D5500, 18-200mm lens @ 28mm. 1/100s @ f5, ISO 400.

Image: Tiago De Almeida

Tiago made this image while exploring Rembrandt lighting with a “soft box” lighting kit.

“I had never tried self portrait photography as I was never comfortable in front of the camera, but have been inspired by street portrait photographer Lee Jeffries. I used a remote trigger and experimented with different lighting, then I edited the image in Lightroom, really going for strong textures.”

Self portraiture is a good exercise for any photographer, in part because you can be in the head of both the photographer and the subject at the same time (and it lets you explore ideas you might not be ready to try yet with a real subject). 

All up, I do like this image; the lighting is very good, the background works well and the model looks reasonable too. The one thing that I would like to improve though, is the cropping of the image – you  have cropped into the woollen beanie both at the top and the right of the frame, but both crops seem timid. Personally, I would like to see more cropping at the top of the image, but no cropping on the right – you could almost afford to shoot a little wider and then crop to square. Nonetheless, well done.

Anthony’s Tip: Try shooting portraits in the horizontal and then cropping to square; the square form can give images a really strong look.

TITLE: Sunset at Kamay Botany Bay National Park
PHOTOGRAPHER: Denny Christian
DETAILS: Sony A7 II, Sigma 28-70mm f/2.8 lens @ 28mm. 4s @ f7.1, ISO 50.

Image: Denny Christian

Denny did not give us much information about this image, aside from “Post processing in Lightroom with a bit adjustment in colour, and cropped to make pic look more symmetry”. What we do know though, (from Denny’s 2599 Instagram posts) is that Denny enjoys photographing Sydney and its many National Parks.

I love the use of symmetry in this image, and your use of a model in the red jacket. What I do have a problem with though, is that the model is competing for attention from that large area of blue sky in the top left of the picture.

There are two ways I would have changed this image; at the time I of making the photo I would have moved the model a little closer to the camera so they were not so distant in the frame. By way of improving the image after the event though, I would crop the image down to a 16 x 9 ratio, keeping most of the foreground and losing some of the sky. This will enhance the graphic nature of the sculpture and the model will look more significant in the frame.

Anthony’s Tip: If in doubt, explore your crop options. Removing some bright sky or eliminating a distracting object from the edge of your frame can often improve an image.

TITLE: Sugarloaf
PHOTOGRAPHER: Dani Maver
DETAILS: Sony A7 III, 24-70mm f/2.8 lens @ 26mm. 1/160s @ f4, ISO 100.

Image: Dani Maver
Image: Dani Maver

Dani made this image at Sugarloaf reservoir in Christmas Hills, near Melbourne. “I have been taking photos for about a year and I’m trying to teach myself how to look at light. I went to the reservoir intending to take photos of sunrise and hot air balloons, but over my shoulder I saw the light reflecting off the guard rail of the dam wall. I have ‘enhanced’ the warmth of the reflection and increased the contrast in post”.

Dani, you are heading in the right direction! Learning how to see light and if it “hard” or “soft”, knowing how it affects the subject and ultimately how you can work or even manipulate this light will make you a better photographer, but it takes time. I once asked my mentor how long it takes to understand light and he said ten years. I reminded him of this comment a few years later and he revised the number up –
“it takes a lifetime!”.

As for this image, I think you have gone a little too wide here. If you crop in on the dam and eliminate the left of the frame you will make this image more graphic – and interesting.

Anthony’s tip: Remember, less can be more – crop in and let others guess what they are looking at.

TITLE: The Waterfront
PHOTOGRAPHER: Susan Shanta
DETAILS: Olympus E-M5 Mk III, 14-24mm lens @ 26mm. 1/500s @ f8, ISO 200.

Image: Susan Shanta
Image: Susan Shanta

Susan recently discovered the waterfront at Geelong. “As I walked around the long boardwalk, it felt like I was walking on water. Being a bay within a bay, the water is calm and reflective. A mild but cloudy day lent itself to the amazing cloud reflections on the glassy surface of the water.

The boardwalk sits flush with the water so I could get down lower and shoot across the surface. The posts of the water gives the impression of a scar in the middle holding the sky and water together. With a touch of yellow in the buoy to the right, being the contrast splash of colour complimenting.”

Hey Susan, this is a great image, and your synopsis above covers it well. There are a couple of things that you might have done differently though. Many people apply the “Rule of Thirds” to EVERY image, but there are occasions when placing the horizon line is perfectly acceptable, particularly when working with pure reflections and such a strong dividing line.

You can still crop this image so that the boardwalk is in the middle of the frame and it will look very strong. Also, if you are using Lightroom or Adobe Camera RAW, try using a Gradient mask along with the Dehaze tool (along with a little increase in the exposure); this will help add life to the reflection!

Anthony’s tip: Dehaze is one of the most useful mask adjustments in Lightroom and ACR. Use it prudently as a Mask option to add life to otherwise flat areas on an image. 

TITLE: Sun, Moon and Stars
PHOTOGRAPHER:  Rod Coysh
DETAILS: Pentax KP, 18-55mm lens @ 18mm. 30s @ f3.5, ISO 3200.

Image: Rodney Coysh
Image: Rodney Coysh

Rod made this image at Whiskey Bay in the Wilson’s Promontory using his Pentax KP on a tripod and one single 30 second exposure. Post processing was done using the Pentax Digital Camera Utility 5 from a RAW image. As Rod comments – “The light from a new moon can be seen in the upper right hand corner of the image, with the after glow of a sunset in the bottom right hand corner”.

Astrophotography is challenging because we are asking our cameras to do something that we ourselves are not that good at – seeing in the dark. We can see the camera’s struggle in the “noise” of the picture (the graininess) and also the hint of star trails.

Some people buy ‘fast’ f1.4 and f1.8 lenses for astrophotography, but another option is to work with what you have, and actually reduce the noise by using a lower ISO (like ISO 200) and then use the Bulb mode on your camera to create a 10 minute exposure. The noise will be significantly reduced but you will also get longer star trails, and that might make the image more interesting.

One other thing that I would try if you were shooting this image again would be to put the camera into the vertical so that you can make more of the beach in the foreground. Otherwise, good effort.

Anthony’s Tip: If you are struggling in low light, don’t be scared to put the camera onto a solid tripod, drop the ISO down and explore alternate options.


[ad_2]

Expanded Hunting Orion the Hunter! 2-Image Mosaic – David Lane Astrophotography

[ad_1]

 Scouring Orion from Barnards Loop to the Orion Nebula. 2-Image Mosaic

Click Image below for a much larger version

Barnard to Orion nebula

Barnard to Orion nebula


Whats better than Orion in the Winter sky? Nothing that’s what!

In Kansas, we had a rare clear night with the temperature above 5 degrees F, wind below 40 mph and just a tiny sliver of moon. It was a perfect night to go out and hunt Orion the Hunter!
I captured two different images and put them together to form a mosaic. In the first shot, I managed to bag the Horsehead Nebula (right), M78 or Messier 78 (center left blue), and a piece of the large area around Orion called Barnard’s Loop. Later as Orion drifted toward the horizon I managed to reposition the lens to get the Horsehead and Orion Nebulas in the same frame. I added the two together and BOOM a nice two image mosaic with several distinct areas included. 
You have M78 center left (blue looking object) Barnards loop (red far left), Horsehead nebula (centered) and the Orion and Running Man Nebulas (right)
There are so many fantastic areas of Hydrogen Alpha Emissions (called Ha) and super bright Nebulas in this region. These are that areas you see as pink in the image. The HA emission is 656 nanometers which is a bit above the color red on the light spectrum. Here a bit from Wikipedia on H-Alpha emissions.
H-alpha () is a specific deep-red visible spectral line in the Balmer series with a wavelength of 656.28 nm; it occurs when a hydrogen electron falls from its third to second lowest energy level. H-alpha light is important to astronomers as it is emitted by many emission nebulae and can be used to observe features in the Sun‘s atmosphere, including solar prominences and the chromosphere.
H-Alpha emissions are typically emitted by dense nebulas which are the star-forming regions of galaxies. Trillions of tons of dust and remnants of supernova explosions gather together like a snowball rolling downhill slowly gathering more and more material until gravity compresses the material to the point it heats to ignition. Then in a massive explosion that jets out leftover material and creates a Herbig-Haro object that is a protostar. 
All the pink areas and dark dust areas are stars in evolution, from a clump of dust to the largest star. All represented in a single picture.
Enjoy! Plus check out the cool way to focus at night I created too!
EXIF: 300mm f4.0 212 x 70secs, ISO 4000


[ad_2]

Working with previews in PixInsight

[ad_1]

When working in PixInsight you probably make use of Previews a lot. And I really mean a lot! Most processes can take quite a bit of trial and error to get the right settings and fine tune them for the optimal result. We run these processes on previews so that it is much faster to see the effects compared to running it on the complete picture. Furthermore, we can use multiple copies of the same preview and apply the process with different settings so we can really compare the results of our fine tuning in great detail.
In this post I want to give you some quick tips for working with previews in PixInsight so that you may use them more efficient and convenient.

Name your previews
I must admit I don’t always do this myself, but I ran into problems because of it more than once. Nothing more annoying than to select the wrong preview for a process. Happens to me quite frequently in ColorCalibration for instance. It helps to consistently adjust the identifiers of your images and previews. Just double click the preview tab in the image side bar or right click and choose ‘Identifier’ and give the preview a descriptive name.

Cloning previews
In order to compare different operations on the same preview we need to create copies of the same preview. There are a two ways of doing this;
– right click the preview and choose ‘clone preview’
– drag the preview tab within the same sidebar

Please note that if you copied a preview which had some process applied to it, the new preview won’t have this process applied. So this way you can compare the ‘before’ and ‘after’ by simply comparing these two previews. Apply another process with different settings to compare the effect of the changed settings.

Copying zoom level
Note that the zoom will not be cloned and will be reset in the new preview.
In order to copy the zoom level, simply drag the preview tab from the preview with the zoom level you want to copy on top of the other preview tab.

Reset preview
If I ran a process on a preview which didn’t give good results I used to copy the preview to get a new one without a process applied and deleted the old one. This is quite inconvenient and actually there is a much simpler way to deal with this; you can simply reset the preview; hit Ctrl + R (or Cmd + R on mac) or right click on the preview tab and choose ‘reset’.

Cycle through previews quickly
In order to compare 2 or more previews you probably click the preview tabs and try to spot and judge the differences. When you do this by clicking the preview tab you (subconsciously) are looking away from the preview image itself for a short while to make sure you click the in the right spot on the preview tab. To prevent this and make it more easy to ‘blink’ the previews, simply use the keyboard short cut: Ctrl -> and Ctrl and Cmd Create new image from preview
Simply drag the preview tab outside the sidebar of the image you are working on. A new image will be created with just the preview. A very easy way to make different crops of the same image for instance!

Duplicate preview on another image
Sometimes you want to compare the same preview on different images. I use this to compare stacking results sometimes or maybe you want to compare the results of different settings on a preview by looking at them side by side at the same time instead of ‘blinking’ through the previews. It can be really annoying to get exactly the same preview on the other image. But again, there is a really easy way to do this; simply drag the preview tab from the sidebar of one image to the sidebar of the other image.

Duplicate multiple previews on another image
You might want to copy all previews on one image to one or more other images. For instance if you want to compare the previews of luminance with R, G and B versions of the image. You can drag an drop the previews like explained before, but this is tedious.Luckily there is a script that can do this for you in 1 go; PropagatePreviews. You can find it under Script -> Utilities -> PropagatePreviews.

Make sure you have selected the image that contains the previews you want to copy when opening the script. Simply check the previews you want to copy and select the images you want them to copy to. Unfortunately it doesn’t copy the Identifier you used on the previews.


Aggregate previews in one image
When you want to show the comparison of different previews or want to check the effects of different settings side-by-side you can aggregate multiple previews in one new image. Go to Script -> Utilities -> PreviewAggregator.

In the script window you can simply select the previews you want to aggregate in the new image.

I hope you found these tips on working with previews in PixInsight helpful. Please let me know in the comments below if I forget some useful preview tips or if you have any questions.


[ad_2]

¿Qué es un eclipse lunar?

[ad_1]

esquema de un eclipse lunar
Esquema de un eclipse lunar. Fuente Wikipedia.

El eclipse lunar es un fenómeno astronómico que se produce cuando la Tierra se sitúa entre el Sol y la Luna, proyectando su sombra sobre ésta y oscureciéndola.

El eclipse de Luna es uno de los eventos astronómicos más hermosos y se puede observar a simple vista sin necesidad de telescopios. Durante el eclipse podemos apreciar como la sombra de la Tierra avanza sobre la superficie lunar, primero reduciendo el brillo de esta a medida que se sumerge en la zona de penumbra y luego adquiriendo una tonalidad rojiza cuando se adentra en la sombra.

La Luna gira alrededor de la Tierra en un ciclo de 27,5 días que denominamos periodo sidéreo pero durante este tiempo la Tierra se ha movido también alrededor del Sol por lo que para que volvamos a ver a la Luna en la misma fase tienen que pasar los 29,5 días del periodo sinódico.

Los eclipses de Luna se pueden ver desde cualquier parte de nuestro planeta si es de noche y suelen tener una duración de varias horas.

¿Por qué no se produce un eclipse Lunar cada Luna llena?

La Luna gira alrededor de la Tierra en una órbita con una inclinación de unos 5º con respecto al plano orbital de la Tierra alrededor del Sol, por este motivo la Luna no siempre pasa por detrás del cono de sombra de la Tierra, a veces pasa un poco por arriba y otras por debajo de ésta. Para que se produzca el eclipse lunar nuestro satélite debe encontrarse en el nodo o punto de intersección entre su órbita y el plano orbital terrestre.

Solo se producen entre dos y cinco eclipses lunares al año de los cuales los eclipses totales se producen dos veces cada 3 años. También es interesante saber que cuando se produce un eclipse de Sol, 15 días después se puede observar también un eclipse de Luna.

eclipse lunar y estrellas
Las estrellas se vuelven visibles durante el eclipse de Luna.

¿Qué tipos de eclipse de Luna hay?

Dependiendo de la cómo la sombra de la Tierra se proyecta sobre la Luna podemos hablar de 3 tipos diferentes de eclipse:

Eclipse total de Luna

Un eclipse total lunar se produce cuando la sombra de la Tierra oculta toda la superficie de la Luna. Es el eclipse lunar más vistoso en el que la Luna se oscurece totalmente adquiriendo tonalidades rojizas, marrones o incluso más oscuras.

Eclipse parcial

Hablamos de eclipse parcial de Luna cuando solo una parte de de la Luna se ve ocultada por la sombra de la Tierra. Hay que tener en cuenta que durante los eclipses totales también se produce una fase de parcialidad antes y después del eclipse total.

Eclipse penumbral

El eclipse penumbral es tan solo un leve oscurecimiento de la Luna debido a que la sombra de la Tierra no oculta a nuestro satélite y esta solo atraviesa la zona de penumbra que rodea a la sombra. Dentro de los eclipses penumbrales podemos encontrar la circunstancia de que toda la superficie de la Luna quede bajo la penumbra o que solo una parte de nuestro satélite se vea afectado en una parte. Estos últimos son los eclipses más difíciles de apreciar ya que la luna solo ve reducida una parte muy poco significativa de su brillo.

Fase de parcialidad de un eclipse lunar en 2019.

Se suele utilizar la escala de Danjon para medir la oscuridad de los eclipses lunares. Esta escala fue propuesta por André-Louis Danjon en 1921 y va desde el valor L=0 para indicar mayor oscuridad a L=4 para menor oscuridad.

  • L=0: Eclipse muy oscuro, la Luna es casi invisible en la semitotalidad.
  • L=1: La Luna adquiere tonalidad gris oscura o pardusca, hay pocos detalles visibles.
  • L=2: Eclipse rojizo o rojo pardusco con área central más oscura, regiones externas muy brillantes.
  • L=3: La Luna adquiere una tonalidad roja brillante, habitualmente con un borde amarillento.
  • L=4: Eclipse anaranjado o cobrizo, muy brillante, a veces con un margen azulado.

Estas diferencias de tonalidad pueden ser producidas por el grado de inmersión de la Luna en el cono de sombra pero también por la presencia de partículas en la atmósfera de nuestro planeta. Por ejemplo, las erupciones volcánicas o grandes incendios forestales pueden producir eclipses más oscuros.

¿Qué podemos ver durante un eclipse de Luna?

Hay algunos fenómenos ópticos muy interesantes que podemos observar durante un eclipse lunar. En primer lugar el paulatino oscurecimiento de nuestro satélite pero también los diversos cambios de tonalidad a media que la Luna se adentra en la sombra de la Tierra.

En ocasiones es posible ver un borde azulado junto a la umbra. Esa tonalidad azul es producida por la capa de ozono de nuestra atmósfera que absorbe la luz roja.

También podemos apreciar que la Luna adquiere cierta profundidad o sensación de 3D a medida que avanza el eclipse. Durante la fase de Luna llena ésta se muestra plana ya que no hay sombras sobre su superficie. Durante el eclipse la Luna si que muestra perspectiva de profundidad debido a las diferencias sutiles de iluminación. Su observación con prismáticos es una experiencia única que no te dejará indiferente.

También es posible observar el impacto de meteoros en la superficie de la Luna durante los eclipses. Estos se muestran como pequeños destellos luminosos en la superficie. No es habitual pero nosotros lo vimos personalmente en una ocasión y son varios los registros fotográficos de estos eventos.

Otro fenómeno muy llamativo es la paulatina aparición de estrellas en el cielo a medida que la Luna va perdiendo su brillo. Es fácil observar incluso ocultaciones de estrellas por nuestro satélite durante la fase de totalidad.

¿Cuánto dura un eclipse lunar?

Los eclipses lunares duran varias horas y las diferentes fases se determinan por sus sucesivos contactos con la sombra o penumbra. Un eclipse total puede durar hasta 6 horas. Las fases de un eclipse total son las siguientes:

  • P1 (Primer contacto): Inicio del eclipse penumbral. La Luna alcanza el límite exterior de la penumbra.
  • U1 (Segundo contacto): Inicio del eclipse parcial. La Luna alcanza el límite exterior de la umbra.
  • U2 (Tercer contacto): Inicio del eclipse total. La Luna se adentra completamente en la umbra.
  • Máximo del eclipse: Fase central del eclipse y de mayor ocultación de la Luna. La Luna está en su punto más próximo al centro de la umbra.
  • U3 (Cuarto contacto): Fin de la fase de totalidad. El punto más externo de la Luna sale de la umbra.
  • U4 (Quinto contacto): Fin de la parcialidad. La Luna sale de la umbra terrestre.
  • P2 o P4 (Sexto contacto): Fin del eclipse penumbral. La Luna sale completamente de la penumbra terrestre.

En un eclipse parcial no se producen las fases U2 y U3 y en un eclipse penumbral no hay fases U1, U2, U3 ni U4.

La duración de las diferentes fases es muy variable y depende de la distancia de la Tierra a la Luna que no es constante debido a la excentricidad de la órbita. El eclipse será más largo cuanto más cerca del apogeo se encuentre la Luna.

finparcialidad2022 05 16 05 25HDR scaled
Final de la fase de parcialidad del eclipse de 2022

¿Cuando se podrán ver los próximos eclipses totales de Luna?

Aquí puedes consultar algunos eclipses totales pasados que hemos vivido personalmente y las fechas de los próximos eclipses de Luna:

Eclipse total de Luna del 28 de septiembre de 2015 y crónica de observación desde Cubas.

31 de enero de 2018: Visible solo en Australia y Asia.

Eclipse total lunar del 27 de julio de 2018 y crónica de observación desde Corral de Almaguer.

Eclipse total de Luna del 21 de enero de 2019 y crónica de observación desde Madrid.

26 de mayo de 2021: Visible en América, Australia y Asia.

Eclipse total de Luna del 16 de mayo de 2022 y crónica de observación desde Carranque.

8 de noviembre de 2022: Visible en América del norte, Australia y Asia.

14 de marzo de 2025: Visible en América, Australia y Asia.

7 de septiembre de 2025: Visible en Asia, África y Europa.

3 de marzo de 2026: Visible en Nueva Zelanda, Australia y Asia.

31 de diciembre de 2028: Visible en Europa, África, Asia, Australia y Pacífico.

26 de enero de 2029: Visible en América, Europa, África y Asia.

20 de diciembre de 2029: Visible en América, Europa, África y Asia.

[ad_2]

Control Your Consumption – Astroniklas

[ad_1]

When you’re planning to head out for astrophotography, one of the things in your check lists it to figure out your power consumption (or it should if you haven’t figured that out yet!). Some people rely on batteries, others again have a steady power supply from a plug in their homes/outdoor observatory sites, and finally some would rely on a power generator.

To figure out how much power your equipment consumes per hour, there’s a simply calculation method. If you know your Watt-hours and Volts (most astronomy equipment is powered by 12 Volts) to Ampere-hours you can use a simple formula to discover the amount. Supposedly your Watt-hours is 240 then we get;

\[Ah = \frac{Wh}{Volts} => \frac{240}{12} = 20Ah\]

Now, to convert how much time would that give us, create a simple list of all your equipment and how many Amperes each one of them consumes. In my case,

  • Mount (NEQ6 Pro): 4 Amp
  • Cooling Camera (ASI1600GT): 2 Amp
  • RCA Dew Heaters (1 Amp each): 2 Amp
  • Lakeside Focuser: 1 Amp
  • EAGLE Pro (Mini-PC + Power Management Unit): 1 Amp

That would give us a total of 10Ah. Supposedly I’m using a Duracell battery of 20Ah, then my power consumption would end up discharging my battery source after 2 hours (20 Ah / 10 Ah).

Instead, in my case I would then need a steady powersource for much longer than that. In average my observing sessions are no less than 3 hours (on mediocre nights) or even up to 4 or 5 hours when there are really beautiful night skies making it worthwhile to stay up longer.

A battery would be enough to just observe visually, but definetely wouldn’t take me a long way for astrophotography. And to make matters worse with batteries, they shouldn’t go below 20% of their total capacity if you want them to be long lived, or say goodbye to an expensive battery after just a few sessions!

I’ve decided that, for my own personal gain to buy a power generator that would provide me a reliable power source for many hours at end, without risking killing any expensive batteries, damage my equipment or to abandon a beautiful night sky. Additionally it gives me great independence from anything when it comes to sudden power outages, people around, or ending up running out on battery sources.

The downside is of course a solid power generator would become heavy to carry around (the one I’m looking at is 48 lbs) and the other downside is of course its loudness (~50 dB which corresponds to light rainfall) when its operating. You’ll also need a long cable to avoid having it too close to cause vibrations during your astrophotography session.

Ultimately nothing beats a steady power source offered by a wall outlet… But you can’t ask to have everything right?

[ad_2]

Best star trackers for astrophotography 2022

[ad_1]


null


© Future
null

The best star trackers for astrophotography have changed the scene forever by counteracting the rotation of our planet. Until only a few years ago a long exposure of over about 10 seconds caused stars to blur. That made it very difficult to extract much data from deep-sky objects such as nebulae, but also from the Milky Way. Cue the invention of the star-tracker, which is basically a shrunken equatorial mount, but designed for cameras instead of telescopes.

Like an equatorial mount, a star tracker needs to be aligned (often with the help of a smartphone app) with the north celestial pole (the star Polaris) in the northern hemisphere or the south celestial pole in the southern hemisphere. It then keeps your camera in sync with Earth’s rotation. That way it counteracts the rotation of the Earth and keeps the target object still in a composition, thus allowing blur-free long exposures.

The best star trackers for astrophotography 2022

While most star trackers are a compromise between their own weight and their payload, the Benro Polaris is both super lightweight (at 3.3lbs / 1.5kg) and super-supportive, taking a mighty 15lbs/7kg of gear (the highest carrying capacity of any star tracker mount so far). It achieves that by using precise high torque motors and a waterproof IPX6 rating. That helps explain the very high price. It’s the first star tracker to offer built-in DSLR control and a built-in micro SD card slot. Remarkably, the Benro Polaris can even be controlled via the cellphone network. Its huge 2500 mAh battery can be recharged via USB-C while alignment is via any objects from a choice presented on a smartphone app. However advanced the best star trackers appear, there’s evidence from this electric tripod head that their days are numbered. 

The incessant creep of light pollution means it’s now almost inevitable that you’ll need to travel to find the darkest night skies possible. Even if you don’t travel internationally, finding dark skies often means hiking into backcountry areas away from other humans. That necessitates a star tracker that strikes the right balance between its own weight and what it can support. 

Cue the Sky-Watcher Star Adventurer Mini, affectionately known as SAM, which can take a payload of 3kg yet it is relatively easy to squeeze into a camera bag. It’s not the sleekest device ever, and nor is its SA Console app up to much. However, as we found during our Sky-Watcher Star Adventurer Mini review, once you get used to its foibles SAM is reliable and relatively easy to use. It’s possible to get accurate long-exposure images of up to about four minutes, which makes SAM a great compromise product. Accessories include a counterweight and declination bracket to increase the payload.

The priciest and one of the best star trackers around for astrophotographers is the iOptron SkyGuider Pro. Many star trackers are made for landscape photographers wanting to save on weight when out in the field searching for wide-angle compositions that include the night sky. But there are plenty of astrophotographers that only want to use telephoto lenses to capture light from distant deep sky objects. That means bigger payloads and longer exposures, which is what the iOptron SkyGuider Pro is designed for. 

Able to take about 11lbs / 5kg, it can support long lenses or even a small telescope, making this a product that in some ways behaves more like a motorized equatorial mount, though its wedge lacks a little precision. Another downside is its use of a counterweight to reach that higher capacity than average, which adds a further 3lbs/1.35kg to the product. Aligning using its electronic polar finderscope and iOptron Polar Scope app, like most of its rivals this star trackers also tracks the Sun, Moon and allows 1/2-speed motion time lapses at night.

Even smaller and more nimble than the SAM is the great value Move Shoot Move, a star tracker that’s suitable only for wide-angle lenses. That’s partly because of its limited payload of 6.6lbs / 3kg and partly, as we discovered in our Move Shoot Move star tracker review, because it’s just not the most accurate star tracker around. 

While that might sound like a deal-breaker, it’s actually a plus if you intend only to take wide-angle images of the Milky Way and starfields. For such photos a rough alignment with Polaris is all you need, something that can be done easily and quickly using an included green laser pointer. 

The Move Shoot Move isn’t going to accurately track Polaris for more than about two or three minutes (though the wider and lighter your lens the longer it will remain accurate enough). But if you have a reasonably fast wide-angle lens none of that is going to matter much. If you have a telephoto lens though, look elsewhere.

While iOptron’s SkyGuider Pro is aimed at deep sky photography, the pared-down and more compact iOptron SkyTracker Pro is aimed more at wide-angle nightscapes. Its payload capacity, at 6.6lbs/3kg, is a lot less than its stablemate and at 2.5lbs/1.1kg it also weighs less. As such it’s more suitable for those wanting to carry a star tracker in their camera bag during trips and travel. 

It has a wider appeal than just nightscapes since in addition to tracking objects in the night sky it can also follow the Sun, Moon and has a half speed for motion timelapses. As a bonus, its internal battery can run for 24 hours. Accessories include a counterweight and declination bracket to increase the payload.  

The Vixen Polarie isn’t for deep-sky astrophotography. In the world of star trackers, it’s always a trade-off between size and versatility, and the Polaris compact size means it can support a payload of just 2kg. Therefore, it is best used with not only wide-angle lenses but fairly lightweight models, though using a mirrorless camera body will give you more flexibility. Alignment is via a supplied compass, a built-in latitude meter and a polar sight hole, so you will have to know how to find Polaris and/or the south celestial pole. 

On hand to help are both red light illumination and the Vixen PF-L Assist app for smartphones. As well as long exposure astrophotography the Polaris can track the Moon and the Sun (the latter useful for solar eclipses) and its half-speed allows motion time-lapses at night. Its short two-hour battery life can be augmented by instead attaching a portable battery to its micro USB slot. Optional accessories include a counterweight to boost the payload to 6.5kg, a polar axis scope and a time-lapse adapter.

Best star trackers for astrophotography 2022: What to look for

However, star trackers — which sit between a tripod and a camera — are not all the same. They have varying weights and designs but also manage different payloads. While some are ideal for telephoto lenses pointed at specific targets, others can only handle wide-angle lenses for capturing the Milky Way. Both the maximum payload and the accuracy of star trackers vary. They are often fiddly and time-consuming, but at their best star trackers can deliver addictively good images.

As well as weighing your camera body and lens before making a purchase do remember to take into account the added weight of a couple of ball-head mounts and the load-bearing ability of your tripod. If in doubt, go for bigger capacity mounts because as a rule of thumb it’s best to have your rig’s total weight about half the capacity of the mount.

Here’s everything you need to know about the best star trackers available for astrophotography and night-scape photography.

How we test the best star trackers for astrophotography

In order to guarantee you’re getting honest, up-to-date recommendations on the best star trackers for astrophotography to buy here at Space.com we make sure to put every star tracker through a rigorous review to fully test each instrument. Each star tracker is reviewed based on a multitude of aspects, from its construction and design, to how well it functions as an imaging instrument and its performance in the field.

Each star tracker is carefully tested by either our expert staff or knowledgeable freelance contributors who know their subject areas in depth. This ensures fair reviewing is backed by personal, hands-on experience with each star tracker and is judged based on its price point, class and destined use.

We look at how easy it is to set up, whether the star tracker mounts are reliable and quiet if a star tracker comes with appropriate accessories and also make suggestions if a particular star tracker would benefit from any additional kit to give you the best astrophotography experience possible.

With complete editorial independence, Space.com are here to ensure you get the best buying advice on telescopes, whether you should purchase an instrument or not, making our buying guides and reviews reliable and transparent.

You May Be Also Interested in:

[ad_2]

I’m a Sony fan and these are the Black Friday lens deals that are on my radar

[ad_1]

November is here, which means the best Black Friday camera deals are now ramping up. But you don’t need to limit your attention to cameras – because plenty of lenses will also see some big discounts over the next few weeks. 

Photography isn’t a cheap hobby or career at the best of times, so finding some great discounts can make all the difference, particularly when we’re going through a cost of living crisis. 

[ad_2]