Longer exposures versus multiple shorter exposures

[ad_1]

Which is better: many short exposures or fewer long exposures? 120 x 1 minute exposures or 10 x 12 minute exposures? Questions similar to this one get asked really often and they probably receive all kinds of different answers. People talk about the camera, faintness of the signal, dithering, stacking, light pollution etc. etc. So many factors creep into the discussion that sooner or later it will seem like a personal choice, almost like a matter of opinion. Is this really a matter of opinion and/or complicated? Or can we find some definitive answer to the question if more shorter exposures are better than fewer longer exposures?
Actually, it turns out that although there are formulas for ideal (theoretical!) exposure times, personal preferences and opinion and practicality will come into play in reality when determining the exposure you want to be using.
Knowing how the subexposure time will impact the SNR of your stacked image will help you to determine the exposure time you choose to use. Please bear with me while we explore the way to determine this optimum exposure time, which will include quite a bit of math. I find that going over the math and actually calculate the SNR for a few different scenarios helps greatly in my understanding of this matter. So I encourage you to follow along with the math. For those who are mostly interested in the key take aways I’ll start with those in a short summary, before diving into details and the math further on.

Key take aways

When you are imaging under light polluted skies, you should not worry about your exposure times. It will make very little to no difference if you are using subexposures of 30sec. or 3minutes. It’s the total integration time that matters.
If you are imaging under dark skies, you will benefit from longer exposures in terms of SNR. However, it’s not worth it to go to extremes and keep in mind the cost of throwing out a subexposure due to poor tracking for instance. Only increase exposure time if you can reliable track accurately for that long.
If you don’t use darks and/or want to use dithered (bayer) drizzel integration, make sure you get at least 10 to 15 subexposures.

Now that we’ve learned not to worry about subexposure time under light polluted skies and give subexposure time priority under dark skies, let’s see why this is the case and how we arrive at these conclusions.

Read noise and background sky flux

To determine the optimum exposure it basically comes down to these two factors; read noise and the background sky flux.
The read noise is the noise that occurs within the electronics of the camera when we convert the electrons coming from the sensor into digital units (ADU) and store them. The background sky flux is the signal coming from the light pollution, moon light and/or air glow. The background is never completely black and the value of the background signal is the background sky flux.

If the read noise is swamped by sky background noise it becomes irrelevant and it doesn’t matter how long our subexposures are

If we wouldn’t have read noise, it wouldn’t matter if we take one very long exposure or many shorter exposures with the same total integration time. If we wouldn’t have background sky noise but do have read noise, the longer exposure would always have better SNR than many shorter exposures.
In reality we always have to deal with some sort of mixture of these two scenarios. There will always be some background sky noise and read noise is always a factor to take into account. Especially for us DLSR users. So how should we take those two factors into account? Well, it comes down to determining the point where the sky background noise will make the read noise irrelevant. Whenever this is the case, it doesn’t matter any more if we take many shorter or fewer longer exposures.
So if you are imaging under strong light pollution this probably applies to you. Alternatively, if you are using narrowband imaging and/or if you are under truly dark skies, it will be practically impossible to reach this point and so the longer exposures will always be better.
Now let’s research why this is the case and look at some test results;

Adding multiple exposures and SNR

Let’s look at what exactly happens to the SNR when we add multiple exposures and when we expose longer. We will dive into some math here and I will try to do this step by step and as clear as possible. I know lot’s of articles will skip steps and rewrite formulas without explaining how or why which I’ll try to avoid.

The SNR is simply the Signal divided by the noise. Sounds simple, but with different noise sources we need to dive in a bit deeper and see how we add noise. But first let’s define the term Signal exactly: S = signal per second (s) * time of the exposure (t) * number of exposures (N). So
To be clear; this is the total amount of signal recorded over multiple exposures.
Next let’s consider the noise sources we are dealing with here: Object shot noise, sky (shot) noise, dark current noise and read noise. Whenever we are dealing with detecting photons we deal with shot noise. This shot noise is the square root of the number of photons. This noise is also building up over time just like the signal. So in terms of the object shot noise, it is the noise associated with the signal of the object(s) we are imaging and is the square root of the signal.

For sky shot noise it is the square root of the background signal coming from the sky over time.

For the dark current noise it is the square root of the thermal signal (dark current) build up.

The read noise is different in the sense that this doesn’t build up over time but it does occur once for every exposure. This is important to realise. The total read out noise (RonTot) is:

We can sum random, uncorrelated noise by adding them quadratically so we get the following formula for the total amount of noise:

Remember the fact that the shot noise is the square root of the Signal source. So if we add this quadratically we can rewrite the Noise in terms of the signal like this:

Since the number of exposures (N) is present in each term we can rewrite this as:

or

So the formula for the SNR is:

Notice we have N as a term present in both parts of the division. Since we can rewrite the above formula into:

Now we have written the formula down for SNR in this useful format, we can explore what the impact of the background sky flux and the read noise is on the SNR.

Scenario with no read noise

Maybe you start to see now what we said earlier; if we wouldn’t have read noise it wouldn’t matter how long we expose as long as the total exposure time is the same. Let’s just take out the read noise (RN) out of the above equation. Without read noise the SNR will be:

Since we have t present now in every term we can group it:

which is the same as

and as we’ve seen before we can write this down as

Now we can see it doesn’t matter for the SNR how we fill in values for N and t as long as N*t = the same value. So only total exposure time matters (N*t) and not how we divide it in subexposures.
But wait, what about really faint signal? Don’t you need very long exposures for that? Well, not in this case where we don’t have read noise. You just need (very) long total exposure time. If we look at the above formula this is clear, but if we think of stacking and consider that we are averaging there this might seem less intuitive all of a sudden. Because, the average of a few electrons collected by many frames is smaller than the average of a few electrons in one frame right? Well, sure that is correct of course. However, this is only considering signal. And it is not useful to talk about signal alone, we always need to talk about SNR. That alone determines if you will have detected signal that will stand out in an image or not.
And if we consider the fact that SNR = simply signal / noise you’ll realise it doesn’t matter in how many frames we detected the signal, since we’ll only end up dividing both terms of the division which doesn’t change anything ((a*b)/(a*c) = (a/a) * (b/c) = 1*(b/c) = (b/c))
So yes, it’s true that if read noise wouldn’t exist it doesn’t matter what exposure time you use and how many exposures you take, all that matters is the total integration time. And even with read noise included in the formula, you can see that once the other values are much much bigger than the read noise, the same will apply; the read noise becomes (almost) irrelevant and we are left in the situation where it doesn’t matter what exposure time you use.

once the other noise values are much much bigger than the read noise, the read noise becomes (almost) irrelevant and we are left in the situation where it doesn’t matter what exposure time you use.

Scenario with little to no sky noise

Alternatively, consider the scenario where we are under a truly dark sky with no light pollution, no moon light and only a little sky glow; we have very little background sky signal (Sky_s). Let’s consider the SNR formula again:

Now let’s say the DarkCurrent_s = 0.15e-/sec (which I found reported for the Nikon D7000), Sky_s = 1e- / sec and read noise = 3e- (Nikon D7000 @ ISO200). If we take a very faint signal that’s similar to the sky flux we will see the following SNR values for different number of exposure times but same total exposure time:
Let’s compare scenarios with a total integration time of 120 minutes and compare 120x1min and 12x10min.

120x1min:

12x10min:

Ok, so SNR is higher indeed as expected. What if we take this to the extreme and just take 1 image of 120min?

1x120min:

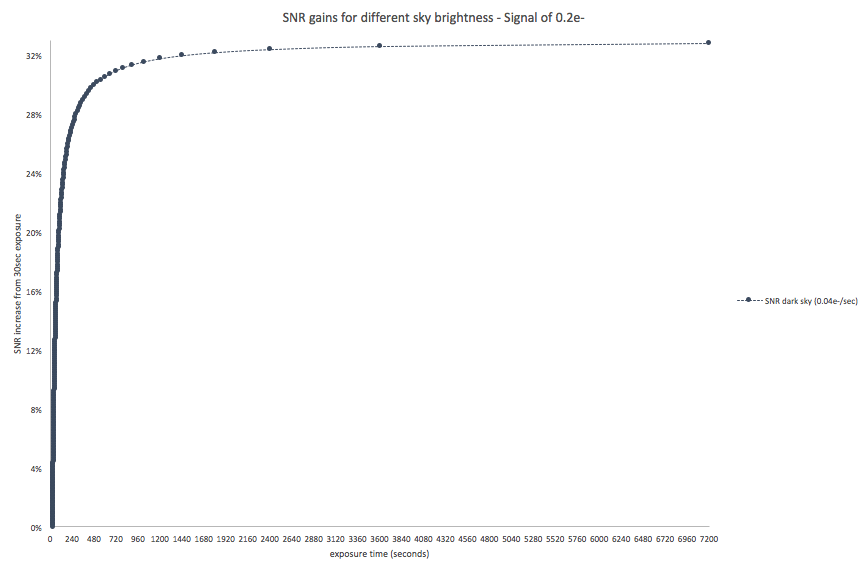
Hmmm, that’s a really small improvement over the 12x10min exposure. Clearly this is a case of (quickly) diminishing returns. I made a graph showing the SNR gains compared to a 30sec exposure SNR for exposures between 30sec and 120min to show the benefit of exposing longer in this scenario:

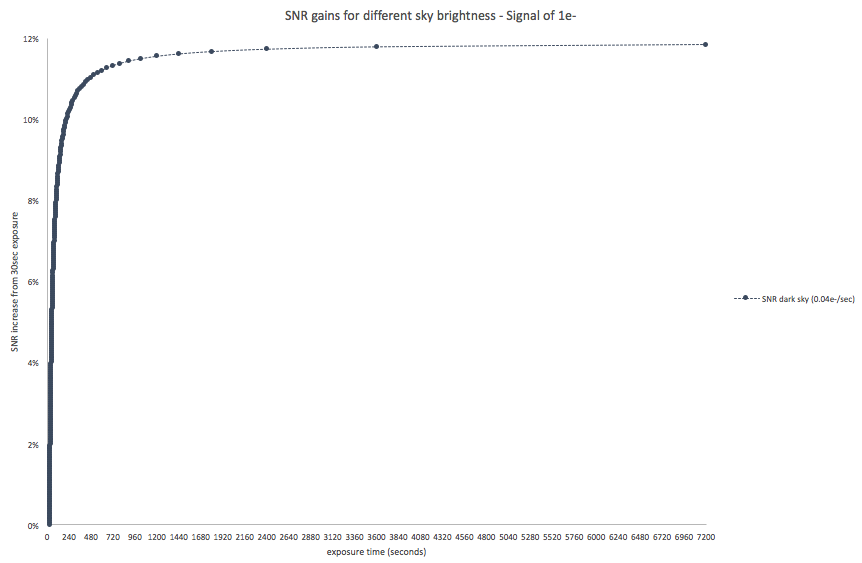
This graph paints quite a clear picture I’d say. In case of a dark sky, the gains in SNR while exposing longer is quite big in the beginning and reaches a 10% improvement already at 3,5minutes exposures compared to 30sec exposures. The improvements tail off quickly as well though, reaching only a further 1% improvement at 8 minutes compared to the 30sec exposures. To be clear; in this scenario, the difference between exposing 3.5minutes and 8 minutes (with the same total integration time) is even slightly less than 1% improvement.
Please note that these gains are dependant on the signal coming from our target object as well. So if we would take a much fainter object with a flux of only 0.2e- compared to the 1e- we just saw, we get the following graph:

Wow! we can see the same strong curve with diminishing returns, but the SNR improvements for a fainter signal are clearly much much higher! Let’s look at the same minute marks as before: using 3.5 minutes exposures compared to 30sec exposures gives you an SNR improvement of 26.3%. Going from 3.5 minutes to 8 minutes gives you a further improvement of 2.86%. So even though we still see strong diminishing returns, the improvements remain significant up till longer exposures as before.
In this scenario, the improvement in SNR between 8 and 15 minutes still is 1%.
Please note that we’re talking about signal coming from the sensor here. So this includes scenarios with slow optics as well as using fast optics on very faint signal.

The role of read noise in SNR
To make it really clear what the role is of the read noise in the scenario’s we just ran through, let’s take a look at the role of read noise specifically and how it adds up when we add more exposures.
Let’s look at the SNR again for the same situation as described before, 12x10min subs versus 120x1min subs and rewrite it a bit just to see what is happening to the noise terms:
For the object shot noise, sky noise and dark current noise we get the following:
12x10min:

which is;
=

and for the 120x1min this then is;
=
So you see this is exactly the same, just as we could expect and have seen before in the scenario without read noise.

Now, let’s see what is happening with the read noise; which is simply
12x10min:
120x1min:

So the read noise is growing with the square root of the number of exposures in our integration, while all the other terms simply grow by total exposure time alone. So for a given fixed total exposure time, the read noise will be smallest with the least number of exposures.

Read noise is growing with the square root of the number of exposures in our integration

To see it’s impact in the total noise let’s run the actual numbers. Remember, uncorrelated noise adds up quadratically, so the total noise we get in these situations is;
12x10min:
120x1min:

Now we can clearly see how big the impact is of the read noise in this scenario.
Next let’s see what these numbers and the impact of read noise looks like in case of a bright sky. Let’s say sky background flux is 50e-.
For the time dependant noise sources we get:
=

If we add the read noise:
12x10min:
120x1min:

This is a totally different situation and the read noise could simply be considered irrelevant.
In fact, this looks very much like the hypothetical situation without any read noise we saw earlier.

So we can conclude that the exposure time only is relevant when the read noise is relevant. And the read noise is only relevant if the sky is dark enough.

The exposure time only is relevant when the read noise is relevant. And the read noise is only relevant if the sky is dark enough.

Determining optimal exposure time

Now we’ve seen the scenarios above you might wonder what would be applicable to your specific situation. As we just concluded this will be dependant mostly on the brightness of the sky you are imaging under.
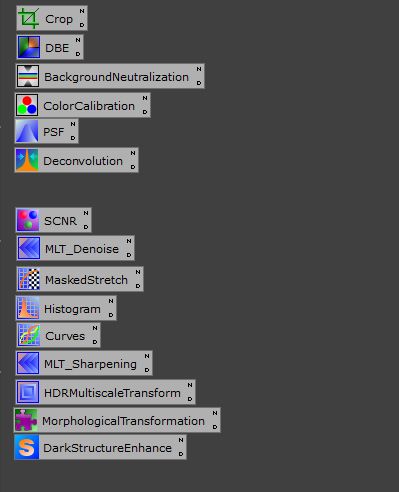
There are formulas to determine the optimum exposure using the read noise and sky flux as input. There is also a script in PixInsight which you can use to give you an ‘ideal exposure length’. (Scripts->Instrumentation->CalculateSkyLimitedExposure)
However, as we’ve seen in the graphs before the benefit in SNR is one of diminishing returns. This means it is not possible to give one absolute answer to the question what the optimal exposure time is. Assumptions need to be made about how much contribution of read noise to the total noise you will tolerate. And the differences in this assumption is often huge (factor 2 differences). Furthermore they don’t take practicalities into account. So I’d like to just show you a few more scenarios and the SNR corresponding gains for longer exposures compared to using 30sec exposures in a situation where we use a total exposure time of 2 hours. I’ve listed the ‘95% improvement mark’ for exposure time for each sky brightness.

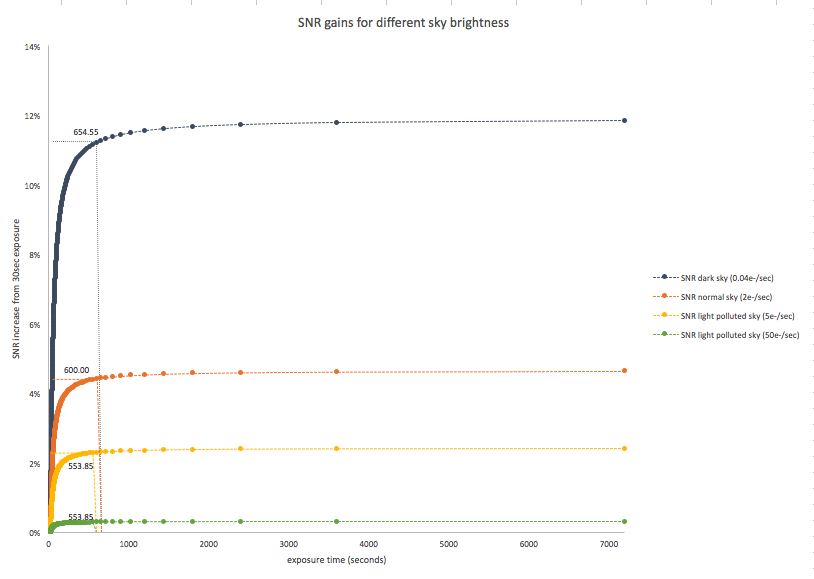
The most obvious thing we can learn from this chart is that there is a huge difference how much you benefit from longer exposures under a dark sky versus brighter skies. Furthermore, the 95% improvement mark seems to be awfully close for all scenarios. However, I’m not sure how useful this number is since the next step up in exposure after this mark under a dark sky will still give you 0.05% increase while this improvement is only 0.0012% in the brightest scenario. To make this even more clear; for the brightest scenario the SNR for 30sec. exposure was 11.83, while all the way at the end with one exposure of 120 minutes the SNR was 11.86. So we could safely consider this a scenario where subexposure length is completely irrelevant.

Remember we saw earlier that the SNR improvements were much larger if we are dealing with faint signals. So let’s look at the SNR improvements for different sky brightness with the previously used faint 0.2e- signal

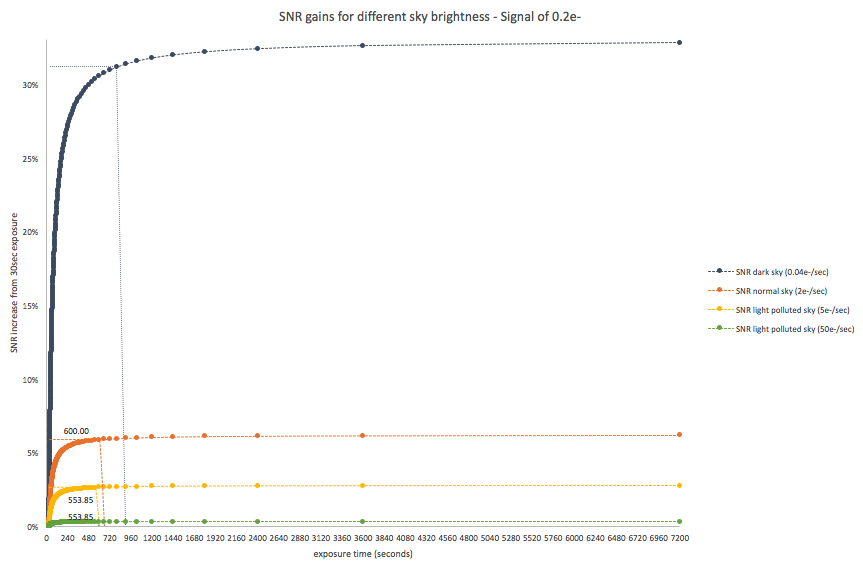
The impact of the sky brightness is very clear again in this chart. Although we do benefit more from longer exposures when dealing with fainter signal also from brighter skies, the difference is negligible for very bright sky and is really huge for the really dark sky.

Based on these graphs we can conclude that if you are imaging under a light polluted sky you should not worry much about your exposure length. Every sky brightness between 5e- and 50e- basically has a total SNR improvement between 0.2% and 2% for which you’ll reach 80% of maximum SNR increase already at 3 minute exposures.

Other practical considerations to take into account

Next to the read noise and background sky flux, we need to take some practical factors into account as well when we want to determine the optimal exposure length. The ability to guide accurately for longer exposures for instance is of course really important, as well as the cost of loss of data if you need to throw out a subexposure. Remember that the total integrated exposure time is most important for SNR, so there is a real significant cost when you need to throw out subexposures.
Furthermore you might want to use (bayer) drizzle integration, which will need a minimum amount of (dithered) subexposures to give proper results.
These are all very important things to consider which might change things completely in terms of the optimal exposure time for you personally.

Light pollution and narrow band filters

I got asked a lot about the influence of filters. I haven’t tested this out myself, but the book The Astrophotography Manual covers a comparison between different light pollution filters and concluded that in his test it didn’t effect the background sky flux all that much (which was surprising). As always, test it out to know for sure, but I think the effect of light pollution filters is minimal on the read noise contribution to the overall noise.
Narrowband filters on the other hand will basically change even a light polluted sky to a dark(er) sky in general. So with narrowband filters you will benefit a lot from longer subexposures.
Of course there will always be exceptions to this, like OIII imaging with full moon, and exact details will depend on the speed of your scope and the quantum efficiency of your camera for instance. However, the generalisations will hold true in most situations.

A comparison from a dark site

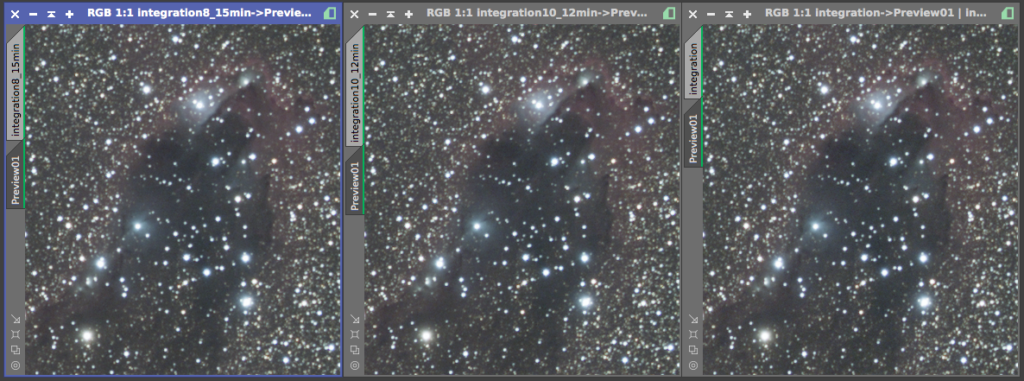
Let’s look at the following data that I shot while I was in Namibia. There is practically no light pollution there and this was shot without the moon present. The only bit of background sky flux was the sky glow and perhaps a bit of zodiacal light.
The data was shot during 3 different nights so some variation is to be expected based on conditions for that particular night. There were no noteworthy differences between those nights so I have no reason to believe this is influencing the comparison much.
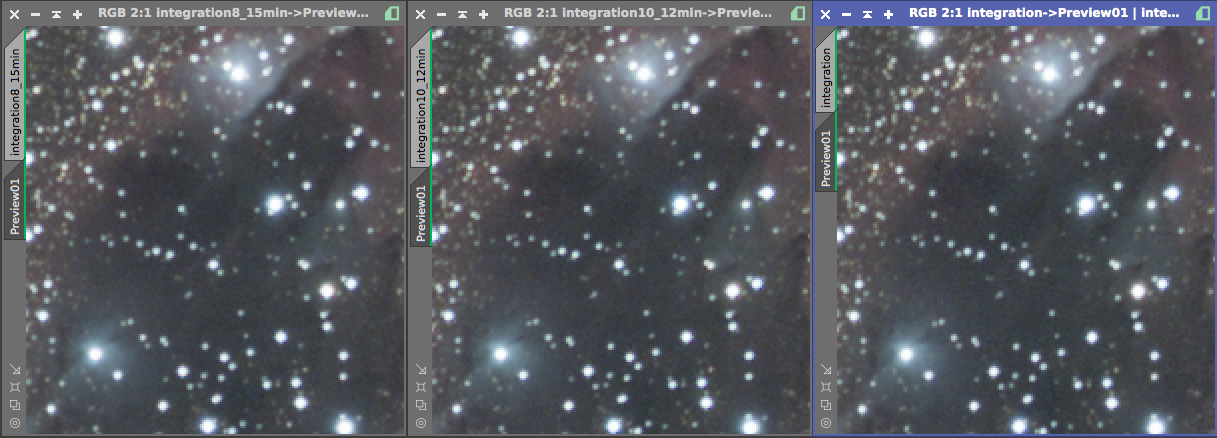
I had used different exposure lengths: 8, 12 and 15 minutes. For this comparison I made three integrations that all had the total integration time of 120minutes. So 15 frames of 8 minute exposures, 10 frames of 12 minute exposures and 8 frames of 15 minute exposures. No processing is done to these integrations. Just a STF applied to make the data visible.
Based on what we learned before we would expect the fewer but longer exposures will have the better SNR. Let’s see if this was the case:

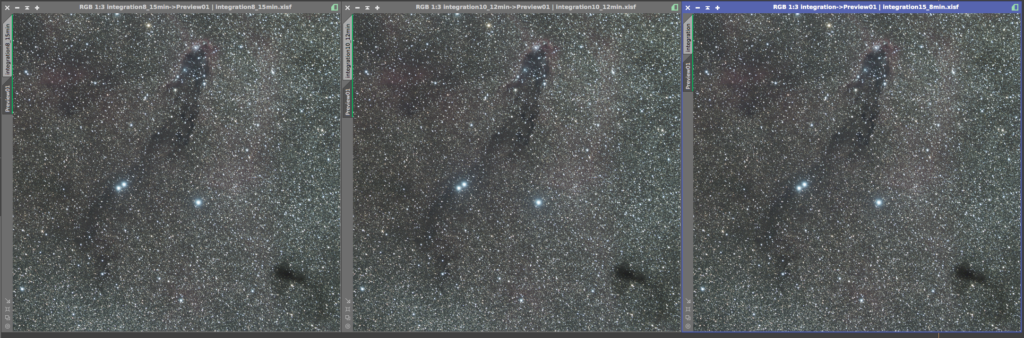
Hard to tell from this wide shot, so let’s zoom in a bit.

Here we can already see some difference in the amount of noise. Let’s zoom in further to have a better look.

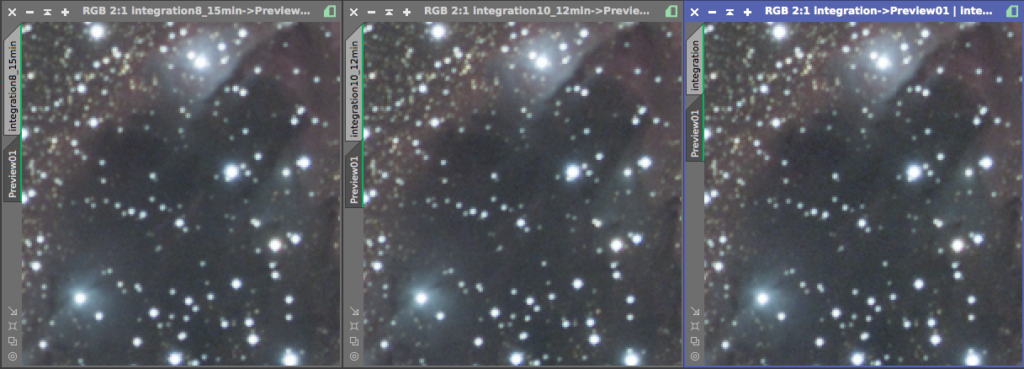
The differences in SNR are clearly visible now and we see indeed what we expected: the 8x15min. integration looks (much!) better than the 15x8min. integration.
This is even better visible in the dark region of Barnard 44A:

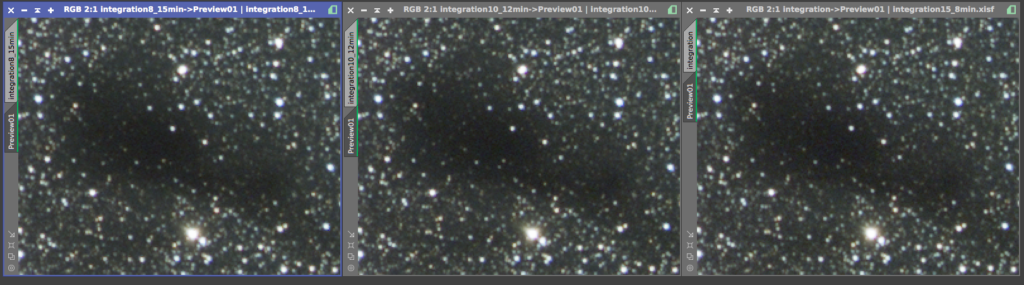
So visually we can already draw the conclusion that we were right: longer exposure has better SNR in this situation where we are clearly read noise limited. Now let’s check the numbers to confirm.
First let’s look at the amount of noise:

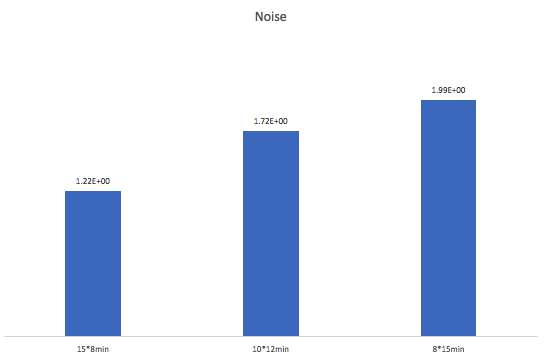
Noise is higher in longer exposures which is expected. The question is; did the signal grow more than the noise?
The SNRWeight measure (to be clear; this is a relative measure and not reflective of the actual SNR differences)

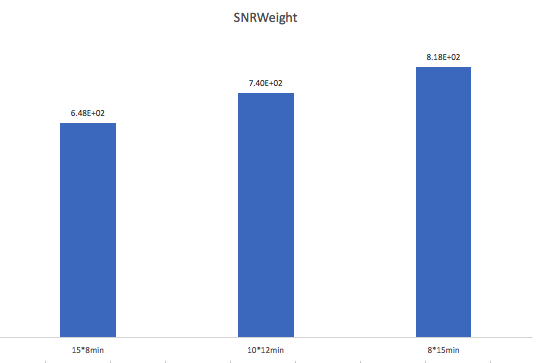
So yes, it clearly did.

Unless you are under dark skies, the subexposure length won’t matter much once you are using 2 to 3 minute exposures.

Conclusion and final considerations on sub exposure time and number of exposures

With all that we learned and the simulations we looked at and the real world dark site test we have quite some information about the optimal subexposure length. However, I bet you still are wondering how this impacts your particular situation and what the optimal subexposure length is. That will remain difficult to answer exactly, and much of the details go right out of the window if we need to take other factors like drizzle integration and guiding errors into account. However, I feel the most important conclusion probably is the fact that the exposure length is only relevant when the read noise is relevant. And the read noise is only relevant when you are imaging under a dark sky.
With most moderately to strong light polluted skies, the subexposure length won’t matter much once you are using 2 to 3 minute exposures.
Let me know in the comments below if you agree or disagree or still are left with questions at this point!


[ad_2]

Comprar una estrella es caer en un fraude

[ad_1]

A lo largo de mis años como astrónomo aficionado son muchas las personas que me han preguntando dónde comprar una estrella o peor aún, me confiesan que han pagado dinero para comprar una. Lo cierto es que detrás de la venta de estrellas hay un intento de estafa.

Muchos de los anuncios de empresas que venden estrellas incluyen un certificado de autenticidad pero lo cierto es que el único organismo con potestad para poner o cambiar nombre a una estrella es la Unión Astronómica Internacional (IAU) y ésta se rige bajo criterios científicos sin ánimo de lucro así que olvídese de que pongan el nombre de su persona amada a una estrella, no va a pasar. Como explican en su página web son muy estrictos con la forma de nombrar objetos celestes y se desvinculan totalmente de las practicas comerciales que consisten en vender nombres de estrellas ficticios.

Si quieres regalar una estrella a una persona querida puedes hacerlo por tu cuenta con un folio y una foto o un dibujo de la estrella que tu quieras, será igual de original y tendrá la misma validez legal que ese supuesto certificado expedido por una empresa privada en Internet, pero mucho más barato.

No se puede comprar una estrella ni el nombre de una estrella. Este tipo de prácticas son fraudes.
Las estrellas pertenecen a toda la humanidad. No se puede comprar ni vender una estrella.

El timo de la venta de estrellas comenzó en el año 1979 cuando apareció la primera empresa que ofrecía estos servicios, la International Star Registy (ISR). En su página web afirman ser los únicos que tienen registro en la oficina de derechos de autor de los Estados Unidos como si eso fuera algo que les diera relevancia o autoridad. Lo cierto es que nosotros mismos podemos crear el «Atlas de estrellas de Cielos Boreales» y registrarlo como un libro más en tal registro y apuntar los nombres ficticios de nuestro catálogo como cualquier otra publicación de ciencia-ficción. Nadie, excepto nuestra propia conciencia, nos impide cobrar 100 o 200€ por añadir tu nombre al de una estrella en nuestro catálogo personal, no estaríamos haciendo nada ilegal.

Estas empresas ofrecen todo tipo de merchandising para aumentar sus beneficios; cuadros, pulseras, colgantes, tazas… durante estos últimos 40 años han ganado millones de dólares aprovechándose de los incautos que se dejaron engatusar. A menudo han usado incluso a populares actores de Hollywood para promocionar sus servicios.

Otros regalos con estrellas más éticos

Hay otro tipo de regalos basados en las estrellas que son un poco más éticos. Es lo que hacen algunas empresas y creadores particulares al vender cuadros con la representación de la esfera celeste en un día determinado para conmemorar una fecha especial como un aniversario, por ejemplo.

En este caso no te están ofreciendo ningún certificado ficticio, es solo una imagen de cómo se veía el cielo en una noche determinada. Puedes hacer esto tu mismo ayudándote de programas como Stellarium o hacer un planisferio fijo para una fecha determinada.

Otras empresas más originales venden productos que han estado casi en el espacio. Es lo que hace EarthtoSky, que pone colgantes y otros avalorios en globos de helio que llegan a la estratosfera para luego caer de nuevo.

En cualquier caso ¿Por qué regalar una sola estrella si puedes regalar millones de ellas? Regala un telescopio y estarás haciendo el mejor regalo posible para cualquier amante de las estrellas.

[ad_2]

ZWO’s ASI1600GT Camera – Astroniklas

[ad_1]

I remember in my early days my old astronomy club had a monochrome CCD camera from SBIG, which was used for scientific projects. The club opened its doors to students allowing them to discover new supernovae and other cool features in the night sky involving photometry.

Years passed by and as an amateur astronomer I’ve dealt with DSLRs for the most part of my observing sessions. While DSLRs can be suitable for using them both at day and at night, unfortunately they can’t compete with dedicated astronomy cameras.

CMOS technology has advanced more and mover over the years as well, bringing their sensors to a very competitive level vs. CCD.

In a market the recipe to success is very simple and that comes with manufacturing cost. While CCD manufacturing has struggled enormously to lower its costs, CMOS has prevailed in the technology area and made itself more dominant over the years. Availability and cost efficiency are the two major factors in its success. Both sensors eventually convert light to electrons so the end result will be the same.

Thus, it brings us to the point of my blog entry here. I’ve recently acquired ZWO’s monochrome ASI1600GT. A camera that has a very effective cooling capability, high reliability, built-in filter wheel and lightweight. ZWO has done an awesome job and provided amateur astronomers with a very competitive and strong camera. I can’t wait for the California weather to offer me the chance to try it out very soon!

With my purchase I’ve also acquired a set of OIII (Oxygen), SII (Sulfur), H-alpha (Hydrogen) 7nm narrowband filters with a set of LRGB filters from SVBony as well.

[ad_2]

How To Photograph the Total Lunar Eclipse

[ad_1]

Are you hoping to capture a photo of the upcoming total lunar eclipse on November 8th? If so, you are not alone. Amateur photographers and astrophotography enthusiasts around the world will do their best to take pictures of the upcoming lunar eclipse using a wide variety of camera equipment.

A total eclipse of the moon is a truly breathtaking astronomical event that anyone can appreciate. The best part about it is that you do not need expensive astrophotography equipment or special filters to take a great picture of the total lunar eclipse. It’s all about using the best settings on the camera you are using (even if it’s a phone).

I recommend practicing your moon photography skills before the night of the upcoming lunar eclipse, so you don’t waste precious time fiddling with camera settings during the celestial event. With that out of the way, let’s get to the key information you need to take a great picture of the total lunar eclipse. 

camera settings for a lunar eclipse

Fast Tips:

  • Practice your camera settings on the moon before the night of the lunar eclipse 
  • If you are using a smartphone through a telescope, use a smartphone adapter to hold it in place
  • Use your cameras manual or ‘pro’ mode for full control over settings like ISO, Aperture, and Exposure
  • Capturing the moon during totality is often easier to accomplish due to less extreme lighting variations
  • Use a tracking equatorial mount when shooting at high magnification (star trackers work great)

How to Photograph a Lunar Eclipse

Over the years, I have photographed a number of total lunar eclipses using a variety of cameras – from my smartphone to a dedicated astronomy camera. The key to a great image isn’t the specific camera you use, it’s all about magnification and the correct settings

Without enough ‘reach’, the moon will appear small and lack the details you are hoping for. I recommend capturing the lunar eclipse with at least 300mm of focal length or more, which means an astronomical telescope or telephoto camera lens is best.

Then, it’s all about choosing the best camera settings to capture such a challenging subject in terms of light conditions. The moon will change in brightness as it goes through the different stages of the eclipse, and you must adjust your camera settings accordingly. 

What about those of you that don’t own a telescope or a long lens? The good news is you can still capture a great nightscape-style shot at a wider field of view. However, these types of photos look best if the moon is closer to the horizon while eclipsed. 

lunar eclipse photography

A total lunar eclipse captured in the early morning hours using a DSLR and standard kit lens. 

Wide-angle nightscape images that include a large portion of the night sky including an eclipsed moon can be done using a DSLR and tripod. For a 30-second exposure, a tracking mount is not necessary. At a focal length of 18mm or wider, star trailing will begin to show after about 20-25 seconds, so just keep that in mind. 

To capture the stars and constellations in the night sky, an ISO of 800 or above is recommended. However, this exposure will likely record the eclipsed moon as a featureless ball of light.

To properly capture both the starry sky and a detailed moon, you will need to capture exposures of varying lengths and blend them together into a composite image. This is because the moon is much brighter (even while eclipsed) than the surrounding starry sky.

A composite image can be made by masking the area of your night sky exposure and blending in a shorter exposure of the moon with surface details. This technique will take some time and experience to master, but the results can be amazing.

When and Where is the Lunar Eclipse Happening?

For a celestial event like this, a little planning goes a long way. You’ll definitely want to know exactly when the lunar eclipse is taking place, and where it will be in the sky from your location. 

For example, you may have to travel to a location with a low western horizon for a total lunar eclipse occurring in the morning if your backyard is full of tall trees.

Lunar eclipses are visible from different parts of the world at different times. There are many times when a lunar eclipse is taking place on the other side of the earth that you are unable to observe.

Here are some helpful resources to help you plan for the lunar eclipse:

lunar eclipse photography methods

Upcoming Lunar Eclipses (NASA)

Date Eclipse Type Visible From
November 8, 2022 Total Asia, Australia, Pacific, Americas,
May 5, 2023 Penumbral Africa, Asia, Australia
October 28, 2023 Partial Americas, Europe, Africa, Asia, Australia
March 25, 2024 Penumbral Americas
September 18, 2024 Partial Americas, Europe, Africa
March 14, 2025 Total Pacific, Americas, Europe, Africa
September 7, 2025 Total Europe, Africa, Asia, Australia

The 7 Stages of the Lunar Eclipse

There are 7 stages of a total lunar eclipse, and many amateur photographers like to capture the event in each stage. This can later be made into a composite photo showing the transition of the moon as Earth’s shadow covers it. A time-lapse video is another excellent way to capture each stage of the eclipse.

The maximum eclipse stage is when most photographers want a great shot. This is when the moon turns “blood” red and the surrounding night sky becomes much darker from our point of view on Earth. It is an unforgettable experience for those lucky enough to witness this moment.

Stages of the total lunar eclipse:

  1. Penumbral Eclipse begins
  2. Partial Eclipse begins
  3. Full Eclipse begins
  4. Maximum Eclipse
  5. Full Eclipse ends
  6. Partial Eclipse ends
  7. Penumbral Eclipse ends

An interesting thing happens when the moon is completely eclipsed by the shadow of Earth. Not only does the moon turn to an eerie reddish hue, but the stars and constellations surrounding the moon begin to appear as they would on a moonless night. Capturing a scene like this requires careful planning and execution.

Ways to Photograph the Total Lunar Eclipse

Here are 6 different ways to photograph the lunar eclipse, depending on the equipment you own:

Examples and Best Practices

There are many ways to photograph the total lunar eclipse, but for the best results, I recommend using a DSLR camera and a small refractor telescope on a tracking mount. 

This will allow you to get an up-close shot of the moon in each of its phases in detail. Some of the most incredible images of the lunar eclipse I have ever seen were captured this way. 

If you do not own a telescope, you can use your longest focal length camera lens to pull the moon in close. For the photo of a nearly total lunar eclipse below, I used a Canon EF 400mm F/5.6 telephoto lens. 

lunar eclipse

The 2021 Partial Lunar Eclipse on November 19, 2021. DSLR and 400mm lens. 

An equatorial tracking mount, such as a star tracker is the best way to take a clear photo of the moon during an eclipse when using high-magnification optics. This essentially freezes the moon in place for an extended period of time.

When you have compensated for the rotation of the earth, your subject is no longer moving, and you have many more options to choose from in terms of camera settings. Now, you can dial back ISO settings and f-stop if necessary and let a longer exposure time collect the light. 

This makes everything easier because the Moon will stay ‘still’ in the image frame while you adjust your camera settings based on the current stage of the eclipse. During the first stage of the eclipse, the moon will be very bright, whereas, during totality, it will be much dimmer. 

Below, you will see the camera and telescope I used to take a crisp photo of the total lunar eclipse that occurred in September 2015. This telescope has a focal length of nearly 500mm, which was enough to reveal some amazing details on the lunar surface.

Basic astrophotography setup

Moon photography

The camera and telescope used to capture a total lunar eclipse. Canon EOS 70D and Explore Scientific ED80. 

Using a DSLR and Telescope

A DSLR camera (or mirrorless camera) and telescope can provide an up-close view of the eclipsed moon in detail. The prime focus method of astrophotography is best, as the camera sensor’s focal plane is aligned with the telescope. You can directly attach a DSLR camera using a T-Ring adapter (see below) to utilize the telescope’s native focal length.

The prime focus method requires that the telescope tracks the apparent rotation of the night sky to avoid any movement in your shots. To learn more about the process and equipment involved in deep-sky astrophotography, have a look at a typical DSLR and telescope setup.

t-ring adapter

A DSLR camera and T-Ring Adapter attached to a telescope

If your goal is to capture an up-close view of the moon during the eclipse, there are many benefits to this technique. A small refractor telescope will have an adequate amount of focal length (magnification), offer precision focus, and have a stable base to attach to an equatorial telescope mount. 

With the camera connected to the telescope, experiment with different exposures and ISO settings in manual mode, using live-view to make sure you have not under/overexposed the image.

The shortest exposures will only be useful during the partial stages of the lunar eclipse, as the lunar eclipse is beginning and ending. This is a challenging phase of the event to capture in a single shot, as the shadows and highlights of the image are from one end of the spectrum to the other.

Remote shutter release cable

A remote shutter release cable will help to avoid camera shake in your image. 

When the moon enters totality, you will need to bump up your ISO, and/or your exposure length to reveal the disk of the moon as it becomes dimmer. Use a timer or external shutter release cable to avoid camera shake if possible.

Ideally, you’ll keep the ISO as low as possible for the least amount of noise. With an accurately polar-aligned tracking mount, exposures of 2-5 seconds will work great.

To record the lunar eclipse with a DSLR camera, no filters are necessary. A stock DSLR camera is best as the additional wavelengths available with a modified camera are unused in moon photography.

total lunar eclipse photo

Canon EOS 7D, Explore Scientific ED80 Refractor, Sky-Watcher HEQ5 Tracking Mount.

Without a tracking equatorial mount like the Sky-Watcher HEQ5, a 2.5-second exposure like the one above is impossible. Even 1-second of movement at this focal length will record a blurry image if the telescope or lens is not moving at the same speed as the moon.

The benefit of shooting a long exposure during the maximum eclipse (totality) is that you also record the starry sky behind the moon. To do this in a single exposure on a normal full moon is not possible as the dynamic range is too wide.

A dedicated one-shot-color astronomy camera is more than capable of taking a brilliant photo of the eclipse as well. The computer software used to control these devices have countless options to control the Gain and exposure settings of these cameras. 

For projects like this, I personally enjoy the freedom and simplicity of a DSLR. Camera settings such as ISO, exposure, and white balance can easily be changed on-the-fly as the eclipse is taking place.

Without A Tracking Mount

Since the moon is very bright, it is possible to take a fast exposure (1/500″ or faster) of the moon without tracking. You will still want to use an optical instrument such as a telescope or long lens, and without tracking, it will be tricky. 

Even at 10X magnification, the moon will slowly move across the eyepiece as you look at it through the telescope. This a subtle reminder that the earth is always spinning, and why astrophotography is so challenging overall. 

Thankfully, unlike dim deep-sky objects like nebulae and galaxies in the night sky, solar system subjects like the moon are incredibly bright. You can take an ultra-fast exposure of the moon through a telescope that is still sharp, without tracking. 

Many visual observers enjoy the affordability and performance of a Dobsonian Telescope like the one shown below. They are a fantastic choice for anyone interested in astronomy, and why I consider them to be the best telescope for beginners

Apertura AD8 Dobsonian Telescope


It is possible to produce a comparable close-up image using a digital camera or smartphone through the eyepiece of a non-tracking telescope such as a Dobsonian, using the eyepiece projection method. For the best results, use a smartphone adapter that allows you to secure your phone to the telescope.

Photographing a Lunar Eclipse with Your Phone

This type of astrophotography is often referred to as the eyepiece projection method. To do this, you’ll simply position your digital camera or smartphone into the eyepiece of the telescope. This method usually requires a fair amount of trial and error, but you may be quite surprised with your results.

An eyepiece smartphone adapter may help to steady your shot of the lunar eclipse. Although you’ll have much less control over exposure and record less detail, this technique can be used with a non-tracking telescope as a traditional Dobsonian telescope like the one pictured above, or a smaller tabletop model. 

The moon is one of the few subjects that are relatively easy to photograph with a non-tracking mount compared to deep-sky astrophotography. However, the transition phases of the eclipse can be difficult due to the changing lighting conditions and exposure levels.

I recommend capturing the lunar eclipse during its maximum phase if you’re using this method. You likely won’t be able to capture a well-exposed image using the camera’s auto-exposure mode. Experiment with your camera’s manual settings that allow for variations in shutter speed. 

I have had great results using the Celestron NexYZ smartphone adapter when photographing the moon. This model features a 3-axis design that allows me to line up the camera on my bulky Samsung S21 Ultra phone with the eyepiece. It clamps onto the eyepiece itself and is much more secure than models I have used in the past. 


smartphone adapter

Use a smartphone adapter to line up your camera lens and secure your phone. 

Camera Settings

Once you have secured your phone in the adapter, and the camera lens is lined up with the eyepiece, you can start experimenting with settings. To fully control the exposure, it is best to use manual mode (often called ‘pro’ mode) rather than the standard auto setting. 

Chances are, when you are pointing at the moon with your smartphone and telescope, it will appear very bright, and your camera will have trouble finding the correct exposure to show the lunar surface details. To fix this, adjust the basic camera settings like exposure length, ISO, and f-stop to properly expose the bright moon through the eyepiece. 

A shorter exposure time 1/500′ and a moderate ISO setting of 400 is a good place to start (see below). If the moon looks too bright or too dim using these settings, make small adjustments to the exposure time until it is well exposed to reveal the moon’s surface. 

Use manual focus mode to ensure that the moon is in critical focus, rather than relying on the autofocus capabilities of your phone camera. This can be tricky to get right, but keeping the camera steady via the smartphone adapter will make this a lot easier.

how to photograph the lunar eclipse with your phone

Capturing the lunar eclipse using the ‘pro’ mode on my smartphone. 

Using a Telephoto Camera Lens

If you don’t own a telescope, a telephoto camera lens with at least 300mm of focal length will work well. At longer focal lengths like the ones necessary for a close-up of the moon, you must use fast exposure to capture a sharp photo of the moon. This is because the Earth is spinning, so you’re essentially trying to photograph a moving target. 

The image below was captured using a Canon EOS 70D and a Canon EF 400mm F/5.6 Lens. 

partial eclipse phase

The final stages of the partial eclipse phase are challenging to photograph because there is a bright highlight on a small portion of the moon. For the photo below, the camera settings included an ISO setting of 6400 and a shutter speed of 1/8.

A tracking telescope or camera mount such as the iOptron SkyGuider Pro (pictured below) is recommended. An equatorial mount that is polar aligned with the rotational axis of the Earth will allow you to take longer exposures, and get more creative with your camera settings.

Owners of astronomical telescopes for astrophotography usually own an equatorial telescope mount, and this is an ideal configuration for moon photography. This allows the user to enter any celestial object into the hand controller, and the mount will automatically slew to that object once it has been properly star-aligned.

An iOptron SkyGuider Pro camera mount with a DSLR and 300mm Lens attached

The key to capturing details of the moon’s surface in your lunar eclipse photo is reach and exposure. By this, I mean that you need enough magnification to show the detailed craters of the moon’s surface, and a fast enough shutter speed to not blow out any of the highlights in your image. 

To do this, a precise exposure length must be used. One that preserves the data in your image while also bringing enough of the shadowed areas forward is ideal. For my photos, I found an ISO of 200 and an exposure of 1/200 to work quite well. This was enough to showcase a starry sky behind the eclipsed moon.

I use Adobe Photoshop to process all of my astrophotography images, including photos of the moon and our solar system. Adobe Camera Raw is a fantastic way to edit your images of the lunar eclipse because it gives you complete control over the highlights and color balance of your image. 

Adobe Photoshop

Adobe Camera Raw offers powerful tools to edit your photos of the Total Lunar Eclipse

Capturing a Lunar Eclipse Without a Telescope 

If you are simply using a point-and-shoot camera or a DSLR and lens on a stationary tripod, you can still take an amazing photo of the lunar eclipse. This is often a great way to capture the landscape and mood of the moment. The photo below was captured back in October 2014 using a Canon EOS 7D and an 18-200mm lens on a tripod.

This is a wide-angle shot captured at 18mm, while the inset image was captured at the lens’s maximum focal length of 200mm. A zoom lens is handy for photographing the moon at varying magnifications. 

Total Lunar Eclipse - Moon Photography

When capturing the lunar eclipse without a telescope, you’ll want as much manual control over the camera settings as possible. “Auto” mode, flash, and autofocus won’t work on a photo of the total lunar eclipse. Adjusting individual parameters such as exposure length and ISO is essential to properly expose the moon. 

Practice taking shots at night beforehand, so that you are ready when the eclipse happens. Ideally, find a location that includes some interesting foreground and background details to capture a dramatic scene on the night of the event. In the case of the lunar eclipse shown above, it took place in the early morning hours as the moon was setting. 

What is Happening During a Lunar Eclipse?

Do you understand why a lunar eclipse happens? There are two types of lunar eclipses: partial and total. As you know, the Earth orbits the sun, and the moon orbits the Earth. During a total lunar eclipse, the Earth is sitting directly between the sun and the moon.

Although the moon is covered in Earth’s shadow, some sunlight still reaches the moon. When the moon enters the central umbra shadow of the Earth, it turns red and dim. This distinctive “blood” color is due to the fact that the sunlight is passing through Earth’s atmosphere to light up the disk of the moon. 

What is a lunar eclipse?

A diagram of what happens during a total lunar eclipse – NASA

Unlike a solar eclipse, observing a total lunar eclipse is completely safe to do with the naked eye. This natural phenomenon can be enjoyed without the aid of any optical instruments, although binoculars can really help to get an up-close view of the action.

camera settings for lunar eclipse

Camera settings used for my lunar eclipse photo

This article was originally posted in January 2019, and updated on November 4th, 2022. 

Related Posts:

Related Posts

Share This

Related Tags

[ad_2]

Astrophotographer to give tips on night sky pics

[ad_1]

The Andromeda Galaxy as captured by award winning astrophotographer James Cahill.
JEC ASTROPHOTOGRAPHY PHOTO

MOUNT DESERT — Astrophotography is no longer limited to NASA and other organizations with big telescopes. Recent improvements in technology have enabled more amateurs to take amazing photographs of the night sky, from near objects such as the moon and the planets, to galaxies, nebulae and other objects in outer space.  

On Tuesday, Nov. 8 at 6:30 p.m., the MDI Photo Club will be hosting a Zoom talk by award-winning amateur astrophotographer James Cahill. The public is welcome to join the presentation in which Cahill will share the equipment and techniques needed for night sky photography and show some of his stunning deep space photographs.   

Cahill is an IT specialist by day and amateur astronomer and astrophotographer at night. His work is shot primarily in Bucks County, Pa., but he also visits dark sky areas in Maine, Pennsylvania and other states on the East Coast. His work in astrophotography ranges from capturing nearby solar system objects to deep sky objects and wide field shots of the Milky Way.  

Cahill started with a webcam, imaging the moon and other planets. After that, he was hooked, adding equipment to start taking pictures of objects farther away like nebulae, galaxies and star clusters. Pairing a digital camera and using the telescope as a “lens” has enabled him to take pictures of what has always been his passion –the night sky.  

Cahill recently received the patron’s award for the 2020 Phillips Mill Photography Exhibition, in New Hope, Pa. His astrophotography can be viewed on Instagram @jec_astrophotography. 

Non-members of the MDI Photo Club who are interested in attending this presentation should send an email to [email protected] to receive the Zoom link. 

[ad_2]

Ladybug Glass Celebrates Second Anniversary

[ad_1]

To celebrate its second anniversary in Algoma, Ladybug Glass Studio & Gallery is featuring new glass and photography pieces by Kimberly Lyon. An opening reception will be held during First Friday Art in Algoma on Nov. 4, 5-8 pm, and it will continue Nov. 5, 10 am – 4 pm. The gallery will also have some specials to kick off its third year. 

Work by Kimberly Lyon.

Lyon works in fused and stained glass and has developed a distinctive photographic style by using a macro lens to explore some of her glass creations. The resulting abstract photographs are mostly printed on metal to enrich the colors and brightness, and fabrics created from the photos are turned into table linens, scarves and bags. 

In addition to Lyon’s work, Ladybug Gallery sells astrophotography, jewelry, paintings and textile arts created by local artists, and it typically highlights the work of a guest artist.

[ad_2]

The Goldfield Colorado Star Mine – David Lane Astrophotography

[ad_1]

Victor Colorado Star Mine

Victor Colorado Star Mine

The Victor/Goldfield Colorado Star Mine

Jimmy and I were headed home from out west after 9 days of shooting images. In case you have missed it I really find mining and specifically the buildings and mechanisms to bore holes miles into the ground extremely interesting.

I managed to find this little area with a really cool walking trail through half collapsed building remnants, and just a bit away from the scattered lights of Goldfield a very small town of maybe 20 houses. This area was also behind the hill on the right from Victor Colorado (far right glow.) This was the second to last shot of the night. The first two had happened with a very tiny sliver of a moon still visible on the horizon. By now the moon had slipped behind the hill to the west and a dark night calm night awaited introspection.

If you look really carefully in the center you can see a peek-a-boo shot of Jimmy (my loyal GMC Jimmy) just showing. If you had x-ray eyes you could see not only the fence in front of Jimmy but the KEEP OUT sign as well. Sometimes you just have to do what you have to do to please your Astro-friends!

I was really pleased with how the Milky Way turned out considering that Colorado Springs just to the left edge of the image and distant Pueblo was to the right. Recovering the highlights in this image not only required an excellent Light Pollution Filter but also a lot of astro manipulation to deal with it.

For those that find such things interesting, the two headframes are the Grace Greenwood headframe (left) and the Deadwood headframe (center.) Both were moved here in 2012-2013 by the Cripple Creek & Victor Gold mining company in an effort to preserve the mining heritage of the area.

The Grace Greenwood mine was owned by the Anaconda Mining Company. The development of the mine was begun in1902-03. The company owned 100 acres of land with several mines operated by lessees. Some of the mines included the Half Moon and Kittie M. The Greenwood mine lasted over half a century closing for good in 1959.

The Grace Greenwood gallows frame and hoist house were placed here on the reclaimed Altman Backfill above the Vindicator Valley near the town of Goldfield.

The Deadwood Mine was a quite minor mine but its beautiful headframe remains as a testament to the intense effort to blast through solid rock.

If you ever get the chance to visit Victor Colorado “The City of Mines” it is way worth it. It is amazing how much mining took place here. You can also stop by Cripple Creek as well but in my mind, Victor is the place to wander about and see a virtually untouched original 1900s mining town.

Wandering around these ruined buildings at night was so interesting. The connection to miners and times lost was real and visceral. The hulking buildings forming black silhouettes against the sky whispering their souls to the winds, atop an 11,000-foot mountain for decade after decade alone, awaiting their ultimate fate.

Please Like Comment and Enjoy! This one was tough but I hope you enjoy it.

EXIF: 35 images clipped left for light pollution and a pile of rocks. 55mm f1.6 ISO 8,000 


[ad_2]

Save process settings in PixInsight

[ad_1]


For a lot of processes in PixInsight you’ll have some basic values for the settings you want to use or at least start with, every time. But how do you remember these values? If you are anything like me you’ve written them down somewhere, or stored a bookmark to some article that discusses certain values. Every time you use the process you need to look up these values. Wouldn’t it be great if you could store these values somewhere in PixInsight?
Well, you can!

Saving process icons

To store a process along with its settings you can simply drag the triangle icon out to the workspace and it will store a copy of the process along with the settings. You can right click on this icon to choose to set the name of the Icon (icon identifier). You can also right click and save this icon. It will save as a .xpsm file which you can load and use at any time in the future.
You can also save multiple processes at once so you can store a basic workflow or all processes you use frequently.
Go to Process->Process icons->Save Process Icons to store all process icons currently present in your workspace. Likewise you can go here and pick ‘Load Process Icons’ to load them up in the future.

Basic DSLR Workflow processes

A great way to have a reminder of the steps you need/want to take in your processing is to store the process icons for each step in your workflow.
I’ve done this for the DSLR workflow and made it available for all to download and use. Simply click the download below and load it via Process->Process icons->Load Process Icons.
Download process icons for Basic DSLR workflow


It will have the process icons for each step and some process icons for assisting processes like Starmask, PixelMath and Rangemask.
Tweak and adjust to your own liking and add/remove processes and save it so you have your own workflow available step by step within PixInsight.


[ad_2]

Lámina de flats eXcalibur lite de Rbfocus

[ad_1]

Obtener buenos flats es imprescindible para conseguir una calibración correcta de nuestras imágenes astronómicas y tras haber comprado y y probado recientemente la lámina de flats eXcalibur lite ya podemos darte nuestra opinión sobre este producto de la marca Rbfocus.

Anteriormente estábamos usando para hacer los flats una lámina de calco de dibujo alimentada por USB que consiste en un panel electroiluminado y que hasta ahora nos había dado buenos resultados, o eso creíamos. Lo cierto es que el panel funcionaba muy bien con nuestra cámara réflex pero con la más sensible ASI1600MM en ocasiones nos encontrábamos con el problema de que N.I.N.A nos decía que el flat resultante era demasiado brillante. La solución económica por la que optamos fue poner láminas de metacrilato translúcido hasta conseguir reducir el brillo de la pantalla hasta una medida que consideramos «aceptable».

El problema de los avisos en NINA desapareció pero a la hora de calibrar las imágenes empezamos a encontrarnos con muchos problemas y resultados desconcertantes sobre todo en el canal azul. Tras investigar un poco parece que el problema que nos afectaba era que cuando la ASI1600MM hace tomas muy cortas (inferiores a 5 segundos) induce mucho ruido por el modo de configuración de la cámara. Necesitábamos un panel de flats que brillara mucho menos que nuestra lámina para poder alargar las exposiciones y eso nos llevó a conocer la eXcalibur lite.

Una magnífica lámina de flats

lámina de flats excalibur lite frontal
La lámina de flats eXcalibur Lite es ligera y robusta

En el mercado astronómico tenemos varios fabricantes de láminas de flats pero RBfocus nos atrajo mucho por lo bien trabajado de sus productos y porque son desarrollos hechos por un apasionado de la astronomía como es Reinaldo. Sus productos mezclan el cuidado y la sabiduría de un trabajo artesanal con la precisión industrial necesaria en estos productos y todo ello a un precio muy razonable.

Esta lámina de flats permite ajustar el brillo de manera variable y además se puede controlar desde los programas de captura como N.I.N.A. ya que es compatible con el protocolo ASCOM Cover Calibration y con INDI.

La conexión con el pc puede hacerse a través de cable USB o de modo inalámbrico por Bluetooth.

La lámina es ligera ya que está hecha con fibra de carbono, aluminio y plástico pero a su vez es robusta. Requiere alimentación a 12V que en mi caso es proporcionada por el dispositivo Astrolink mediante un conector jack (RBfocus también desarrolla sus propias power box de uso astronómico).

eXcalibur lite se quita y pone manualmente en el telescopio pero podemos optar por dejar la solución de manera fija en el tubo y accionarla automáticamente en la versión normal que incluye un brazo con servomotor.

Prueba y opinión sobre eXcalibur lite

Hemos podido usar el eXcalibur lite durante los últimos meses y nos ha dado muy buen resultado. Gracias a su pequeño tamaño lo llevamos en la propia caja del telescopio y configurarlo nos llevó tan solo un rato durante una tarde para calcular los valores recomendables en N.I.N.A en base a nuestra cámara y el tren óptico.

Panel de flats en N.I.N.A
Configuración del asistente de flats en N.I.N.A. totalmente compatible con eXcalibur lite.

Ahora el proceso de adquisición de flats es más sencillo y aunque nos lleva más tiempo porque estamos haciendo flats de 5 segundos en vez de fracciones de segundo como antes, la diferencia en cuanto a calidad se nota y mucho. En definitiva estamos muy contentos con esta lámina y la recomendamos sin dudarlo.

Quizá piensas que estás haciendo bien tus flats con tu lámina casera como lo pensábamos antes nosotros. Tal vez crees que tus imágenes están bien calibradas pero, créenos, si no lo están estás desaprovechando mucha información en tus imágenes astronómicas y no estás obteniendo los mejores resultados. Que pena con ese telescopio y esa cámara tan buena que tienes…

[ad_2]

SETI & Milky Way Galaxy

[ad_1]

For you who might’ve not been aware, Milky Way is the name of our very own galaxy where our solar system and subsequently ourselves live within. It is our galactic home filled by a vast amounts of stars, interstellar dust, energy, old star clusters, black holes, our very own supermassive black hole in the center and other wonders. Our very own star, the sun is a modest little star in comparison to other giants out there.

Every single star that appears in the night sky is our neighbor that belongs to our immediate galactic neighborhood. When we look at the night sky from the northern hemisphere we tend to look towards the outer regions of our galaxy, and when we move to our southern hemisphere we look inwards towards our galactic center. It makes sense then that the night sky is rich in stars in the southern hemisphere as everything is more dense. We can’t see individual stars that belong to other neighboring galaxies. Everything starts to become fuzzy and dim; occasionally we might see a big supernova (a star that dies) in a massive explosion, but that’s pretty much it. Without powerful telescopes we can’t distinguish these stars.

Below is a map of our Milky Way galaxy (made by SETI) that is mapping the most interesting regions of our galaxy from our perspective (solar system).

SETI stands for Search for Extra Terrestrial Intelligence. It is a branch in the astronomy science that pursues the question; are we truly alone in this galaxy, how about other neighboring star systems and their planets? And even more importantly, what about intelligent life and how could we communicate with them? Or should we avoid communicating with anyone at all, in the event these extra terrestrial civilizations are hostile, just like the warrior like beings Clingon from Star Trek? These and many more questions and studies and powerful telescopes is what SETI is all about.

Some of you might even remember the SETI @ Home program where you could download an app at your computer and help SETI scientists analyze recorded data from their radio telescopes.

In any case, the map above is intriguing and a reminder to us, there are much bigger things and questions to be answered by humanity, if we ever decide to stay around long enough to deal with them. After all, our very existence as a human race in a cosmological standpoint, is insignificantly small. We’ve barely been around for a fraction of a second in this enormous vastness of the cosmos.

[ad_2]