
[ad_1]
PixInsight has many keyboard short cuts build in right from the start (you can find an overview of them here.), some very useful while others won’t get used at all probably. One thing that bothered me though is that I can’t start processes using keyboard short cuts so I decided to look for a way around this. Luckily there is this great open source program called AutoHotkey that will let you define your own keyboard shortcuts and basically have them do anything you like. Even better; you can also program mouse buttons and movements!
Using AutoHotkey
You can download AutoHotkey for free here. As far as I’m aware, this only works on Windows at the moment. AutoHotkey will work with so called scripts, in which you can program the keystrokes or mouse behaviour it needs to react on and define what the program will need to do once it detected the particular keystroke(s).
This scripting can seem a bit complicated from the start, but there is a lot of great documentation and examples available. I’ll post some example code specificaly for PixInsight further down in this post.
Now let’s run briefly through the required steps to use AutoHotkey to add custom keyboard shortcuts to PixInsight:
- Download and install AutoHotkey
- Add AutoHotkey to Startup
- Create a script
- Right-Click on your desktop.
- Find “New” in the menu.
- Click “AutoHotkey Script” inside the “New” menu.
- Give the script a new name. Note: It must end with a .ahk extension. Ex. MyScript.ahk
- Find the newly created file on your desktop and Right-Click it.
- Click “Edit Script”.
- A window should have popped up, probably Notepad.
- Special keys and their symbols
- Add a custom shortcut for an existing keyboard shortcut in PixInsight
- Save the script and run it
Download AutoHotkey here and simply run the installer
It will be really convenient for AutoHotkey to always run in the background, so add it to Startup
Now it’s time to start creating a script for AutoHotkey;
Now we can start editing the file to create some shortcuts for PixInsight.
First we need to be aware of the symbols we’ll need to use to define certain keys like Alt, Ctrl and Shift. AutoHotkey uses the following symbols for the keys:
| Symbol | Key |
|---|---|
| # | Win (Windows key) |
| ! | Alt |
| ^ | Ctrl |
| + | Shift |
| Use the left key of the pair. e.g. | |
| > | Use the right key of the pair. i.e. >+a = right Shift + a |
Let’s start really easy and simply use another keyboard shortcut to toggle the ScreenTransferFunction. The default shortcut for this is F12, which I don’t find convenient for frequent use. Let’s say we want to use Alt+S instead. We can do this with this simple line of code:!s::send, {F12}
Save the file and double click it on your desktop to run it. Now open up PixInsight and open an image on which you can test the ScreenTransferFunction Toggle. Hit Alt+S to toggle the ScreenTransferFunction!
Now you have your first script succesfully working, let’s dive in a bit deeper and use the PixInsight Console to open up Processes
Open up Processes with keyboard shortcuts
Most people probably won’t know this, but the PixInsight console is more than just a monitor for processes to output to and which you can keep an eye on to see what’s going on when you execute processes. It is also a really extensive input console which you can use to do really a lot of (complicated) stuff. This is very useful in this case because it is the console we will use to fire up Processes instead of mimicking mouse movements and menu clicks which are far less reliable. Luckily there is even a keyboard short cut to open up the Console in PixInsight, so scripting a custom keyboard shortcut in AutoHotkey for PixInsight is remarkably easy!
Basically we need to do 6 things when we want to open up a process;
- Define the keyboard shortcut that needs to trigger the opening of the process.
- Open the Console
- Wait for the Console window to open
- Type in the name of the process we want to open
- Hit Enter
- Tell AutoHotkey we are done with the actions for this particular shortcut
Let’s open up the ScreenTransferFunction with Ctrl+Alt+Shift+S. We can do this by starting the script with ^!+s::
Note: Please be aware of existing keyboard short cuts like Ctrl+S to save a file, and avoid using those.
We can open the console with ^!c
We can’t start typing right away, we’ll need to wait till the window is opened. This can be done by using the sleep command and specifying the time in miliseconds that AutoHotkey needs to wait. sleep, 600 is what I use to make sure PixInsight has opened up the Console window.
We can simply send keystrokes to mimick typing. To open up the interface window of a process from the console, all we have to do is add ‘–interface’ to the name of the process.
To mimic hitting enter we can simply add; {enter}
If we use only one line of code like before, we don’t need to specify the end of the script and we can simply begin a new shortcut on a new line in the file. If we use multiple actions like we are doing now, we need to tell AutoHotkey when this collection of actions end so that we can start up a new shortcut after it.
We do this by simply adding “Return”
If we combine this we’ll get the following code:
^!+s::
send, ^!c
sleep, 600
send, ScreenTransferFunction --interface {enter}
Return
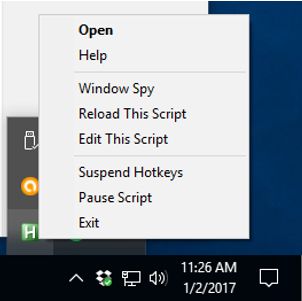
Now save the file and right-click the AutoHotkey icon in the Taskbar and Reload the script.
Go to PixInsight and try it out!
Add more keyboard shortcuts in the same script file
You can just continu adding more shortcuts by placing the code for new keyboard shortcuts after the previous ones. We’ve seen two examples already, now let’s just add a third one to open another Process interface; Windows key + S for Starmask.
#s::
send, ^!c
sleep, 600
send, StarMask --interface {enter}
Return
It is usefull to add comments in the script file, so you can keep track of what everything means. You can do this by starting a line with “;”.
If we combine all three examples and add comments, our script file will look like this:
;ScreenTransferFunction - Toggle
!s::send, {F12}
;ScreenTransferFunction – Interface
^!+s::
send, ^!c
sleep, 600
send, ScreenTransferFunction –interface {enter}
Return
;Open StarMask interface
#s::
send, ^!c
sleep, 600
send, StarMask –interface {enter}
Return
Limit the keyboard shortcuts to only work in PixInsight
It is very useful to limit the keyboard shortcuts to only work in PixInsight. This enables you to use the same keyboard shortcuts again in other programs for instance.
You can do this by simply using the #ifWinActive statement with the title of the window. So in our case we’ll be adding the following to your script: #ifWinActive PixInsight 1.8 and place the keyboard shortcuts for PI between {}
So if we add this, now our script file looks like this:
#ifWinActive PixInsight 1.8
{
;ScreenTransferFunction - Toggle
!s::send, {F12}
;ScreenTransferFunction – Interface
^!+s::
send, ^!c
sleep, 600
send, ScreenTransferFunction –interface {enter}
Return
;Open StarMask interface
#s::
send, ^!c
sleep, 600
send, StarMask –interface {enter}
Return
}
Add more commands
In addition to opening up the process windows, you can also execute them with certain settings and do a lot more using the Console in PixInsight.
Just type in –help in addition to the process name to see all the things you can do in the Console with that particular process.
Please let us know in the comments below if you have any good ideas for more keyboard shortcuts!

[ad_2]
Source link