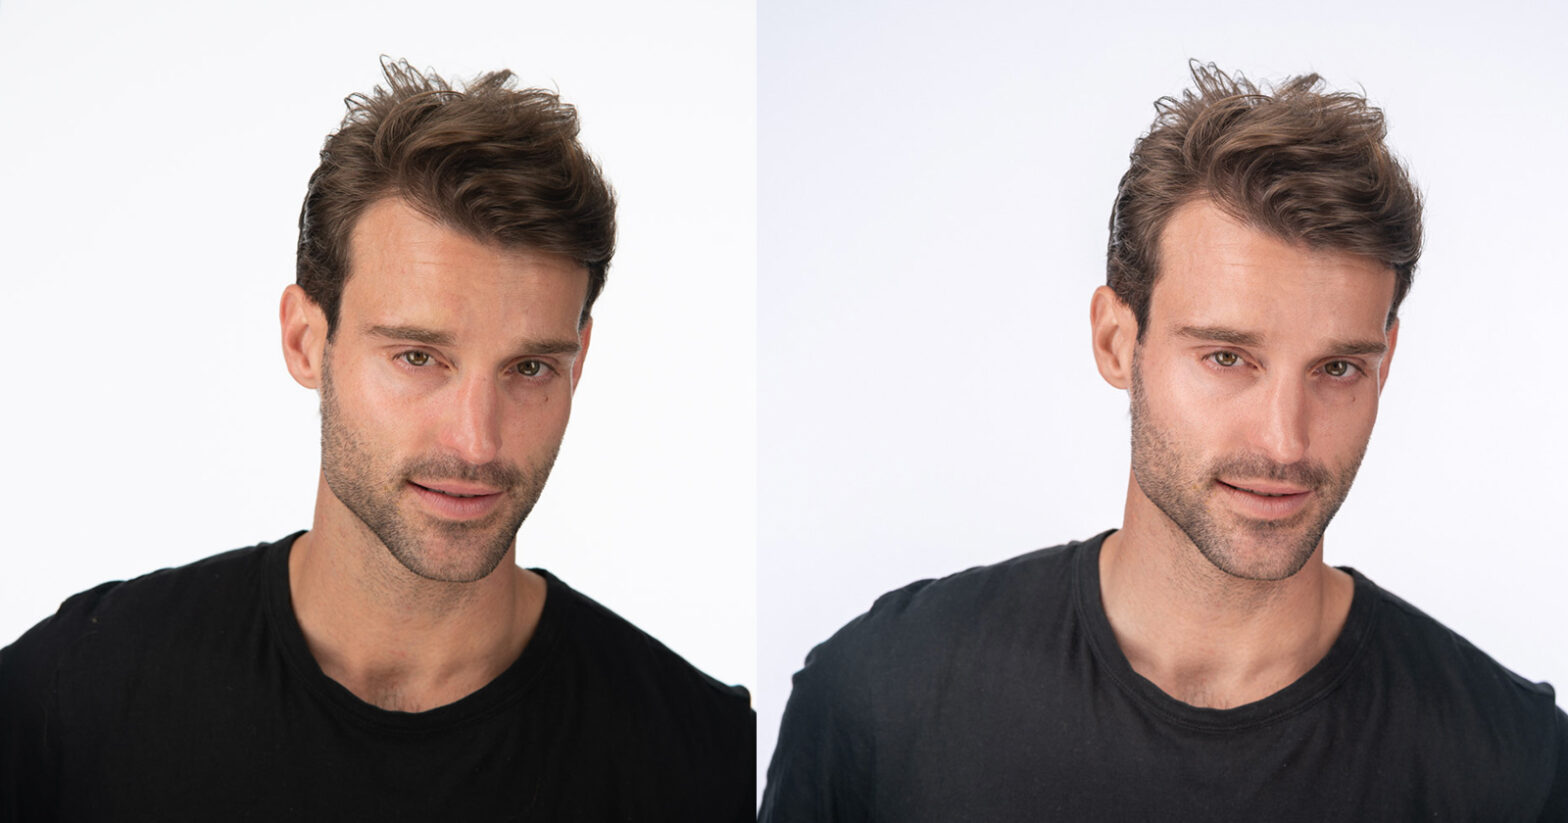
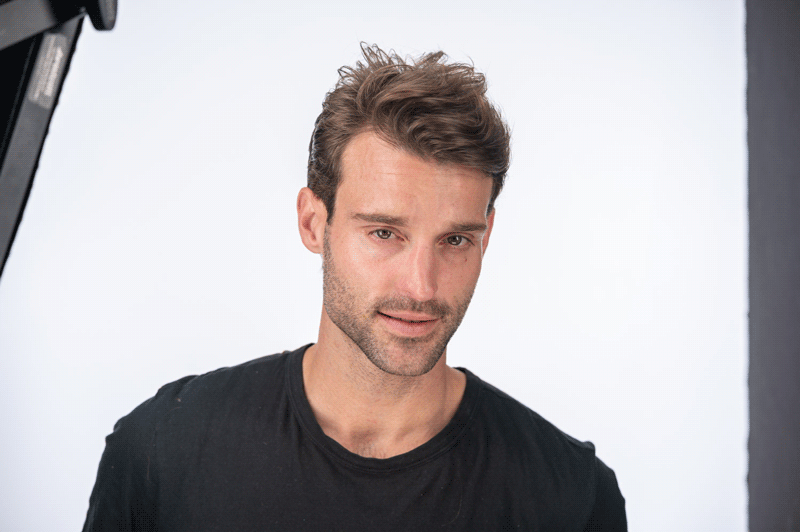
Portrait retouching can get overwhelming sometimes with the steps you need to take to make your shots look absolutely perfect. Maybe these steps aren’t that hard, but they can definitely be very time-consuming, so finding any way to speed this process up to make better and more efficient use of your time is a high priority for every photographer. Using Luminar Neo to tackle these steps can make retouching a breeze using just a few tools and leveraging some of the Artificial Intelligence (AI) built into the application.
Full disclosure: This article was brought to you by Skylum, the software company behind Luminar NEO.
Luminar Neo is a surprisingly diverse and versatile application that can help photographers do incredibly advanced work from everything including star trails and astrophotography to composite work, breathtaking landscapes, and incredible portraits. Taking advantage of the advanced retouching tools within Luminar Neo can help editors speed up their work, as well as take a lot of the tedium out of the process. Users can leverage a powerful “slider” based editing system for a large portion of the work that would normally require detailed and pin-point pen/mouse work to complete.
The Essentials
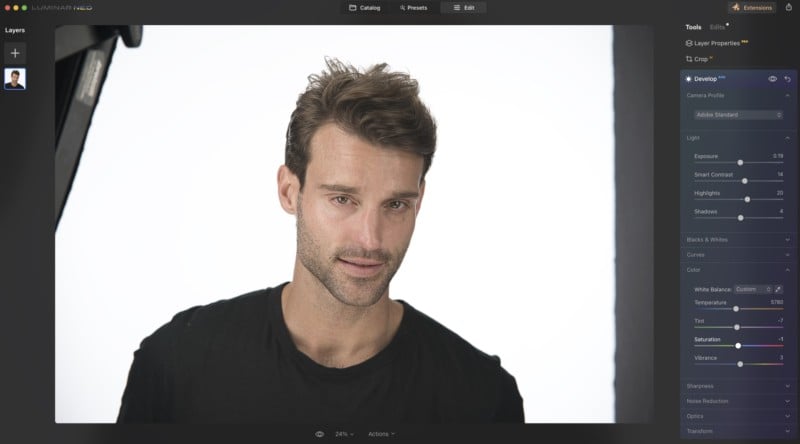
The first thing to do is bring your images into the catalog of Luminar Neo either by importing or simply adding an existing folder on your computer into the system. Once the folder and images have been added to the catalog, select an image from the batch you want to edit and either start with a preset (if you choose), or just jump directly into the EDIT tab and start manually adjusting the image to meet your needs starting with the “essentials” section.
It might actually be best to start with using the Structure and Enhance AI tools to start as these tools will help users automatically make adjustments to the highlights, shadows, contrast, tone, saturation, and exposure of the image for you. The powerful AI tools within Luminar will analyze the image and make some of the basic and most fundamental decisions in your image edits for you here, making it easily the smartest way to start editing your image. For these edits, we kept things a little more natural, using the Accent AI set to about 22 (out of 100) with an even smaller bump in the Structure AI slider (about 8).
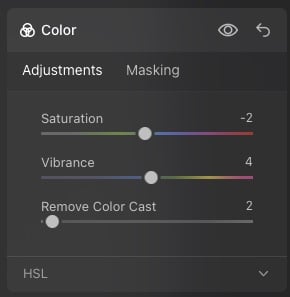
After starting with the AI tools, the next step is to open the Develop section where users will find most of the tools they are familiar with from other editors like adjustments to highlights, shadows, contrast, exposure, white balance, lens optics corrections, and even sharpening and noise reduction. These will apply globally to the image and are a great place to start to get the photograph looking the way you want after using the AI tools. For me, I just boosted the shadows a little to get a little more light on the dark areas of my image, and added a little more contrast with a quick tweak to the white balance to even things out. Finally, from the COLOR tool, since this is a headshot, I lowered the saturation about -2 and bumped the vibrance by about +4 while removing the Color Cast by about two points. While subtle, this helped me dial back the red/orange tones in the skin slightly without having to go in and manually make adjustments to each Hue/Saturation slider.
(Obviously this doesn’t apply to my current photograph, but with outdoor portraits or maybe if my lens/sensor was dirty and had some dust spots on it, this would also be a good time to use the ERASE tool to automatically remove the dust spots and power lines from the image.)
Improving Skin Tone And More With AI
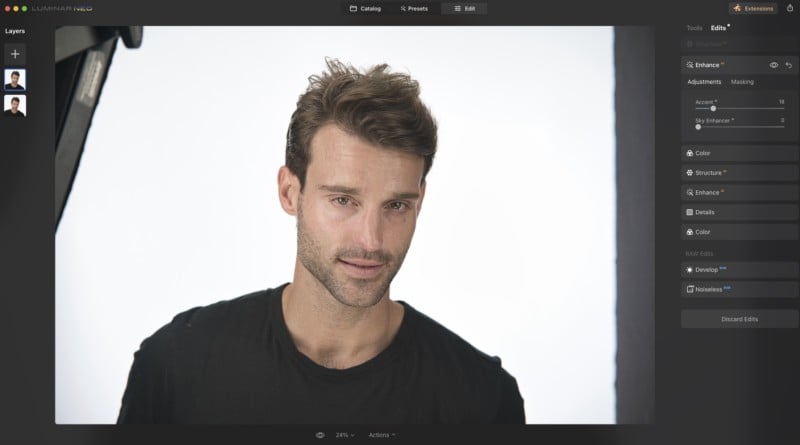
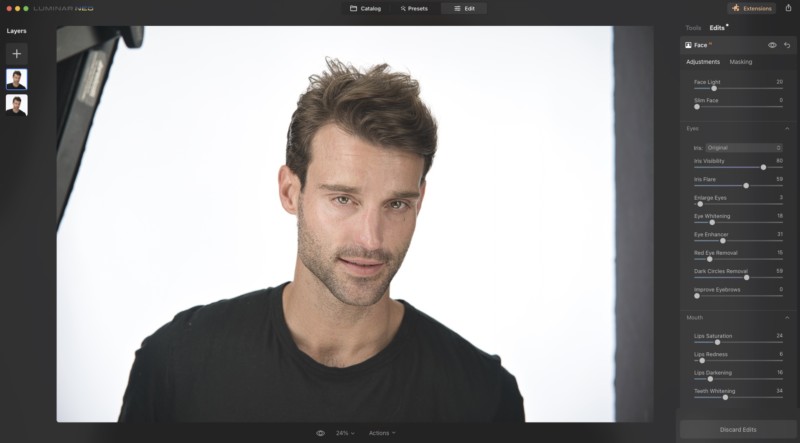
Now we get into the more portrait-specific tools like the Face AI and Skin AI tools to help correct skin tones, remove shine, adjust the lighting specific to the face, and even reshape the face and body if that is needed or requested by the clients. In this particular instance, since we’re working with a bearded male model who has pretty good skin to begin with, we don’t need to go too heavy on the Skin and Face AI tools.
To help save time from dodge & burning and frequency separation/color adjustments, I simply bumped the Skin adjustments by about 10 on the slider to even the tones out while keeping the skin texture very natural (aka rugged) but bumped the Shine Removal up to 35 since I didn’t want the highlights on his face for this particular look.
Since this is an actor headshot, the next adjustments were with the Face AI tool where we bumped the Face Light up slightly, made the eyes pop while removing the “red eye/vessels” slightly, and significantly reduced the dark circles (a task normally tacked through manually dodge and burn in Photoshop, but was a simple 3-second adjustment with Neo).
This effectively wraps up the “basic” edits for the headshots taking us from raw to a very refined image, which the edits can be saved as a preset and applied to the rest of your session which I’ll explain in more detail a little further below.
Applying Edits to the Entire Session
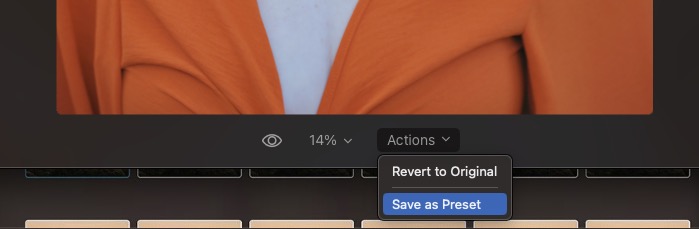
After you have made the adjustments you want to the brightness, skin tones, colors, and more, you can even save these adjustments as your own custom preset by clicking Actions and clicking SAVE AS PRESET which is located at the bottom of the Edit screen below the image you will be working on. Just be sure to name it properly as you cannot make changes to it once it has been saved. The good news is there is no limit to the number of user presets that can be manually created for the app, meaning you can create custom edits for pretty much every conceivable setting.
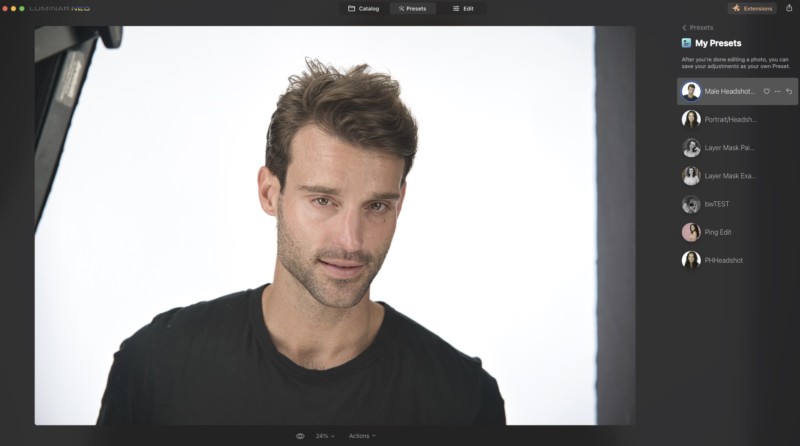
From here, if you have multiple headshots you need to edit, you can save some time by taking this preset and applying it to the rest of the images from your session, making it easier when culling to choose which images you want to continue working on, and obviously save a lot of time and steps by already having the “Basics” of your editing session done and applied to all of the photos.
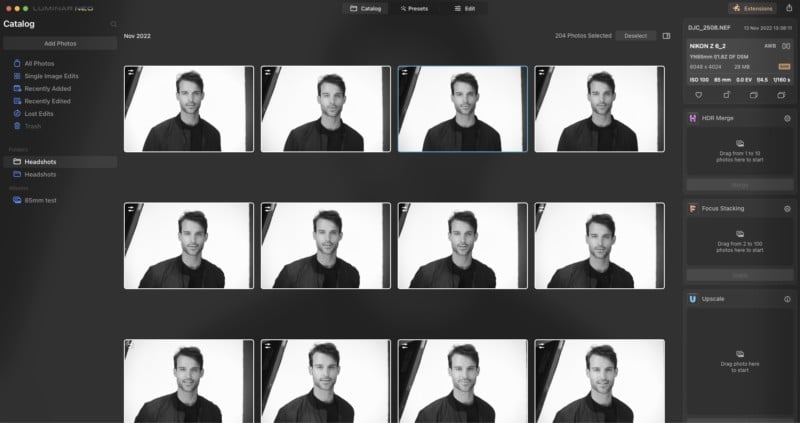
You can apply this preset, or the adjustments as a whole, by viewing the session from the Catalog view in Luminar Neo, copying the adjustments from the image you are working on, selecting the rest of the session, and selecting Sync or Paste adjustments (from the right click dropdown menu) to the rest of the images.
Depending on the number of images and complexity of the edits you have made, this process could take a few minutes depending on the speed of your computer, once it completes you will notice that all of the thumbnails have updated to reflect the changes made to the batch.
Cleaning Up and Finalizing The Shot
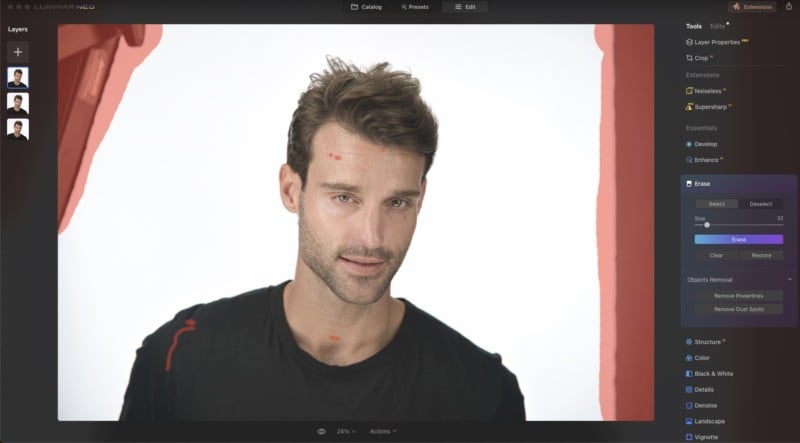
Now that we’ve applied the base edits to the session as a whole, it’s time to work on the fine details of the individual images you want to edit and finalize. The first thing we need to do in this headshot is clean up the cluttered background. We do this by simply selecting the ERASER tool from the essentials section. This kind of acts like a real-life magic-eraser (aka content aware) where we’ll mask over the objects in the image we want removed. In this case, it’s the edge of the v-flat and lights in the corners of the shot we want taken out.
Just click “Erase” after the selections have been made, this can include fixing “blemishes” and even fabric and hairs on clothing if needed to have the system remove those problems and distractions from your image.
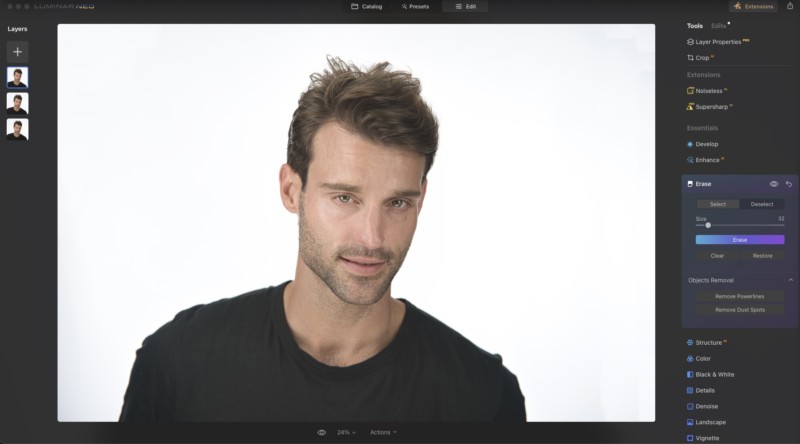
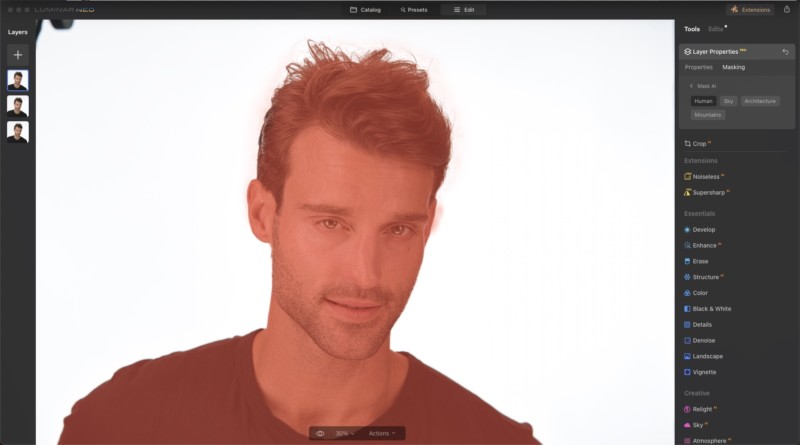
In just seconds, the erase tool will remove unwanted elements from your image, including skin blemishes leaving you with a near-perfect shot with just minor details left to adjust. In the portrait and headshot scenario, users will often have some stray hairs they need to have cleaned up. To do this, you can either spend some time doing additional micro-erase tool work, or you can use the “Mask AI” tool found in the Structure tool and select “human” to show the resulting mask it created.
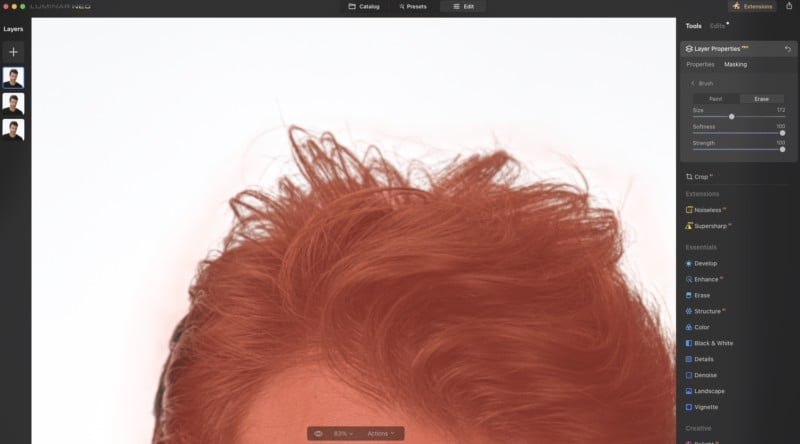
Sometimes the mask isn’t 100% perfect, but it’s rather easy to clean up simply by backing out of the MaskAI and selecting the BRUSH tool and “SHOW” to ensure we can see the mask. Then just simply add or remove sections of the mask to make sure it’s covering exactly the area you want for your next steps of the edit. Using the mask tool here can allow us to eliminate any stray fly hairs we don’t want in the image by removing them from our “human mask” and then clicking INVERT on the mask actions and pulling the structure details down. Since we have a solid and clean background, this is a very easy way to deal with stray/fly hairs in the image, leaving you with a clean, crisp headshot at the end.
All that’s left to do is to export the final edit in the format of your choice and that’s it, you’ve edited a portrait from start to finish using Luminar Neo and its advanced AI tools.
Full disclosure: This article was brought to you by Skylum, the software company behind Luminar NEO.
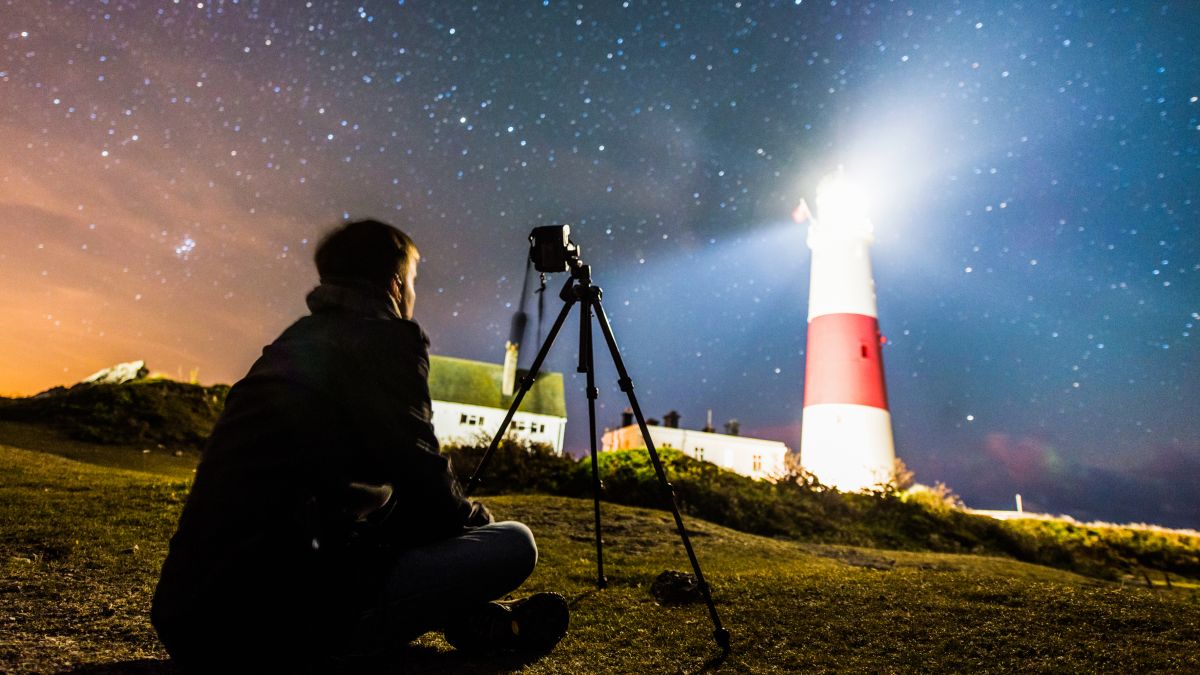
The Geminid meteor shower has already started appearing in the night sky. It occurs between November 19 to December 24, 2022, but will peak on the nights of December 13 and 14, 2022, where you could see up to 150 an hour.
With the right astrophotography tools (opens in new tab) it’s possible to photograph shooting stars on any night of the year. But meteor showers like the Geminid bring lots of opportunities for stunning night sky photography (opens in new tab). Keep your camera ready if you want to catch a glimpse of this stunning shooting star display, and read our tips below to get the best meteor shots.
We’ve mentioned that the Geminid meteor shower will start in the next week, but what exactly is the shower, and when is the best time to photograph it?
What is the Geminid meteor shower?
A meteor or ‘shooting star’ is essentially just dust. Earth’s orbit of the Sun often takes it through stacks of debris left in the solar system by comets and asteroids. Mostly it’s just dust particles – no bigger than grains of sand – that Earth’s atmosphere slams into. As it does, these particles energize briefly and become disintegrating meteors.
Royal Museums Greenwich (opens in new tab) shares that, apart from the Quadrantids, the Geminids are the only major meteor showers not originating from a comet. As Space.com explains (opens in new tab), “the Geminids are the product of an asteroid. The reliable shower produces bright meteors associated with the asteroid Phaethon, a strange blue rock that acts like a comet.”
Although the Geminids are thought to be getting brighter each year, this year they’ll have to compete against interference from bright moonlight, which could make them harder to see and photograph.
(Image credit: Skarie20)
When is the Geminid meteor shower?
As mentioned already, the Geminid meteor shower has already started appearing in the night sky. It is generally a reliable annual shower, and in 2022, it will peak on the nights of December 13 and 14.
How to photograph the Geminid meteor shower
A meteor shower typically only lasts a split-second – though occasionally as long as a second – as it streaks across the night sky. That doesn’t give you enough time to react to it, so your camera’s shutter needs to be already open, ready, and waiting for the light from a shooting star to hit its image sensor. That means you’ll need to use long exposures of up to 30 seconds or beyond.
If you’ve never done any after-dark shooting before, you might like to start by reading out beginner’s guide to photographing the night sky (opens in new tab).
The right location
In terms of location, picking a site with little light pollution is important because you’re going to be opening the shutter for at least 25 seconds, so a lot of light is going to get in. This interactive world light pollution map (opens in new tab) and the Dark Site Finder (opens in new tab) are both very useful for scouting a good location away from the bright lights of urban areas. However, if you can’t travel outside a city, you can still try to photograph shooting stars. Find somewhere where no streetlights are going to interfere with your composition, and get your camera into the shadow of a building.
• Read more: How to capture star trails
Although the darkest skies are between midnight and dawn, the radiant of the Perseids – the constellation of Perseus – is ‘up’ right after dark in the northern hemisphere, so you can start looking for shooting stars right away. Or, while you wait for the night skies to darken, you could try to capture a beautiful crescent moon just above the southwestern horizon before it leaves the sky.
The right gear
You’ll need a DSLR or mirrorless camera to capture meteors (Image credit: Canon)
(opens in new tab)
Our best astrophotography tools (opens in new tab) buying guide has you covered for all the gear you’ll need to photograph the Geminid meteor shower this year. However, here’s a quick overview for the key kit you’ll need…
Full-frame camera
You can use any DSLR (opens in new tab) or mirrorless camera (opens in new tab) as long as it has a manual mode, and you can shoot long exposure images for at least 30 seconds. However, one of the best full-frame cameras (opens in new tab) is the best option because it will capture more light and feature less image noise when used at high ISOs.
Wide-angle lens
Since you want to capture as much of the night sky as possible to maximize your chance of capturing shooting stars, a wide-angle lens is best. The best lenses for astrophotography (opens in new tab) have an effective focal length of between 10mm and 28mm.
Tripod
Keeping your camera steady is an absolute must for long exposures, so you’ll need the best tripod (opens in new tab) you can get. If it’s windy, don’t use the tripod’s extension arm. Check that the horizon is level before taking a shot.
Other gear
A shutter release cable (opens in new tab) that can be locked, or an intervalometer or remote control, will be helpful for taking repeated long exposures without having to manually depress the shutter button every 25 seconds.
The right composition
Although it’s tempting to point your camera at the radiant, meteors can just as easily appear anywhere in the sky.
By pointing at the radiant you’ll likely miss as many meteors as you’ll catch, so it’s better to get something interesting in the foreground – perhaps an old barn, a tree, or a sculpture – in your composition to add interest. That way you’ll have a beautiful landscape photo that will hopefully feature a shooting star or two.
Taking the shot
With your lens’s focus set to infinity, and its aperture to around f/2.8 (or as open as possible), choose ISO 800 or ISO 1600 (or even higher if you’re in a really dark sky site) and fix the shutter speed to 25sec. Take the shot, and if you’re not happy with result as a stand-alone image, make adjustments and re-take.
Once you’re happy, here comes the fun bit; take the same shot 50-200 times in Raw over the course of an hour, or a couple of hours. Just be careful not to switch-on any lights, or nudge your tripod during the shooting period; keep dark and stand well back.
Either way, you’ll end up with hundreds of shots of the night sky, some of which will hopefully have shooting stars within them. If that’s all you’re after, you can extract the images that do feature a shooting star and ditch the rest. However, if you use the free software StarStaX (opens in new tab), you can drag-and-drop all 200 photos into it to create a star-trail (opens in new tab) image … featuring shooting stars, of course. It’s also possible to do this on Adobe Photoshop.
Enjoyed this article? You might also like these astrophotography tips, tricks and techniques (opens in new tab), as well as the best star tracker (opens in new tab) camera mounts.
The concept of time has always fascinated photographers. “Photography takes an instant out of time, altering life by holding it still,” said Dorothea Lange. The American photojournalist was best known for her Depression-era work during the 1920s in the United States, capturing the gaunt and haunted images of families on the verge of starvation.
In some ways, it’s easy to see the impact of time on ravaged faces. But it’s much harder to see the impact of time on landscapes, landmarks and buildings.
Today, photographers have turned to all sorts of methods to expand the moment and to encapsulate more than just the one second in which the shutter clicks.
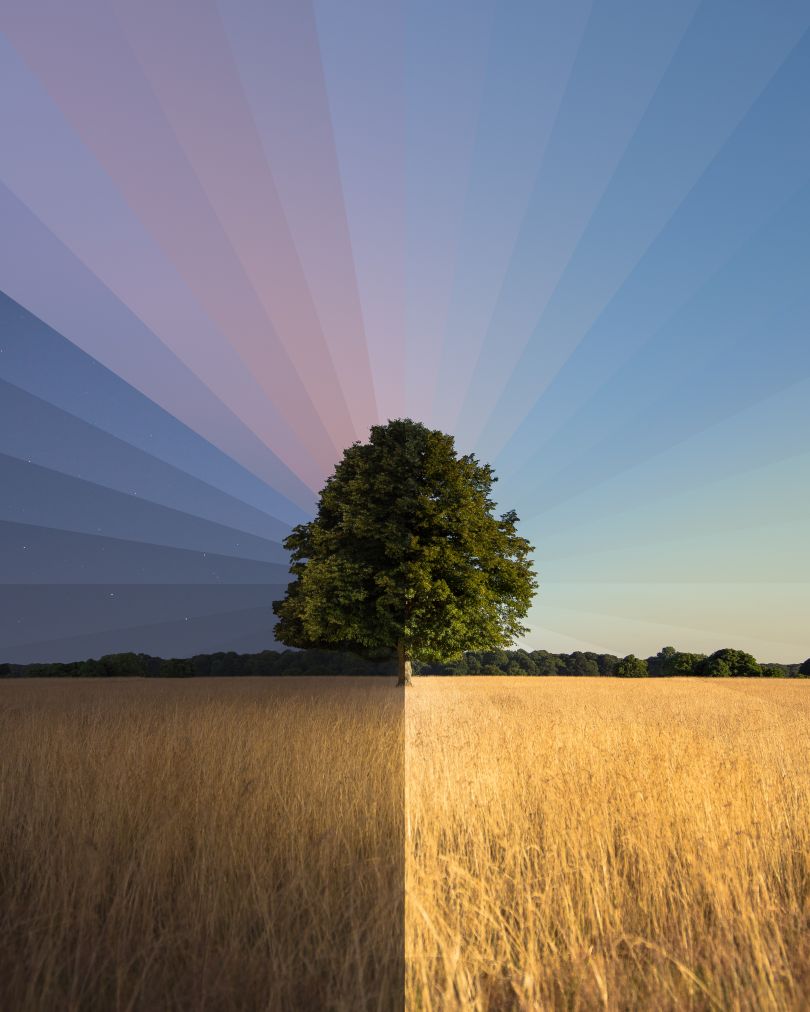
Time-slice photography is used as a tool to capture the motion, pace and atmosphere of the subject. We often think of photography as capturing a single moment, but a time-slip image shatters this illusion by showing a person, place or thing over minutes, months or even years in one picture.
In the early days of photography, cameras struggled with capturing a sharp image, given the limitations of shutter speeds and types of lenses. Nevertheless, early photographers were fascinated by movement and the ability of a photograph to capture a ‘true’ likeness of a person or landscape.
Perhaps the earliest instance of time-slice photography was in the attempts made by Eadweard Muybridge and his study of movement. His most famous image was taken in 1878, of a horse in motion, which captured on film for the first time that a horse actually ran with all four feet off the ground at one part of a gallop, which was a revelation at the time. Muybridge’s work opened up new possibilities and expanded what we could see.
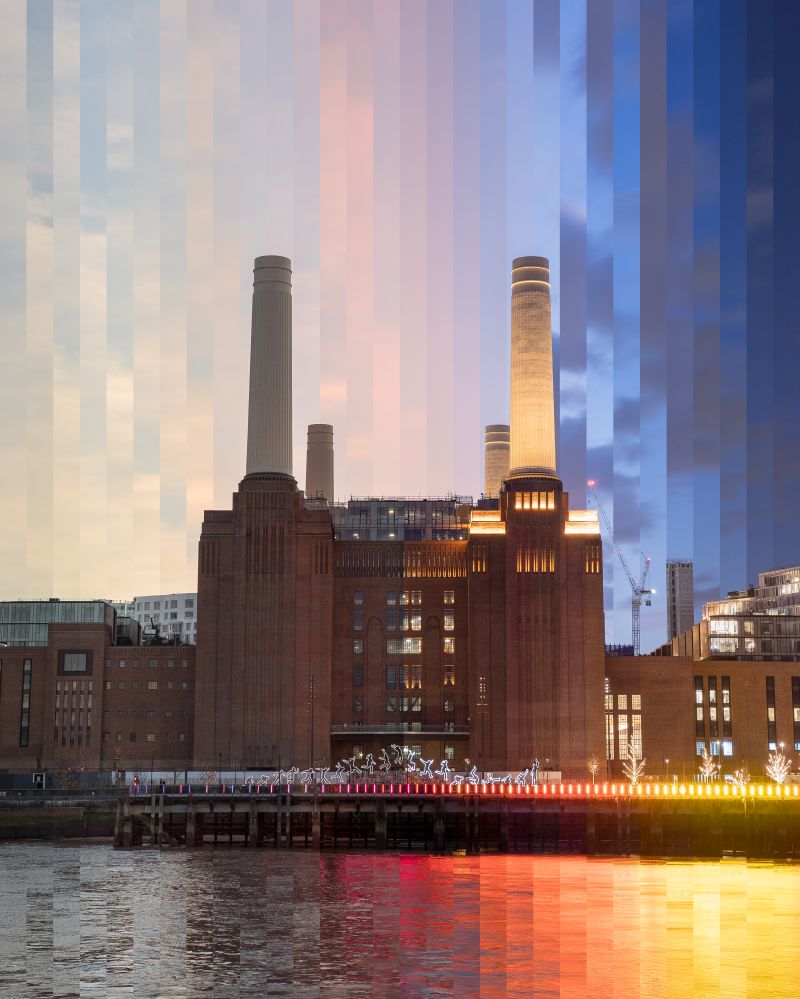
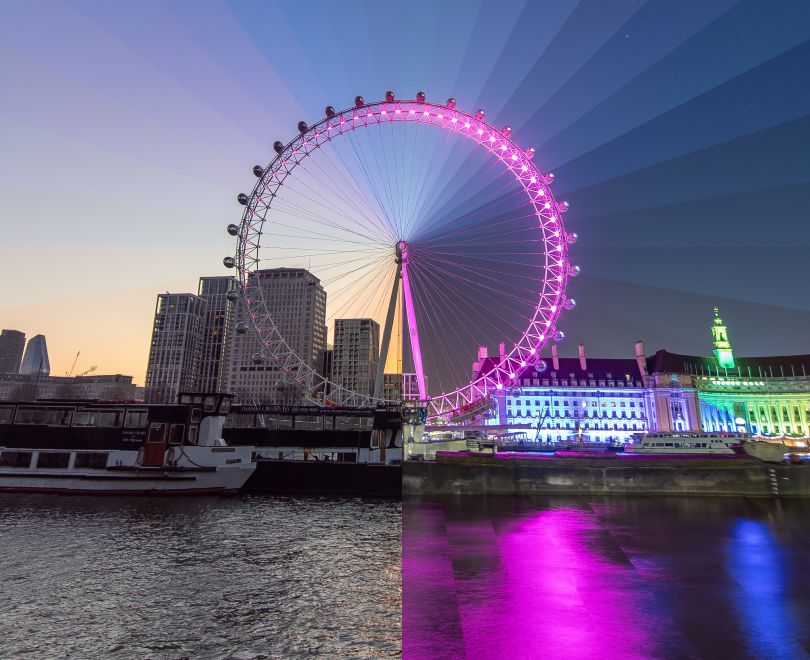
Photographer Matt Keneally took up time-slice photography to enhance his creative process. He started his career as a designer but now dedicates all of his efforts to time-slip photography.
The sense of time and of ‘now’ is questioned by Keneally in his images of the urban environment, as well as the movement and motion surrounding buildings and landscapes. His definition of time-slice photography is “when you take a series of photos over a few hours and then, in post-production, slice them together to show the passing of time in one single image.
“It’s a time-lapse without the video, showing the passing of time in a single image. I like having a still image; I feel people can stay with it longer.”
His photography equipment includes a Sony A7R Mark II, which is mirrorless. “You get a bigger frame to work with, more detail, bigger sensor, bigger pixels,” Keneally explains.
As the name suggests, mirrorless cameras capture images without using a mirror in the camera body. This is the main difference with DSLR cameras, which reflect images into viewfinders via mirrors. Mirrorless cameras use electronic viewfinders (EVF) to display images digitally.
The photographer is happiest standing out in all kinds of inclement weather, often for hours to shoot his time-slices. Kenneally often has to return again and again to the location if he doesn’t feel he has captured the image he wants.
“I can spend up 3-4 hours at a time trying to capture the changing of time, especially from day to night, or the twilight hour, with its dramatic light shift.
“A lot of people think it’s a bit weird, but I used to be an astrophotographer before. I used to sit all night out in the cold, so this is a bit of an upgrade.”
At first, photography was just a hobby, and he was content to play around with his first camera in 2009. However, the obsession grew until it completely took over his life and became his full-time career for 13 years.
“I was looking for something a bit different. I was bored of taking standard landscape photography. I remembered this technique called time-slice that I tried a long time ago. I was rubbish at it, but I thought I would give it another go. Now, I don’t know how to do anything else.”
His favourite part of time-slice photography is putting the image together and then finally seeing the finished image in post-production. Several different versions of a single image can be created by choosing a different photo, which results in varying results.
Talking about his time-slice image of the London Eye, Keneally found it one of the most challenging due to bad weather and the wheel’s constant motion. “It was a nightmare to shoot and took seven attempts to get right. The weather conditions can change and completely ruin the shot or not achieve the effect you’re after.”
However, it was well worth the effort as his images were published in Digital Camera World. Not surprisingly, Keneally has also chosen the Prime Meridian at Greenwich to shoot. Since the late 19th century, this location has served as a reference line for GMT (Greenwich Mean Time).
The photographer felt it was the right place to show the passing of time. The time-slice image was made over two hours and 30 minutes.
Keneally now has a number of limited prints for sale on his website. A new book is in the pipeline for next year, which will have a collection of new images, not just his London landmarks.
He is moving forward and exploring new themes. “The last shot I did was of the Houses of Parliament. I think I’m done with that. Next year I want to move on to shots other than standard landmarks. I want to move away from the digital and more into books and prints. Anything that distracts people from their phones for a while will be worth it.”
Tired of just stargazing? The best astrophotography cameras will enable you to enjoy and explore the heavens above in ways that your telescope simply can’t compete with.
Rather than just staring at the stars, you can capture the cosmos for artistic expression or scientific record keeping. However, you can’t get satisfactory images with just any old kit – the best cameras for astrophotography are finely tuned imaging devices with very specific properties.
From bespoke sensors designed to cut through solar radiation to bespoke GPS functions that follow the path of the stars, these cameras unlock the secrets to shooting spectacular photographs with the kind of clarity and detail that others simply aren’t capable of.
We’ve split our guide into sections depending on what type of astrophotography camera you’re looking for, so whether you’re looking for a traditional camera, a CCD camera that attaches to your telescope, or even just the best smartphone for astrophotography, we’ve got you covered.
Below the camera options, you’ll also find some useful information about astrophotography cameras, and what you should be looking for when making your purchase. And if you want to learn more about our night sky, you can also check out our guide to the best astronomy books too.
Best astrophotography cameras
(Image credit: Canon)
1. Canon EOS Ra
A pure astro camera with custom full-frame sensor
Specifications
Camera type: Mirrorless
Sensor size: Full frame (IR modified)
Resolution: 30.3 megapixels
ISO range: 100-40,000 (expandable to 50-102,400)
Rear screen: 3.15-inch vari-angle touchscreen, 2.1 million dots
Viewfinder: 0.5-inch OLED, 3.69 million dots
Max video resolution: 4K up to 30p
Reasons to buy
+
IR-modified full-frame sensor
+
30x magnification in live view / viewfinder
+
Uses Canon RF and EF glass (with adapter)
Reasons to avoid
–
4K video is cropped
–
Single memory card slot
–
Not well suited to non-astro shots
There have been a handful of dedicated astrophotography cameras over the years, such as the Canon EOS 60Da and Nikon D810a. However, the only model currently on the market is this, the Canon EOS Ra. A special edition of the standard EOS R mirrorless camera, its 30.3MP image sensor has a modified IR filter array to accommodate quadruple the amount of hydrogen alpha rays – enabling the camera to capture the distinct details and deep red hues of nebulae.
That same full-frame sensor also allows for beautiful 4K video, albeit with a 1.6x crop (effectively increasing your focal length and ‘zooming in’ on your composition). Perhaps most useful of all, the EOS Ra also boasts a 30x magnification when previewing your scene – most cameras top out at 10x, so this is invaluable for punching in and making sure that your stars are as sharp as possible.
The camera employs the new Canon RF (mirrorless) lens mount, which is populated by optics that are generally fantastic in quality but have a price tag to match. However, it is compatible with Canon EF (DSLR) lenses via an affordable adapter – which gives you a much greater selection of glass and at lower prices.
(Image credit: Sony)
Astonishing low light performance and best in class video
Specifications
Camera type: Mirrorless
Sensor size: Full frame
Resolution: 12.1 megapixels
ISO range: 80-102,400 (expandable to 40-409,600)
Rear screen: 3-inch vari-angle touchscreen, 1.44 million dots
Viewfinder: 0.5-inch OLED, 9.44 million dots
Max video resolution: 4K up to 120p
Reasons to buy
+
Incredible low light performance
+
Insanely detailed viewfinder
+
In-body image stabilization
Reasons to avoid
–
Low 12.1MP resolution
–
Magnification limited to 4x
–
“Star eater” in video mode
The Sony A7S III boasts near night vision performance, thanks to its ridiculous native ISO range of 80-102,400 (expandable to 409,600, though you’ll never actually shoot that high) which also features dual native ISO. While most cameras have just one native ISO (the point at which performance is cleanest), the A7S III has two – one at ISO640 and another at ISO16000 (though this varies in video modes).
As a body designed primarily for video, it should come as no surprise that this is the ultimate astrovideography camera. However, herein lies a compromise: the A7S III only features a 12.1MP sensor. This aids the camera’s low light performance (since there are fewer pixels, each one is larger and able to gather more light), but means there is less detail if you want to print your photographs.
While this is the best camera for filming stars, though, there is one sting in the tail: the “star eater” phenomenon that plagued earlier Sony cameras (where overactive noise reduction would ‘eat’ stars misidentified as noise) occasionally rears its head when shooting video with wide angle lenses that are very sharp. And where the EOS Ra has a monstrous 30x magnification, the Sony only has a paltry 4x – which can make focusing a challenge, especially if you have poor eyesight.
(Image credit: James Artaius)
Innovative GPS and IBIS tech, with lighting and night mode
Specifications
Camera type: DSLR
Sensor size: Full frame
Resolution: 36.4 megapixels
ISO range: 100-819,200
Rear screen: 3.2-inch vari-angle, 1.04 million dots
Viewfinder: Optical pentaprism
Max video resolution: 1080p up to 60p
Reasons to buy
+
Weather sealed
+
Astrotracer to prevent star trails
+
Night mode LCD + external illumination
Reasons to avoid
–
No touchscreen control
–
No 4K video
–
Launched in 2016, so tech is old
Mirrorless bodies are great for shooting the stars, but some of the best astrophotography cameras are still DSLRs. The Pentax K-1 Mark II is the best of the bunch, with its 36.4MP full-frame sensor, weather sealing, in-body image stabilization (IBIS) and cleverly designed flexible angle rear screen. And while it can’t beat the EOS Ra or A7S III for specialist features, the K-1 Mark II might be the best all-round astro camera when you consider everything else it has to offer.
Central to this is Pentax’ Astrotracer technology. Rather than using the stabilization (which makes micro-adjustments to the image sensor) to compensate for camera shake, Astrotracer uses it in tandem with the inbuilt GPS to compensate for the movement of the stars. Using GPS data, it moves the sensor to prevent unwanted star trails when the camera is mounted to a tripod – so you can capture long exposure shots without getting unwanted star trails.
Throw in a Night Vision mode that turns the LCD screen red to optimize it (and your eyes) for shooting in the dark, along with external illumination that lights up the underside of the rear screen as well as the camera mount (for changing lenses in the black of night), this is a camera that’s tailor made for awesome astrophotography.
(Image credit: Nikon)
A fantastic DSLR that lends itself brilliantly to astrophotography
Specifications
Camera type: DSLR
Sensor size: Full frame
Resolution: 45.7 megapixels
ISO range: 64-25,600 (expandable to 32-102,400)
Rear screen: 3.2-inch tilting touchscreen, 2.36 million dots
Viewfinder: Optical pentaprism
Max video resolution: 4K up to 30p
Reasons to buy
+
Huge 45.7MP full-frame resolution
+
Brilliant battery life
+
(Some) illuminated buttons
Reasons to avoid
–
LCD is tilt-only, not fully articulated
–
No inbuilt WiFi for image transfer
–
Not all buttons are illuminated
Unlike other cameras on this list, the Nikon D850 doesn’t have any astro-specific features. Instead, it is simply a fantastic DSLR whose specs lend themselves wonderfully to photographing the night sky.
Its 45.7MP image sensor is back side illuminated (constructed so that the circuitry is on the underside, so as not to obstruct the front), which means that it has superior light-gathering capabilities with less noise and better all-round image quality. This works in tandem with a good, if not great, ISO range to produce enviably low light performance. Like the Sony A7S III, the D850 also has dual native ISO – but at the less useful ISO64 and ISO400 sensitivities.
The chunky DSLR design is a pleasure to handle, boasts weather sealing, and also has a curtain mechanism for the optical viewfinder to stop unwanted light when shooting long exposures. It also boasts two card slots, one XQD / CFexpress and one SD. A big bonus is the inclusion of illuminated buttons, but only on the left-hand side of the camera – we’d love to have all the buttons light up, but being able to see key controls in the dark is a hugely welcome feature.
(Image credit: OM Digital Solutions)
5. Olympus OM-D E-M1 Mark III
Light enough to carry anywhere – and shoot stars handheld!
Specifications
Camera type: Mirrorless
Sensor size: Micro Four Thirds
Resolution: 20.4 megapixels
ISO range: Low-25,600 (200 base)
Rear screen: 3-inch tilting touchscreen, 1.04 million dots
Viewfinder: Electronic, 2.36m dots
Max video resolution: 4K up to 30p
Reasons to buy
+
Starry Sky Autofocus
+
Shoot astrophotography handheld!
+
MFT is compact, lightweight, affordable
Reasons to avoid
–
MFT sensor not optimum for low light
–
Modest megapixel count
–
Rear screen very low resolution
Micro Four Thirds sensors are approximately 50% the size of full frame sensors, enabling the bodies (and lenses) to be much smaller, lighter and cheaper – so your kit is compact enough to take anywhere. However, because the sensor is so much smaller, it has less surface area with which to absorb light. As the Olympus OM-D E-M1 Mark III proves, though, there is more to consider than just sensor size when it comes to astrophotography.
The E-M1 III features a unique Starry Sky AF algorithm, which can perform precision autofocus on even the smallest stars. The Accuracy Priority mode will help you nail focus when the camera is on a tripod, but the Speed Priority mode (which uses the powerful image stabilization, good for up to 7.5 stops of compensation) means that you can shoot astrophotographs handheld with a wide-angle lens!
Coupled with the Live Time and improved Live Composite mode (which enables you to keep the shutter open for six hours, and only adds exposure when illumination changes to keep your images clean and evenly lit) makes capturing light trails an absolute breeze. You can even use a USB source like a power bank to charge the camera while shooting. If size, weight and cost are considerations, the E-M1 Mark III offers powerful tools that make it a formidable choice despite the smaller sensor.
(Image credit: Sony)
Sony’s super-popular camera is a capable stargazer
Like the Nikon D850, the Sony A7 III isn’t a dedicated astrophotography camera – it’s just a darned good mirrorless camera that is very adept at shooting the stars. And again like the D850, the A7 III boasts a back side illuminated full frame sensor (with a lower 24.2MP resolution) and a sky high ISO range – which hits a staggering 51,200 natively, and is expandable all the way to 204,800.
With dual memory card slots and the ability to employ USB power (such as a power bank) while shooting, taking long exposures all night long won’t cause you any problems. However, the camera does feature a few Sony specific quirks that you’ll have to be able to overlook to get the most out of it.
The main culprit is the dreaded “star eater” phenomenon when shooting stills, whereby aggressive noise reduction can make stars disappear during long exposures. It’s not as bad as earlier Sony bodies, but the problem does raise its head from time to time. The other issues relate to the rear screen, which is a tilt-only affair, has only limited touch functionality, and is very low resolution at less than a million pixels.
Best astrophotography CCD cameras
Where normal cameras are standalone devices, a CCD (charged couple device) camera is purpose-built to work with a telescope. Previously they were prohibitively clunky and costly, but nowadays they are both easier to use and much more affordable – and they are designed to capture images of deep space.
They remain the preserve of more advanced, dedicated astrophotographers, but if you really want to up your game then it’s worth considering one of these CCD cameras from astrophotography specialist ZWO.
(Image credit: ZWO Company)
7. ZWO ASI183MC (Color)
Packs a powerful sensor for deep sky imaging
Specifications
Camera type: CCD
Sensor size: 1-inch BSI CMOS
Resolution: 20.2 megapixels
Max video resolution: 5496 x 3672 up to 19fps
Reasons to buy
+
Great for galaxies and nebulae
+
Formidable image sensor
+
Double cooled for low noise imaging
If you’re looking to get into long-exposure deep sky photography of subjects like nebulae, the ZWO ASI183MC (with color sensor) is an affordable entry point to the world of expensive, cooled cameras.
Its high-sensitivity 1-inch 20.2MP CMOS sensor is made by Sony, and is back side illuminated for clean and efficient imaging (aided by the cooling system to further reduce noise in long exposure imaging).
With a claimed 12 stops of dynamic range, impressive spectral response (the amount of light that enters the telescope and is used by the sensor) and software finely tuned to reduce amplifier glow, the ASI183MC offers impressive performance.
(Image credit: ZWO Company)
8. ZWO ASI120MC (Color)
A great entry level CCD camera to use with your telescope
Specifications
Camera type: CCD
Sensor: 1/3-inch CMOS
Resolution: 1.2 megapixels
Max video resolution: 1280 x 960 up to 60fps
Reasons to buy
+
Perfect for moon and planet images
+
Low price
+
Ideal first CCD camera
Reasons to avoid
–
Not optimal for galaxies and nebulae
Where the ASI183MC is an ideal entry point for deep sky imaging, the ZWO ASI120MC is the perfect beginner camera for CCD astrophotography – making it a great option if this is your first time taking images using your telescope.
While its bigger brother is the one to go for if you intend to shoot galaxies and nebulae, this is camera’s image sensor is a smaller and lower megapixel affair with slightly lower spectral response. It is still very capable for photographing the moon and planets, though, and can capture video at up to 60fps at just under 1080p resolution (1280 x 960).
It’s not well suited to deep sky astrophotography, but otherwise it’s a fantastic choice for your first time shooting the stars.
Best astrophotography camera phones
While they aren’t going to give you anything like the results of a traditional or CCD camera, some camera phones have been designed to take impressive images of the night sky with starscapes and even the galactic core.
So if you’re an astro shooter looking for a new handset, or you’d like a camera that fits in your pocket that can take some impressive (if limited) nightscape images, it’s well worth checking out these camera phones.
(Image credit: Samsung)
9. Samsung Galaxy S21 Ultra
Hands down, the best camera phone for astrophotography
The Samsung Galaxy S21 Ultra is arguably the best camera phone on the market, so it should come as no surprise that it’s also the best phone when it comes to shooting astrophotography.
This is thanks to the fact that you can take fully manual control. While other phones features night shooting modes, they are powered by computational photography that produces results via software wizardry. The S21 Ultra, by contrast, enables you to use Pro mode to shoot exposures up to 30 seconds, adjust the ISO up to 3200, and even perform manual focus.
Away from astro shooting it’s an incredible all-round photography device, with four cameras including its headline 108MP f/1.8 primary unit and its 12MP f/2.2 ultra-wide. For the best photos right from your pocket, the S21 Ultra is a no brainer.
(Image credit: Google)
10. Google Pixel 5a
Hands down, the best camera phone for astrophotography
Google wasn’t the first company to feature an astro mode in its phones, with the likes of Huawei beating it to the punch. However, the Astrophotography mode that debuted in the Google Pixel 4 was a cut above the competition – and it’s better than ever in the Google Pixel 5a.
Built on Google’s HDR+ technology – a system that ‘brackets’ a series of multiple exposures, in order to preserve highlight detail and prevent blown-out images, then boosts the shadows to create artificial dynamic range – Astrophotography mode takes around 15 exposures of about 15 seconds each, processing the sky separately in order to accurately render the stars.
So it’s a completely software-driven system, unlike the manual control offered by the Samsung, but that makes this a much more streamlined point-and-shoot solution to shooting astrophotography on your phone.
What is an astrophotography camera?
Astrophotography cameras are imaging devices that enable you to capture clean long-exposure images of the night sky. This is achieved, primarily, by opening the camera’s shutter long enough (usually around 30 seconds) to allow the dim starlight to be clearly visible through the black of night.
In order to accomplish this, you’ll obviously need a camera with pristine image quality – though getting great photographs in low light conditions is one of the most challenging tasks that any camera can perform.
Thus, the best astrophotography cameras need to possess a number of critical characteristics: exceptional ISO performance (the sensitivity of the camera’s image sensor), the ability to record low noise and high dynamic range, and a capable image processor to translate all this technology into the best possible image.
Some cameras even feature a specially modified IR filter on the sensor, which is designed to allow the infrared rays of deep space to be recorded by the camera (rather than being blocked, as they are by stock sensors in 99% of cameras).
Cameras come in two flavors: DSLR and mirrorless. DSLRs (digital single lens reflex) are chunkier cameras with a traditional mirror mechanism inside that flips out of the way to record an image. These tend to be cheaper and sturdier, but are built on older technology. Mirrorless cameras are smaller and lighter cameras that ditch the mirror, giving you a live ‘what you see is what you get’ view of exactly what your photograph will look like, both on the rear screen and through the viewfinder.
(Image credit: Future)
What else do you need for astrophotography?
Even with one of the best astrophotography cameras, though, you’re still not quite set to start taking great pictures of the Milky Way; the camera body is just one part of the equation…
The right lens Firstly, you’ll need an appropriate optic – the slow kit lens that came bundled with the camera won’t really be up to the job. Invest in a fast, wide-angle lens – fast meaning an aperture with a large f-number (such as f/1.8 or f/2.8), and wide-angle meaning something ideally between 10mm and 24mm. Prime lenses (with a fixed focal length) tend to be both faster and sharper, though zoom lenses (with a variable focal length) offer greater versatility at the expense of speed.
A sturdy tripod Since you’ll be shooting long exposures of 30 seconds or so, you’re going to need something to keep your camera rock-steady. Travel tripods and vlogging-friendly Gorillapods will do in a pinch, but you should really invest in a full size, heavy tripod with as few sections as possible. You want to ensure that your camera is being held as rigid as possible, since even a slight gust of wind will be visible when shooting a long exposure.
Remote shutter Even with a tripod, just the act of depressing the camera’s shutter can cause vibrations. To combat this, invest in a remote shutter or shutter release cable – this enables you to control the shutter without physically touching the camera, and some even come with intervalometers that make it easier to shoot multiple exposures (handy for star trails). Alternatively, you can use the camera’s self-timer to avoid shake when hitting the shutter.
Star tracker A motorized star tracker does exactly what it says on the tin: it tracks the movement of the stars, enabling your camera to move in sync to avoid unwanted trails when capturing long exposures. These are advanced tools of the trade, so once you’ve cut your teeth in astrophotography they’ll offer you the next step to up your game.
Of course, at the heart of your setup is the camera itself – so here are the best astrophotography cameras you can get right now…
Storing telescopes, mounts, tripods and cameras inside their home, the couple takes out all the heavy equipment to their backyard to try and capture an element in our universe not seen by the naked eye. This method of photography is called astrophotography — it goes beyond landscape photography to use a combination of lenses, computers and telescopes to capture a moment in deep space.
“You can go out in the summer and set up a tripod and a camera and a wide angle lens and do a long exposure … and get to see the stars in the Milky Way in the core and some beautiful details of the sky,” Marcus explained. “I would say the biggest difference between that and deep space astrophotography is with deep space astrophotography, you’re looking way closer in on a target.”
To do that, Marcus and Miles must understand and keep track of what is happening in the sky above and when. Then given those parameters, they pick a target or two for the night, set up their equipment to get it polar aligned and then take long-exposure pictures for as long as possible — often lasting throughout the whole night.
The idea is to capture a series of long-exposure images, which invite more light into the lens, to gather as much visual data as possible. Marcus and Miles’ equipment keeps them on the target throughout the night as the subject moves across the sky. The series of photos, which will be later layered on top of each other, add more detail to the image.
As one might imagine, this hobby isn’t best served by partial commitment.
“If you meet anybody in the astro[photography] community, they’re going to talk about the time that they spent on this,” said Marcus with a smile.
On top of the time it takes to capture the images overnight, it takes about an hour to set up the equipment and a little bit less than that to take it down. While a lot of technology helps Marcus and Miles, they still must constantly check on the equipment throughout the night.
“We got up to the observatory property last Friday night at about 7:00 and we left the next morning at 7:30. So, we were there for 12 and a half hours,” said Marcus.
Marcus and Miles often take the deep space photos from just their backyard, but they also have connected with a person who has an observatory near Florissant, about 11 miles west of Pikes Peak. There they have access to power to operate their equipment, and it’s under a dark sky protected area and at high elevation. These conditions give Marcus and Miles an even better chance of capturing the beauty of the stars above.
“When I go to a dark sky and I look up and I see these things, these stars, these brighter stars, it’s like I reaffirm that they’re still there as am I. Me and the universe, we’re on the same terms,” said Marcus.
When Marcus returns to inside her home, she then has the immense task of stacking the images and pulling out the beauty from them. A single image can look like a smattering of stars, but as she is able to put several images together, nebulas, galaxies and other targets really start to take shape.
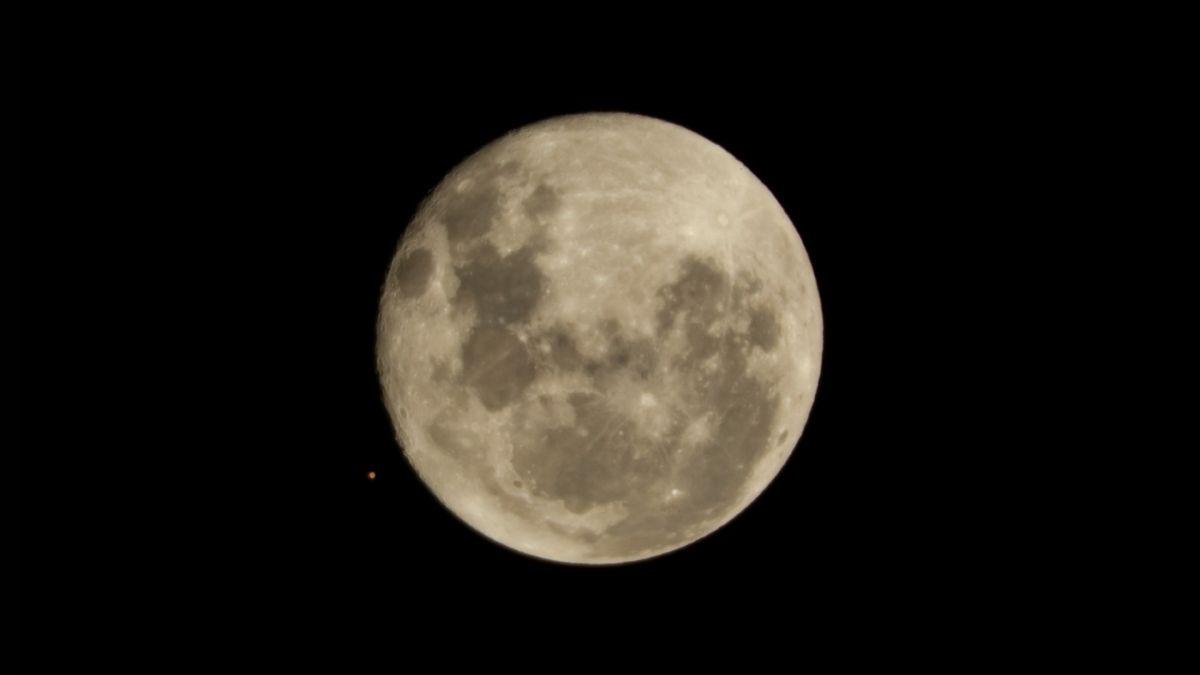
Update for Dec. 8: The rare Mars eclipse by the full moon thrilled skywatchers around the world. See photos and video of the Mars occultation. Also, don’t miss your second chance to see Mars on Dec. 8 during these Mars opposition webcasts!
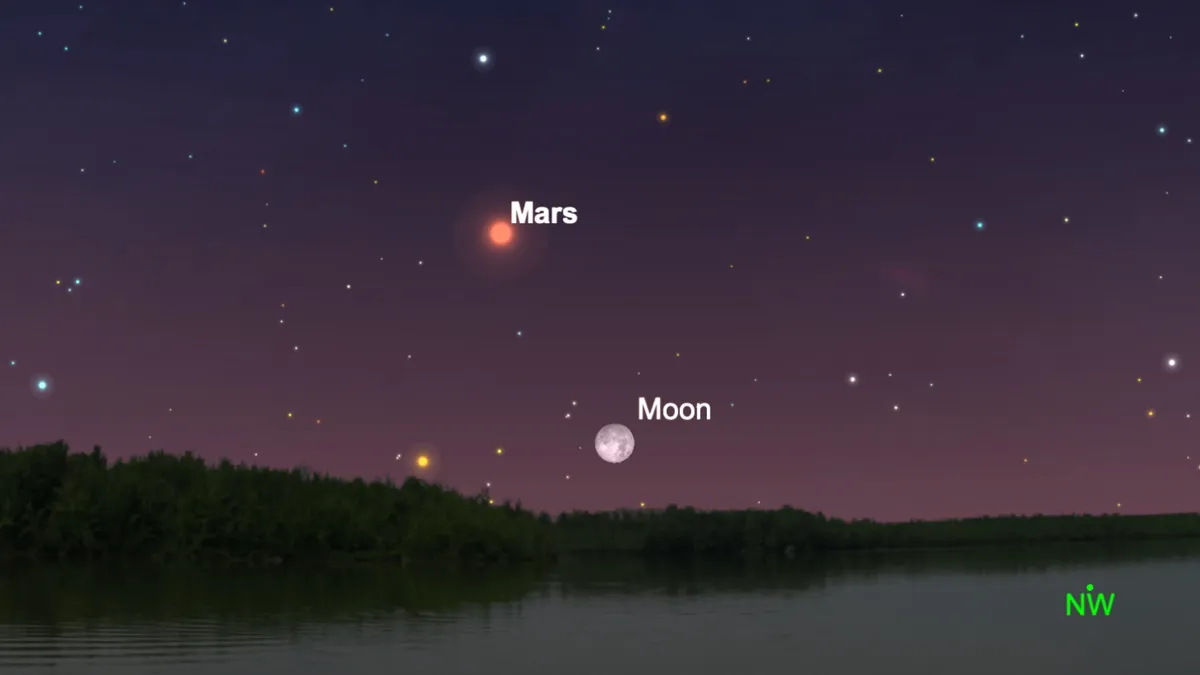
This week offers an excellent opportunity to view Mars in the night sky as it puts on quite a show for observers on Earth.
This week, the Red Planet is at opposition, meaning it forms a straight line with Earth and the sun, with Earth in the middle. In this alignment, Mars will appear brighter than usual and be much easier to see in the sky. Mars is at opposition just once every 26 months. In addition to being at opposition, this week will also see a lunar occultation of Mars on Wednesday evening (Dec. 7). An occultation is an event in which one object appears to pass behind another in the sky, completely disappearing from view. In this case, Mars will disappear behind the moon and reappear an hour later.
The lunar occultation of Mars will begin shortly after sundown on Wednesday for viewers in North America, while skywatchers in Europe and parts of North Africa will be able to witness the spectacle shortly before sunrise in the morning hours of Thursday (Dec. 8). If you’re unable to get outside during that time or if skies in your area are cloudy, you can watch the lunar occultation of Mars online for free, courtesy of several webcasts from observatories around the world. If conditions in your area are right to see the event in person, check out our tables below on optimal viewing times based on your location.
Related: Mars at opposition will meet up with the full moon next week (Dec. 7). Here’s how to see it
The lunar occultation of Mars will be visible for most of North America, Europe and a few areas in northern Africa and the Middle East. Sky & Telescope has put together a thorough guide on the event (opens in new tab), including the map below showing viewing locations and rough times for viewing the occultation of Mars.
A map showing areas from which the lunar occultation of Mars will be visible. (Image credit: Gregg Dinderman / Sky & Telescope)
The table below lists the times of Mars’ disappearance and reappearance from behind the moon as seen from various locations throughout North America. These times can vary considerably. For example, if Mars passes behind the moon’s larger central area from your vantage point, it may be covered for an hour or more. But if the Red Planet slides behind the moon’s lower edge, it could be covered for less than a half hour. Disappearance and reappearance times listed below are for Mars’ center.
The table below provides specific occultation viewing times for 27 selected cities in the United States and Canada. For times with an asterisk (*), the calendar date is Dec. 8.
Swipe to scroll horizontally
Local viewing circumstances for the occultation of Mars, Dec. 7 and Dec. 8, 2022
Location
Time zone
Mars disappears
Mars reappears
Juneau
AKST
6:19 p.m.
6:55 p.m.
Los Angeles
PST
6:30 p.m.
7:30 p.m.
San Francisco
PST
6:34 p.m.
7:35 p.m.
Seattle
PST
6:51 p.m.
7:50 p.m.
Vancouver
PST
6:55 p.m.
7:52 p.m.
Tucson
MST
7:32 p.m.
8:27 p.m.
Las Vegas
PST
7:34 p.m.
8:35 p.m.
Salt Lake City
MST
7:41 p.m.
8:46 p.m.
Denver
MST
7:44 p.m.
8:48 p.m.
Helena
MST
7:51 p.m.
8:56 p.m.
Edmonton
MST
8:04 p.m.
9:06 p.m.
Yellowknife
MST
8:23 p.m.
9:16 p.m.
Whitehorse
MST
8:25 p.m.
8:57 p.m.
Tulsa
CST
8:54 p.m.
9:41 p.m.
Kansas City
CST
8:56 p.m.
9:52 p.m.
Austin
CST
8:57 p.m.
9:12 p.m.
Saskatoon
CST
9:03 p.m.
10:10 p.m.
Winnipeg
CST
9:05 p.m.
10:16 p.m.
Chicago
CST
9:10 p.m.
10:04 a.m.
Memphis
CST
9:14 p.m.
9:29 p.m.
Churchill
CST
9:22 p.m.
10:31 p.m.
Louisville
EST
10:21 p.m.
10:47 p.m.
Toronto
EST
10:29 p.m.
11:17 p.m.
Montreal
EST
10:40 p.m.
11:29 p.m.
Quebec City
EST
10:45 p.m.
11:36 p.m.
Halifax
AST
12:15 a.m.*
12:33 a.m.*
Gander
NST
12:47 a.m.*
1:37 a.m.*
An illustration of the night sky on Dec. 7 showing the full Cold Moon occulting Mars. (Image credit: Sky Safari Astronomy)
Even if you are outside of the viewing area for the occultation, you will still be able to see the moon and Mars in a close approach of one another known as an appulse.
The table below provides times and locations for Mars’ closest approach to the lower edge of the moon during the event. Separation between Mars and the moon’s lower edge is given in terms of minutes of arc. (The apparent width of the moon on Dec. 7 is 30 arc minutes.)
For times with an asterisk (*), the calendar date is Dec. 8.
Swipe to scroll horizontally
Local viewing circumstances for the appulse of the moon and Mars, Dec. 7 and Dec. 8, 2022
Location
Time zone
Closest approach
Separation
New Orleans
CST
9:11 p.m.
3 arc min.
Huntsville
CST
9:23 p.m.
1 arc min.
Miami
EST
10:16 p.m.
11 arc min.
Jacksonville
EST
10:23 p.m.
7 arc min.
Atlanta
EST
10:26 p.m.
3 arc min.
Columbia
EST
10:31 p.m.
4 arc min.
Knoxville
EST
10:31 p.m.
1 arc min.
Charlotte
EST
10:36 p.m.
3 arc min.
Norfolk
EST
10:46 p.m.
4 arc min.
Washington
EST
10:46 p.m.
2 arc min.
Philadelphia
EST
10:51 p.m.
1 arc min.
New York
EST
10:56 p.m.
1 arc min.
Boston
EST
11:01 p.m.
0.6 arc min.
San Juan
AST
11:51 p.m.
23 arc min.
Hamilton
AST
12:06 a.m.*
11 arc min.
If you miss the lunar occultation of Mars on Dec. 7, you’ll have to wait until January 2025 for the next one, so even if you can’t make it outside, make sure to watch Mars at opposition pass behind the moon in one of the free livestreams available online.
If you’re an avid skywatcher or even if you’re just getting started, make sure to read our guides for the best binoculars and the best telescopes to view the occultation of Mars and other incredible things in the night sky. For capturing the best pictures of Mars or the moon that you can, don’t miss our recommendations for the best cameras for astrophotography and best lenses for astrophotography.
Editor’s Note: If you snap a great photo of either Mars at opposition or the lunar occultation and would like to share it with Space.com’s readers, send your photo(s), comments, and your name and location to [email protected].
Follow us on Twitter @Spacedotcom (opens in new tab)or onFacebook (opens in new tab).
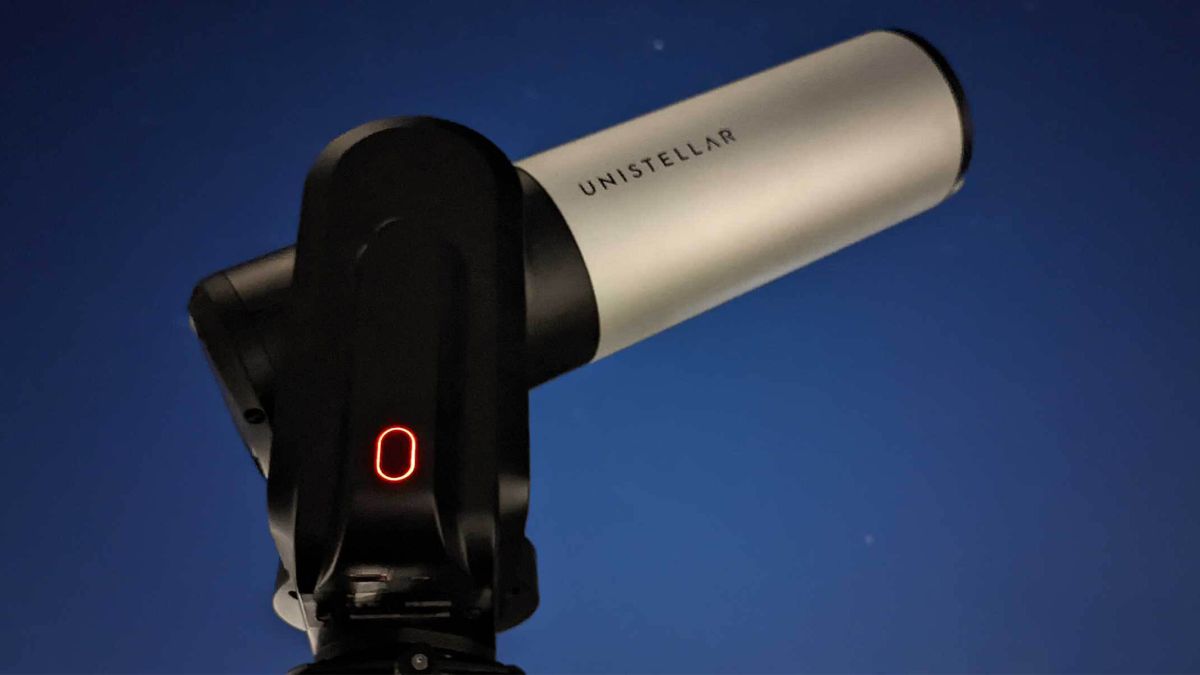
Unistellar and Amazon are offering one of the best festive deals we’ve seen as their eVscope 2 telescope is $900 off (opens in new tab) while their eQuinox telescope is $600 off (opens in new tab) until Boxing Day 26 December 2022.
From December 8 through to December 26 these smart telescopes are on offer. So if you’re looking for a high-end, high-spec, powerful telescope now is the time as you can either get $900 off their eVscope 2 (opens in new tab) model or save $600 on Unistellar’s eQuinox telescope (opens in new tab).
This time of year is always great for telescope deals and trying to bag a bargain on the best telescopes around. The appeal of these telescopes is their ease of use, their power, the sophisticated design and the use of technology all contributing to an out-of-this-world stargazing experience. If you want to take a look at more fantastic deals on telescopes that are more suitable for a smaller budget check out our guide to the best budget telescopes under $500.
It’s easy to look at the huge amount of money off these two telescopes and see the value in these deals, but what makes the telescopes worth getting? Well, the specs on these scopes are enough to make you want these alone, and the savings might just tempt you. Both make use of an app and because of the sophisticated technology, not much experience is required as they can auto-detect night sky objects for you to view.
While these aren’t like traditional telescopes, the two do share similarities with each other. Firstly, the eVscope 2 which you can save $900 (opens in new tab) on offers its users a lot of power for the price. The telescope operates solely through the use of a smartphone so it’s fantastic for astrophotography too. It also comes with 7.7MP enhanced image resolution and a Nikon eyepiece so there’s no need to purchase any extra astrophotography equipment.
Focusing on the eQuinox telescope and the $600 saving (opens in new tab), it has a focal length of 450mm and a digital magnification of up to 400x meaning that given its wide field of view, deep-sky and faint objects like star clusters, nebulas are clearly visible. What’s more, there’s a light pollution reduction system so you’ll even have a good star gazing experience in built-up areas.
These are highly sophisticated telescopes and although they come in at the higher end of most budgets, they are both huge holiday discounts. With savings of $900 and $600 respectively, these discounts are not to be missed so easily.
Be sure to check out our guides to the Best telescopes and Best telescopes for beginners. Or if you’re hankering for a discount read our Telescope deals page to bag a bargain.
Follow Alexander Cox on Twitter @Coxy_97Official (opens in new tab). Follow us on Twitter @Spacedotcom (opens in new tab) and on Facebook (opens in new tab).
Battling freezing temperatures and the seemingly constant dark of winter can make it challenging to find inspiration.
But wilderness photographer and Canon Ambassador Valtteri Hirvonen – who spends more than 16 hours of the day in darkness in Finland – has seized this as an opportunity to experiment with shooting new subjects in his personal work.
He reveals how he turned his lens to the night sky and bent the rules of astrophotography to create beautiful, yet unique photos.
Is it tough being a photographer when you spend so much of your winter in darkness?
In Finland, we spend nearly half the year in darkness, so during the winter months I wanted to find a way to continue pursuing photography in my personal time.
It’s not just my profession, it’s also my hobby.
Like so many other photographers, I had to find ways of working creatively with what is within reach and that’s what ultimately inspired me to shoot the night sky.
Luckily, Finland is a great place for it.
There are so many forests and amazing places where you have great visibility of the stars, so it all came together very naturally.
The Milky Way over Finnish Lapland, Arctic region. Equipment: Canon EOS R5, Canon EF 16-35mm f/2.8L III, ISO 3200, 30s, f/2.8. Credit: Valtteri Hirvonen
What equipment tips do you have for beginner astrophotographers?
Some astrophotographers will have a lot of gear to help capture really sharp photos and use apps to track the stars or how the world is spinning.
However, I’ve shot a lot of astrophotography in my personal work handheld.
With today’s technology, you can find a way to make it work most of the time.
For astrophotography, you just need a camera with full manual control and a lens with a wide aperture.
Of course, the results between handheld and long-exposure shots taken with a tripod will look very different, but there is great creative potential in trying more artistic approaches, for example with a bit of movement in the shot, you can almost paint with your camera.
How else can people experiment when shooting the night sky?
I love experimenting in my personal work and trying to create something that we don’t really see as much on our social feeds.
For instance, shooting the Northern Lights in black and white or painting with an artificial light source.
I’ve played around with having a light on my drone and using long exposure to create these unusual light trails in the foreground of my images.
Normally people recommend staying away from any distracting light sources, but even if you live in a city or somewhere with a lot of light pollution, you can use it in your shot to create an interesting effect.
In one of my photos of Joshua Tree, you can see the light pollution, but it creates this beautiful gradient from orange to black, which I love.
Even clouds can make the scenery much more interesting – just try to embrace the elements in the frame.
Light trails created by a headlamp in front of the night sky in Joshua Tree National Park, California. Equipment: Canon EOS 5D Mark III with a Canon EF 24-70mm f/2.8L II USM lens at 24mm, 30 sec, f/2.8 and ISO1600. Credit: Valtteri Hirvonen
What do you like about shooting during the winter months?
Shooting the night sky makes you forget about time.
On my work shoots there are usually a lot of people and this sense of hustle, but with astrophotography I am out in nature on my own or with one other friend.
I love being in nature, especially during the night. It’s so silent and creates really peaceful moments.
I also love that it forces you to be totally present in the moment.
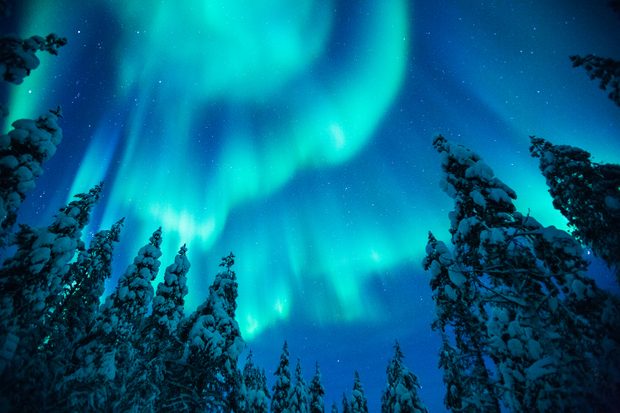
Living in Finland, I’ve seen the Northern Lights a number of times, but it’s always a surprising and fun experience.
It all happens very fast, so you get a huge adrenaline rush, running to get the shot because it can be over within seconds.
You also don’t know how the images will turn out because you can get different colours each time and that makes it all even better.
When we shoot in darkness, we’re shooting blind so the best thing is creating images that you can’t normally see with the naked eye.
Only a camera can capture the long exposure, amongst other features and that’s what makes these moments magical – the end result is always a surprise.
Where’s the best place to do astrophotography?
You can capture astrophotos anywhere. Of course, there are pros and cons to any location.
For example, if you live further south, you have the benefit of having a more consistent night fall which gives you the freedom to shoot all year round, while those of us in the arctic regions are lucky enough to have the Northern Lights.
There are unique astronomical moments everywhere – it’s just knowing how to look for them and then capture them.
Credit: Valtteri Hirvonen
What are some easy objects to start out with when astro imaging?
As a starting point, the stars or Milky Way are easy and interesting subjects to shoot.
You need to be mindful though that it is difficult to photograph them when there is a full Moon, or when the Moon is really bright, so consider the current moon phase before you head out.
Has the advancement of tech has changed the way you shoot?
The cameras launching today are so good that it allows us photographers to capture professional looking shots way more easily.
I don’t just mean the higher end cameras, but even entry level models are sensitive enough to capture the detail of the night sky.
I’ve spoken a bit about handheld shooting – something that wouldn’t have really been as successful in the past – but with the image stabilisation in cameras now, you can get really sharp images.
It’s also making it far more accessible. With mirrorless cameras you have a much lighter and more compact kit bag, which makes the experience much more fun and not so sweaty.
Aurora borealis, the Northern Lights. Credit: Valtteri Hirvonen
How has your own technique developed through the years?
The basic principles are the same, but the whole experience has changed.The innovation of cameras lets me be more experimental in my work.
Of course, you can now see results much faster.
When I first started, I had to make my experiments and would find out weeks later what went wrong after the film had been developed.
But now I can see it instantly on my screen on the back of my camera – even down to tiny details that add up to help you make the final image.
Apart from technical skills, what else do you need to succeed in shooting the night sky?
I say this for every genre of photography, but it really helps if you master the basic techniques as it frees you to not have to think about it when it really matters.
Give yourself the freedom to experiment, even the things people say you can’t or shouldn’t do such as shaking the camera.
Trust your instincts and push your creativity to achieve new styles.
It also helps to know your surroundings.
I usually go somewhere before it gets dark to wander around before the shoot and figure out where the trees or foreground are.
This helps me to find different elements to create a beautiful shot when its dark.
See more of Valtteri Hirvonen’s work via his Instagram and Facebook pages.
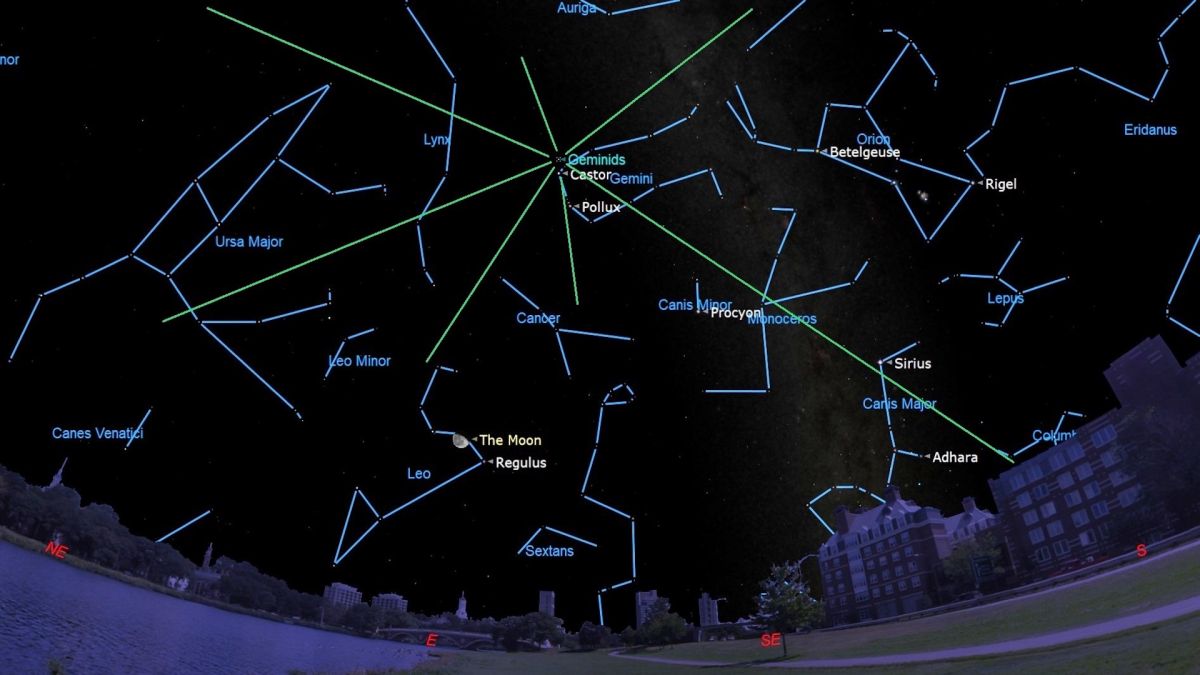
The annual Geminids meteor shower reaches its peak on Wednesday (Dec. 14).
The peak of the Geminid meteor shower offers skywatchers the opportunity to view what is regarded as the most consistent and reliable meteor shower of the year while at its best — as long as they are willing to brave the frigid weather of mid-December.
Over New York City the Geminids peak at 8:00 am EST (1300 GMT) on Wednesday (Dec. 15). As a result, the best displays should be seen in the pre-dawn hours on this day, according to In the Sky (opens in new tab).
Related: Meteor showers 2022: Where, when and how to see them
This year the Geminids have been active since Dec. 4, and will end on Dec. 17. During this period, the best way to see plenty of meteors is to view the sky when the viewing location is pointed towards the shower’s radiant point, found in the constellation of Gemini.
More meteors from the Geminids shower will be seen when its radiant point is above the horizon, with the number of meteors increasing as this point rises higher in the sky. For astronomers in New York City, the Geminids will become visible at around 5:32 p.m. EST (2232 GMT) each night when the radiant point rises above the horizon and the radiant point will be at its highest at around 2:00 a.m. EST on Dec. 15 (0700 GMT).
EarthSky recommends (opens in new tab) not waiting for this point, however, instead suggesting to attempt to view the meteor shower after its radiant point is above the horizon but before the moon, which will be in its waning gibbous phase, rises and illuminates the night sky. This is because the bright streaks and fireballs created by meteors are most visible in dark skies.
In suitably dark conditions with clear skies and no moon, skywatchers could spot as many as 120 Geminid meteors per hour at its peak.
Geminid meteor shower captured above a railroad water tower at Dos Cabezas Siding in Anza-Borrego Desert State Park, California, U.S. (Image credit: Kevin Key / Slworking)
Meteor showers occur when Earth, on its annual journey around the sun, passes through clouds of debris left behind by comets or asteroids. These fragments enter our planet’s atmosphere at high speeds and burn up creating streaks of light and the occasional bright fireball created by larger pebble-sized chunks of material.
The Geminid meteor shower can be traced back to dusty debris left behind by the asteroid or possible ‘rock comet’ 3200 Phaethon that Earth passes through each December. This 3.6-mile (5.8-kilometer) wide space rock comes closer to the sun than any other named asteroid and is considered a strange hybrid somewhere between an asteroid and comet. This is because while 3200 Phaethon is composed of rock (like an asteroid) rather than ice (like a comet), it brightens when it approaches the sun once around every 524 Earth days similar to the behavior of a comet, not an asteroid.
Comets usually act like this when the icy material within them changes immediately from solid to gas due to the heat of the sun, a process called sublimation. In lieu of ice, which was baked off the space rock long ago thanks to its frequent close brushes with our star, 3200 Phaethon’s glow as it approaches the sun may come from the ‘fizzing’ of sodium scientists suggested in 2021.
The movement of asteroid 3200 Phaethon imaged on Dec. 25, 2010 (Image credit: Marco Langbroek/Wikimedia Commons)
As the asteroid approaches the sun, its sodium heats up and vaporizes. This has depleted the element at 3200 Phaethon’s surface, which explains why when its debris enters the atmosphere at 79,000 miles per hour (127,000 kilometers per hour) to create the Geminids, these meteors are low in sodium.
To learn more about this strange hybrid comet/asteroid and the source of the Geminids meteor shower the Demonstration and Experiment of Space Technology for INterplanetary voYage with Phaethon fLyby and dUst Science, or DESTINY+ mission (opens in new tab), will flyby 3200 Phaethon later this decade.
Though the Geminids will be visible with the naked eye, there are plenty of other wondrous objects in the night sky that require specialized optics. If you need a telescope or a pair of skywatching binoculars, make sure to read our guides for the best binoculars and the best telescopes to view the night sky. For capturing the best pictures of the Geminid meteor shower that you can, don’t miss our recommendations for the best cameras for astrophotography and best lenses for astrophotography.
Editor’s Note:If you snap the Geminid meteor shower and would like to share it with Space.com’s readers, send your photo(s), comments, and your name and location to [email protected].
Follow us on Twitter@Spacedotcom (opens in new tab) or on Facebook (opens in new tab).
35mm lenses with wide apertures are some of the most important and popular options out there, equally at home in a huge range of scenarios, including portraits, weddings, events, astrophotography, and more. Premium 35mm lenses can easily run north of $1,500, which makes the Viltrox 35mm f/1.8 AF a breath of fresh air. This great video review takes a look at the lens and if its performance and image quality allow it to compete with those much more expensive options.
Coming to you from Maarten Heilbron, this excellent video review takes a look at the Viltrox 35mm f/1.8 AF lens. At $379, the 35mm f/1.8 AF is quite affordable; nonetheless, it comes with a variety of great features, including:
10 elements in eight groups, including two extra-low dispersion elements and two high-transparency elements for less chromatic aberrations and better clarity
Two aspherical elements for less distortions and higher levels of sharpness
HD nano multi-layer coating for reduced flares and ghosting and improved contrast
STM autofocus motor with full-time manual focus override
Nine-blade diaphragm for smoother bokeh
Altogether, the 35mm f/1.8 AF looks like quite a good performer for the price, sure to satisfy the needs of a lot of creatives. Check out the video above for Heilbron’s full thoughts on the lens.