[ad_1]
Portrait retouching can get overwhelming sometimes with the steps you need to take to make your shots look absolutely perfect. Maybe these steps aren’t that hard, but they can definitely be very time-consuming, so finding any way to speed this process up to make better and more efficient use of your time is a high priority for every photographer. Using Luminar Neo to tackle these steps can make retouching a breeze using just a few tools and leveraging some of the Artificial Intelligence (AI) built into the application.
Full disclosure: This article was brought to you by Skylum, the software company behind Luminar NEO.
Luminar Neo is a surprisingly diverse and versatile application that can help photographers do incredibly advanced work from everything including star trails and astrophotography to composite work, breathtaking landscapes, and incredible portraits. Taking advantage of the advanced retouching tools within Luminar Neo can help editors speed up their work, as well as take a lot of the tedium out of the process. Users can leverage a powerful “slider” based editing system for a large portion of the work that would normally require detailed and pin-point pen/mouse work to complete.
The Essentials
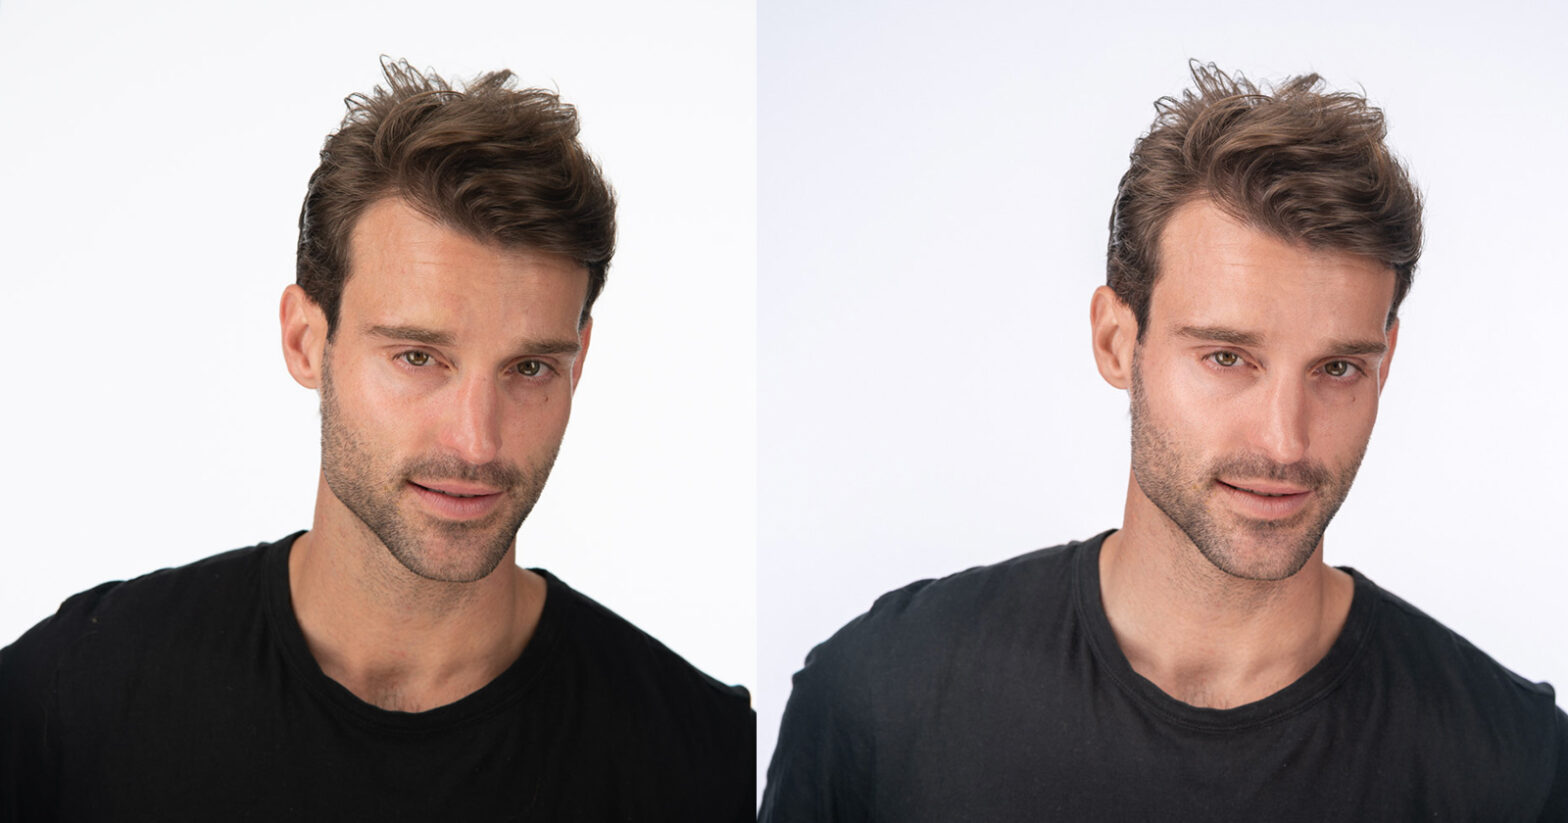
The first thing to do is bring your images into the catalog of Luminar Neo either by importing or simply adding an existing folder on your computer into the system. Once the folder and images have been added to the catalog, select an image from the batch you want to edit and either start with a preset (if you choose), or just jump directly into the EDIT tab and start manually adjusting the image to meet your needs starting with the “essentials” section.
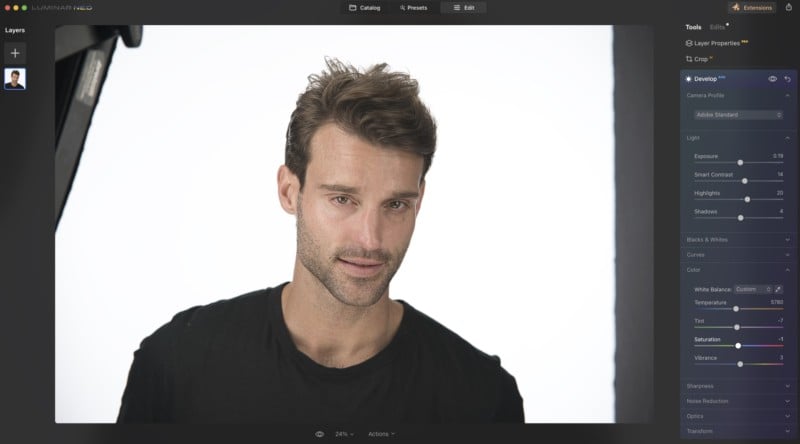
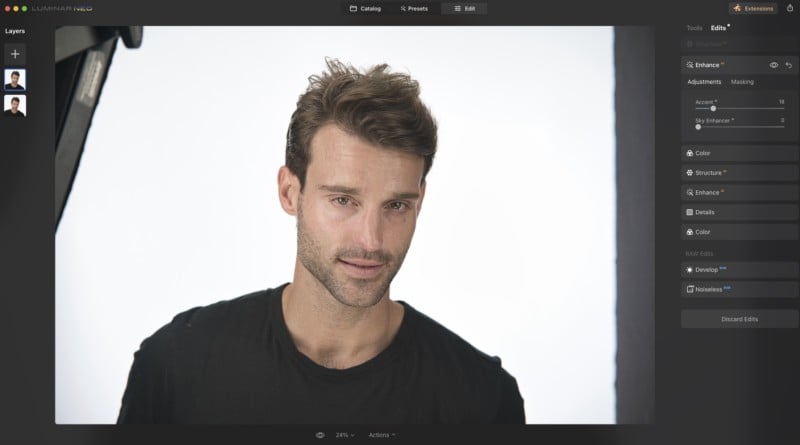
It might actually be best to start with using the Structure and Enhance AI tools to start as these tools will help users automatically make adjustments to the highlights, shadows, contrast, tone, saturation, and exposure of the image for you. The powerful AI tools within Luminar will analyze the image and make some of the basic and most fundamental decisions in your image edits for you here, making it easily the smartest way to start editing your image. For these edits, we kept things a little more natural, using the Accent AI set to about 22 (out of 100) with an even smaller bump in the Structure AI slider (about 8).
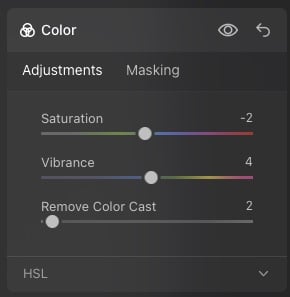
After starting with the AI tools, the next step is to open the Develop section where users will find most of the tools they are familiar with from other editors like adjustments to highlights, shadows, contrast, exposure, white balance, lens optics corrections, and even sharpening and noise reduction. These will apply globally to the image and are a great place to start to get the photograph looking the way you want after using the AI tools. For me, I just boosted the shadows a little to get a little more light on the dark areas of my image, and added a little more contrast with a quick tweak to the white balance to even things out. Finally, from the COLOR tool, since this is a headshot, I lowered the saturation about -2 and bumped the vibrance by about +4 while removing the Color Cast by about two points. While subtle, this helped me dial back the red/orange tones in the skin slightly without having to go in and manually make adjustments to each Hue/Saturation slider.
(Obviously this doesn’t apply to my current photograph, but with outdoor portraits or maybe if my lens/sensor was dirty and had some dust spots on it, this would also be a good time to use the ERASE tool to automatically remove the dust spots and power lines from the image.)
Improving Skin Tone And More With AI
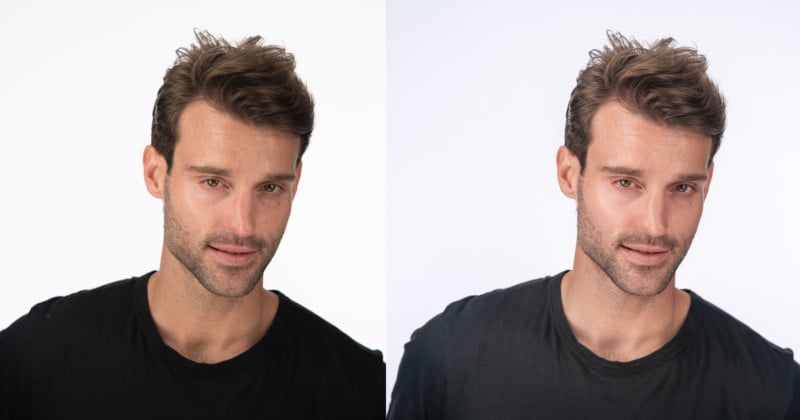
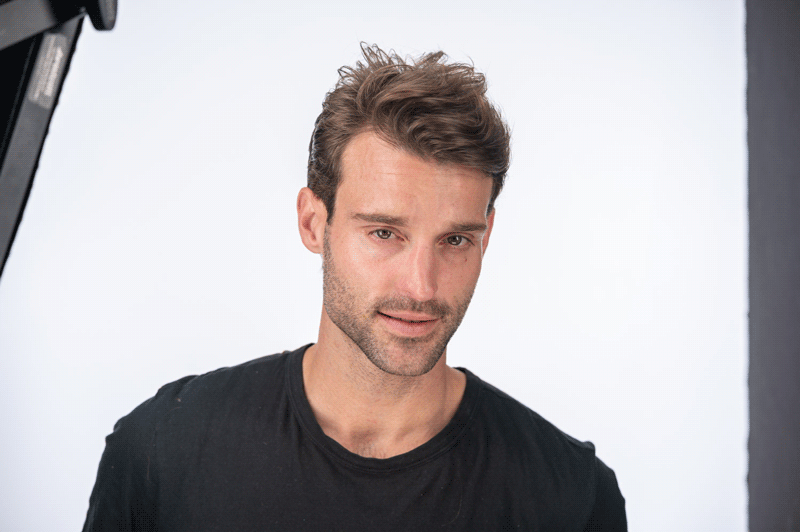
Now we get into the more portrait-specific tools like the Face AI and Skin AI tools to help correct skin tones, remove shine, adjust the lighting specific to the face, and even reshape the face and body if that is needed or requested by the clients. In this particular instance, since we’re working with a bearded male model who has pretty good skin to begin with, we don’t need to go too heavy on the Skin and Face AI tools.
To help save time from dodge & burning and frequency separation/color adjustments, I simply bumped the Skin adjustments by about 10 on the slider to even the tones out while keeping the skin texture very natural (aka rugged) but bumped the Shine Removal up to 35 since I didn’t want the highlights on his face for this particular look.
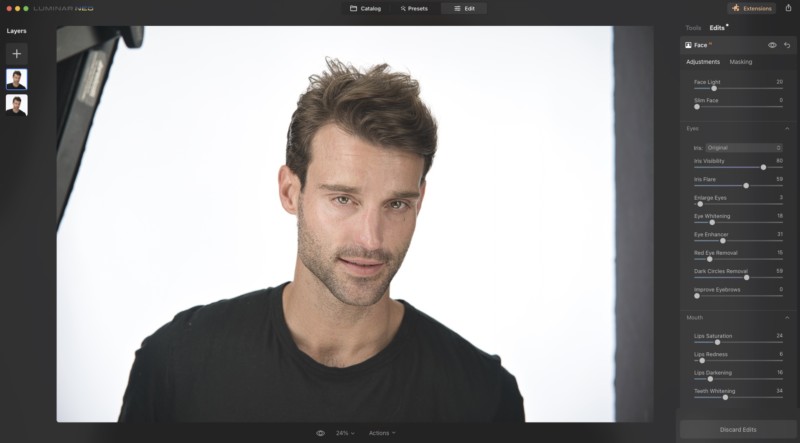
Since this is an actor headshot, the next adjustments were with the Face AI tool where we bumped the Face Light up slightly, made the eyes pop while removing the “red eye/vessels” slightly, and significantly reduced the dark circles (a task normally tacked through manually dodge and burn in Photoshop, but was a simple 3-second adjustment with Neo).
This effectively wraps up the “basic” edits for the headshots taking us from raw to a very refined image, which the edits can be saved as a preset and applied to the rest of your session which I’ll explain in more detail a little further below.
Applying Edits to the Entire Session
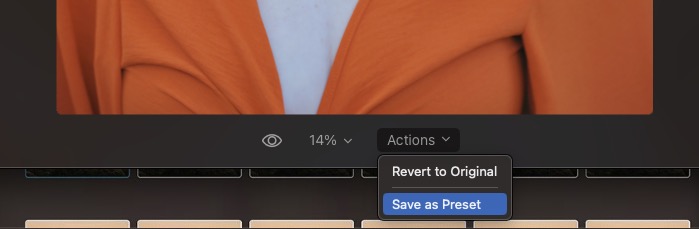
After you have made the adjustments you want to the brightness, skin tones, colors, and more, you can even save these adjustments as your own custom preset by clicking Actions and clicking SAVE AS PRESET which is located at the bottom of the Edit screen below the image you will be working on. Just be sure to name it properly as you cannot make changes to it once it has been saved. The good news is there is no limit to the number of user presets that can be manually created for the app, meaning you can create custom edits for pretty much every conceivable setting.
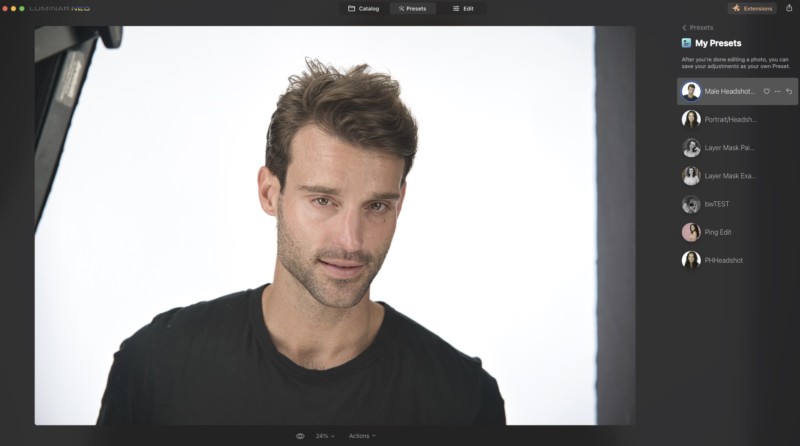
From here, if you have multiple headshots you need to edit, you can save some time by taking this preset and applying it to the rest of the images from your session, making it easier when culling to choose which images you want to continue working on, and obviously save a lot of time and steps by already having the “Basics” of your editing session done and applied to all of the photos.
You can apply this preset, or the adjustments as a whole, by viewing the session from the Catalog view in Luminar Neo, copying the adjustments from the image you are working on, selecting the rest of the session, and selecting Sync or Paste adjustments (from the right click dropdown menu) to the rest of the images.

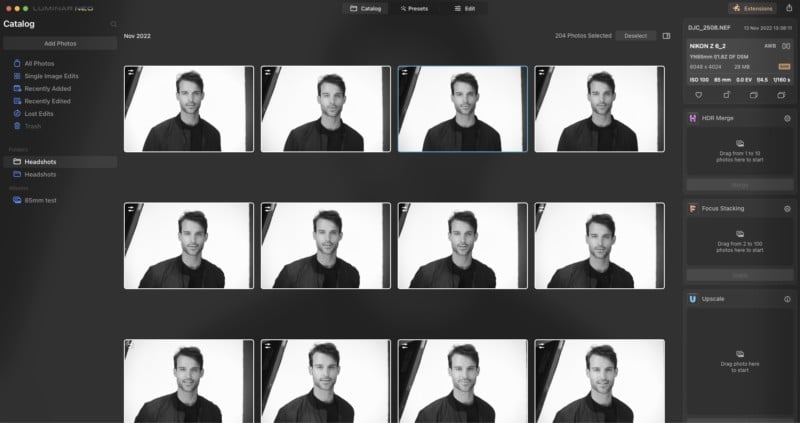
Depending on the number of images and complexity of the edits you have made, this process could take a few minutes depending on the speed of your computer, once it completes you will notice that all of the thumbnails have updated to reflect the changes made to the batch.
Cleaning Up and Finalizing The Shot
Now that we’ve applied the base edits to the session as a whole, it’s time to work on the fine details of the individual images you want to edit and finalize. The first thing we need to do in this headshot is clean up the cluttered background. We do this by simply selecting the ERASER tool from the essentials section. This kind of acts like a real-life magic-eraser (aka content aware) where we’ll mask over the objects in the image we want removed. In this case, it’s the edge of the v-flat and lights in the corners of the shot we want taken out.
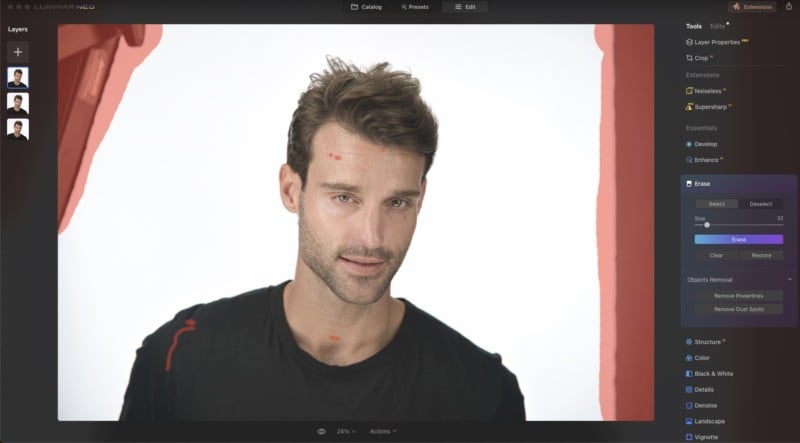
Just click “Erase” after the selections have been made, this can include fixing “blemishes” and even fabric and hairs on clothing if needed to have the system remove those problems and distractions from your image.
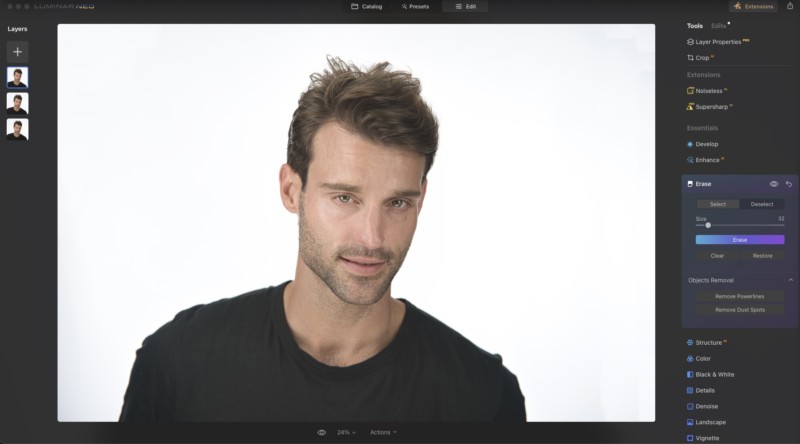
In just seconds, the erase tool will remove unwanted elements from your image, including skin blemishes leaving you with a near-perfect shot with just minor details left to adjust. In the portrait and headshot scenario, users will often have some stray hairs they need to have cleaned up. To do this, you can either spend some time doing additional micro-erase tool work, or you can use the “Mask AI” tool found in the Structure tool and select “human” to show the resulting mask it created.
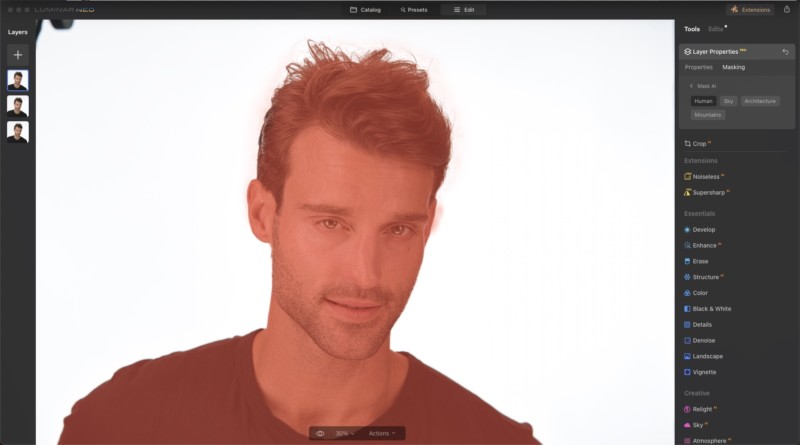
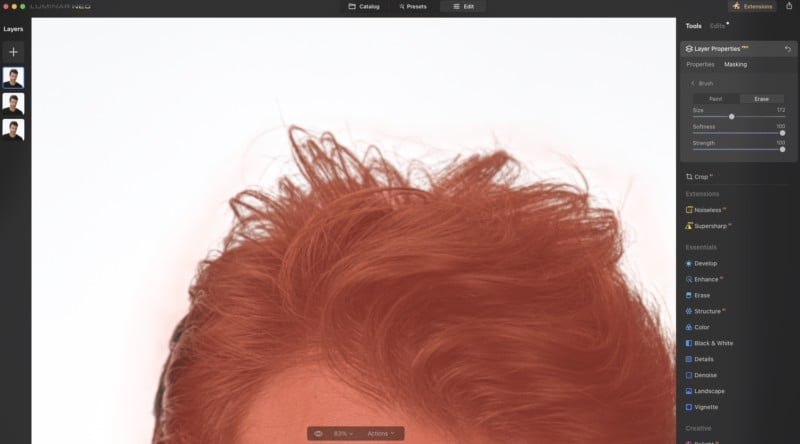
Sometimes the mask isn’t 100% perfect, but it’s rather easy to clean up simply by backing out of the MaskAI and selecting the BRUSH tool and “SHOW” to ensure we can see the mask. Then just simply add or remove sections of the mask to make sure it’s covering exactly the area you want for your next steps of the edit. Using the mask tool here can allow us to eliminate any stray fly hairs we don’t want in the image by removing them from our “human mask” and then clicking INVERT on the mask actions and pulling the structure details down. Since we have a solid and clean background, this is a very easy way to deal with stray/fly hairs in the image, leaving you with a clean, crisp headshot at the end.
All that’s left to do is to export the final edit in the format of your choice and that’s it, you’ve edited a portrait from start to finish using Luminar Neo and its advanced AI tools.
Full disclosure: This article was brought to you by Skylum, the software company behind Luminar NEO.
[ad_2]