[ad_1]
We live in rather amazing times, with private citizens travelling to space and citizen scientists contributing to the knowledge base of professional astronomy.
Now, just as it did with the Hubble Space Telescope, NASA has made data from the James Webb Space Telescope (JWST) available for download, for anyone to process for themselves.
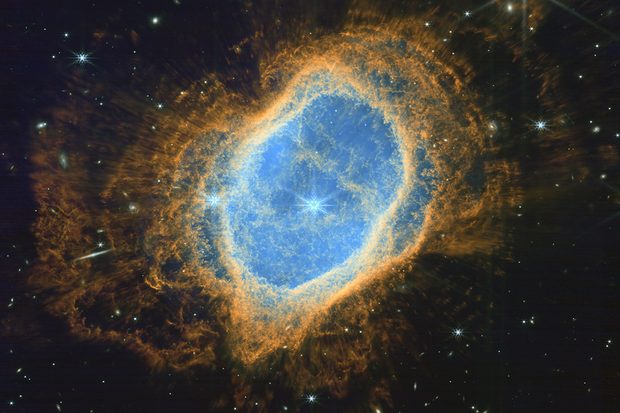
Below is our final image of NGC 3132, processed from raw Webb data. Here we’ll walk you through how to do it, step-by-step.
See the James Webb Space Telescope’s latest images for inspiration and read our guide to image processing for more advice.

How to get raw data from James Webb Space Telescope
Visit the MAST Portal, an archive named after Barbara Mikulski, a retired US senator and staunch supporter of space exploration.
Clicking on Advanced search at the top of the page opens a new window.
On the far right, type ‘JWST’ in the Mission box and press Enter.
At far left, under Columns, select Release date and scroll down to the box of the same name.
Type ‘2022-07-13 14:00:00’ as the beginning date and time – 13 July 2022 being the day on which the first observations were released to the public.
With the end date at default (the year 2050), note the number of Records found at the top of the page.
At the time of writing, there were already over 120,000 in the archive.
As NGC 3132 is our target and was one of the first data sets released, entering an end date of ‘2022-07-13 16:00:00’ displays a manageable 2,325 records.
Clicking Search at top left reveals the individual file folders and you’ll need to narrow the field yet again.
Under Instrument in the Filters box at left, choose the near-infrared data by checking NIRCAM.
Depending on the width of your monitor and browser window, you may need to use the scroll bar at the bottom to slide over to the Target name column.
Also note the Filters column. I found F187N, F356W and F444W to be the most useful filters.
Click on the floppy disc icons of records 13, 15 and 18 to download the zipped folders to your computer (see image below).

Choose your colours
Unzip the folder to a suitable location on your computer then open the parent folder, then a second folder with the same name and, finally, the JWST directory.
Next, open the Nircam folder, discarding all but the FITS file ending in ‘i2d.’
Double-clicking that file will open seven individual files in your program of choice, mine being PixInsight.
Of these, the seventh and last to open has a _SCI suffix and is the only file that you’ll need.
When finished, you will be left with three files to post-process, each ending in ‘i2d.fits’, with the filter names f444w_f470n, f356w and f187n.
Those of us who process narrowband images will understand the concept of ‘mapping’ data that’s invisible to the human eye to colours that we can perceive.
The same is true here. Rather than the emission lines of the Hubble palette, we’re now dealing with Webb’s near-infrared information.
How best to assign these filters? For guidance, search online for ‘NIRCam Filters – JWST User Documentation’ or visit the NIRCam Filters page.
There you will find a full-colour graph illustrating the transmission lines of each filter from short to long wavelengths.
While there’s no single, correct way to proceed, it made sense to me to assign the shortest wavelength data (F187N) to the blue channel, as blue is on the shorter end of the visible spectrum.
Conversely, I mapped the long wavelength F470N data to red and the medium F356W to green.
I found this to be the most aesthetically pleasing colour blend for this particular object, and strikingly similar to the Hubble SHO palette (see image below).

After marrying the channels with PixInsight’s Channel combination process, the images were cropped of edge artefacts and stretched with Histogram transformation (HT).
Transferring a Boosted autostretch from the STF (Screen transfer function) to HT with the RGB channels unlinked provided a great start to good colour.
PixInsight’s SCNR (Subtractive chromatic noise reduction) was then applied to reduce an undesirable green cast in the stars (see image below).

From there, a range mask was applied, so that contrast, sharpness and colour saturation could be boosted in the nebula only.
As the data was so clean, no noise reduction was needed for our final image, which you can see at the very top of this page.
If you’re a Photoshop-based processor, be sure to view Nico Carver’s excellent tutorial, ‘Can I process the JWST data better than NASA?’ on his ‘Nebula Photos’ YouTube channel, which you can view below
Processing JWST data: 3 quick tips
- Knowing the release date of a particular data set will help narrow your records search considerably.
- Note that the strength of the NIRCam’s infrared signal may render noise reduction unnecessary.
- While gathering the data is a rather tedious process, the end result is well worth the effort!
Have you processed your own James Webb Space Telescope data? We’d love to see it! Get in touch by emailing [email protected].
This guide originally appeared in the November 2022 issue of BBC Sky at Night Magazine.
[ad_2]