Southern Illinois astrophotographer captures the night sky in these incredible images

[ad_1]

Few things in this world are more beautiful than the night sky. But, because of the ever increasing light pollution, few have seen the night sky in all its photogenic glory. One local man is putting his technical expertise to use bringing heavenly beauty to Southern Illinois. 

“I think that people really enjoy seeing my astrophotography because it is getting harder and harder to experience,” said John O’Connell, a local astrophotographer and teacher, who is also a PhD student in zoology at SIU that centers on digital mapping and aerial imagery. “I am lucky to live in Southern Illinois where light pollution is relatively low compared to major cities, but it still has enough that it washes out our view of many stars.”

O’Connell says that light pollution is only continuing to increase around the world, but with long exposures and advanced photo processing, he says he can show people what they are missing with their eyes.”

People are also reading…

And what the naked eye misses is awesome. O’Connell’s astro-art takes its inspiration from the artist’s enthusiasm for the night sky. “There might be as many reasons to enjoy astrophotography as there are stars in the sky, but it does have several aspects that I particularly enjoy. First, I grew up in Miami, FL where I could count the stars. For me to walk outside in Southern Illinois and see so many stars that I could never dream of counting them all just blows me away every time,” O’Connell said. 

Take, for instance, his “Grassy Bay Milky Way” which is featured this month at the Artspace 304 gallery, in the exhibit “Nature,” which showcases the beauty of Southern Illinois in a variety of media. The scene immerses you literally right in the water of the Crab Orchard Lake, and among the lotus fields which sprung up during the once-in-a-decade lowering of the water levels. O’Connell describes how he enjoyed exploring the banks with his photography colleagues by boat, but decided to get a closer look.  

“I then walked about 30 yards from the boat in knee-to-waist deep muck with about 6 inches of water on top. Of course, I forgot something in the boat and had to do the trip twice! I set my tripod with the camera close to the water to capture the trio of lotus at the bottom of the image complete with the water drops that were beaded up on top,” O’Connell said. 

What was captured over dozens of exposures and several panoramic stitching’s is a cosmic vision from the very humble but mystical lotus leaves of Southern Illinois. Light dances off the leaves as your eye traces them into infinity to the horizon, a darkened mass of trees in the distance. Just there at the darkest point of the photograph, a soothing orange glow rises up from the dark horizon into a galactic display of the Milky Way stood on end, pointing higher and higher as if to summon our vision beyond Southern Illinois lowlands whence it originated to the stars above and beyond to the furthest reaches of reality. The photograph is simply a masterpiece of art, both technically flawless and aesthetically rich, and, what’s most important, spiritually enlightening. We are called from the mud, the slime of the earth, to the stars, or from humility to a homeland among the stars.  

O’Connell has honed his photography art through countless hours reading and watching video tutorials, and trial and error, and now he wants to share his proven knowledge with others, even if it costs him.  

“I know that there are many people who want to capture the amazing night sky in Southern Illinois, so I put together a workshop, along with some fellow night photographers, to help people get started in that endeavor. Our focus will be on landscape astrophotography in particular, meaning pairing the sky with a foreground scene. My goal is that everyone will have the tools that they need to go out on their own and capture the Milky Way,” O’Connell said, who jokes that it is somewhat risky sharing his knowledge, because he is training tomorrow’s competition, but he says he maintains a collaborative and supportive mentality nevertheless. “Further, I liken photography to a journey, one in which I can give people some skills to help them navigate their own route and to their own goals, but not turn-by-turn directions to duplicate my work or style. Besides, where’s the fun in that?!”

O’Connell says that he hopes his art brings the viewer joy, happy memories, calm, wonder, or other pleasant feelings – like, for this viewer, spiritual enlightenment.    

“I love hearing from people when I am able to evoke positive emotions in them through my photography. There are plenty of worries in the world, so I hope that my art, whether purchased as a print or enjoyed for free on Facebook, helps make their day better.”

For those who just want to learn photography in general, O’Connell also hosts a free Beginner Outdoor Photography workshops at the Giant City State Park visitor’s center every few months, the next one being July 8. With limited seats are reservations are required, so contact Giant City State Park to claim a spot: (618) 457-4836.

For information about O’Connell’s advanced astrophotography course, go to his website https://www.johnoconnellphotography.com/home or message him on his Facebook, JohnOConnellPhotography, or, if for nothing else, to see this local artist’s amazing photographs!  

[ad_2]

Amazing shots of the Highlands night skies captured by award-winning photographer

[ad_1]


Click here to sign up to our free newsletters!

Graham Hazlegreaves with the equipment he uses to capture the stunning images of space. Picture: Aidan Woods.

One of the very best regions in the UK to capture the night skies is the Cairngorms and here is the heavenly proof.

Talented award-winning photographer Graham Hazlegreaves has shared with Highland News & Media some of his stunning images which, incredibly, were taken from his back garden in Boat of Garten.

Graham has captured these photographs of the hidden beauty of the universe using his technical know-how and specialist astrophotography camera equipment.

Our nearest neighbour, the moon. This is a single shot captured with my mirrorless camera and a 500mm lens and received a Bronze Award from the Guild of Photographers. Graham said: "The moon is not as easy a target as you may think. It is very bright with huge contrast against the night sky and this needs to be considered when selecting the exposure. " I edited this image in Photoshop and accentuated the colours of the moon stemming from the minerals spread across the surface from meteor strikes."
Our nearest neighbour, the moon. This is a single shot captured with my mirrorless camera and a 500mm lens and received a Bronze Award from the Guild of Photographers. Graham said: “The moon is not as easy a target as you may think. It is very bright with huge contrast against the night sky and this needs to be considered when selecting the exposure. ” I edited this image in Photoshop and accentuated the colours of the moon stemming from the minerals spread across the surface from meteor strikes.”

Of course it helps to know where to look – the sun and moon can’t exactly be missed and several of the Solar System’s planets are easy enough to see but pretty much everything else is not visible to the naked eye other than as pin pricks in the vast sky given the unimaginable massive distances from the earth.

Some of the galaxies are millions of light years away.

This is Sol, our sun, captured in white light last summer. Sol is in a phase of increased sunspot activity, and several are showing in this image. I captured this using my largest telescope, a Celestron Nexstar 8SE with a focal length of 2032mm. I used a commercially available solar filter which blocks 99.99 per cent of light. Graham said: "It is so important not look directly at the sun without using an approved Solar filter, if you do you risk serious damage to your retina and blindness."
This is Sol, our sun, captured in white light last summer. Sol is in a phase of increased sunspot activity, and several are showing in this image. I captured this using my largest telescope, a Celestron Nexstar 8SE with a focal length of 2032mm. I used a commercially available solar filter which blocks 99.99 per cent of light. Graham said: “It is so important not look directly at the sun without using an approved Solar filter, if you do you risk serious damage to your retina and blindness.”

Graham said: “We are blessed in the Badenoch and Strathspey area with dark skies which allow the beauty of the night sky to be visible to us.

“I remember when, as a child, growing up on the Wirral seeing dark skies full of stars.

“My imagination was captured by the Apollo Missions and especially the moon landings.

Moving further out again beyond the solar system, we enter the realm of deep space. This is Messier 42 (M42) also known more commonly as the Orion Nebular and is one of few nebulae that are visible to the naked eye. M42 is a diffuse nebula situated in the Milky Way and is the central 'star' of Orion’s sword. The Orion Nebula is some 1,344 light years distant, and the nebula spans some 24 light years across.
Moving further out again beyond the solar system, we enter the realm of deep space. This is Messier 42 (M42) also known more commonly as the Orion Nebular and is one of few nebulae that are visible to the naked eye. M42 is a diffuse nebula situated in the Milky Way and is the central ‘star’ of Orion’s sword. The Orion Nebula is some 1,344 light years distant, and the nebula spans some 24 light years across.

“I was fascinated by science and nature and through my photography I see the world and space in a new light.”

Graham added: “My astrophotography journey started about three years ago when I mounted my camera and 400mm lens on a tripod and captured my first image of the Orion Nebula in the constellation of Orion, the Hunter.

“The image showed a blue–purple image of the nebula.

Staying in the Orion area there are other nebulae that can be imaged with Graham's equipment but they are not visible to the naked eye. In the vicinity of the star Alnitak are the Horsehead and Flame Nebulae.The Horsehead Nebula is a dark nebula and is visible against the bright emission nebula IC 434 and is some 1,500 light-years from earth. Immediately adjacent to the Horsehead is nebula NGC 2023 – the small blue feature below and slightly left from the Horsehead Nebula. Graham explained: "Emission nebulae are so called because their light comes from atoms that are 'excited' by the radiation from a nearby star. Reflection nebulae are visible because they reflect the light from a nearby star." To the far left is the Flame Nebula is an emission nebula approximately 900 to 1,500 light-years distant. The nebula is a vast cloud of hydrogen gas which is excited by the ionising radiation from the star Alnitak.
Staying in the Orion area there are other nebulae that can be imaged with Graham’s equipment but they are not visible to the naked eye. In the vicinity of the star Alnitak are the Horsehead and Flame Nebulae.The Horsehead Nebula is a dark nebula and is visible against the bright emission nebula IC 434 and is some 1,500 light-years from earth. Immediately adjacent to the Horsehead is nebula NGC 2023 – the small blue feature below and slightly left from the Horsehead Nebula. Graham explained: “Emission nebulae are so called because their light comes from atoms that are ‘excited’ by the radiation from a nearby star. Reflection nebulae are visible because they reflect the light from a nearby star.” To the far left is the Flame Nebula is an emission nebula approximately 900 to 1,500 light-years distant. The nebula is a vast cloud of hydrogen gas which is excited by the ionising radiation from the star Alnitak.

“It wasn’t much to look at but it inspired me to find out more about astrophotography.

“I made baby steps with my digital camera and progressed onto a tracking mount that allowed me to capture longer exposures which allowed me to capture more details in the nebulae.

“Eventually I progressed to my current equipment.”

The Cone Nebula and Christmas Tree cluster lie some 2,350 light years from earth in the constellation of Monoceros. It is an emission nebula and star cluster – the colour green shows the oxygenrich gas clouds, red the hydrogen rich areas and the ambers/orange are sulphur rich dust clouds.

The professionally trained photographer captures all sorts of the images of the natural world which he said ‘for me covers just about everything between macrophotography and astrophotography’.

The technical part

Graham’s main telescope is a William Optics Zenithstar 61 II and Achromatic Refractor. Attached to it is a specialist astrophotography camera, the ZWO 294 MC Pro, it is a one-shot colour camera.

The smaller telescope mounted piggy-back on the Z61 is a William Optics Guide scope with a ZWO 290mm mono camera.

The North America Nebula (NGC7000) is an emission nebula located in the constellation of Cygnus (The Swan). The nebula resembles the shape of the North America Continent. The nebula is some 2,590 light years distant, 90 light years north to south and 140 light years across.

The rig is mounted on equatorial mount which ,in concert with the guide scope and camera, tracks the target very accurately accounting for the rotation of the earth.

The system is orchestrated by a minicomputer enabling Graham to take very long exposures of the order of five to 10 minutes.

Graham explains: “Long exposure times are needed to capture the very low levels of light reaching the camera from deep space.

The Rosette Nebula is also located in the constellation of Monoceros and is 5,200 light years distant. The Nebula is also sometimes referred as the 'Skull Nebula' because there is a resemblance to a human skull. The Rosette is approximately 130 light years across and the radiation from young stars excites atoms and produces the nebula we see today.
The Rosette Nebula is also located in the constellation of Monoceros and is 5,200 light years distant. The Nebula is also sometimes referred as the ‘Skull Nebula’ because there is a resemblance to a human skull. The Rosette is approximately 130 light years across and the radiation from young stars excites atoms and produces the nebula we see today.

“I capture a series of exposures and in bespoke software I integrate the images producing a detailed image of a faint nebula and galaxies many hundreds, thousands, and in the case of galaxies, millions of light years distant from earth.”

Further out again we find two nebulae in the constellation, Cassiopeia.Graham said: "The first is the Heart Nebula and is one of the most beautiful nebulae that I have had the pleasure to image. The Heart Nebula is some 7,500 light years from earth and is in the Perseus Arm of our Milky Way Galaxy. "In this narrowband image the blue colour is ionised oxygen and the orange colours from ionised sulphur gases."
Further out again we find two nebulae in the constellation, Cassiopeia.Graham said: “The first is the Heart Nebula and is one of the most beautiful nebulae that I have had the pleasure to image. The Heart Nebula is some 7,500 light years from earth and is in the Perseus Arm of our Milky Way Galaxy. “In this narrowband image the blue colour is ionised oxygen and the orange colours from ionised sulphur gases.”

A bit of explanation

Put simply, a nebula is a giant cloud of dust and gas in space.

Also located in the Cassiopeia constellation at 7,500 light years from earth is the Soul Nebula which is an emission nebula.

A galaxy can have millions or billions of stars.

The nearest large galaxy to earth, Andromeda, is 2.5 million light-years away. So, we see Andromeda as it was 2.5 million years in the past.

The universe is filled with billions of galaxies.

Moving on from our own galaxy is the Andromeda Galaxy (M31) which can found in the constellation of Andromeda and is 2.5 million light years from earth.The bright red/pink areas in the arms of the galaxy are regions where star formation is taking place. Andromeda is larger than our galaxy and is on a collision course and will ultimately merge with the Milky Way Galaxy in about four to five billion years.

Looking to the future

Graham said: “My journey into astrophotography has been one of discovery and wonderment which has clearly been helped by the dark skies we enjoy over the strath.

“But we should not take those skies for granted and we should strive to use lighting systems that do not pollute the night sky.

Finally moving even further out into inter-galactic space we have the Whirlpool Galaxy (M51a).The Whirlpool Galaxy is a grand spiral class galaxy and is interacting with a smaller galaxy M51b/NGC 5195.This galactic interaction is taking place 31 million light years from earth. This is a cropped image to show the interaction.

“If we can protect the night skies, then further generations may well be inspired by the marvels that exist in the universe.”

All images are copyright to Graham Hazelgreaves. If you would like to see more of hiss stunning work check out his website at https://ghazlegreaves.myportfolio.com/

.


Do you want to respond to this article? If so, click here to submit your thoughts and they may be published in print.

[ad_2]

Samsung Galaxy S23 Ultra accused of taking ‘fake’ moon photos via AI

[ad_1]

Samsung is in a bit of a controversy over the legitimacy of the Galaxy S23 Ultra’s Space Zoom photos that serve up detailed photos of the moon. 

A Reddit (opens in new tab) thread has exploded with a post claiming that the moon shots delivered by the Galaxy S23 Ultra are fake, with the phone applying non-existent details to photos of the moon. Samsung has claimed that it does not overlay images into photos or add in texture effects. 

@tomsguide (opens in new tab)
♬ PRETTY BOY FLOW – STURDYYOUNGINN (opens in new tab)

While Reddit user ibreakphotos said this was technically true, in practice Samsung was adding detail into moon shots, which they claim is proven through their own tests. The test involved taking an image of the moon from the internet, blurring it on a laptop then taking a zoomed-in photo of it from afar using a Galaxy S23 Uttra in a dark room. 

A side-by-side photo of a blurred photo of the moon and the final image a Galaxy S23 Ultra produced

This side-by-side comparison shows a blurred photo of the moon and what the Galaxy S23 Ultra allegedly produced.  (Image credit: ibreakphotos / Reddit )

Given a gaussian blur was applied, there was simply no data for the Galaxy S23 Ultra’s image signal processor or computational photography algorithms to process. Yet the photo served up has a lot more detail in it than could be seen in the original image. As a result, the Redditor branded the Galaxy S23 Ultra’s astrophotography moon shots as “fake” given the detail enhancements were seemingly added. 

[ad_2]

Samsung responds to fake moon photo accusations, says it ‘does not apply any image overlaying’

[ad_1]


null


© Tom’s Guide
null

Samsung has been in bit of controversy this week over the legitimacy of the Galaxy S23 Ultra’s Space Zoom photos that serve up detailed photos of the moon. And now the company has issued a response. 

It all started with a Reddit post claiming that the moon shots delivered by the Galaxy S23 Ultra are fake, with the phone applying non-existent details to photos of the moon. 

While Reddit user ibreakphotos said this was technically true, in practice Samsung was adding detail into moon shots, which they claim is proven through their own tests. The test involved taking an image of the moon from the internet, blurring it on a laptop then taking a zoomed-in photo of it from afar using a Galaxy S23 Uttra in a dark room. 

Here is the official response from Samsung, delivered via email to Tom’s Guide:

“Samsung is committed to delivering best-in-class photo experiences in any condition.

When a user takes a photo of the Moon, the AI-based scene optimization technology recognizes the Moon as the main object and takes multiple shots for multi-frame composition, after which AI enhances the details of the image quality and colors. It does not apply any image overlaying to the photo.

Users can deactivate the AI-based Scene Optimizer, which will disable automatic detail enhancements to the photo taken by the user.” 

The poster on Redditor claimed that given a gaussian blur was applied, there was simply no data for the Galaxy S23 Ultra’s image signal processor or computational photography algorithms to process. Yet the photo served up has a lot more detail in it than could be seen in the original image. As a result, the Redditor branded the Galaxy S23 Ultra’s astrophotography moon shots as “fake” given the detail enhancements were seemingly added. 

“Samsung is using AI/ML (neural network trained on 100s of images of the moon) to recover/add the texture of the moon on your moon pictures, and while some think that’s your camera’s capability, it’s actually not,” ibreakphotos concluded. “And it’s not sharpening, it’s not adding detail from multiple frames because in this experiment, all the frames contain the same amount of detail. None of the frames have the craters etc. because they’re intentionally blurred, yet the camera somehow miraculously knows that they are there.” 

What happened when we tried the fake moon test 

When we tried this on our Galaxy S23 Ultra, we didn’t get the same results. Rather our images of the moon turned out to be a fuzzy mess. 

We are just theorizing here, but the differences between our shots and ibreakphotos test results could be down to different software versions of One UI and the Galaxy S23 Ultra camera app. Unfortunately, ibreakphotos doesn’t detail what versions of the respctive software they are on.

It’s also possible that Samsung has turned off the post-photo processing in reaction to this controversy. 

Embrace or rage against the machine learning

Now some might claim this is false advertising, and that the Galaxy S23 Ultra isn’t the incredible zooming camera phone you might have expected. But others might shrug and understand that a small camera on the rear of a svelte phone isn’t going to be able to capture shots that even capable DSLRs would struggle with, unless it had some software help.

Given AIs are trained on data, and in this case images of the moon, the processing done by the Galaxy S23 Ultra’s space-related model is likely figuring out what detail should be added based on images of the moon it’s previously been fed.

The result might not be a true representation of what the Galaxy S23 Ultra’s camera sensors can capture, but we’d argue it’s not truly fake either. Instead, the moon shots are enhanced with details the camera can’t see or detect. In ibreakphotos’ test case, the details weren’t there but the Galaxy S23 Ultra’s processing is doing the equivalent of filling in the gaps based on what it knows could/should be in certain spots of the moon.

As such, the Galaxy S23 Ultra and its AI might be adding in detail and artificially enhancing moon photos but it’s not simply faking it with a different image. Think of it as someone applying a few edits to Instagram photos to pick out details or deliver more pleasing shots. These enhancements may not be true-to-life, but they aren’t simply fake Photoshopped images either. Whether you think such enhancements are acceptable or duplicitous is down to your tastes.

More from Tom’s Guide

[ad_2]

ZWO AM5 Review | Complete, In-Depth (After 8 Months of Use)

[ad_1]

ZWO AM5 Review

The ZWO AM5 is the astrophotography mount I didn’t think I needed. Yes, it perfectly matches the color of my existing ZWO cameras (and ASIAIR Plus), but do I really need a tracking telescope mount that doesn’t require a counterweight?

I have casually observed a number of harmonic drive telescope mounts appear in the astrophotography market over the past 5 years. I thought they were a clever idea, but definitely not something I would consider to be a ‘must-have’. 

After all, the traditional equatorial telescope mounts I use for astrophotography have been helping me collect incredible deep-sky images from my backyard for over a decade, why change now? Well, this one is a bit different. 

The AM5 is a strain wave gear (harmonic drive) telescope mount that was specifically designed to be compact, portable, and lightweight. In fact, it is not much heavier than a portable star tracker, yet it can handle the job of a much more robust equatorial mount. 

My first question was, does it actually track better than my existing astrophotography mounts? And to my surprise, the answer was no. So why is everyone excited about a new technology that doesn’t improve the primary function of the device?

The AM5 is all about portability. It’s about how everything seems to get a little easier once you start using it. The small size and overall convenience of the ZWO AM5 have changed the way I approach the art of astrophotography.

ZWO AM5 Mount

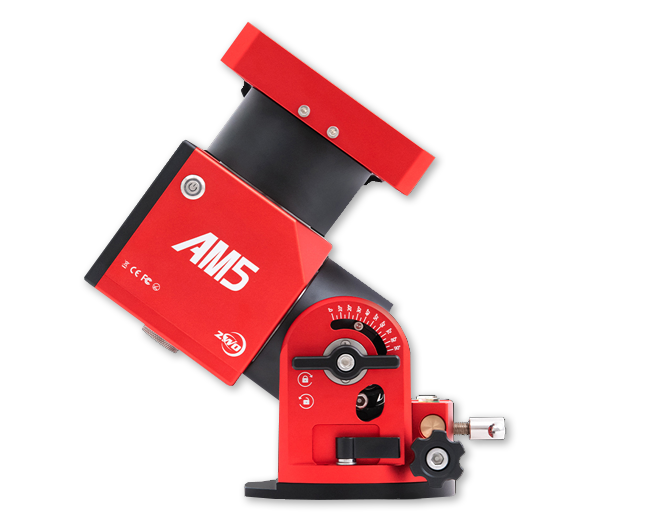
ZWO AM5 Harmonic Drive Mount ($1,999 at OPT)

Key Features

  • No Counterweight (for loads up to 28 lbs)
  • Guiding Error Between 0.6-0.8 
  • Extremely Portable & Lightweight
  • Functions in EQ/AZ Modes
  • WiFi Connection 
  • ASCOM Compatible
  • Vixen + Losmandy Dovetail Mounts
  • Flawless Function with ASIAIR
  • Up to 44 lbs payload (with counterweight)

Orion Nebula

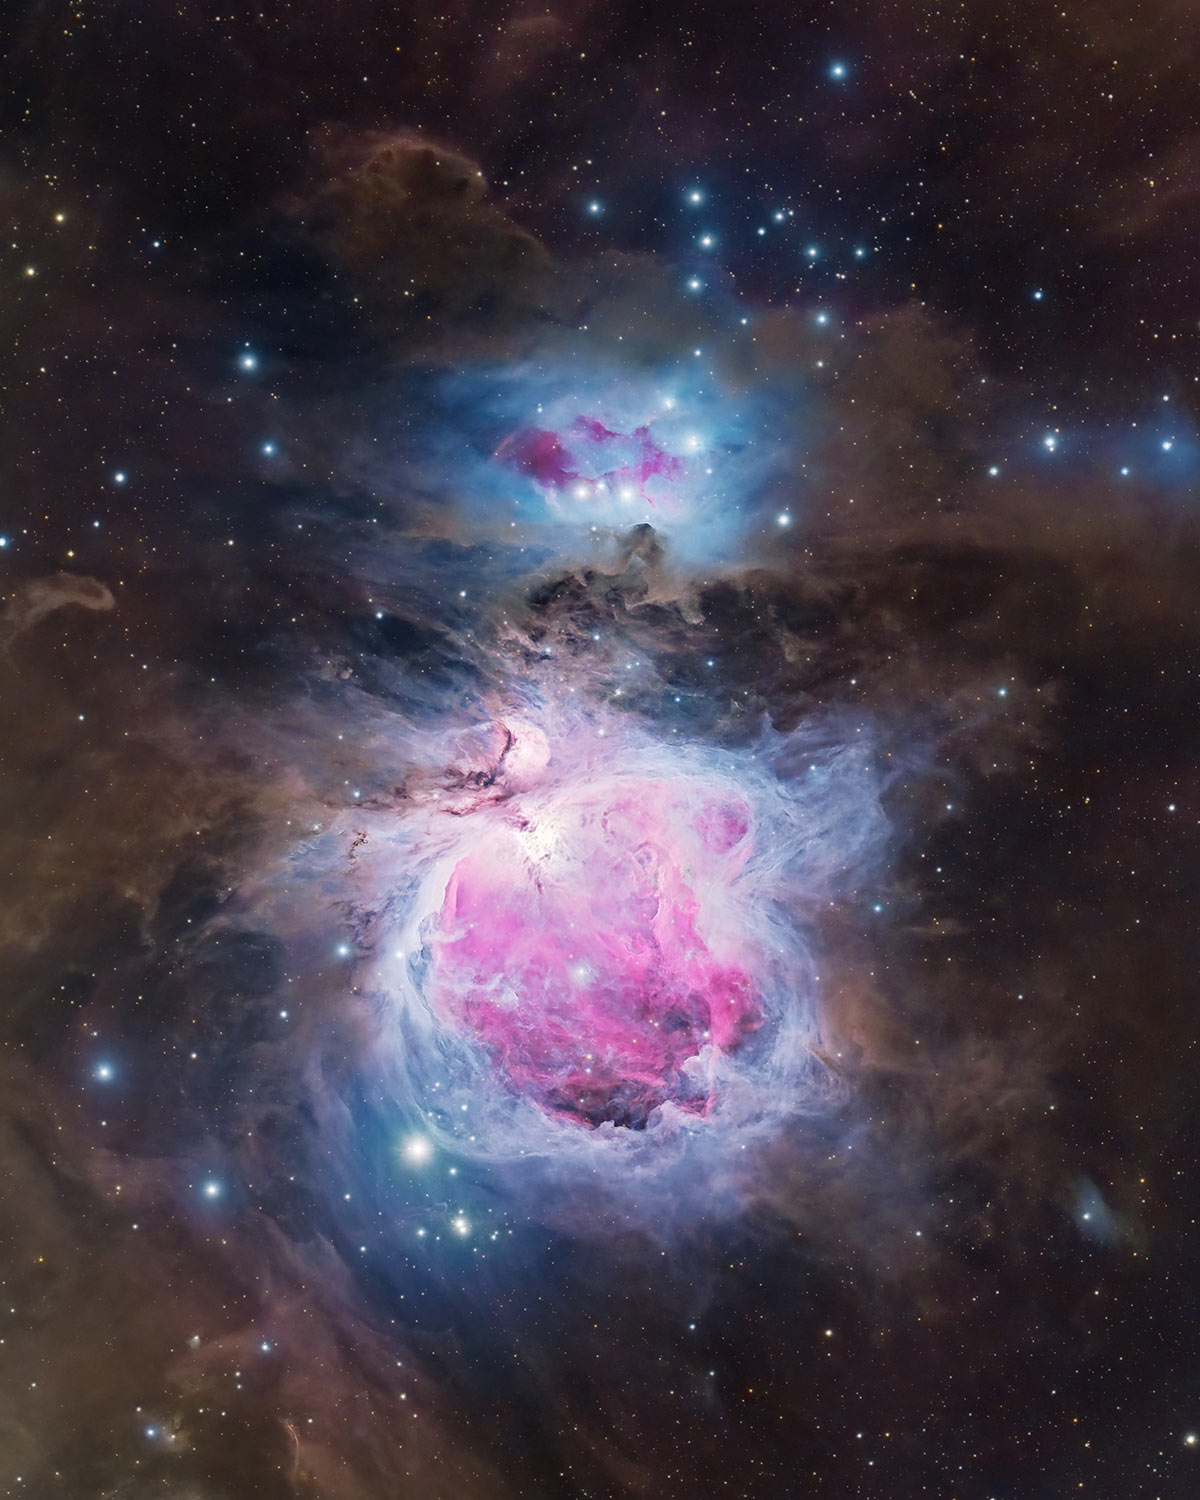
The Orion Nebula in LRGB. ZWO AM5, ASI 2600MM Pro, Radian 75.

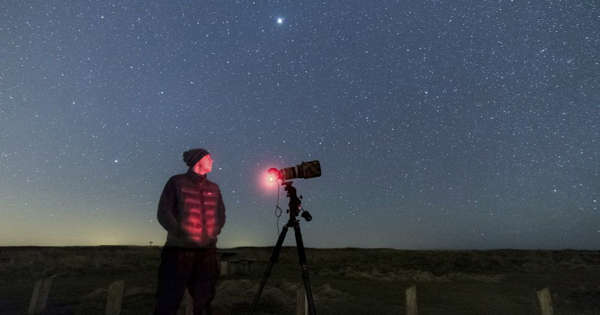
In this article, I’ll show you how well the ZWO AM5 harmonic drive mount has performed for me in all weather situations, from the backyard and beyond. From hot and sticky July nights to frosty January nights with temperatures well below freezing. 

The team at ZWO kindly lent me a demo copy of the AM5 mount around the same time they started shipping in the USA. There was zero obligation to provide a positive review, nor was I compensated in any way. 

I began testing the ZWO AM5 harmonic drive mount in July 2022, just as Ashley, Rudy and I moved into our new house.  I have been using this astrophotography mount for 8 months now, and I am ready to share my honest opinions about it. 

ZWO AM5 Harmonic Equatorial Mount Review

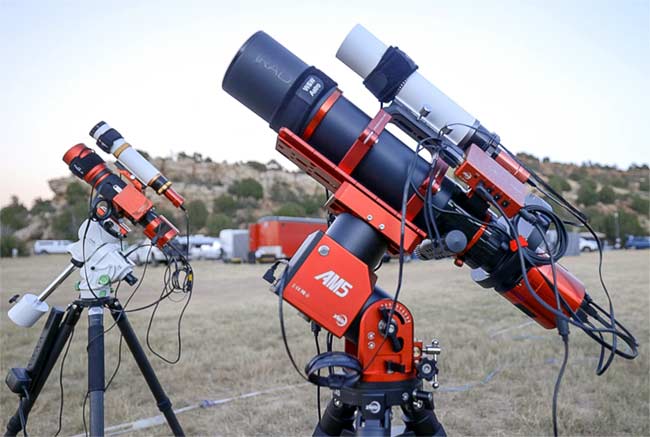
The ZWO AM5 is an incredible option for small to medium-sized astrophotography setups. With several deep-sky astrophotography kits at my disposal in the astro-garage, I find myself reaching for the AM5 most often. 

Although the majority of my deep-sky astrophotography sessions take place at home in the backyard, I like to travel to darker skies during the new moon phase in the warmer months.

I fully realized the magic of the ZWO AM5 when packing up for the Okie-Tex Star Party. This event required a full day of travel by plane, from Ontario, Canada to Amarillo, Texas (with a layover in Dallas). 

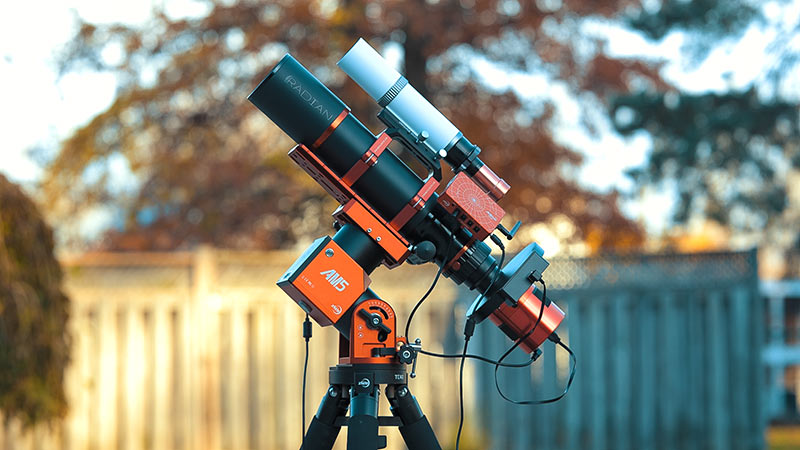
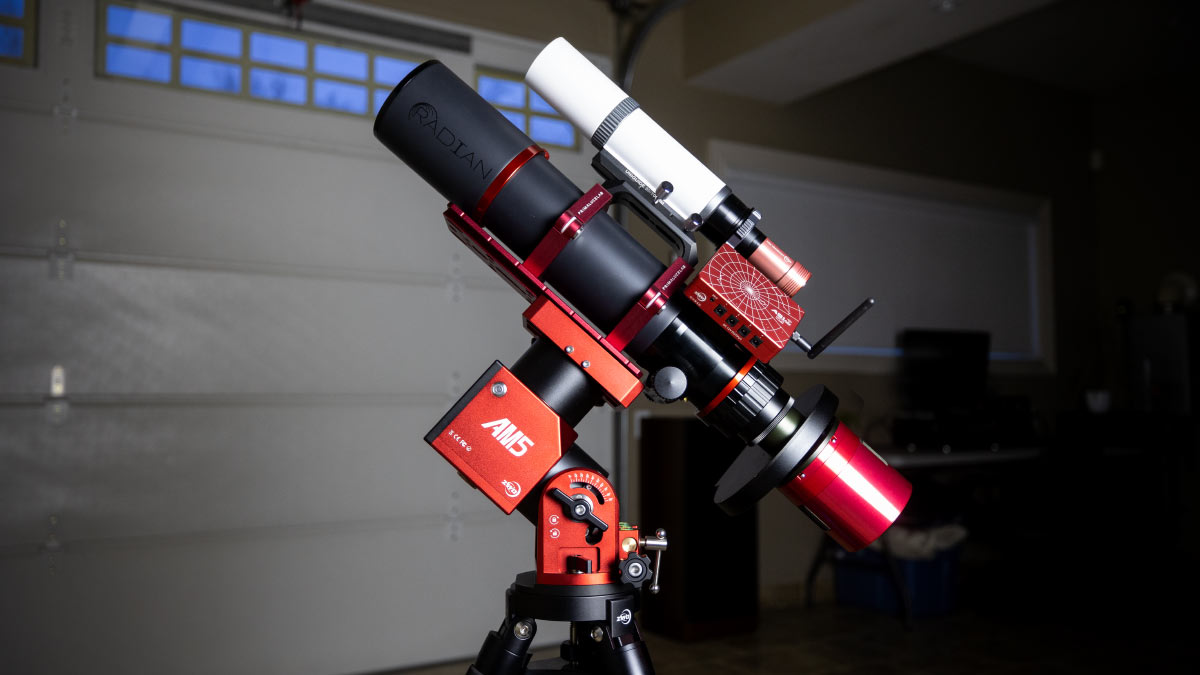
The deep-sky imaging rig I brought with me was the most advanced, capable astrophotography rig I’ve ever flown with. It included everything from the ZWO AM5  tracking mount to a 75mm apochromatic refractor telescope.

Oh, and a full-frame ZWO ASI6200MM Pro monochrome camera, a 5-position filter wheel, and a heavy-duty carbon fiber tripod. A bit of a jump from my usually travel-friendly setup involving a star tracker and telephoto lens. 

ASIAIR telescope

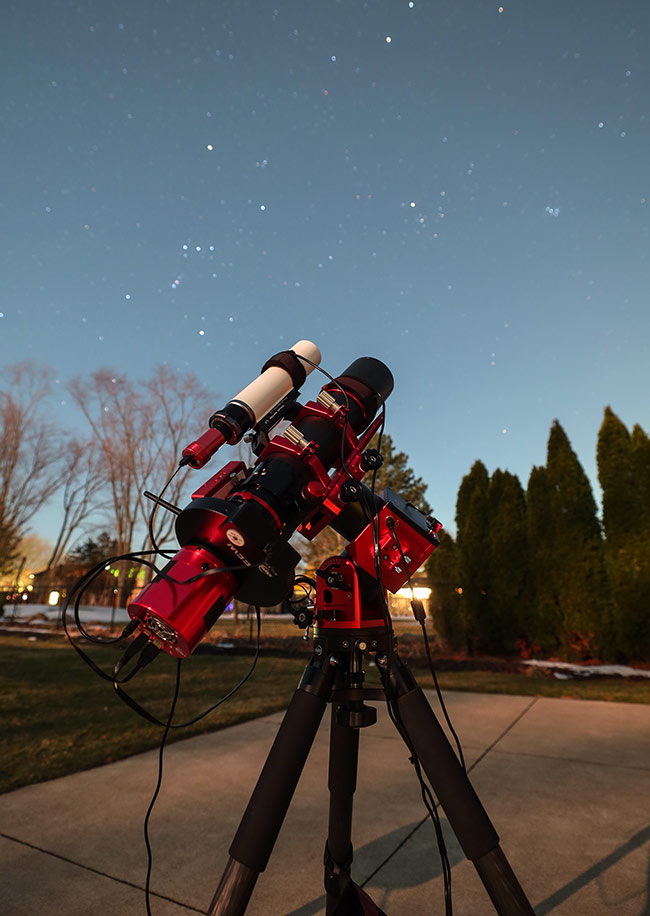
The ZWO AM5 mount set up at the Okie-Tex Star Party.

Historically, traveling with a deep-sky astrophotography kit is a bit of a challenge. If you do somehow manage to pack a robust, telescope-capable computerized tracking mount in your luggage, you better hope that it was packed securely with lots of padding.

I have never trusted an airline enough to safely check my luggage with my precious telescope mount inside. So if I am bringing astrophotography gear on a plane, it must fit in my carry-on bag. 

Not only is the ZWO AM5 mount small enough to pack neatly into your carry-on luggage, but I also brought it in my ‘personal item’ backpack. Yup, I could pull it out to play with right there on my lunch tray if I wanted. (I kept it in my backpack the whole time).

AM5 carry-on-bag
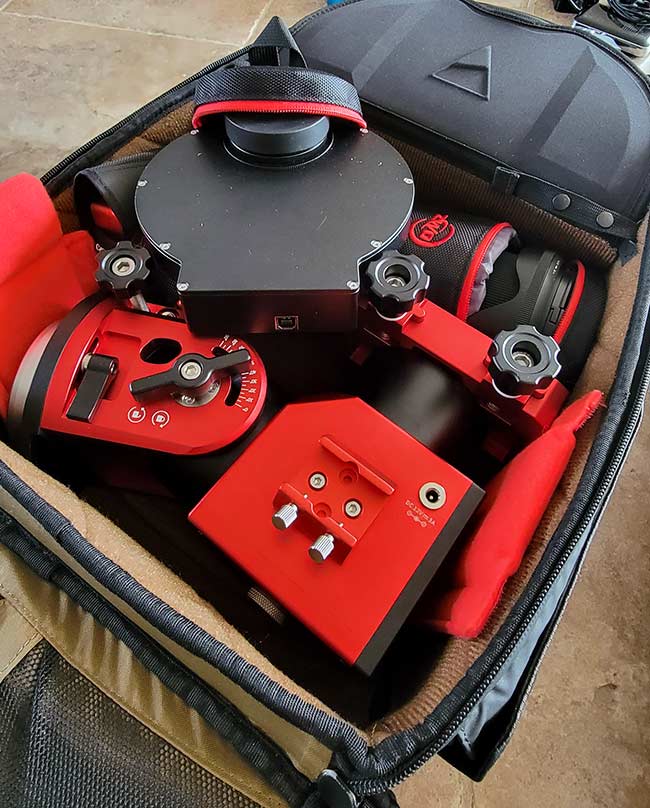
AM5 packed into my Nomatic V2 camera bag

Ashley brought the Sky-Watcher Star Adventurer GTi, another incredibly portable (fully capable) astrophotography mount. With an 11-pound payload capacity, the Star Adventurer GTi falls into the star tracker category, yet it is not much smaller in overall size than the ZWO AM5. 

telescopes at a star party

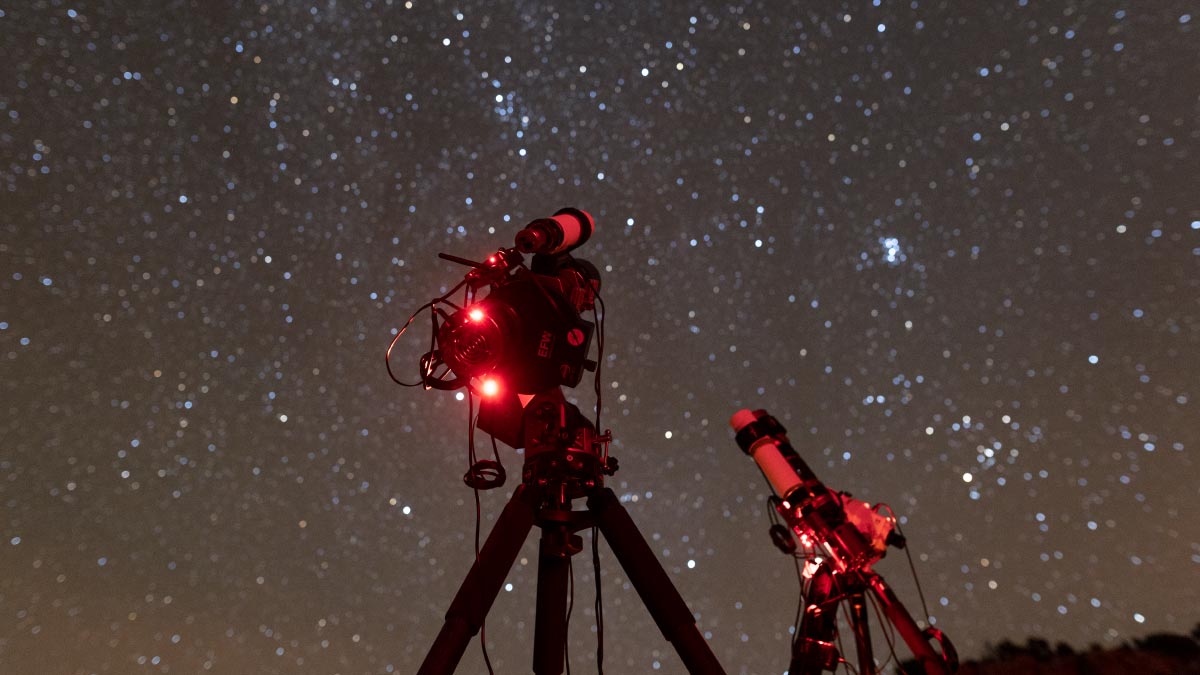
Our telescopes under the Bortle 1 skies of the Okie-Tex Star Party. 

After many successful astrophotography sessions with this mount, I decided it was time to share the incredible results and positive experiences I have had with it over the past 6 months. If you are in the market for a portable astrophotography mount to compliment your wide-field refractor telescope setup, I think the AM5 will exceed your expectations. 

Before we get into the nitty-gritty, let’s answer some of the most common questions people have about the ZWO AM5:

What is the maximum payload of the ZWO AM5?

The maximum payload capacity of the ZWO AM5 mount is 28.6 pounds, without the use of the counterweight. When a counterweight is added, the maximum payload capacity increases to an impressive 44 pounds. 

How much does the ZWO AM5 weigh?

The ZWO AM5 mount weighs just 11 pounds. It is lightweight enough to easily carry in and out of your garage, and fit in your carry-on bag on an airplane. 

What is the longest practical focal length for ZWO AM5?

I have personally had success using the AM5 with refractor telescopes from 400-800mm. ZWO confidently markets the mount as being able to handle a Celestron C11 (2000mm) without the use of a counterweight. 

How do you polar align a ZWO AM5 mount?

Because there is no polar finder scope built into the mount, you must use an electronic polar alignment tool such as the one built into the ZWO ASIAIR software. This was a bit of an unwanted change for me.

horsehead nebula

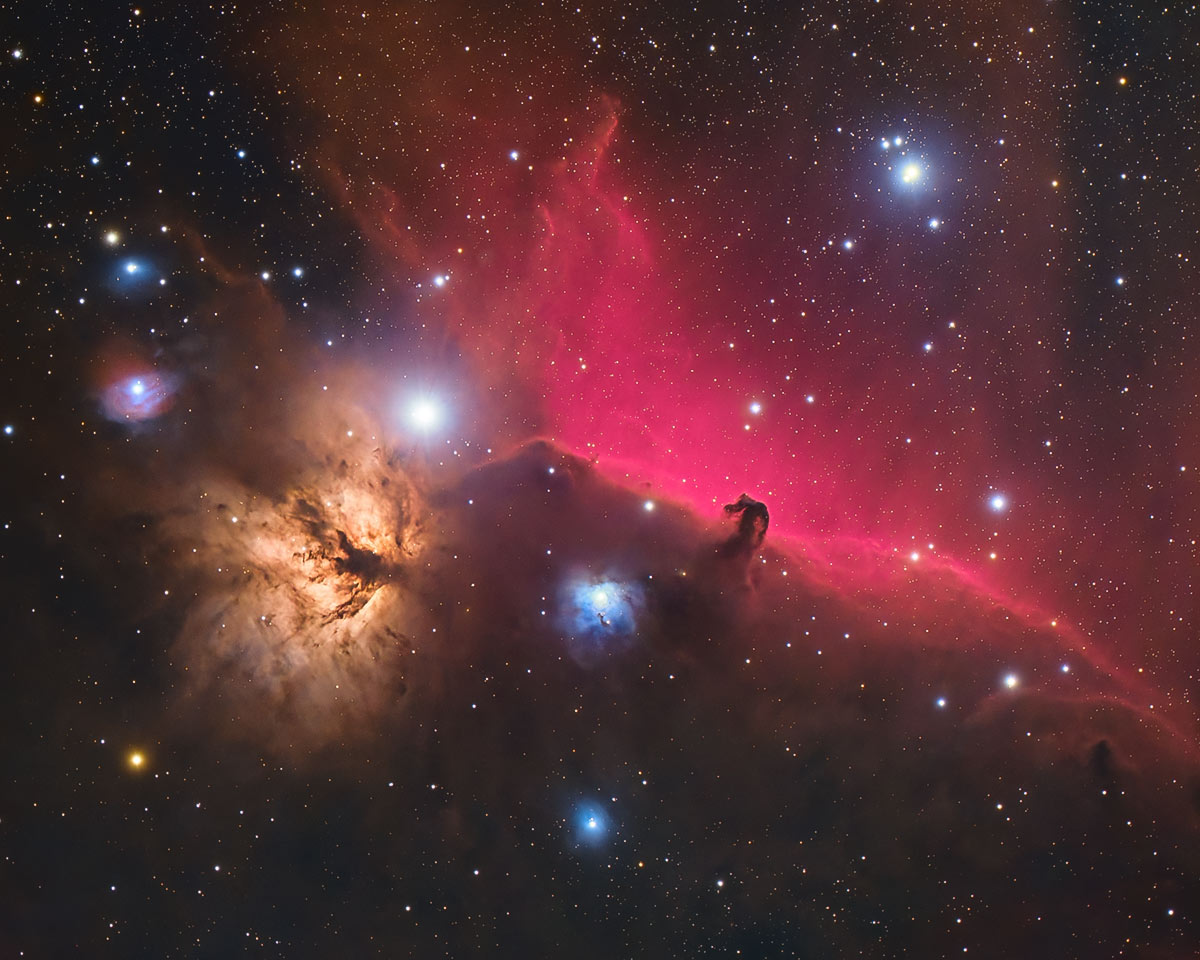
The Horsehead and Flame Nebula. ZWO AM5 mount, ASI2600MM Pro, Radian 75 APO. 

Equipment Used:

What’s in the Box?

The ZWO AM5 mount arrived at my house in two boxes. Box number 1 included the mount head itself, and the other contained the official ZWO T40 carbon fiber tripod. The tripod is strong and lightweight (5 pounds), and I definitely recommend purchasing this tripod to go with your AM5 if you can. 

A pier extension is also available to accommodate longer telescopes (to avoid running into the tripod), but I have not used it myself. The tripod can be purchased individually or in a bundle with the mount as it arrived for me. 

  • ZWO AM5 mount
  • The Carrying Case
  • The Hand Controller
  • Two Allen keys
  • A USB Cable
  • The Manual
  • ZWO T40 Tripod

astrophotography mount

The tripod is strong and sturdy, but you may find that it is a little short at just 31.5″ tall with the tripod legs fully extended. This places the telescope at about my waist, which was a bit strange at first. In terms of stability, having a lower center of gravity is a good thing. Just be sure that you’re able to point your telescope over any obstructions you have in your yard such as your house or any tall trees.

ZWO lists the maximum payload capacity for the tripod at 110 pounds, a ridiculously heavy amount that I doubt very few will ever come close to. Each tripod leg has padding along the top which is very much appreciated when carrying this setup outside in the winter. The tripod is said to be able to accommodate mount heads from other manufacturers including Celestron and Sky-Watcher, but I have not tested this feature myself. 

ZWO TC40 Tripod

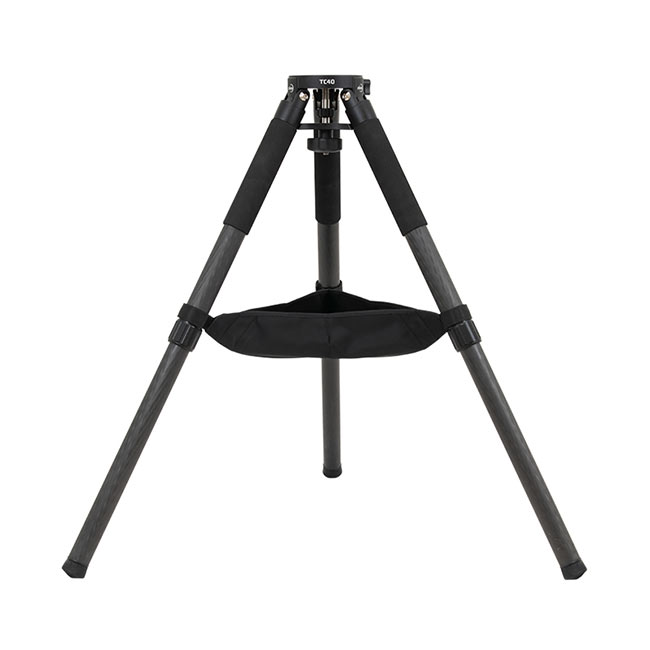
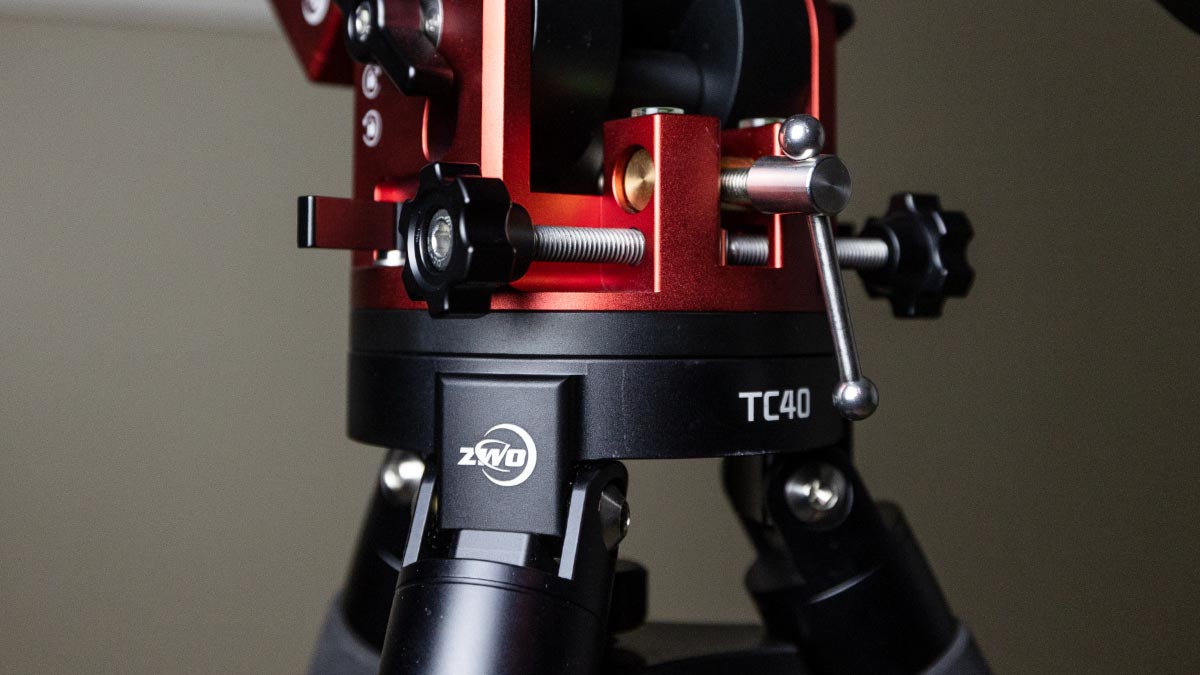
The ZWO TC40 Tripod is lightweight and ultra-stable

ZWO also offers pier extensions for those with imaging payloads on the longer side. Using my setup, the small refractor, filter wheel, and dedicated astronomy camera cleared the tripod legs even when pointed near the zenith, so this was not an issue for me. The pier extensions allow for more room between your telescope and the mount head so you don’t have to worry about a collision. 

ZWO AM5 Harmonic Drive Mount

Running the ZWO AM5 

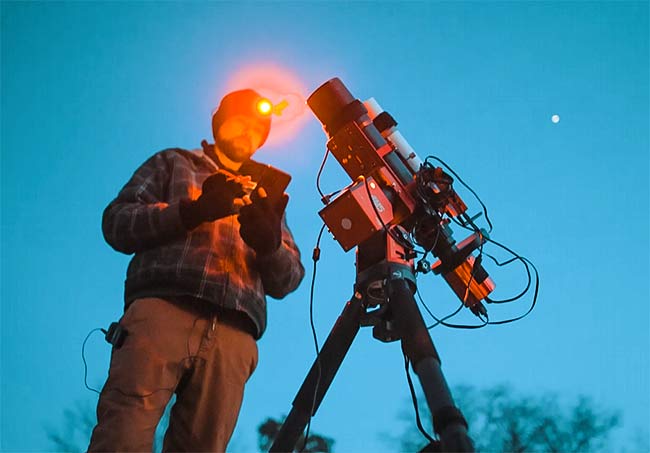
I know that many others that have reviewed the ZWO AM5 mount have successfully controlled it using software on their laptop computer (including the increasingly popular NINA). Because I am a huge fan of the ZWO ASIAIR Plus wireless experience, I chose to run the mount exclusively with this software. If you prefer to use your existing favorite image capture software, the ZWO AM5 supports ASCOM PC control. 

This allows me to control absolutely every aspect of my imaging session, from polar alignment to plate-solving my target. I have not connected the hand controller to the AM5 mount, not even once. The seamless, hands-free control of the mount using the ASIAIR mobile app is just too easy and painless to not utilize.

With the AM5 in the home position, I start my polar alignment process. The ASIAIR software communities directly to the mount via the included USB 2.0 cable, and runs the mount through a short routine involving rotating the telescope about 45 degrees in the RA axis.

From there, it’s a matter of following the on-screen prompts to make subtle adjustments to the alt/az adjustment bolts on the mount to dial in your polar alignment. The software uses your camera to take short exposure images of the star field and quickly plate-solves the information to guide you in the right direction.

Once this has been completed (it usually takes me about 2 minutes these days), you can slew to your intended target, or perhaps a bright star to focus your camera using a Bahitnov mask. If you own a ZWO EAF, the process becomes even easier as you wait for the software to find the perfect focus for you. 

ASIAIR controlling AM5 mount

It should come as no surprise that the AM5 and ASIAIR communicate flawlessly, as I am sure this is exactly what ZWO had in mind when they developed the mount. The ASIAIR is constantly being updated and tweaked to include new features such as a mosaic planner, deep-sky image processing, and much more.

If you use a non-ASI camera, I understand your frustration with the ‘closed ecosystem’ ZWO has created, but for ASI camera users (my first dedicated astronomy camera was the ZWO ASI071MC Cool in 2017) like myself, it is a great time to be an amateur astrophotographer. 

Balancing Your Telescope

If you are used to setting up a traditional deep-sky astrophotography setup on an equatorial telescope mount, this part just feels wrong. You do not need to balance the telescope in the RA and DEC axes on the ZOW AM5. In fact, there is no possible way to balance the telescope in RA if you are not using a counterweight. 

This is something to get used to (and you will), but it seems to throw all of the rules of setting up a telescope on a tracking mount out the window. Now, this incredible feat can not be mentioned without a bit of warning. 

Although the AM5 harmonic drive mount can handle the telescope payload with ease, you must ensure that the tripod base underneath is solid and secure. With a small refractor telescope like the one shown below, the tripod is stable even with the telescope slewed toward the meridian. However, with a heavier payload, it is possible for the entire tripod to tip over if the weight of the tripod base is not secure. 

For this reason, ZWO supplies sandbags to add stability and weight to the tripod. You may also want to add weight to the included canvas pouch that sits between the tripod legs. This is also a great spot to place any power supply cables and lens caps. 

best astrophotography telescope

 ZWO AM5 Guiding Performance

ZWO provides the following periodic error report on their website and states that “ZWO measures each mount and includes an exclusive PE curve before it leaves our factory”. I received a unique periodic error report for the ZWO AM5 I am using and it was very similar to the one shown below. 

ZWO AM5 Periodic Error Chart

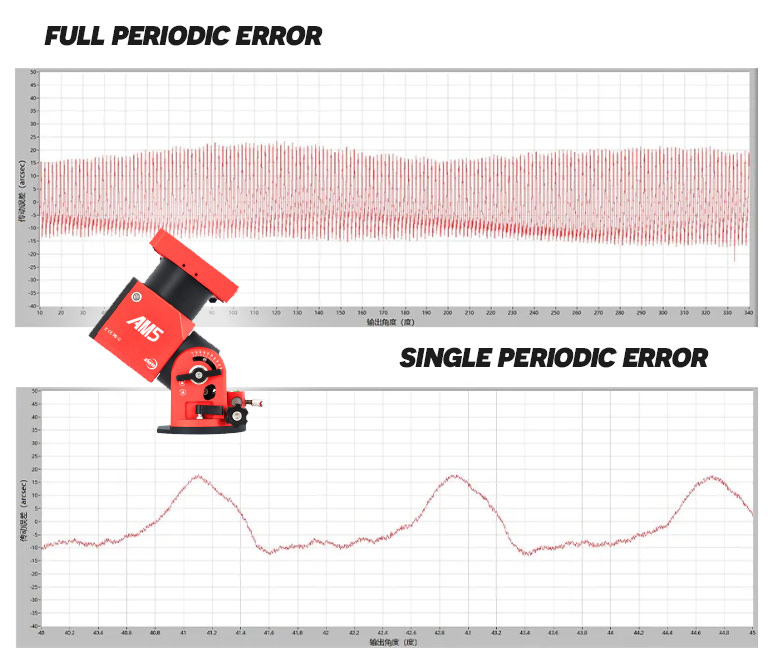
The guiding performance of the ZWO AM5 is more than adequate for my needs as an amateur astrophotographer. I regularly enjoy a total RMS error of about .06-.08 arc seconds depending on the sky quality conditions that night.

These values are equal to the level of performance I had become accustomed to using the larger Sky-Watcher EQ6-R Pro. It should go without saying, that these numbers can only be achieved after an accurate polar alignment of the telescope mount. 

The autoguiding experience on the ZWO AM5 is so consistent and painless, it is just not something I even think about when running an imaging session. After I polar align the mount, I use the guiding tool on the ASIAIR app to perform a quick calibration routine, and I am on my way. 

Shooting at a focal length of about 400mm is not exactly pushing the mount to its limits, but this is a practical use case for many backyard amateur astrophotographers. I am confident a heavier load would achieve similar performance, although I think a practical focal length range for this mount is 2000mm and under.

ZWO AM5 guiding graph

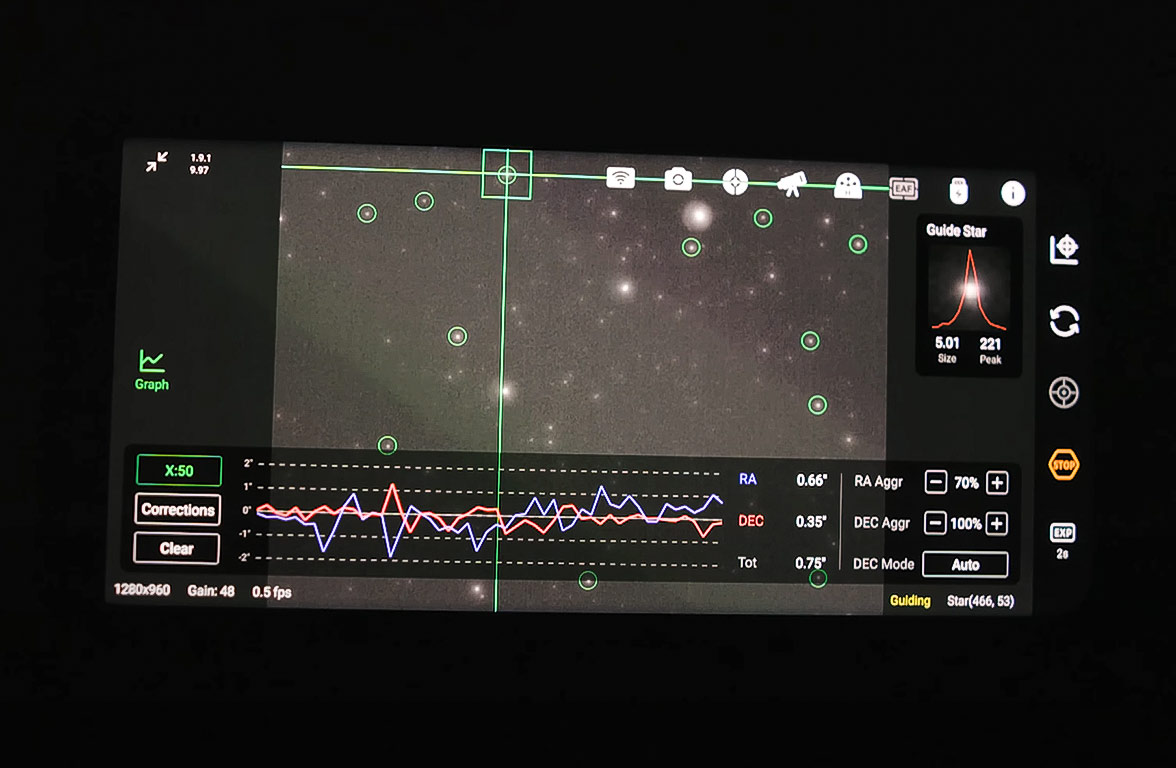
The guiding performance of my ZWO AM5 using the ASIAIR Plus. (Radian 75mm APO + ASI2600MM Pro). 

What is a Harmonic Drive Mount?

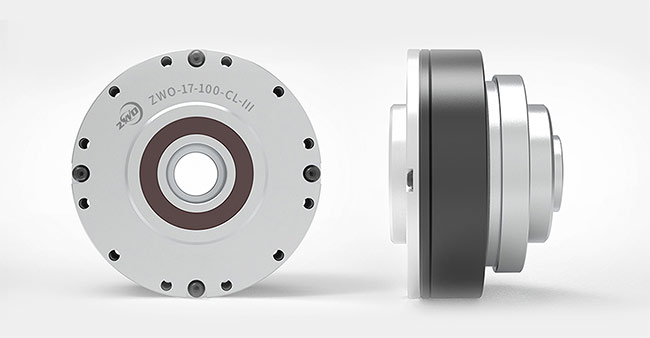
The ZWO AM5 uses a strain wave gear instead of worm gears as you would find in a traditional equatorial telescope mount such as the Sky-Watcher EQ6-R Pro or Celestron AVX. 

A harmonic drive has three key components, a wave generator, a flex spline, and a circular spline. The wave generator has an elliptical shape and consists of an elliptical hub and a special thin-walled bearing that follows the elliptical shape of the hub.

A strain wave gear system does not experience backlash, and balancing the weight of the telescope and imaging equipment is not required.

Hamonic Drive Mount

The strain wave gearing system at the heart of the ZWO AM5. 

Compared to a traditional equatorial mount head with worm gears, the harmonic drive design has the benefit of containing the entire system in a smaller, lighter mount head.

ZMO AM5 Specifications

  • Mount Modes: Equatorial + Altazimuth
  • Periodic Error: <+/-20″
  • Weight: 11 lb (5 kg)
  • Payload Capacity (Without Counterweight): 28.6 lbs (13 kg)
  • Payload Capacity (With Counterweight): 44 lbs (20 kg)
  • Dovetail: Losmandy, Vixen
  • Max Slew Speed: 6°S
  • Latitude Adjustment Range: 0°-90°
  • Power Requirement: DC 12V 5A
  • Autoguide Port: Yes (ST4)
  • Communication Interface: USB/WiFi
  • Hand Controller: Yes
  • Operating Temperature: -15°C-40°C
  • Power Failure Protection: Yes

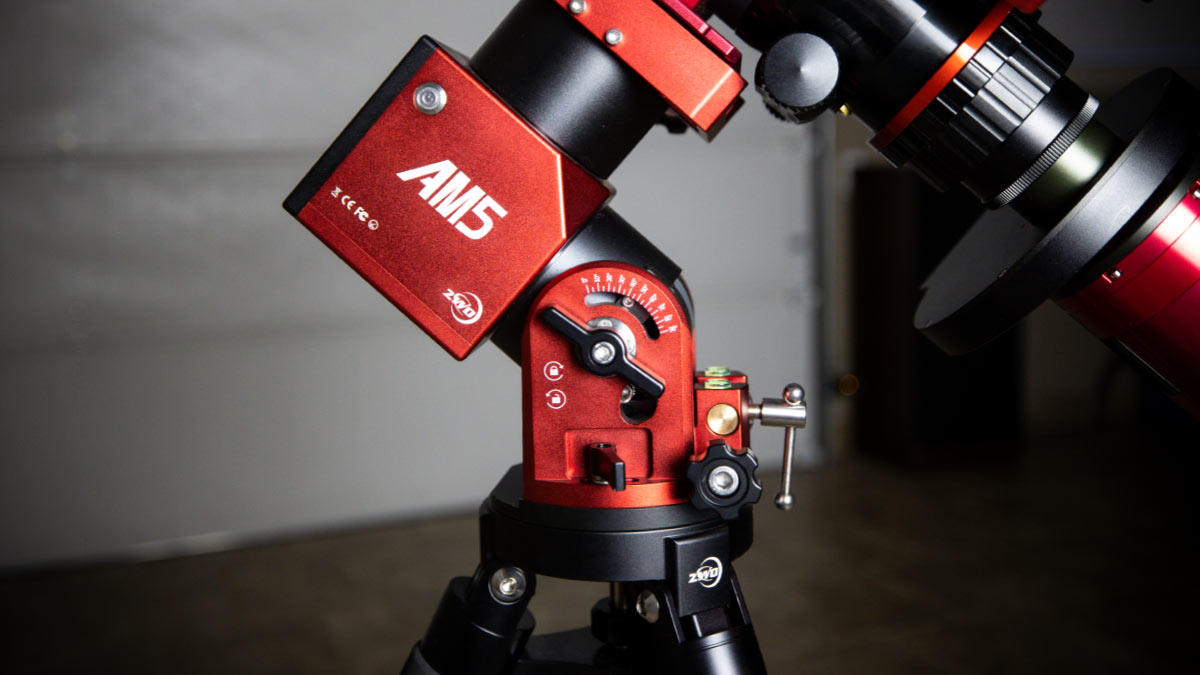
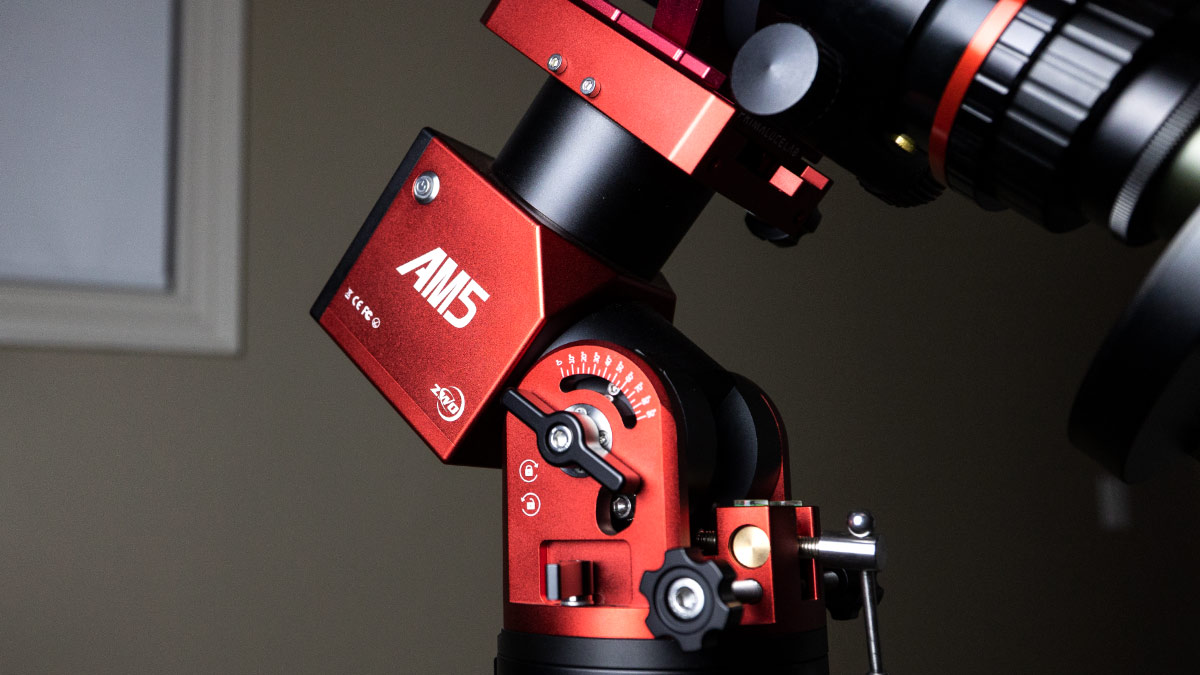
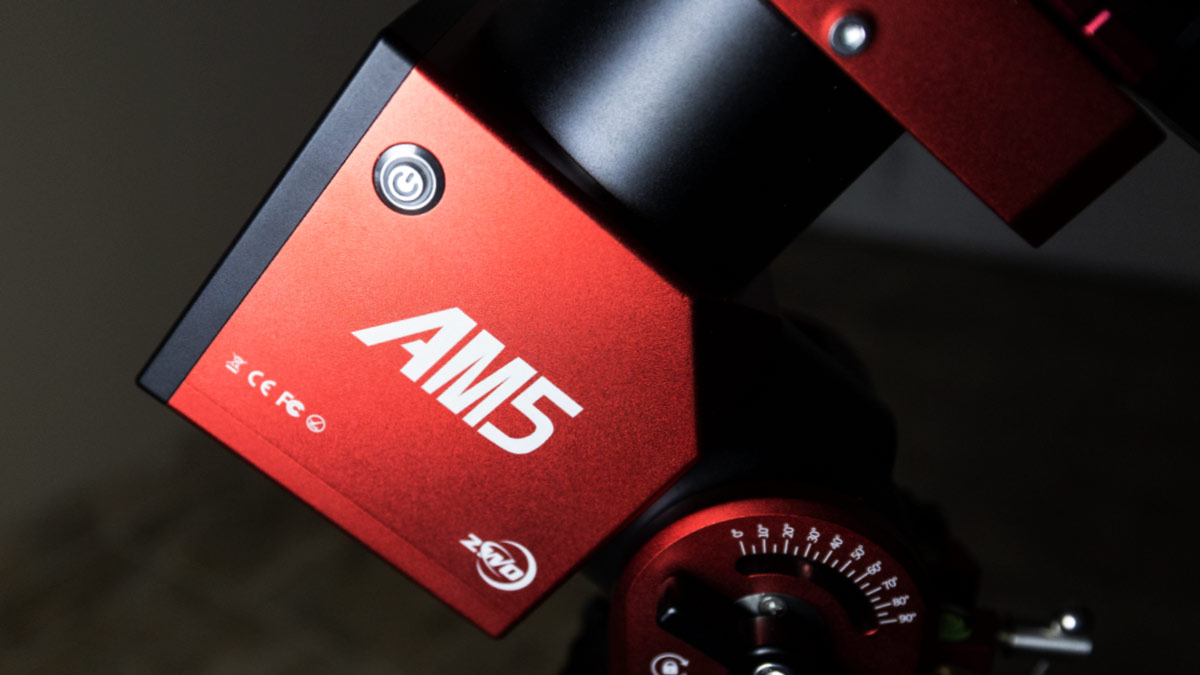
The design of the ZWO AM5 mount is very practical and slick in terms of both style and operation. It does have that familiar harmonic drive mount look to it (it reminds me of a robotic arm like one you would see in a factory), which is due to the fact that it aims to keep the size to a minimum. 

The signature ZWO red matches the rest of my ASI cameras and accessories perfectly (if you’re into that sort of thing). I’ve heard some people complain about the loud “beep” the AM5 makes when you turn it on and slews to a new target. ZWO has since provided the option to turn this volume down (or off completely) within the menu on the ASIAIR software.

The AM5 can accept both Vixen and Losmandy style dovetail mounts, depending on the mounting hardware of your telescope. The tension knobs on the right-hand side of the mount head feel solid and secure, providing some peace of mind when your telescope is attached.

Veil Nebula

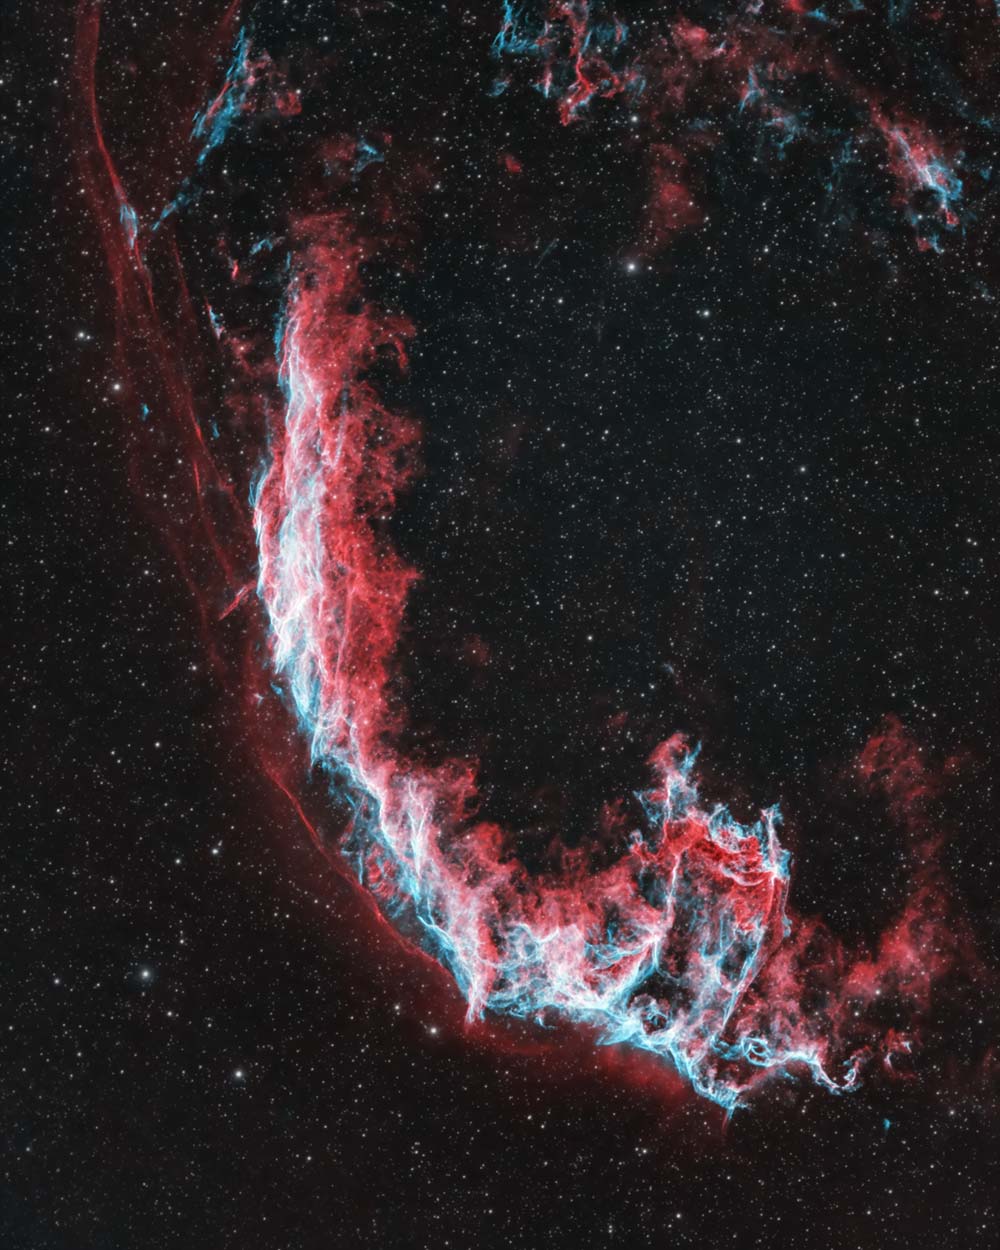
The Veil Nebula. ZWO AM5, ASI2600MM Pro, Radian 75 APO.

There is a finder shoe on the right side of the mount as well, which you could use to install a small finder scope to aid in polar alignment. I have not used this finder show for anything since the mount arrived. I would not suggest keeping anything in this location (such as an ASIAIR controller), as it looks like it could run into the tripod while slewing in certain directions. 

The power switch for the mount is on the other side and lights up red with a “beep” when you turn it on. The status indicator light shines red when in EQ mode, and green when in Alt/Az mode. This light is on the front of the mount, along with all of the primary input ports. 

On the front of the mount, you’ll find all of the main input ports on the mount including the USB 2.0 port, DC 12V power supply port, and autoguide port. I have never plugged the hand controller into the mount, as the USB cable running from the AM5 to my ASIAIR Plus handles all operations of the mount. 

The back of the mount is where you will find the important adjustment knobs to perform your polar alignment. The altitude and azimuth adjustment bolts are nothing special, but get the job done. I find it easiest to loosen the primary connection knob (the big black knob under the tripod) when making major adjustments in the azimuth directions. Just don’t forget to tighten everything back up when you’re done.

I rarely touch the tension grip for adjusting latitude, unless I am traveling far from home and need to make a major latitude change. The Altitude and Azimuth can both be locked to secure your position once polar aligned. 

Alt/Az Adjustment Bolts

Things to Keep in Mind

Watch the rear of the mount while slewing to ensure that no cables are getting caught up on the azimuth or altitude adjustment bolts. These spots stick out, and it wouldn’t take much for a cable to loop around one of the bolts and potentially cause damage to the port your device is plugged into. 

Always make sure to return the telescope to the home position when your imaging session has finished. Unlike a traditional equatorial mount, you can’t manually unlock the clutches in RA and DEC after the mount has been turned off. If you turn it off with the telescope off to one side, the off-balance load is much easier to top over when transporting your rig. 

Speaking of an off-balance load, you need to be very careful about tipping your entire setup over when not using a counterweight. My little rig with a 75mm refractor and imaging accessories only weighs about 12 pounds, and I can feel the weight leaning to one side when pointed near the meridian. 

Add weight to the tripod if necessary, and make absolutely sure that there is no potential for a tip-over with your setup. This may seem obvious to some, but if you’re coming from a German Equatorial mount (like me), this is not something you’re used to. 

Use a counterweight bar if you plan on mounting a heavy telescope  (20+ lbs) on the ZWO AM5. If the total overall weight of your imaging system is approaching 25 pounds (including your camera, filter wheel, guide scope etc.), I definitely recommend using a counterweight.

ZWO lists the size of the counterweight bar as an M12, and you will need to purchase this (and the counterweight itself) separately. 

ZWO AM5 Review

The ZWO AM5 and Radian 75 pointed toward the California Nebula in my backyard.

Final Thoughts

I think the two biggest potential sources of hesitation people have with the ZWO AM5 are its ability to handle a medium-sized astrophotography telescope and the tracking/guiding performance of the harmonic drive system. I too, had these thoughts when the AM5 arrived, and I am happy to report that my experiences with this mount have exceeded all of my expectations.

For owners of the ZWO ASIAIR wifi controller looking for a quality mid-range mount, the AM5 is an absolute no-brainer. ZWO has done an incredible job of creating a top-to-bottom deep-sky astrophotography system. 

The ZWO AM5 is a great fit for anyone looking for a travel-friendly telescope mount that can handle a decent equipment payload. For me, this meant being able to bring a serious deep-sky imaging setup to a remote location (on a plane) for the first time.  

This same portability and reliable performance mean that it is also the mount I use most often at home, simply because I can get it up and running the fastest. Sure, it may only be another 5-10 minutes to get my beloved EQ6-R running (which it often is, as well as the AM5), but the ZWO AM5 is my ‘ready for anything’ telescope mount that gets called into action most. 

astrophotography telescope

The ZWO AM5 is available at OPT 

Related Posts

Related Posts

Share This

Related Tags

[ad_2]

Is Samsung Faking Its Galaxy S23 Ultra Moon Photos? Here’s What We Know

[ad_1]


© Provided by ScreenRant


The so-called ‘Space Zoom‘ feature in the Samsung Galaxy S23 Ultra is known to take amazingly detailed photos of the moon, but an investigation done by a Redittor now suggests that those images might be fake. The ability to photograph the night sky in stunning detail is one of the stand-out features of some recent high-end smartphones, including Google’s Pixel lineup and Samsung’s Galaxy series. While the former offers the so-called ‘Astrophotography‘ mode for the purpose, the latter offers the ‘Nightography‘ and ‘Space Zoom‘ functionality that also allow users to take highly detailed images of the night sky.

Over the weekend, a Redditor accused Samsung of faking its S23 Ultra moon shots as part of the device’s ‘Space Zoom‘ functionality that allows users to take extremely detailed photos of the moon at night. According to u/ibreakphotos, the moon images from the device look stunning, but they’re simply not real. To prove their point, the Redditor downloaded a high-res photo of the moon from the internet, and then downsized it to 170 x 170 before applying Gaussian blur to it. They then put up the photo on their computer monitor, switched off the lights in the room, and zoomed in on the monitor with their Samsung phone.

Related: Samsung’s Galaxy S23 Phones Are Its Most Sustainable Yet: Here’s Why

Is Samsung Faking The Moon Photos?

As it turned out, they got a perfect photo of the moon, with all the craters and other details visible in all their glory. As seen from the side-by-side image, the source photo has virtually no details in it, while the image clicked by the Samsung phone has all the minute details expected from a high-end DSLR camera. The Redditor believes that the only way to explain the anomaly is that Samsung is using a smart algorithm to enhance the details in the moon shots. “In the side-by-side above, I hope you can appreciate that Samsung is leveraging an AI model to put craters and other details on places which were just a blurry mess,” the Redditor wrote.

To further prove their point, the Redditor did another experiment. This time, they photoshopped one blurry moon photo next to another to see if this would fool the AI into correcting only one of the photos while leaving the another untouched. As it turned out, that’s exactly what happened, with one of the moon photos coming out razor sharp, while the other remained blurry. The experiment seemingly leads further credence to the Redditor’s allegation that the moonshots are engineered by software rather than the work of great hardware. The Redditor doesn’t say which particular Galaxy phone they used for the moon shots, but Samsung uses the same Space Zoom technology in all of its flagships over the past four years.

This is not the first time that Samsung is being accused of faking moon shots with AI. A few years ago, similar allegations were made against the S20 Ultra as well, with some users questioning the phone’s unrealistically detailed photos of the moon. Back then, Samsung claimed the enhanced images are only due to its ‘Super Resolution AI‘ rather than fake overlays: “At one push of the shutter, up to 20 frames are captured and processed at instantaneous speeds. Advanced AI then evaluates and corrects thousands of fine details to produce detailed images even at high magnification levels.”

While Samsung is already openly admitting to using AI to enhance the photos, it is not any different from the computational photography in the Pixel or iPhones. Good HDR photography would also not be possible without AI image processing, which is offered by most high-end smartphones circa 2023. However, the key question is whether these images are actually “AI-enhanced,” as Samsung claims, or outright fake, with an overlay of an entirely different photo of the moon. The answer remains up in the air until Samsung clarifies the situation once and for all.

More: Does The Galaxy S23 Have Face ID? All The Ways You Can Unlock The Phone

Source: u/ibreakphotos/Reddit

[ad_2]

Samsung Galaxy S23 Ultra accused of ‘fake’ moon photos via AI

[ad_1]


null


© Future
null

Samsung is in a bit of a controversy over the legitimacy of the Galaxy S23 Ultra’s Space Zoom photos that serve up detailed photos of the moon. 

A Reddit thread has exploded with a post claiming that the moon shots delivered by the Galaxy S23 Ultra are fake, with the phone applying non-existent details to photos of the moon. Samsung has claimed that it does not overlay images into photos or add in texture effects. 

While Reddit user ibreakphotos said this was technically true, in practice Samsung was adding detail into moon shots, which they claim is proven through their own tests. The test involved taking an image of the moon from the internet, blurring it on a laptop then taking a zoomed-in photo of it from afar using a Galaxy S23 Uttra in a dark room. 

Given a gaussian blur was applied, there was simply no data for the Galaxy S23 Ultra’s image signal processor or computational photography algorithms to process. Yet the photo served up has a lot more detail in it than could be seen in the original image. As a result, the Redditor branded the Galaxy S23 Ultra’s astrophotography moon shots as “fake” given the detail enhancements were seemingly added. 

“Samsung is using AI/ML (neural network trained on 100s of images of the moon) to recover/add the texture of the moon on your moon pictures, and while some think that’s your camera’s capability, it’s actually not,” ibreakphotos concluded. “And it’s not sharpening, it’s not adding detail from multiple frames because in this experiment, all the frames contain the same amount of detail. None of the frames have the craters etc. because they’re intentionally blurred, yet the camera somehow miraculously knows that they are there.” 

What happened when we tried the fake moon test 

When we tried this on our Galaxy S23 Ultra, we didn’t get the same results. Rather our images of the moon turned out to be a fuzzy mess. 

We are just theorizing here, but the differences between out shots and ibreakphotos test results could be down to different software versions of One UI and the Galaxy S23 Ultra camera app. Unfortunately, ibreakphotos doesn’t detail what versions of the respctive software they are on.

It’s also possible that Samsung has turned off the post-photo processing in reaction to this controversy. We have reached out to Samsung for comment on this Space Zoom issue. 

Embrace or rage against the machine learning

Now some might claim this is false advertising, and that the Galaxy S23 Ultra isn’t the incredible zooming camera phone you might have expected. But others might shrug and understand that a small camera on the rear of a svelte phone isn’t going to be able to capture shots that even capable DSLRs would struggle with, unless it had some software help.

Given AIs are trained on data, and in this case images of the moon, the processing done by the Galaxy S23 Ultra’s space-related model is likely figuring out what detail should be added based on images of the moon it’s previously been fed.

The result might not be a true representation of what the Galaxy S23 Ultra’s camera sensors can capture, but we’d argue it’s not truly fake either. Rather the moon shots are enhanced with details the camera can’t see or detect. In ibreakphotos’ test case, the details weren’t there but the Galaxy S23 Ultra’s processing is doing the equivalent of filling in the gaps based on what it knows could/should be in certain spots of the moon.

As such, the Galaxy S23 Ultra and its AI might be adding in detail and artificially enhancing moon photos but it’s not simply faking it with a different image. Think of it as someone applying a few edits to Instagram photos to pick out details or deliver more pleasing shots. These enhacements may not be true-to-life, but they aren’t simply fake Photoshopped images either. Whether you think such enhancements are acceptable or duplicitous is down to your tastes.

Again, Samsung has yet to comment on this, but a spokesperson told us that the company is looking into a response.

More from Tom’s Guide

[ad_2]

11 ways to make your Galaxy S23 experience better

[ad_1]

samsung galaxy s23 hero

Ryan Haines / Android Authority

From the palm-sized Galaxy S23 to the king-of-the-hill Galaxy S23 Ultra, 2023 is the year of refinement for Samsung. Be it subtle improvements to the hardware design, a cohesive design language, or just an overall smoothening of software touchpoints, the three phones are taking a three-pronged stab at immediate competitors like the iPhone 14-series and also Chinese value flagships like those by OnePlus. Clearly, there’s a lot to dive into here.

We’ve been using the devices for the last few weeks to understand what makes the phones tick, and we came up with eleven Samsung Galaxy S23 tips and tricks that will elevate your user experience.

It goes without saying that your first step should be to check for software updates. Samsung has released a series of updates since the launch of the three devices to improve on features and stability, and starting with the latest version would be the best approach to improve your user experience. With that said, let’s dive right in.


Samsung Galaxy S23 tips and tricks


1. Pick up a case for the Samsung Galaxy S23

Samsung Galaxy S23 Ultra with a Ringke case

Dhruv Bhutani / Android Authority

It shouldn’t come as a surprise, but getting a protective case to safeguard your very expensive investment should be the first step once you’ve got yourself a new Galaxy S23. This year, Samsung has adopted Corning’s Gorilla Glass Victus 2 solution, which should make the phone even more resilient to drops, but as we all know, accidents do happen.

Now, Samsung has been shipping out some fantastic cases for the S23 series. It’s even got a collaboration with Adidas going on for those who like to show off their brand allegiances. However, if you prefer something a bit more utilitarian or rugged, fret not, as we’ve compiled a list of some of the best Galaxy S23 and Galaxy S23 Ultra cases from the likes of Spigen, Casemate, and others.

Galaxy S23 cases | Galaxy S23 Plus cases | Galaxy S23 Ultra cases


2. Switch up your lock screen

Samsung Galaxy S23 Ultra adjusting lockscreen

Dhruv Bhutani / Android Authority

One of the most notable enhancements to the Galaxy S23 user experience is the revised lock screen. Sure, many of the features here were already available to Goodlock users, but Samsung has integrated many of these into the core One UI 5.1 experience for ease of use.

Samsung offers many opportunities to customize the lock screen, be it through the clock, where you can change the style and font and even accessorize through graphic-heavy widgets or by changing up how notifications appear. The level of customization on offer goes deep and includes the ability to change individual indices, colors of elements within the clock, and more. You’ll also find multiple ways to display notifications, tappable widgets that can be accessed through a touch of the clock, and more.

Here’s how to customize the lock screen on your Galaxy S23

  1. Pop into the Settings app, or tap the cogwheel icon in the notification bar.
  2. Scroll down to the Lock Screen option.
  3. Tap the Edit lock screen or widgets option to dive into the customization options.
  4. You can now tap individual on-screen elements to adjust them to your liking.

3. Customize your home screen

ONE UI vs iOS 16 stackable widgets

Dhruv Bhutani / Android Authority

If this is your first Samsung phone, you’ll be delighted to know about the wealth of customization opportunities in One UI. If it’s not, One UI 5.1, debuting on the Galaxy S23 series, still has several new options to switch up the look of your phone.

There’s a new dynamic weather widget that includes a host of animations to show off weather data in visually pleasing ways. You’ll also find an all-new battery widget. Like Apple’s battery widgets, Samsung’s version pulls in data from its ecosystem of devices like the Galaxy Watch and the Galaxy Buds 2 Pro.

Here’s how to add widgets to your home screen

  1. Long press on the home screen.
  2. Tap the widgets button along the bottom bar.
  3. Select your choice of widget and drag it where you want on the lock screen.
  4. Resize the widget to your choice of dimensions.

4. Check out the new photography features

Samsung Galaxy S23 astrophotography

Dhruv Bhutani / Android Authority

Unlike the Galaxy S23 Ultra, the regular Samsung Galaxy S23 and S23 Plus don’t get new camera sensors this year. However, that doesn’t mean there’s nothing new to check out for buyers. This year’s feature focus for Samsung is astrophotography, and alongside the more straightforward extreme low-light photography option, it is also debuting a software option to capture star trail videos.

Interestingly enough, you’ll have to download Samsung’s Expert RAW module to unleash the full capabilities of the camera. New to the S23 series is an enhanced astrophotography mode. Tapping the constellation-shaped icon allows you to display a star chart and manually trigger extended-duration long-exposure shots.

Here’s how to activate astrophotography mode on the Galaxy S23

  1. Open the camera app.
  2. Swipe right to the More option.
  3. Tap open or download the Expert RAW app.
  4. Now tap the astrophotography icon on the top-left corner.
  5. Tap show or hide for the sky guide.
  6. Use the slider to select the exposure duration.

You can opt for between four to ten-minute exposures, depending on the ambient lighting conditions, and the S23 will automatically spit out a stellar photograph of the starscape.

Similarly, the hyper-lapse setting in the camera app now includes an option to switch over to a 300x speed setting that’s perfect for capturing star trails.


5. Try out image clipping

Samsung Galaxy S23 image clipping

Dhruv Bhutani / Android Authority

Image clipping is yet another new feature on the Samsung Galaxy S23 that is straight out of the Apple iPhone’s feature set. As the name suggests, image clipping lets you pull out a subject from the image using AI algorithms. These images can then be copied, shared to social media or any app on your phone, or saved as a separate image.

Here’s how to use image clipping on the Galaxy S23

  1. Tap open the Gallery app and select a photo.
  2. Long press the photograph till you see a visual confirmation and feel haptic feedback that the image has been clipped.
  3. You can now save the clipped element as a separate image or share it with another app.

6. Set up Bixby Text Call service

Samsung Galaxy S23 bixby text call

Dhruv Bhutani / Android Authority

The Bixby Text Call service is Samsung’s take on Google Call Screening, except unlike Google’s feature, this one is available in most markets where the phone is sold. If you often find yourself unable to take a call while in meetings or a loud environment, Bixby Text Call is the perfect solution. The on-device AI assistant takes over the call, transcribes the audio, and presents it on screen. You can then respond to the call by typing out a response or selecting from one of the pre-fed options. I find myself using it to screen out robocalls and spam.

Here’s how to toggle on Bixby Text Call

  1. Open the phone app, and tap the overflow menu on the right to head into settings.
  2. Tap the Bixby Text Call option.
  3. Toggle the on button, and download an appropriate language pack.
  4. Tap the Bixby Text Call option the next time you get a call to activate the service.

7. Change the default screenshot folder

Samsung Galaxy S23 default screenshot folder

Dhruv Bhutani / Android Authority

One of my biggest annoyances with Samsung phones is the default location of the screenshot folder. By default, the phone saves screenshots and screen recordings in the same root directory as photos from the camera. This means that all your screenshots end up getting uploaded to Google Photos. Not only does it clutter up the image gallery, but it eats into your cloud storage allowance as well. However, you can change that behavior with One UI 5.1 by switching out the screenshots folder.

How to change the default screenshots folder on the Galaxy S23

  1. Pop into the Settings app on your phone.
  2. Scroll down to the Advanced Features tab.
  3. Now tap the Screenshots and Screen Recorder option.
  4. Select the Save Screenshots option and select an existing folder or create a new folder.

8. Pause USB Power delivery

Samsung Game Booster settings Pause USB Power Delivery Featured Image

Robert Triggs / Android Authority

With great performance comes great battery drain, and many gaming enthusiasts tend to keep their smartphones chained to the charger during long hours of gaming. Samsung’s new pass-through charging setting is the perfect way to reduce overheating during, ahem, heated gaming sessions and to prevent undue stress on the battery. When activated, the phone draws power directly from the charger and bypasses the battery circuit.

Here’s how to activate the pause USB Power Delivery feature on the Galaxy S23

  1. Open the Game Launcher app on your Galaxy S23.
  2. Tap the Game Booster settings under the overflow menu and select the Pause USB Power Delivery option.
  3. In case the option doesn’t show up, you might have to install a game and launch it through Game Launcher while connected to a charger.

9. Try out the improved multitasking experience

Samsung phones offer multiple ways to maximize the multitasking capabilities of your phone. You can choose a split-screen mode or pop-up view to access two apps simultaneously. The pop-up view is an excellent way to juggle multiple apps simultaneously, as it lets you resize the window dynamically or drop it into a floating widget. So far, dropping an app into the pop-up windowed mode has required several steps and taps in the multitasking window. With the Galaxy S23, Samsung is debuting a new gesture to quickly trigger the mode.

Here’s how to activate the pop-up view shortcut on the Samsung Galaxy S23

  1. Tap the settings button and scroll down to Advanced Features.
  2. Head into the Labs sub-menu.
  3. Now, toggle on the Pop-up View switch.
  4. Swipe down to the middle of the screen from the top-right corner to activate the pop-up view.

10. Check out the improved Dex Mode

Samsung Galaxy Tab S7 FE One UI DeX with open apps

Eric Zeman / Android Authority

Dex Mode on Samsung phones has long been an underutilized gem. Capable of turning the phone into a very usable computer, Dex Mode delivers a computer-like experience with full-windowing support. This year, Samsung has updated Dex further and improved its responsiveness. Building on multi-tasking and split-view capabilities, Samsung has added a few improvements to Dex as well.

For example, it is impossible to snap a window to a side. Snapping the window automatically adds a list of additional apps to fill up the other side. Corner snapping has also been improved and lets you bring up a four-screen layout of apps that fill up the four corners of the screen.


11. Pick up a charger

Samsung Galaxy S23 Ultra charger

Robert Triggs / Android Authority

Samsung has traditionally been risk-averse to ultra-fast charging, and its latest phones continue to top off at 45W. However, things aren’t quite as straightforward. While the entry-level S23 charges at up to 25W over the USB Power Delivery PPS standard, the Plus and Ultra can go up to 45W. Suffice it to say that picking out the right charger can be challenging. More so since the charger isn’t bundled in the box. Don’t fret; we’ve got you covered with our pick of the best Galaxy S23 chargers.


Those were some of our favorite Galaxy S23 tips for an optimal experience right out of the box, but you might also want to check out our list of last year’s Galaxy S22 tips for more interesting things to check out in your new Samsung phone. Got some more tips? Drop them below in the comments section.

[ad_2]

Shooting the night sky with Samsung smartphones by Jose Antunes

[ad_1]

Shooting the night sky with Samsung smartphonesPhotographers using the Samsung S22 Ultra for astrophotography will discover the smartphone has a sky guide built-in, helping them to find the right targets. It has some bugs too…

It may not be able to rival images captured with a conventional camera, but astrophotography has become a passion for many smartphone users, thanks to the tools included, that help to make more accessible what was once an experience only a few tried, especially with negative film or transparency. Digital has made astrophotography easier, but smartphones really took the whole experience to a new level.

Samsung has gone as far as giving users interested into capturing the night sky a guide built-in one of its apps, Expert RAW, which must be downloaded by users of “old” smartphones but is now part of the software included in the new Samsung Galaxy S23 Ultra. With the sky guide, which guide indicates the location of constellations, nebulae, and star clusters, it’s easier to define what to photograph and… in which direction to point the camera.

While smartphone photographers keen on astrophotography are used to have an app in their devices that shows the night sky, it’s good to have a camera app that offers some of the essential information, without having to jump between apps. This makes for a faster workflow in an experience where every minute counts.

Conventional astrophotography requires a complex process that includes searching for astronomical objects, define the composition, set the camera as required, shoot the subject and finally do all the post-processing the create the final images. It can take hours in the field and hours at the computer, and the more complex setups include tracking systems which works with cameras to follow celestial bodies during the long exposure time.

Shooting the night sky with Samsung smartphonesA guide to the night sky

According to Samsung, the astrophotography function in its cameras provides all these processes as a software solution. The sky guide helps to define the position of celestial bodies after which the camera captures the movement of stars by taking several pictures for a set period of time according to the movement of the celestial body. The result using advanced AI segmentation technology and multi -frame processing boasts outstanding quality as if it were shot with high-end professional equipment.

While I’ve some difficulty believing that part, the truth is that the presence of the sky guide helps as a starting point, and the guiding suggestions included will help those lucky enough to find a place without light pollution – something hard to discover in the region where I live – to explore the potential of their smartphones for astrophotography.

The astrophotography section of the Expert RAW app is identified by a small icon on the top right of the screen. Press it and a menu appears, with the option to show or hide the sky guide and a suggestion of exposure time… which are all beyond what the normal operation of the smartphone allows. Recording times are 4, 7 and 10 minutes, chosen using the slider on the screen. Once you’ve selected your exposure, press the shutter, be it on the screen or using a remote, which is the better way if you want to keep vibration to a minimum.

Shooting the night sky with Samsung smartphonesMoon shot at 100x… it’s marketing

It’s also possible to use a timer, although a remote is the most sensible solution if you intend to do a lot of astrophotography. If you do not own a remote shutter (which uses Bluetooth to “talk” with the smartphone) but have a Samsung Galaxy S22 Ultra, or the new S23 Ultra, here are the good news: the S Pen included doubles as a remote shutter. That’s some valuable information that many photographers seem to forget.

Here are the instructions to activate the S Pen as a remote:

  • Open the Settings of your phone.
  • Enter Advanced features.
  • Tap S Pen.
  • Swipe to turn on the remote control.

The S Pen offers a series of options you may want to explore, through its Air actions. Besides being used as a remote shutter it can also be used to open the Camera module, simply by pressing the button on the pen for a couple of seconds. You can also select which actions are available for the Gallery, besides other options associated with other apps. And yes, the S Pen can also be used to write notes, even on top of your photographs.

Besides using the Expert RAW app, there are other ways to capture images of the night sky using a smartphone. Using the Night mode – or Nightography, as Samsung names it – mode of the main camera is one of them. In the base Camera mode chose night, pick the exposure time you want – from those offered – and shoot. Remember, due to the long exposure time, a tripod is recommended. In fact, it’s necessary for astrophotography.

If you dare to take control of things, then the Pro Mode in the Camera app and the Expert RAW app open new possibilities, allowing you to control both ISO and exposure time, as well as the colour temperature. Depending on the sky you may have to vary your ISO along with the exposure time. For a normal dark sky start with 800 ISO, which will help to keep noise values under control. Suggested exposures times are 30 seconds for the ultrawide lens, 20 seconds for the wide (which is the main camera in the S22 Ultra), 15 seconds for the 70mm Tele and finally 4 seconds for the 230mm lens.

The value above should give you a starting point from where to adjust exposure. Colour temperature may also be adjusted, but you can leave it in Auto, as you’ll probably have to do some postproduction to get the best results. For this reason it is best to shoot in RAW, as you’ve a base file with more information to tweak to reach the final photo.

Still, take all the promises from Samsung with a grain of salt. A Moon shot at 100x? It’s pure marketing. The image you get may look OK on the smartphone’s screen, but in no way competes with the results of a conventional camera with a similar focal length. Open it in your computer and check… There is a reason why the Expert RAW app and the Pro mode of the Camera app only allow the lens to go to 20x digital zoom… and even there you’re already beyond the real capacities of the smartphone and its optical lenses.

Shooting the night sky with Samsung smartphonesA bug Samsung forgot to tell you about

Now, before you go and grab your camera for a night out looking at the sky, here is a crucial piece of information that Samsung has not shared widely but is important for all those who may want to use the Astrophotography mode in Expert RAW. The Astrophotography mode has a bug and if you, like me, use the highest resolution for your smartphone’s screen, it will crash as soon as you try to view the sky guide.

After the Astrophotography mode was introduced, and because I could not use it, as my S22 Ultra crashed, I sent feedback to Samsung and was told to put the app to “deep sleep” – lingo for… don’t use it – which was not exactly what I expected to get from the company. But hey, they still have not told me where I can buy the filter support they announced months ago…

Now, for the Astrophotography mode the solution came from one user, through the US forums, who revealed that by reducing the resolution of the S22 Ultra screen from WQHD+ (3088 x 1440) to FHD+ (2316 x 1080) solved the problem. Apparently, there are other apps affected by the same bug.

This important note about the bug was revealed October last year, and it was suggested that Samsung should find a solution. He are now in March 2023, a handful of updates later, and still no sign that Samsung has squashed this bug – I just changed the screen pm my smartphone to WQHD+ to test and the app stopped working – or has issued any official information telling those who may face the problem how to solve it.

[ad_2]

4 astrophotography tips for out-of-this-world night shots

[ad_1]

Watch video: 4 astrophotography tips

Just because the sun goes down doesn’t mean you should pack up your gear and head home! Some of the most fun you can have with a camera happens after dark. From shooting starry skies and capturing whirling star trails to painting with light, you can get creative – and even shoot the elusive Northern Lights if you’re far north enough to see them. 

After-dark photography is a great string of techniques to add to your bow, and I will help you get that hang of shooting in low light, mastering settings such as high ISOs and fast apertures, and getting to grips with wide lenses, shutter release cables and tripods.

• If you want to get stargazing, you’ll need the best cameras for astrophotography

In this project, I’ll run through four of my favorite techniques to try when the skies are clear and the stars are out… 

1. Pin-sharp stars

You want the stars to appear as little pin-points of light, but if your exposure is too long then you’ll record the motion of the Earth’s rotation – which will turn your stars into streaks. 

To keep the stars sharp, use the ‘500 rule’. This is where you divide 500 by your focal length, such as 16mm – which would give us a shutter speed of 30 secs, and lets us know that an exposure longer than this is likely to turn our stars into trails. You’ll need to adjust this value if you use a cropped sensor camera, due to the crop factor increasing the equivalent focal length. We also like to use the Spot Stars mode on the PhotoPills smartphone app to calculate the exposure time.

2. Shoot a star trail

A star trail image is a photograph of the night sky taken over an extended period, with the main aim to capture the movement of the stars thanks to the rotation of the Earth. The best way to create these is to take a series of consecutive images over time – at least an hour – and then merge all the images in software, such as StarStaX, for epic star trails.

Set up your camera with a shutter speed of 30 secs, then open your lens aperture to f/2.8 or f/4, dial in an ISO of 3200 and take a test shot. If the image is too bright or dark, you’ll need to lower or increase the ISO respectively. Use your camera’s continuous burst mode and plug in your cable release, then lock it down so it takes 120 images back-to-back for an hour.

• Check out the best camera remotes and cable releases

3. Paint with light

While star-filled images can be a sight to behold, adding in a complementary lit-up foreground can really take your pics to another level. We’ll use the same settings as the first tip, but this time paint with a torch facing towards the camera to draw text such as our “Iceland”. It will take a few attempts to get used to writing backwards, as it’s not as easy as it seems!

You could take separate exposures for each letter of your word, to make sure they’re not joined together. Another use for your torch would be to shine it on your foreground, to illuminate it and bring out some details. There’s loads of ways you can get creative with painting with light; even standing in the scene and pointing your torch up is effective.

4. Photograph the Northern Lights

The Northern Lights occur when a strong solar flare hits the atmosphere. They are usually strongest in particular parts of the Northern Hemisphere, yet you can see the Aurora Australis in the Southern Hemisphere. Drew has managed to capture it a few times, even in Wales! 

The technique is again similar to the first tip, for pin-sharp stars, using a fast wide lens, although keep checking the exposure. If the aurora is motionless, you may want a long 30-second exposure; if it’s moving quite quickly, you may only want 10 seconds, which will require a higher ISO.

Shoot Raw and keep checking your shots, and keep taking photos until the display is over so you have plenty of chances to capture a cracking shot. It’s also worth shooting at regular intervals, so you can turn your images into a time-lapse video.


© Provided by Digital Camera World


PhotoPlus: The Canon Magazine is the world’s only monthly newsstand title that’s 100% devoted to Canon, so you can be sure the magazine is completely relevant to your system. View Deal

You might like the best photo editing software and the best photo-editing laptops. Check out these landscape photography pro tips, too.

[ad_2]