Canon, once the undisputed king of award-worthy astrophotography, has been dethroned after ruling the roost for almost half a decade. An annual study has gathered data on the last six years of shortlisted images from the Astronomy Photographer of the Year contest. By analyzing a whopping 828 images, it found some pretty interesting results and trends.
The study has shown that over the past six years, the Canon EOS 6D has been the most used camera – and Canon was the most-used brand overall. However, over the past two years, it has been surpassed by Nikon and Sony, with the Sony A7 III and the Nikon Z6 II being the most successful mirrorless cameras in the competition, with a significant overall increase in mirrorless bodies being used.
A similar study published in 2018 showed that the percentage of mirrorless camera users stood at 17%, but this year has seen that figure rise to 58% – a significant increase that replicates the movement to mirrorless observed in other fields of photography.
The information comes from the study published by Astro website Skies & Scopes, which analyzed the images entered in the Astronomy Photographer of the Year Competition operated by Royal Museums Greenwich in the UK.
By examining the 828 shortlisted images over the past 6 years, it collated data on the all gear used – cameras, lenses, telescopes, and more have been tracked and plotted on graphs to provide useful information to other Astro enthusiasts to find the best equipment for taking photographs of space.
Full frame cameras are the most used and the most successful, the study finds, with a staggering 87% compared to APS-C at 13%. This is to be expected, as the full-frame sensor size allows for greater coverage of light, allowing it to perform more successfully in low light. This is even more evident when narrowing down the category to Landscape Astrophotography where full-frame cameras amount to 97% of the images.
Sigma leads the way in the lens category, with the Sigma 14mm f/1.8 Art and 14mm f/2.8 and lenses being the most used for landscape astrophotography. Perhaps this is another reason that Canon is losing ground in the mirrorless battle, as the RF mount is still effectively (well, selectively) closed to third parties.
Other standout results from the article include:
• ZWO cameras lead for both planetary and deep sky imaging with the successful planetary cameras being the ZWO ASI174MM and ZWO ASI178MM.
• Celestron is the most successful telescope manufacturer overall, with the most successful planetary imaging telescopes being named Celestron C11 and C14 Schmidt-Cassegrains.
There are also results regarding the most common and successful star trackers, deep-sky telescopes, and telescope mounts.
The Astronomy Photographer of the Year provides an array of stunning images showcasing the beauty of our solar system. You can see last year’s winners at an exhibition at Royal Museums Greenwich.
Take a look at the best cameras for astrophotography, and make sure to pair them with the best lenses for astrophotography. If you’re more interesting in looking than shooting, check out the best telescopes for astrophotography and the best binoculars for astronomy.
A rosy red nebula takes center stage in a new photo from the European Southern Observatory (ESO).
The expansive cloud of dust and gas, known as IC1284, is an emission nebula, a bright, diffuse cloud of ionized gas that emits its own light. This particular emission nebula, found at the center of the image, glows red from active star formation and the fusion of hydrogen in the region.
“Its rosy glow comes from electrons within the hydrogen atoms: they’re excited by the radiation from young stars, but then they lose energy and emit a specific color or wavelength of light,” ESO officials said in a statement.
Related: Amazing space views of ESO’s Very Large Telescope (photos)
Astronomers photographed IC1284 using ESO’s wide-field camera, called OmegaCAM, on the VLT Survey Telescope (VST) at the Paranal Observatory in Chile. (VLT stands for “Very Large Telescope.”) Nebulae are made up of enormous clouds of dust and gas, which fuel new star formation. In the new image, the warm red glow of IC1284 is dotted with bright twinkling stars all around it.
IC1284 is joined by two blue reflection nebulae, known as NGC6589 and NGC6590, located in the lower right corner of the new VST image. Compared to emission nebulae, the clouds of interstellar dust in reflection nebulae reflect the light of a nearby star or stars, creating the distinct blue color observed.
“The dust in a reflection nebula preferentially scatters shorter, bluer wavelengths of light from nearby stars, which is what gives these nebulae their eerie glow,” ESO officials explained in the statement. “It’s the same reason why the sky is blue!”
The new image, released on Tuesday (Oct. 2), was captured as part of a larger initiative organized by ESO, called the VST Photometric H alpha Survey of the Southern Galactic Plane and Bulge (VPHAS+). The survey is aimed at observing nebulae and stars in visible light to help astronomers understand how stars are born, live and die, according to the statement.
Photographing a solar eclipse can be a life-changing, yet challenging experience. This video (recommended to me by Fred Espenack) describes the incredible experience of a total solar eclipse.
You may only get a few chances in your lifetime to view or photograph this celestial event, so you want to make sure you have everything you need. It’s also important to be well-prepared and practice beforehand.
Check the specific safety and photography recommendations for the type of solar eclipse you plan to observe, as the precautions and techniques may vary.
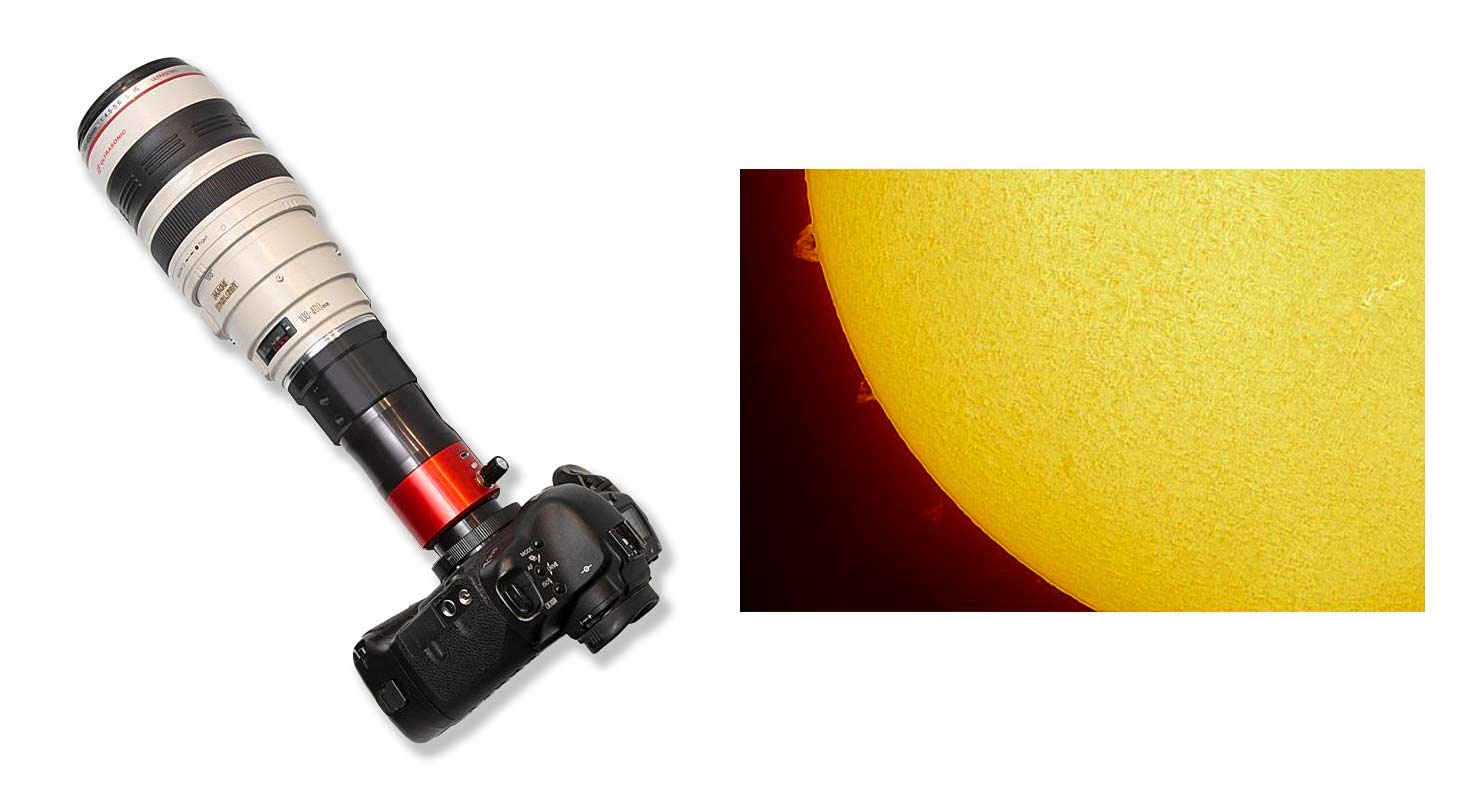
While my personal solar eclipse photography experiences have been limited, I do have some practical advice to share with those preparing for the upcoming annular solar eclipse in October 2023, and the total solar eclipse in 2024.
The equipment I used to photograph the Annular solar eclipse in June 2021. Canon EF 300mm F/4 lens + Certified Safe Solar Filter.
Most importantly, never compromise on eye safety or equipment quality when photographing the Sun.
Here is a quick breakdown of how to photograph a solar eclipse, covered in more detail below.
Research the date, time, and location of the solar eclipse, and look for an unobstructed view of the Sun
Ensure you have all the right equipment, including a manual camera, tripod, telephoto lens, and certified eye protection and solar filters
Attach your solar filter to your camera lens
Set up your equipment, choose your camera settings, and find focus using live view mode only (do not look through the camera’s viewfinder).
Compose your shot using live view mode only (do not look through the camera’s viewfinder)
Take test shots before the eclipse begins to ensure your settings (particularly your exposure) are correct
Start capturing the eclipse as soon as it starts. Include shots over and underexposed to capture all the details
Review your images and adjust accordingly as the brightness will continue to change throughout the eclipse
Take breaks to enjoy the eclipse visually with your solar glasses
Partial Solar Eclipse over Lake Ontario | Trevor Jones.
What is a Solar Eclipse?
As a review, a solar eclipse is a celestial event where the moon passes between the Sun and planet Earth, resulting in the moon blocking our view of the Sun (either totally or partially) from a particular point on Earth.
There are three different types of solar eclipses:
Partial Solar Eclipse: a portion of the Sun is covered
Annular Solar Eclipse: a ‘ring of fire’ shines around the moon, centered in front of the Sun
Total Solar Eclipse: the Sun is fully covered by the moon
The type of eclipse depends on the alignment of the moon, Earth, and the Sun, and how far away the moon is from Earth.
Types of Solar Eclipses. www.timeanddate.com.
When is the Next Solar Eclipse?
The frequency of solar eclipses varies due to the changing distances and angles between the Sun, Moon, and Earth over time.
The alignment of the moon, Sun and Earth takes place approximately every six months during a period of time known as eclipse season. This results in two to five solar eclipses each year, though they are not visible from every location on Earth.
Below is a table of the varying types of solar eclipses and their expected dates for the next few years. For more information and maps, visit Time and Date.
Date
Solar Eclipse Type
Visibility Path
October 14, 2023
Annular
The ‘ring of fire’ is visible along a narrow path that crosses the USA from Oregon to Texas. It passes over parts of Mexico, Belize, Guatemala, Honduras, Nicaragua, Costa Rica, Panama, Colombia, and Brazil. A partial eclipse will be visible in the Americas from Alaska to Argentina.
April 8, 2024
Total
The narrow path of totality runs through Mexico, the USA (from Texas to Maine), and Canada (from Ontario to Newfoundland). A partial eclipse will be visible across nearly all of North America, and a small part of western Europe.
October 2, 2024
Annular
Most of South America, Pacific, Atlantic, Antarctica.
March 29, 2025
Partial
A partial eclipse will be visible in north western Europe, north in Asia, Africa, eastern North America, North in South America, Atlantic, Arctic.
September 21, 2025
Partial
A partial eclipse will be visible in south-eastern Australia, Pacific, Atlantic, Antarctica.
February 17, 2026
Annular
Partial eclipse will be visible in south Africa, Pacific, Atlantic, Indian Ocean, Antarctica.
August 12, 2026
Total
Partial solar eclipse will be visible in most of Europe, northwestern Asia, northwestern Africa, Much of Canada and northeastern US, Pacific, Atlantic, Arctic.
Eye Safety
The most important thing to remember is that it’s not safe to look directly at the Sun without eye protection made for solar viewing.
To prevent eye damage and to view/photograph a solar eclipse safely :
Never view the Sun through a camera lens, telescope, or other optics without a proper solar filter over the front of the optics to avoid serious eye injury.
Solar filters must be attached to the front of any telescope, camera lens or other optics. Do not use non-solar filter drop-in lens filters or place solar filters between your camera and lens.
Do not use solar glasses as a filter for your camera or other optical devices.
All filters should be ISO 12312-2 standard certified. Purchase from a reputable astronomy dealer or company (i.e. Celestron, Lunt Solar Systems, Astrozap etc.)
Inspect your solar viewing gear (i.e. solar glasses, filters, etc.) for any damage before you use them. If there are holes (no matter how small) do not use them.
Do not use the optical viewfinder on your camera (there is no solar protection there), opt for the live view mode on your screen.
Viewing the sun through eclipse glasses
Equipment Needed
There are a few pieces of equipment you will need to photograph a solar eclipse.
You will want to practice setting up your equipment and taking test shots before the eclipse to help you become familiar with your gear and settings.
DSLR/Mirrorless Camera: you will need a camera with manual settings. DSLR and mirrorless cameras are popular choices because they allow for manual control of exposure settings.
Telephoto Lens: a camera lens with at least 300mm focal length, though 400mm – 500mm is better. You can look at renting one if you don’t have a lens this length.
Solar Filter: a certified solar filter (ISO 12312-2 standard) is needed to protect your eyes, camera, and lens from the Sun’s harmful UV rays. Select a filter that fits the size of your lens and never photograph the Sun without a proper solar filter.
Tripod: a stable but lightweight tripod will keep your camera steady, but also allow for easy transport if you need to travel to view your solar eclipse.
Shutter Release Cable: this cable gets plugged into your camera to capture images without having to touch your camera and deal with camera shake. This will help produce sharper images.
Eclipse Glasses: you will want to safely observe the eclipse while your camera is running.
Memory Cards: be sure to have plenty of storage space for the large number of photos you may capture. It’s also a good idea to bring a backup.
Fully Charged Batteries: be sure to fully charge your batteries beforehand, and have fully charged backups just in case.
Solar Eclipse App: use a solar eclipse app to help you predict the timing and duration of the eclipse from your location. Plan your location in advance, while considering the direction of the Sun, to ensure you have an unobstructed view.
Reviewing my Solar Eclipse photos in Adobe Bridge.
Choosing a Camera Lens
The camera lens you choose is arguably the most important piece of gear when shooting a solar eclipse. Your focal length is going to be an important factor when deciding which lens to use.
If you want an up-close view of the Sun, you will need a high focal length. A 200mm lens on a full-frame camera will only produce a tiny view of the Sun, with the extreme of 2000mm potentially cutting off parts of the corona.
A lens in the 800mm – 1200mm range is ideal to get a close-up view and still capture all the details of the corona. Most people do not have access to lenses with such long focal lengths, so you can utilize a crop sensor camera and/or a teleconverter for some extra reach.
I used a Canon EF 300mm F/4 Lens with a 1.4X Teleconverter to photograph the Annular Eclipse in June 2021.
There is also the option to rent a camera lens if you are lucky enough to find a place that hasn’t already rented out all their longer focal length lenses.
Choosing a Solar Filter
As mentioned above, will need a solar filter to photograph a solar eclipse. To choose the appropriate solar filter, you will need to decide on the camera lens or telescope you will be using.
The diameter of your lens/telescope will affect the size of the solar filter since it needs to be placed on the front of the objective lens. If you are unsure of your lens diameter, you can measure across the front, from one side to the other.
The Thousand Oaks Optical SolarLite Solar Filter Film is a great option and allows you to safely cover your binoculars, telescope, or camera lens.
Ensure that the filter you choose is ISO 12312-2 certified. As mentioned above, it is best to purchase your solar filter from reputable sources, such as astronomy equipment suppliers or certified dealers.
It’s a good idea to read reviews and seek recommendations from experienced photographers or astronomers who have successfully used solar filters for eclipse photography. They can often provide recommendations for quality filters.
Types of Solar Filters
You do not have to sacrifice safety if you are on a budget. Solar filters come in a range of different types and prices, with affordable options that meet safety standards.
First off, you will need to consider how the filter will attach to your lens or telescope. Filters can be made with or without the option to firmly mount them to your camera lens or telescope.
Depending on which filter you choose, you will want to make sure you know how to clean it properly.
DIY Solar Filter
The cheapest option for solar filters is the ‘do-it-yourself’ option. You can make your own solar filter for your camera or telescope using solar film, a poster board, and a few other supplies.
For a detailed post about creating your own solar filter, click here.
DIY Solar Filter | Agena Astro
Solar Sheet Filters: a flexible material that can be cut to size to create a custom filter to attach to camera lenses, telescopes etc. Designed specifically for solar viewing and photography and is available in sheets or rolls.
Solar Film Sheets/Rolls from Agena Astro
Universal Solar Filters
Universal filters are made to fit a wide range of camera lenses and telescopes, regardless of their size or diameter. They are adaptable and can be used of many different optical instruments, making them a versatile, and often an affordable option for solar photography.
Universal solar filter made from solar film | Celestron
Fitted Solar Filters
These types of filters are designed for a specific aperture using a combination of flexible solar film or glass and a bracket. They will include a secure method for mounting it to your lens/telescope objective (i.e. hook and loop straps, bracket etc.)
EclipSmart Solar Filter – 6” SCT | Celestron
Threaded Solar Filters
If you are looking to photograph the Sun with your camera lens, this is the best option. A threaded solar filter for your camera lens allows you to safely point your camera at the Sun.
Threaded solar filters are different in that they match the filter threads on your camera lens and are designed to be mounted by screwing directly onto the front of a camera lens or telescope.
They are designed to maintain image clarity and quality and are typically more expensive than universal solar filters due to their glass design and optical performance.
Examples of threaded solar filters include:
Solar Glass Filters: high-quality, coated glass that provides excellent quality, durability, and protection. They are usually manufactured professionally and come in threaded or custom-sized versions to fit camera lenses and telescope apertures.
Thousand Oaks Optical 77mm threaded camera lens filter. Available at Agena Astro.
Hydrogen-Alpha Filters: specialized filters for observing the Sun’s chromosphere. They are commonly used to observe solar prominences and other features in the Sun’s outer atmosphere.
These filters are typically more expensive. The example shown below is the chromosphere model, which is suitable for photographing surface details and broad prominences.
The DayStar Camera Quark Solar Filter with Canon EF Lens Mount. Available at Agena Astro.
How to Photograph a Solar Eclipse
You’re ready to get photograph a solar eclipse, here’s what you need to know.
Plan your Location: before the eclipse, research the date, time, and location using astronomical apps or websites. Pick a spot with an unobstructed view of the Sun.
Gather the necessary equipment: be sure to have the right equipment, including a DSLR/mirrorless camera, 300mm+ telephoto lens, tripod, and solar filter.
Practice safety: when making any adjustments to your framing or focus, never look through the camera’s viewfinder. Use live view on the camera’s screen.
Attach your solar filter: attach your filter securely to your lens, the filter should cover the entire front of the lens
Set up your equipment: mount your camera and set it to manual mode to adjust your settings. Set your ISO, aperture, and shutter speed, and adjust focus. For tips on settings, see the section below.
Compose your shot: using any foreground interest, compose your shot without using the camera’s viewfinder (use live view only). Plan your composition in advance, if possible.
Test your settings: before the eclipse begins, take test shots to ensure your camera settings, particularly your exposure settings, are correct. You will want to expose the Sun’s disk.
Capture the eclipse: start shooting the eclipse and adjust your shutter speed and exposure settings as the Sun goes through different phases of the eclipse. Consider over and under-exposing (i.e. bracketing) a range of frames to capture the disk and corona details of the eclipse for a full dynamic range image.
Review and adjust: review your exposures on your camera’s screen and adjust according. Do not use the camera’s viewfinder.
Enjoy the eclipse: Don’t forget to take a break from shooting to enjoy the event with your solar glasses and observe.
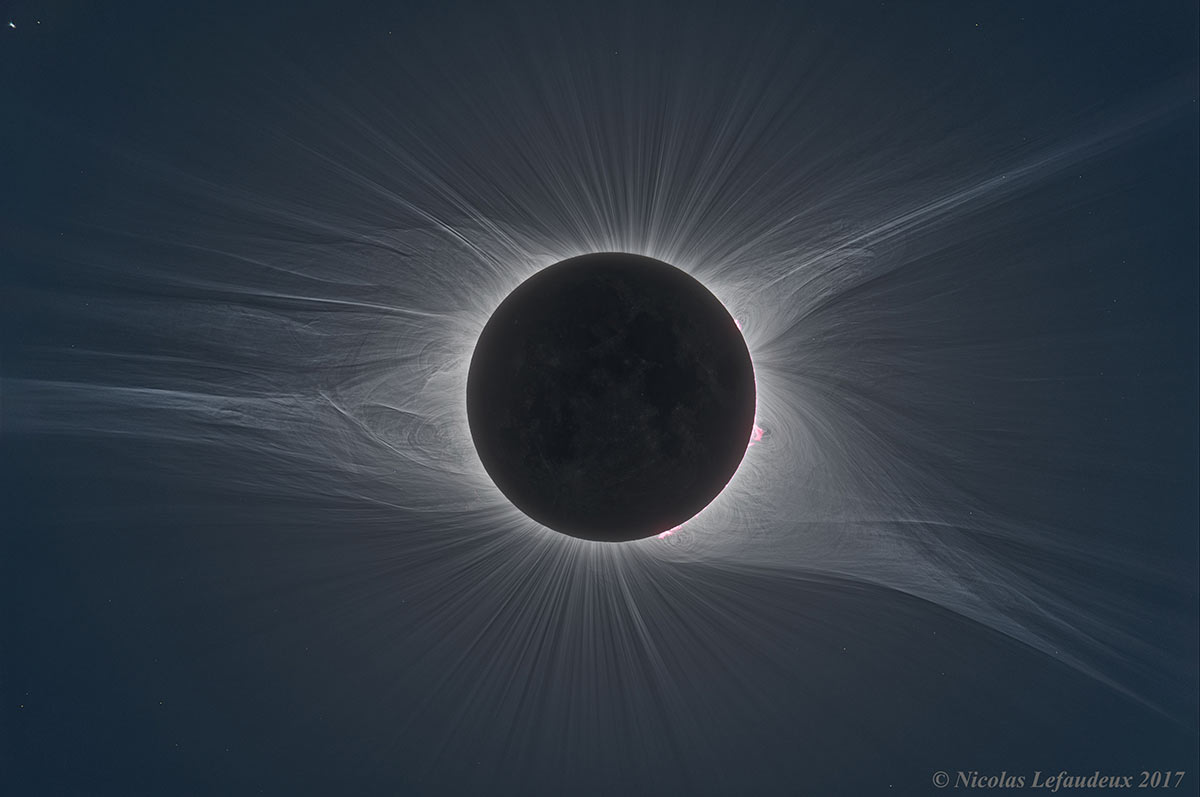
Total Solar Eclipse Corona in HDR. Astronomy Picture of the Day (APOD) Nicolas Lefaudeux.
Photographing a Total Solar Eclipse
When photographing a total solar eclipse, the process will change slightly.
First of all, it is safe to look at the Sun without eye protection when the Sun is completely covered by the moon during the total eclipse phase only. During this phase, solar filters must be removed to capture the details of the Sun’s corona.
Similar to a partial and annular eclipse, be sure to bracket the exposures over a range of shutter speeds (i.e. 1/1000 second to 1 second) to capture the details.
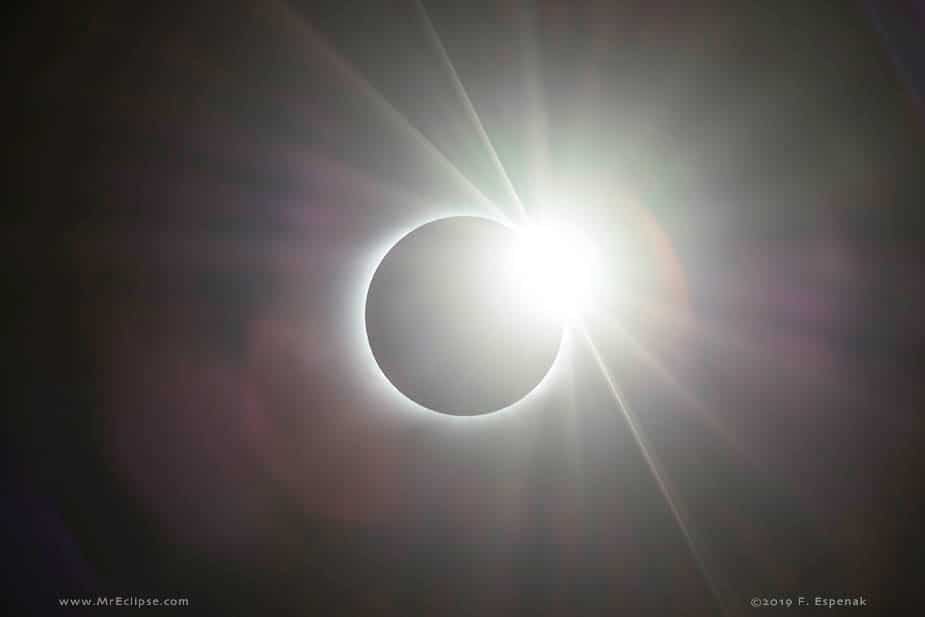
The Diamond Ring Effect during a Total Solar Eclipse | Fred Espenak
When photographing a total solar eclipse, you will want to look for the following effects:
Baily’s beads effect: as the moon covers the Sun during a total solar eclipse, you can see the rugged topography of the moon that allows only sparse amounts of sunlight to shine through in certain areas. Look for these irregularities on the edge of the moon just before totality and immediately afterward.
Diamond ring effect: happens right before or after the moon covers the Sun during a total solar eclipse. With only a small portion of sunlight remaining, it creates the appearance of a shining ‘single diamond’ on the edge of a ring.
Prominences: with only a small portion of sunlight showing during a total solar eclipse, there is the chance to see gaseous formations on the surface of the Sun. They start on the surface and extend out into the Sun’s outer atmosphere (i.e. corona).
Camera Settings
You’re ready to photograph a solar eclipse, here are some settings to try:
ISO: Unlike astrophotography at night, you do not need a high ISO setting to photograph the extremely bright sun. Start with ISO 100, and work your way up from there based on the following settings.
Aperture: You can use your aperture to increase/decrease the amount of light you let into the camera body and onto the sensor. Start with F/4, and increase the f-ratio if your image is too bright.
Shutter Speed: High shutter speeds are the name of the game when it comes to solar photography. 1/1000 is a great place to start. I don’t recommend shooting under 1/500, especially if you are not tracking the Sun.
Focus: Use the edges of the disc of the Sun to focus your camera lens or telescope. From there, use prominences (if possible) or sunspots to dial it in even further.
You can find more information about camera settings in this guide developed by Fred Espenak (also known as Mr. Eclipse).
The night sky tonight and on any clear night offers an ever-changing display of fascinating objects you can see, from stars and constellations to bright planets, the moon, and sometimes special events like meteor showers.
Observing the night sky can be done with no special equipment, although a sky map can be very useful, and a good telescope or binoculars will enhance some experiences and bring some otherwise invisible objects into view. You can also use astronomy accessories to make your observing easier, and use our Satellite Tracker page powered by N2YO.comto find out when and how to see the International Space Station and other satellites. We also have a helpful guide on how you can see and track a Starlink satellite train.
You can also capture the night sky by using any of the best cameras for astrophotography, along with a selection of the best lenses for astrophotography.
Read on to find out what’s up in the night sky tonight (planets visible now, moon phases, observing highlights this month) plus other resources (skywatching terms, night sky observing tips and further reading)
Related: The brightest planets in October’s night sky: How to see them (and when)
Monthly skywatching information is provided to Space.com by Chris Vaughan of Starry Night Education, the leader in space science curriculum solutions. Follow Starry Night on Twitter @StarryNightEdu and Chris at @Astrogeoguy
Editor’s note: If you have an amazing skywatching photo and would like to share them with Space.com’s readers, send your photo(s), comments, and your name and location to [email protected].
Calendar of observing highlights
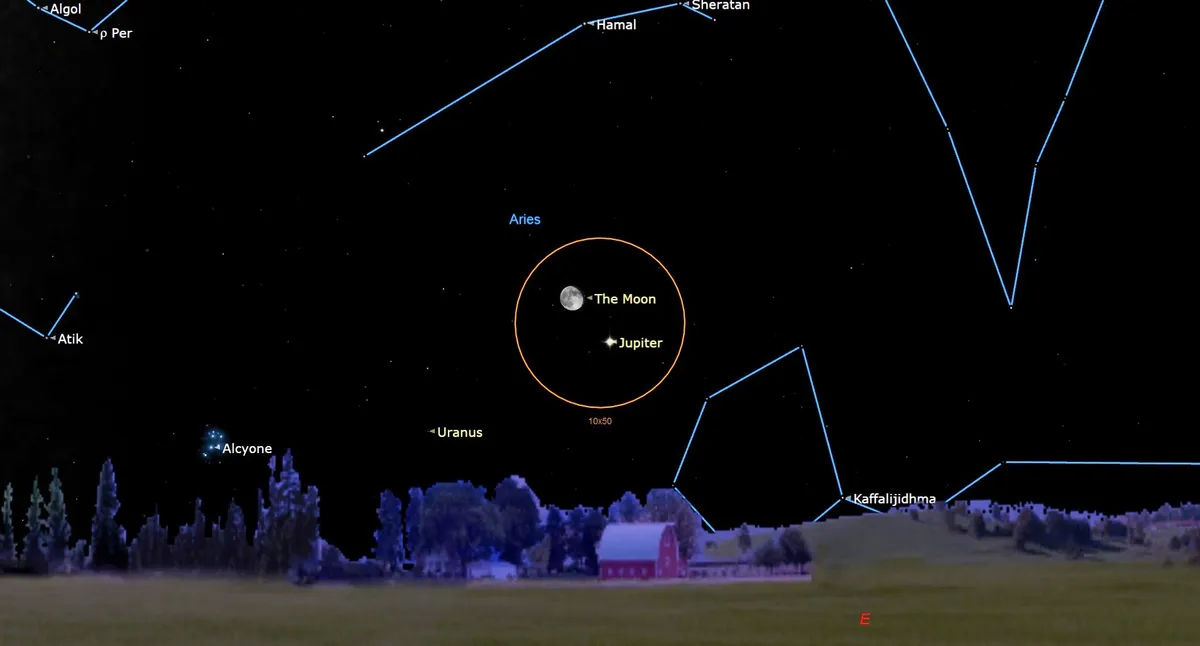
Sunday, October 1 – Bright Moon beside Jupiter (all night)
On Sunday night, October 1, the bright, waning gibbous moon will shine close enough to the very bright planet Jupiter for them to share the view in binoculars (orange circle). (Image credit: Chris Vaughan/Starry Night)
On Sunday night, October 1, the bright, waning gibbous moon will shine close enough to the very bright planet Jupiter for them to share the view in binoculars (orange circle). The duo will rise in the east at around 8 p.m. local time and then cross the sky all night long. By sunrise on Monday morning, the moon and Jupiter will be positioned high in the west. By then Jupiter will be positioned a palm’s width below the moon.
Monday, October 2 – Moon between Uranus and the Pleiades (all night)
In the eastern sky on Monday evening, October 2, use your binoculars to view the scattered stars of the Pleiades cluster (also known as Messier 45) twinkling just a few finger widths to the left (or 2 degrees to the celestial north) of the bright, waning gibbous moon. (Image credit: Chris Vaughan/Starry Night)
In the eastern sky on Monday evening, October 2, use your binoculars to view the scattered stars of the Pleiades cluster (also known as Messier 45) twinkling just a few finger widths to the left (or 2 degrees to the celestial north) of the bright, waning gibbous moon. The cluster, which covers a patch of sky several times larger than the moon, will be a challenge to see against the bright moon’s glare. Instead, hide the moon beyond the lower right edge of your binoculars’ field of view. Skywatchers viewing the scene later, or in more westerly time zones, will see the moon tucked in closer below the cluster. The bright planet Jupiter will shine off to the moon’s upper right. The magnitude 5.7 blue-green dot of Uranus, which is also visible in binoculars, will be positioned about midway between the moon and Jupiter.
Tuesday, October 3 – View Rupes Altai (all night)
On Tuesday night, October 3, the curved terminator on the moon will fall just to the right (or lunar east) of a large, curved escarpment on the moon known as Rupes Altai. (Image credit: Chris Vaughan/Starry Night)
On Tuesday night, October 3, the curved terminator on the moon will fall just to the right (or lunar east) of a large, curved escarpment on the moon known as Rupes Altai, making that feature especially easy to see with sharp eyes and through binoculars and telescopes. The cliff, which climbs up to 0.6 miles or 1 km above the lunar surface, is actually part of the rim of ancient Mare Nectaris. Its curve runs parallel to the edge of that large, dark basin, which will appear to its upper right (lunar northeast), partly in shadow.
Watch for the large crater named Piccolomini straddling the southeastern end of the cliff. Rupes Altai is highlighted every lunar month when the waxing moon is about 5 days past new and again when the waning moon is approaching third quarter.
Friday, October 6 – Third Quarter Moon (at 13:48 GMT)
The moon will complete three quarters of its orbit around Earth, measured from the previous new moon, on Friday, October 6 at 9:48 a.m. EDT, 6:48 a.m. PDT, or 13:48 GMT. (Image credit: Chris Vaughan/Starry Night)
The moon will complete three quarters of its orbit around Earth, measured from the previous new moon, on Friday, October 6 at 9:48 a.m. EDT, 6:48 a.m. PDT, or 13:48 GMT. At the third (or last) quarter phase the moon appears half-illuminated, on its western, sunward side. It will rise around midnight local time, and then remain visible until it sets in the western daytime sky in early afternoon. Third quarter moons are positioned ahead of the Earth in our trip around the Sun. About 3½ hours later, Earth will occupy that same location in space. The week of dark, moonless evening skies that follow this phase are the best ones for observing fainter deep sky targets.
Saturday, October 7 – The Dolphin Swims the Southern Sky (all night)
During the evening in early October, the small constellation of Delphinus is positioned high in the southern sky. (Image credit: Chris Vaughan/Starry Night)
During the evening in early October, the small constellation of Delphinus is positioned high in the southern sky. Look for its five 4th magnitude stars shining just to the lower left (or celestial southeast) of the line connecting the very bright stars Deneb and Altair. According to Greek legend, Poseidon, god of the seas, was assisted in a matter of the heart by a friendly dolphin, so he rewarded it with a place of honor in the heavens.
Delphinus’ brightest two stars are bluish Sualocin, at the top of its head, and whitish Rotanev, at the nape of its neck. Those funny appellations are actually the name of 19th-century astronomer Nicolaus Venator spelled backwards. Gamma Delphinus, the star marking the dolphin’s nose, is a close-together double star with one component a greenish color. Despite swimming close to the Milky Way, Delphinus’ only prominent deep sky objects are two globular clusters designated NGC 7006 and NGC 6934, which are also numbers C42 and C47, respectively on Sir Patrick Moore’s Caldwell List.
Sunday, October 8 – The Andromeda Galaxy (all night)
In October, the Andromeda Galaxy is climbing the northeastern sky during evening. (Image credit: Chris Vaughan/Starry Night)
In October, the Andromeda Galaxy is climbing the northeastern sky during evening. This large spiral galaxy, also designated Messier 31 and NGC 224, is 2.5 million light years from us, and covers an area of sky measuring 3 by 1 degrees (or six by two full moon diameters)! Under dark skies, M31 can be seen with unaided eyes as a faint smudge located 1.4 fist diameters to the left (or 14 degrees to the celestial northeast) of Alpheratz, the star that forms the left-hand (northwestern) corner of the square of Pegasus.
The three westernmost stars of Cassiopeia, Caph, Shedar, and Navi (Gamma Cas), also conveniently form an arrow that points towards M31. Binoculars will reveal the galaxy better. In a telescope, use low magnification and look for M31’s two smaller companion galaxies, the foreground Messier 32 and more distant Messier 110 (inset).
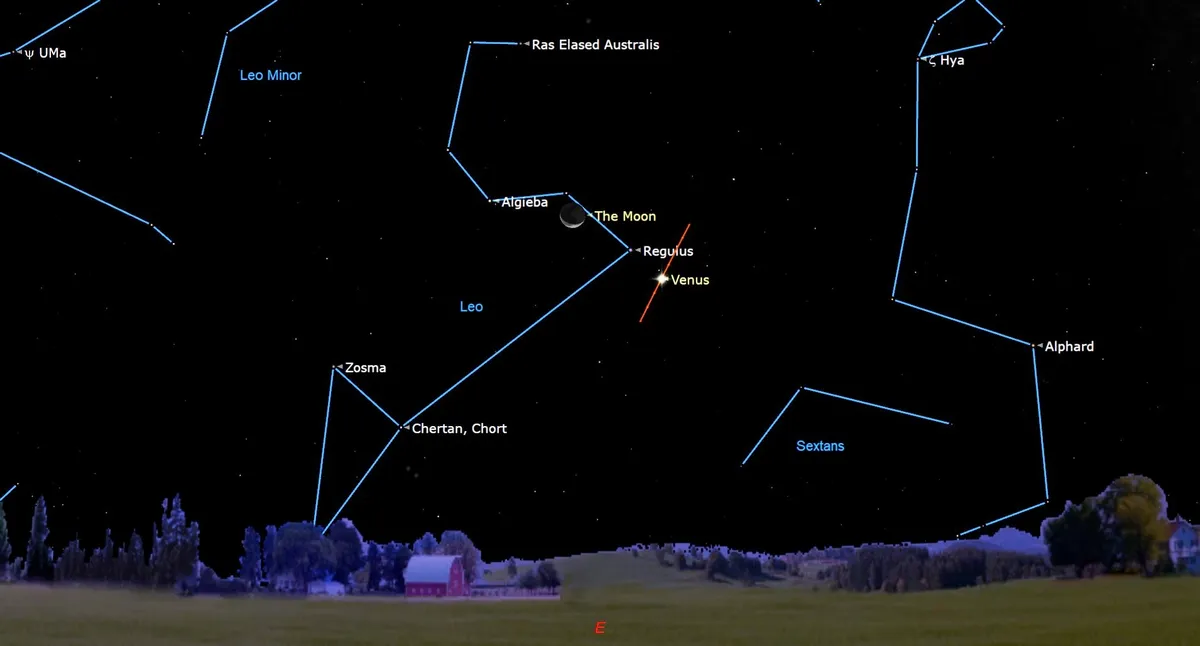
Tuesday, October 10 – Crescent moon near Venus and Regulus (pre-dawn)
For several mornings surrounding October 9, the very bright planet Venus will travel past Leo’s brightest star Regulus in the eastern sky (dotted red path). (Image credit: Chris Vaughan/Starry Night)
For several mornings surrounding October 9, the very bright planet Venus will travel past Leo’s brightest star Regulus in the eastern sky (dotted red path). A pretty sight will greet early risers on Tuesday morning, October 10 when the crescent of the old moon will shine close to the duo for a few hours before sunrise. Regulus will sparkle between the moon and the planet. All three objects will look terrific in binoculars and make a nice photo when composed with some interesting foreground scenery.
Thursday, October 12 – Morning Zodiacal Light for Mid-Northern Observers (pre-dawn)
During autumn at mid-northern latitudes every year, the ecliptic (green line) extends nearly vertically upward from the eastern horizon before dawn. (Image credit: Chris Vaughan/Starry Night)
During autumn at mid-northern latitudes every year, the ecliptic (green line) extends nearly vertically upward from the eastern horizon before dawn. That geometry favors the appearance of the faint zodiacal light in the eastern sky for about half an hour before dawn on moonless mornings. Zodiacal light is sunlight scattered by interplanetary particles that are concentrated in the plane of the solar system – the same material that produces meteor showers. It is more readily seen in areas free of urban light pollution.
Between now until the full moon on October 28, look for a broad wedge of faint light extending upwards from the eastern horizon and centered on the ecliptic. It will be strongest in the lower third of the sky, below the bright planet Venus. Try taking a long exposure photograph to capture the zodiacal light, but don’t confuse it with the Milky Way, which is positioned nearby in the southern sky
In the constellation of Perseus, Algol, also designated Beta Persei, marks the glowing eye of Medusa from Greek mythology. (Image credit: Chris Vaughan/Starry Night)
In the constellation of Perseus, Algol, also designated Beta Persei, marks the glowing eye of Medusa from Greek mythology. The star is among the most accessible variable stars for skywatchers. During a ten-hour period that repeats every 2 days, 20 hours, and 49 minutes, Algol dims noticeably and re-brightens by about a third. This happens when a fainter companion star with an orbit nearly edge-on to Earth crosses in front of its much brighter primary, reducing the total light output we perceive.
Algol normally shines at magnitude 2.1, similar to the nearby star Almach (aka Gamma Andromedae). But when fully dimmed, Algol’s brightness of magnitude 3.4 is almost identical to Rho Persei (or Gorgonea Tertia or ρ Per), the star sitting just two finger widths to Algol’s lower right (or 2.25 degrees to the celestial south). On Thursday evening, October 12 at 8:24 p.m. EDT or 00:24 GMT, Algol will be at its minimum brightness. At that time it will be located in the lower part of the northeastern sky. Five hours later the star will return to full intensity from a perch nearly overhead.
Saturday, October 14 – New Moon and Annular Solar Eclipse (at 17:59 GMT)
Skywatchers in the Americas (except Alaska and the southern tip of South America) and the surrounding portions of the Atlantic and Pacific Oceans will be treated to a solar eclipse when the moon passes the sun at new moon on Saturday, October 14. (Image credit: Chris Vaughan/Starry Night)
Skywatchers in the Americas (except Alaska and the southern tip of South America) and the surrounding portions of the Atlantic and Pacific Oceans will be treated to a solar eclipse when the moon passes the sun at new moon on Saturday, October 14. Since the moon will have reached apogee several days earlier, it will still be far enough from the Earth and small enough not to completely block the sun’s disk, resulting in an annular solar eclipse, or “ring of fire.”
The narrow track where true annularity will be visible will begin near Eugene, Oregon at 16:15:52 GMT or 9:15:52 a.m. PDT. From there the annular eclipse will sweep southeast through parts of Nevada, Utah, New Mexico, and western Texas – treating Corpus Christi to annularity for 5 minutes centred on 16:58:17 GMT or 11:58:17 a.m. CDT. The ring will next pass over the Yucatan Peninsula and portions of Belize, Honduras, Nicaragua, and Panama, then Colombia south of Bogota and central Brazil. It will move offshore at Natal, Brazil at 19:47:29 GMT or 4:47:29 p.m. BRT, about half an hour before the sun and moon set in the west. The regions surrounding the annularity track will see a partial solar eclipse. Exact times for your location can be obtained from astronomy apps like Starry Night and SkySafari. No part of this solar eclipse will be safe to look at without proper protective solar filters.
Sunday, October 15 – Razor-thin Crescent Moon near Mars (after sunset)
Above the western horizon after sunset on Sunday, October 15, the very slim crescent of the moon will be positioned two finger widths (or 2 degrees) from Mars. (Image credit: Chris Vaughan/Starry Night)
Above the western horizon after sunset on Sunday, October 15, the very slim crescent of the moon will be positioned two finger widths (or 2 degrees) from Mars. At mid-northern latitudes the duo will be very hard to spot in the twilit sky. From there, Mars will be located to the moon’s right. Observers at tropical latitudes and farther south will see the duo much more easily, with Mars located to the moon’s lower right. Regardless of viewing location, they’ll be cozy enough to share the view in binoculars (orange circle), but don’t point optical aids in their direction until the sun has completely set.
Wednesday, October 18 – Crescent Moon in the Scorpion’s Claws (after dusk)
After dusk on Wednesday, October 18 look a short distance above the southwestern horizon to see the pretty waxing crescent moon shining several finger widths to the upper left of the bring reddish star Antares, the heart of Scorpius. (Image credit: Chris Vaughan/Starry Night)
After dusk on Wednesday, October 18 look a short distance above the southwestern horizon to see the pretty waxing crescent moon shining several finger widths to the upper left of the bring reddish star Antares, the heart of Scorpius. They’ll share the field of view of your binoculars (orange circle) until they set around 8 p.m. local time. Hours earlier, observers in southwestern Asia can watch the moon pass in front of (or occult) Antares. For those in the Azores, eastern Canary Islands, most of Europe (except northern Scandinavia), most of northern Africa, and the rest of the Middle East, the occultation will occur in daytime.
Friday, October 20 – Double Shadow Transit on Jupiter (06:00 to 07:40 GMT)
Early on Friday morning, October 20 observers with telescopes in the Americas can watch the round black shadows of two of Jupiter’s moons cross the giant planet together for more than 90 minutes. (Image credit: Chris Vaughan/Starry Night)
Early on Friday morning, October 20 observers with telescopes in the Americas can watch the round black shadows of two of Jupiter’s moons cross the giant planet together for more than 90 minutes. Io‘s small shadow will begin its trip across Jupiter’s equator at 1:41 a.m. EDT or 5:41 GMT. Ganymede‘s much larger shadow will appear in Jupiter’s southern polar region at 2 a.m. EDT or 06:00 GMT. They’ll cross together until Ganymede’s shadow moves off the planet at 3:40 a.m. EDT or 07:40 GMT, leaving Io’s shadow to complete its crossing about 10 minutes later.
Saturday, October 21 – Orionids Meteor Shower Peak (pre-dawn)
The annual Orionids meteor shower is produced when the Earth crosses through a cloud of small particles dropped by repeated passages of Comet Halley in its orbit. (Image credit: Chris Vaughan/Starry Night)
The annual Orionid meteor shower is produced when the Earth crosses through a cloud of small particles dropped by repeated passages of Comet Halley in its orbit. Viewed in a dark sky during the peak of the shower, 10 to 20 bright and fast-moving meteors are usually seen each hour. Although this shower is active from September 26 to November 22, it will peak in the Americas on the evening of Saturday, October 21, when Earth will be crossing the densest region of the particle field.
Start watching for Orionids after dusk on Saturday night, especially after the half-illuminated moon sets around 11:30 p.m. The very best viewing time for the Americas will be before dawn on Sunday morning, October 22 when the sky overhead will be plowing directly into the particle cloud. Orionids meteors will appear anywhere in the sky, but they can be traced back to their radiant in the constellation of Orion.
Sunday, October 22- First Quarter Moon (at 03:29 GMT)
The moon will complete the first quarter of its journey around Earth on Sunday, October 22 at 03:29 GMT. (Image credit: Chris Vaughan/Starry Night)
The moon will complete the first quarter of its journey around Earth on Sunday, October 22 at 03:29 GMT. That translates to Saturday, October 21 at 11:29 p.m. EDT or 8:29 p.m. PDT. At first quarter, the moon’s 90 degree angle from the sun will cause us to see it half-illuminated – on its eastern side, and shining near the Teapot-shaped stars of Sagittarius after dusk.
At first quarter, the moon always rises around mid-day and sets around midnight, so it is also visible in the afternoon daytime sky, too. The evenings surrounding first quarter are the best ones for seeing the lunar terrain when it is dramatically lit by low-angled sunlight, especially along the terminator, the pole-to-pole boundary that separates the lit and dark hemispheres.
Monday, October 23 – Venus at Greatest Western Elongation (pre-dawn)
On Monday, October 23, Venus will reach its greatest separation, 46.5 degrees west of the sun, for its current morning appearance. (Image credit: Chris Vaughan/Starry Night)
On Monday, October 23, Venus will reach its greatest separation, 46.5 degrees west of the sun, for its current morning appearance. The very bright, magnitude -4.5 planet will be shining in the eastern sky from the time it rises at about 3:30 a.m. local time until dawn. Viewed through a telescope, Venus will show a waxing, half-illuminated disk (inset) spanning 24.2 arc-seconds.
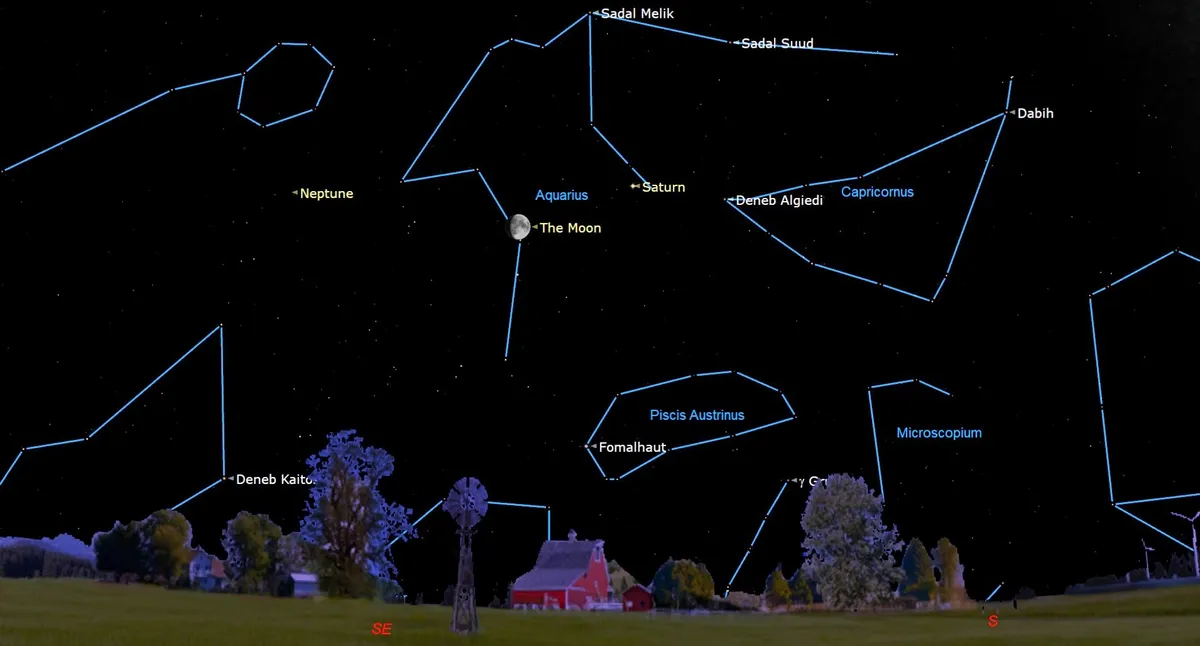
Tuesday, October 24 – Bright Moon near Saturn (evening)
After dusk on Tuesday evening, October 24, look in the lower part of the southern sky for Saturn’s yellowish dot shining almost a fist’s diameter to the upper right (or 9 degrees to the celestial west) of the waxing gibbous moon. (Image credit: Chris Vaughan/Starry Night)
After dusk on Tuesday evening, October 24, look in the lower part of the southern sky for Saturn’s yellowish dot shining almost a fist’s diameter to the upper right (or 9 degrees to the celestial west) of the waxing gibbous moon. By the time Saturn sets in the west-southwest around 2:15 a.m. local time, the diurnal rotation of the sky will have lifted the moon to Saturn’s upper left and somewhat farther from the planet. On the previous evening, Saturn will shine to the upper left of the moon.
Wednesday, October 25 – Crater Copernicus (all night)
The nights starting on Wednesday, October 25 will be particularly good for viewing the prominent crater Copernicus, which is located in eastern Oceanus Procellarum, the dark region located due south of Mare Imbrium and slightly northwest of the moon’s centre. (Image credit: Chris Vaughan/Starry Night)
The nights starting on Wednesday, October 25 will be particularly good for viewing the prominent crater Copernicus, which is located in eastern Oceanus Procellarum, the dark region located due south of Mare Imbrium and slightly northwest of the moon’s centre. This 800 million year old impact scar is visible with unaided eyes and binoculars – but telescope views will reveal many more interesting aspects of lunar geology.
Several nights before the moon reaches its full phase, Copernicus exhibits heavily terraced edges (due to slumping), an extensive ejecta blanket outside the crater rim, a complex central peak, and both smooth and rough terrain on the crater’s floor. Around full moon, Copernicus’ ray system, extending 500 miles (800 km) in all directions, becomes prominent. Use high magnification to look around Copernicus for small craters with bright floors and black haloes – impacts through Copernicus’ white ejecta that excavated dark Oceanus Procellarum basalt and even deeper highlands anorthosite.
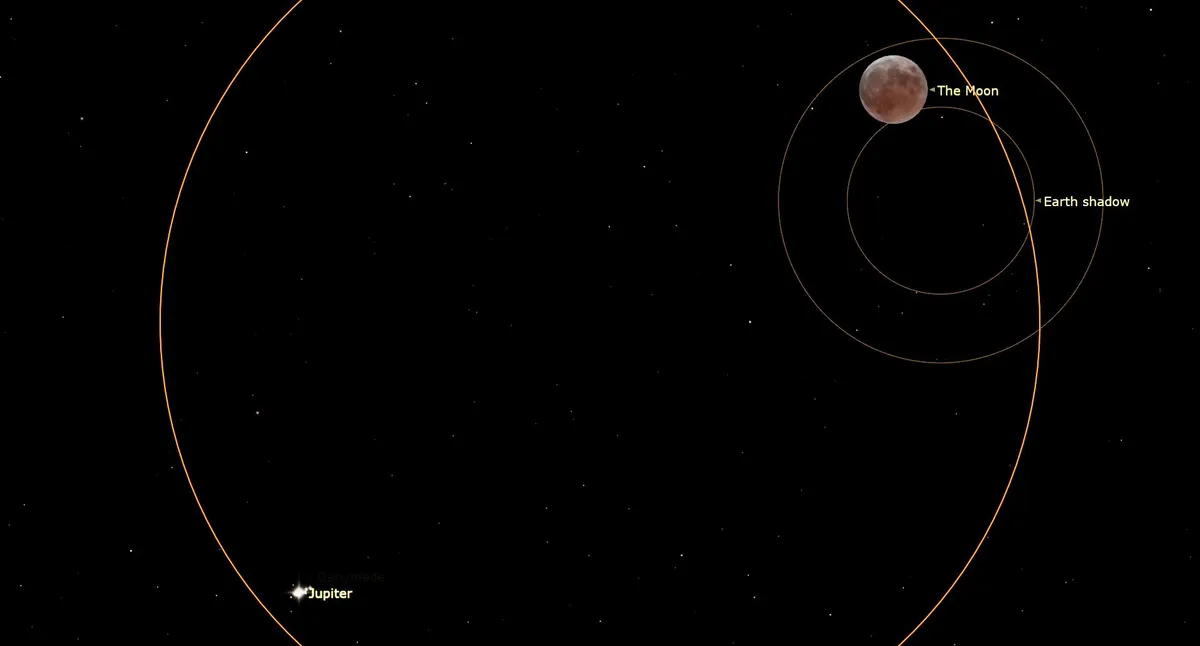
Saturday, October 28 – Full Hunter’s Moon Partially Eclipsed near Jupiter (at 20:24 GMT)
The full moon of October will occur at 4:24 p.m. EDT, 1:24 p.m. PDT, or 20:24 GMT, on Saturday, October 28. (Image credit: Chris Vaughan/Starry Night)
The full moon of October will occur at 4:24 p.m. EDT, 1:24 p.m. PDT, or 20:24 GMT, on Saturday, October 28. This full moon is traditionally called the Hunter’s Moon, Blood Moon, or Sanguine Moon. The Anishinaabe people of the Great Lakes region call it Binaakwe-giizis, the Falling Leaves Moon, or Mshkawji-giizis, the Freezing Moon. The Cree Nation of central Canada calls it Opimuhumowipesim, the Migrating Moon – the month when birds are migrating. The Haudenosaunee (Iroquois / Mohawk) of Eastern North America use Kentenha, the Time of Poverty Moon. Full moons in October always shine in or near the stars of Cetus and Pisces.
This full moon will partly dip into Earth’s shadow, producing a partial lunar eclipse visible across Africa, Europe, and Asia. Observers there will see a small bite out of the moon’s southern limb between 19:35 and 20:53 GMT, with a maximum of 12% of the moon’s diameter inside Earth’s shadow at 20:15 GMT. Lunar eclipses are safe to photograph and view without eye protection. Watch for the bright planet Jupiter shining close enough to the lower left of the moon for them to share the view in binoculars (orange circle).
Sunday, October 29 – Bright Moon Points to Uranus (all night)
A short time after the bright, still very full moon clears the treetops in the northeastern sky on Sunday evening, October 29, the planet Uranus will be situated less than three lunar diameters below it, or 1.6 degrees to the moon’s south-southeast. (Image credit: Chris Vaughan/Starry Night)
A short time after the bright, still very full moon clears the treetops in the northeastern sky on Sunday evening, October 29, the planet Uranus will be situated less than three lunar diameters below it, or 1.6 degrees to the moon’s south-southeast. As the pair cross the night sky together, the moon’s easterly orbital motion will carry it farther from Uranus and diurnal rotation will shift the moon above the planet in the hours before dawn.
While the blue, magnitude 5.6 ice giant planet is normally easy to see in binoculars and backyard telescopes, so much bright moonlight next door will make that difficult. Uranus will occupy the sky between Jupiter and the bright Pleiades star cluster for some time, so look for the distant planet on nights when the moon isn’t around.
Monday, October 30 – Moon below the Pleiades (predawn)
As the morning sky begins to brighten on Monday, October 30, the scattered stars of the Pleiades cluster will be located a few finger widths above the moon in the western sky. (Image credit: Chris Vaughan/Starry Night)
As the morning sky begins to brighten on Monday, October 30, use your binoculars to view the scattered stars of the Pleiades cluster (also known as Messier 45, Subaru, and the Seven Sisters) located a few finger widths above the moon in the western sky. The brighter sky will reduce the moon’s glare, allowing the seven sister stars, which are spread over an area near four times larger than the moon, to be seen more easily.
Tuesday, October 31 – The Spooky Owl Cluster (all night)
NGC 457, better known as the Owl Cluster, ET Cluster, or Dragonfly Cluster, is dominated by two prominent, close-together, yellow stars (Phi Cas and HD 7902) that form the eyes, a sprinkling of dimmer stars for the body and feet, and two curved chains of stars that look like upswept wings (inset). (Image credit: Chris Vaughan/Starry Night)
One of my favorite spooky objects can be seen in binoculars or a backyard telescope on autumn evenings. It’s one of the many bright, open star clusters in the W-shaped of Cassiopeia, the Queen, which you’ll find in the northeastern sky. NGC 457, better known as the Owl Cluster, ET Cluster, or Dragonfly Cluster, is dominated by two prominent, close-together, yellow stars (Phi Cas and HD 7902) that form the eyes, a sprinkling of dimmer stars for the body and feet, and two curved chains of stars that look like upswept wings (inset).
The critter is positioned with its head pointing away from Cassiopeia, which circles the north celestial pole, so it rotates through the night. The cluster occupies the 90 degree corner of a right-angle triangle that is completed by the stars Gamma Cas and Ruchbah. It’s about two finger widths above (or 2 degrees to the celestial south-southwest of) Ruchbah – as if the queen is bouncing the baby owl on her knee!
Visible planets in October
Mercury
Mercury as it will appear in the October night sky. (Image credit: Chris Vaughan/Starry Night)
As October begins, the magnitude -1.0 planet Mercury will be visible above the eastern horizon for a short time before sunrise – but its daily drift sunward through Virgo will soon hide it from view. After it passes the sun at superior conjunction on October 20, the speedy planet will commence a poor evening apparition for mid-northern latitude observers, but a good showing for those in the tropics and farther south, where telescope views will show its fully illuminated, 4.7 arc-seconds-wide disk.
Venus
Venus as it will appear in the October night sky. (Image credit: Chris Vaughan/Starry Night)
The brilliant planet Venus will continue to dominate the eastern pre-dawn sky during October. At the beginning of the month, the magnitude -4.7 “morning star” will rise around 3:15 a.m. local time. In a telescope it will display a waxing crescent phase and an apparent disk diameter of 31.7 arc-seconds. With each passing day, Venus will grow in illuminated phase and shrink in size while diminishing in brightness.
Venus will spend all of October traveling prograde eastward through Leo, passing 2 degrees south Leo’s brightest star, Regulus on the nights surrounding October 9. The pretty, waning crescent moon will pose to Venus’ upper left (or celestial north) on October 10. On October 23, Venus will reach its greatest separation of 46.5 degrees from the sun. At the end of October, Venus will be rising around 3:30 a.m. local time, shining at magnitude -4.4, and exhibiting a 22.3 arc-seconds-wide disk and a slightly gibbous phase in backyard telescopes.
Mars
Mars as it will appear in the October night sky. (Image credit: Chris Vaughan/Starry Night)
Marswill spend October positioned just above the western horizon after sunset while it steadily approaches the sun. The magnitude 1.6 planet will be very hard to see from northern latitudes, but it should be visible from the tropics or farther south. Skywatchers there can try to spot the very slim crescent of the young moon positioned two finger widths above Mars (or 2 degrees to the east) on October 15.
Jupiter
Jupiter as it will appear in the October night sky. (Image credit: Chris Vaughan/Starry Night)
The brilliant planet Jupiter will be travelling retrograde westward through the stars of southern Aries during October, in preparation for its opposition on November 3. On October 1 the magnitude -2.8 planet will rise around 8 p.m. local time along with the bright, waning gibbous moon, then cross the sky to gleam high in the west before sunrise. For the rest of the month Jupiter will appear 4 minutes earlier per night, eventually shining from dusk to dawn. Over the month, Jupiter will brighten a little and grow in apparent size from 48 to 50 arc-seconds.
Binoculars will reveal Jupiter’s four large Galilean moons flanking the planet. A backyard telescope will show its equatorial bands. A better quality instrument will reveal the Great Red Spot every 2nd or 3rd night, Jupiter’s Galilean satellites frequently eclipsing and occulting one another, and the passages of the round, black shadows they cast upon the planet.
Early on the morning of October 20 observers with telescopes in the Americas can watch the shadows of Io and Ganymede cross the giant planet together for more than 90 minutes. The full moon will return to pose just north of Jupiter on October 28.
Saturn
Saturn as it will appear in the October night sky. (Image credit: Chris Vaughan/Starry Night)
More than a month past opposition, the prominent, creamy-yellow dot of Saturn will shine well above the southeastern horizon after dusk as October begins. The magnitude 0.6 ringed planet will culminate due south in late evening and then set during the wee hours of the morning. Saturn will be travelling retrograde westward through western Aquarius all month long – with faint Neptune following 25 degrees to its east. Viewed in a telescope during October Saturn will show an apparent disk diameter of 18.3 arc-seconds, and its rings will subtend 42.5 arc-seconds.
Saturn’s rings will be tilting more edge-on to Earth every year until the spring of 2025 and are already noticeably less wide. Quality optics and good seeing conditions will allow you to see the dark, narrow Cassini Division in the rings and the enlarging wedge of shadow that Saturn’s globe casts upon them. Watch for a handful of Saturn’s moons arrayed as tiny dots around the planet. The bright, waxing gibbous moon will hop past Saturn on October 23-24.
Uranus
Uranus as it will appear in the October night sky. (Image credit: Chris Vaughan/Starry Night)
During October blue-green Uranus will be moving slowly retrograde west through the stars of eastern Aries and following far brighter Jupiter across the night sky. On October 1, their separation will be 8.3 degrees, but Jupiter’s faster retrograde motion will widen that to 10.8 degrees on Halloween. The Pleiades Cluster will be positioned a similar distance to Uranus’ lower left (or celestial northeast).
As October begins, the magnitude 5.66 planet, which is visible in binoculars and backyard telescopes in a dark sky, will be rising at about 8:30 p.m. local time. At the end of the month, it will be appearing two hours earlier. Uranus’ small, 3.8 arc-seconds-wide disk will best be seen in a telescope during the wee hours of the morning when the planet will be relatively high in the southern sky. On October 29, the waning gibbous moon will shine about 3 degrees to the left (or celestial north of) Uranus.
Neptune
Neptune as it will appear in the October night sky. (Image credit: Chris Vaughan/Starry Night)
Just weeks past opposition, the distant, magnitude 7.8 planet Neptune will cross the night sky all night long during October, following much brighter Saturn, which will be shining about 24 degrees to Neptune’s upper left (or celestial west). Neptune will be moving slowly retrograde westward about 7 degrees below (south of) the circle of stars that forms Pisces’ western fish. Viewed in a large telescope, Neptune’s apparent disk size will be 2.35 arc-seconds. Its large moon Triton should be visible under good conditions.
Skywatching terms
Gibbous: Used to describe a planet or moon that is more than 50% illuminated.
Asterism: A noteworthy or striking pattern of stars within a larger constellation.
Degrees (measuring the sky): The sky is 360 degrees all the way around, which means roughly 180 degrees from horizon to horizon. It’s easy to measure distances between objects: Your fist on an outstretched arm covers about 10 degrees of sky, while a finger covers about one degree.
Visual Magnitude: This is the astronomer’s scale for measuring the brightness of objects in the sky. The dimmest object visible in the night sky under perfectly dark conditions is about magnitude 6.5. Brighter stars are magnitude 2 or 1. The brightest objects get negative numbers. Venus can be as bright as magnitude minus 4.9. The full moon is minus 12.7 and the sun is minus 26.8.
Terminator: The boundary on the moon between sunlight and shadow.
Zenith: The point in the sky directly overhead.
Night sky observing tips
Adjust to the dark: If you wish to observe fainter objects, such as meteors, dim stars, nebulas, and galaxies, give your eyes at least 15 minutes to adjust to the darkness. Avoid looking at your phone’s bright screen by keeping it tucked away. If you must use it, set the brightness to minimum — or cover it with clingy red film.
Light Pollution: Even from a big city, one can see the moon, a handful of bright stars, and the brightest planets – if they are above the horizon. But to fully enjoy the heavens — especially a meteor shower, the fainter constellations, or to see the amazing swath across the sky that is the disk of our home galaxy, the Milky Way — rural areas are best for night sky viewing. If you’re stuck in a city or suburban area, use a tree or dark building to block ambient light (or moonlight) and help reveal fainter sky objects. If you’re in the suburbs, simply turning off outdoor lights can help.
Prepare for skywatching: If you plan to be outside for more than a few minutes, and it’s not a warm summer evening, dress more warmly than you think is necessary. An hour of winter observing can chill you to the bone. For meteor showers, a blanket or lounge chair will prove to be much more comfortable than standing, or sitting in a chair and craning your neck to see overhead.
Daytime skywatching: On the days surrounding first quarter, the moon is visible in the afternoon daytime sky. At last quarter, the moon rises before sunrise and lingers into the morning daytime sky. When Venus is at a significant angle away from the sun it can often be spotted during the day as a brilliant point of light – but you’ll need to consult an astronomy app to know when and where to look for it. When large sunspots develop on the sun, they can be seen without a telescope — as long as you use proper solar filters, such as eclipse glasses. Permanent eye damage can occur if you look at the sun for any length of time without protective eyewear.
The European Southern Observatory (ESO) shared a beautiful new image of stars trailing across the night sky. It was taken at the ESO’s Paranal Observatory, located in the Chilean Atacama Desert. The observatory is home to the Very Large Telescope (VLT), which consists of four Unit Telescopes and four smaller, movable Auxiliary Telescopes, like the one in the foreground of the image on the right.
Astronomers used a long exposure technique in which the night sky is photographed over several hours, capturing the movements of stars as they travel overhead. This creates a dazzling trailing effect, where starlight appears to arc over the observatory’s ground-based telescopes.
Two bright orange lasers are also seen beaming out of one of the Unit Telescopes. These laser beams, known as laser guide stars, are used to correct the distortion of starlight caused by Earth’s turbulent atmosphere, according to a statement from the ESO. The beams are pointed in opposite directions because the long exposure technique took several hours to complete, during which the telescope moved to observe different targets in the sky, ESO officials said.
Related: Amazing space views of ESO’s Very Large Telescope (photos)
A laser guide star creates an artificial star by shooting a laser beam into the sky, which excites sodium atoms in the upper layer of the atmosphere and causes them to glow like stars. This, in turn, provides a reference point for ground-based telescopes, enabling them to cancel out the effects of atmospheric turbulence and create a sharper image of the sky.
RELATED STORIES:
— How to photograph star trails
— Astrophotography for beginners 2023: How to shoot the night sky
— Very Large Telescope surprisingly finds exoplanet lurking in 3-body star system
“Each laser delivers 22 watts of power — about 4000 times the maximum allowed for a laser pointer — in a beam that’s about 30 centimeters in diameter,” ESO officials said in the statement. “This remarkable display doesn’t just look pretty: the twinkling of these artificial stars is measured in real time and used by the adaptive optics system to correct for the blurring caused by the Earth’s atmosphere so that the telescope can create sharp images.”
When we look up at the night sky, we see stars as individual points of twinkling light. However, the new image of the star trails over ESO’s Paranal Observatory remind us of Earth’s constant rotation, or spin, around its axis. Long exposure images such as this capture the beautiful motion of the sky as the Earth rotates relative to the backdrop of stars.
Of all the lone trees in the UK, the one at Sycamore Gap was arguably the most famous. It was situated almost smack bang in the middle of Hadrian’s wall and was featured in the 1991 movie Robin Hood: Prince of Thieves. The one-of-a-kind beauty spot’s photogenic nature and Dark Sky location made it a favourite among landscape photographers and astrophotographers, but it was also sought out by thousands of hikers, daytrippers, historians and local residents year upon year. It was a bastion of rural England and a symbol of the Northumberland National Park. It was even named tree of the year by the Woodland Trust in 2016. And now it’s gone…
The felled tree was found on September 28 and at the time of writing a police investigation is ongoing. Reuters quoted the police in calling it a “deliberate act of vandalism,” but the damage has already been done. You cannot simply replace a three-century-old tree and although the prospect of the stump providing new shoots has provided some solace, this is by no means a certainty. Even if the old tree does regrow, how can it measure up to the majesty of what was? After all, it was a textbook specimen – a tree from childhood picture books – the muse of millions of photographers and a movie star.
• Read more: Photographers react to Britain’s much-loved tree being chopped down at Sycamore Gap
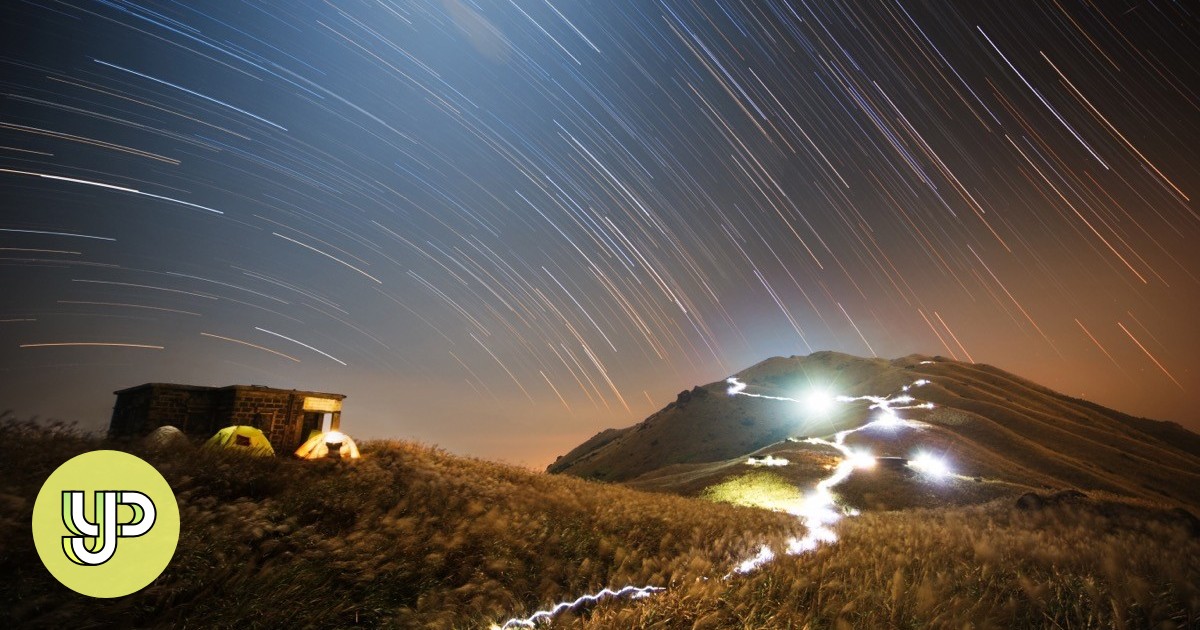
But it’s the local residents I feel for most. Campsites, holiday cottages and B&Bs line the nearby Military Road. The Twice Brewed Inn is famously little more than a half-hour walk from the gap. Its logo is a silhouette of the sycamore tree and it runs a variety of stargazing and astrophotography events throughout the year. The Vindolanda Charitable Trust relies on footfall through its Roman Army Museum and Roman Vindolanda Fort & Museum, the latter being a live excavation site. And then you have the thousands of walkers who take up the Hadrian’s Wall Challenge every year, walking the 84-mile National Trail from Bowness-on-Solway to Wallsend (or vice versa). Sycamore Gap is one of the route’s biggest draws. And you have to assume that its destruction will have some kind of impact on local tourism and businesses.
Two weeks ago, a friend and I embarked on the Hadrian’s Wall Challenge. Roughly 67km in I twisted my knee and to make matters worse, I woke up in my tent the following morning with tonsillitis. Constant rain throughout the four-day hike from Bowness-on-Solway had beaten me down, and I couldn’t continue. My friend suggested struggling the final 2.5km to Sycamore Gap so I could at least see it, but with another deluge of rain falling upon my already sodden clothes and the prospect of a seven-hour journey home, I elected to hit the road. My intention was to return in the summer and finish what I’d started. Little did I know that my departing friend would be one of the last hikers to see the famed sycamore tree still standing. I’ve missed my chance, and I won’t be alone.
Much like the mindless act of cutting down a tree, I’m struggling to find a point to this article. I guess I’m sad that nobody else will get to experience or photograph Sycamore Gap. I’m sad because so many local businesses rely upon the landmark’s worldwide appeal. I’m sad because in a world where humanity is constantly reminded that it’s failing the planet, this feels like a cruel microcosm of more heartbreak to come.
I’m afraid too. Afraid that we’re powerless to safeguard historical and natural landmarks from a similar incident. It’s hardly an isolated one… In 2021 an osprey nest was felled at Llyn Brenig and nature reserves across the country regularly report acts of vandalism. It makes me want to do my part in safeguarding other areas of natural beauty. Refrain from geotagging landscape locations on Instagram, perhaps even refrain from photographing them altogether. But then again, isn’t photography and videography at least partially responsible for fuelling the nation’s passion for nature and history? And that passion is evident in the nationwide response to the felling. Hopefully it’s enough to deter other would-be vandals.
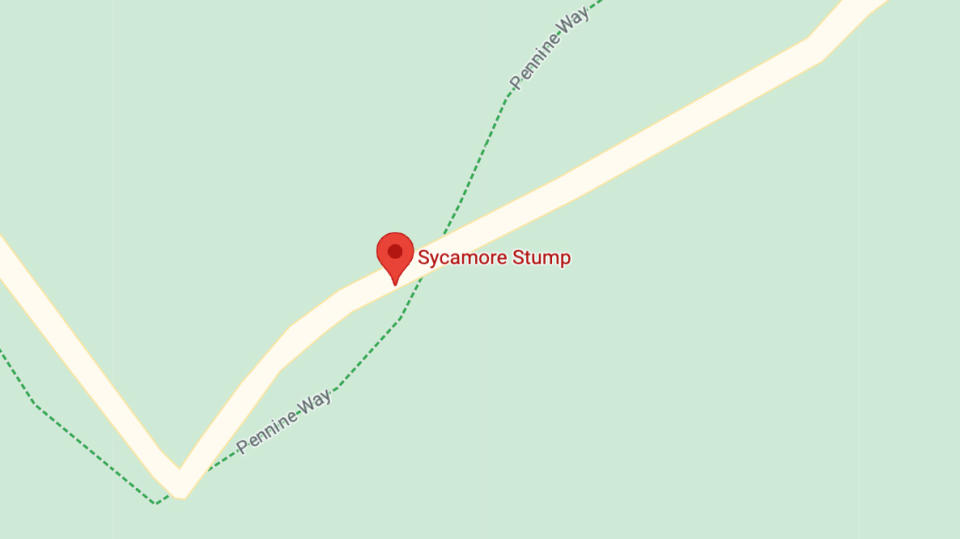
The sad truth, though, is that nothing can bring back Sycamore Gap. What really got me today was Google. The omniscient overlord of the Internet never misses a trick. Already, when you search Sycamore Gap on Google Maps, you are presented with a red pin. It no longer reads Sycamore Gap, just: Sycamore Stump…
N-Photo: The Nikon Magazine is a monthly publication that’s entirely dedicated to Nikon users. For the best news, reviews, projects and more, subscribe to N-Photo today!
View Deal
If you enjoyed this article, you might be interested in reading about the best Nikon Z lenses for FX and DX cameras. If you’re clinging to your DSLR you can also check out the best lenses for the Nikon D850, and it you’re embracing the revolution then take a look at the best lenses for the Nikon Z50.
The Astrophotography Cameras Market report offers qualitative and quantitative insights as well as a thorough examination of the market size and expansion rate of all potential market segments. The report has been put together using primary and secondary research methodologies, which offer an exact and detailed understanding of the Astrophotography Cameras market. The Astrophotography Cameras Market is projected to succeed at a CAGR of 6.3% during 2023 – 2029.
The research report on the global Astrophotography Cameras market includes a SWOT analysis and Porter’s five forces analysis, which help in provided that the precise path of the market. These market measurement tools help in identifying drivers, restraints, weaknesses, Astrophotography Cameras market opportunities, and threats. The research report offers global market figures as well as figures for regional markets and segments there. The analysts used a top-down and bottom-up approach to evaluate the segments and provide a fair assessment of their effect on the global Astrophotography Cameras market. The report offers an outline of the market, which briefly defines the market condition and the important segments. It also mentions the top players present in the global Astrophotography Cameras market.
Key players which are covered in the global Astrophotography Cameras market is: Nikon,Canon,Sony,ZWO,QHYCCD,Atik Cameras,Fujifilm,Panasonic,Olympus,Leica
Global Astrophotography Cameras Market Split by Product Type and Applications
On the basis of Types:
Requires Connected Device or Specific Software
No Connected Devices or Specific Software Required
On the basis of Application:
Individual
Commercial
Regional and Country-level Analysis:
The key regions covered in the Astrophotography Cameras market report are North America, Europe, Asia Pacific, Latin America, Middle East and Africa. It also covers key regions (countries), viz, U.S., Canada, Germany, France, U.K., Italy, Russia, China, Japan, South Korea, India, Australia, Taiwan, Indonesia, Thailand, Malaysia, Philippines, Vietnam, Mexico, Brazil, Turkey, Saudi Arabia, U.A.E, etc.
Major highlights of the Astrophotography Cameras Market report:
– All-inclusive evaluation of the parent market
– Evolution of significant market aspects
– Industry-wide investigation of market segments
– Assessment of market value and volume in past, present, and forecast years
– Evaluation of market share
– Tactical approaches of market leaders
– Lucrative strategies to help companies strengthen their position in the market
What benefits does Market Intelligence Data Market Insights study is going to provide?
2023 Latest industry influencing trends and development scenario
To Size powerful market opportunities
Key decision in planning and to further expand market share
Identify Key Business Segments, Market proposition & Gap Analysis
Assisting in allocating marketing investments
Updated Methodology of Market Intelligence Data Market Insights
Browse full Astrophotography Cameras market report description with TOC:
– Potential and niche segments/regions exhibiting promising growth.
– Detailed overview of Astrophotography Cameras Market
– Changing market dynamics of the industry
– In-depth market segmentation by Type, Application, etc.
– Historical, current, and projected market size in terms of volume and value
– Recent industry trends and developments
– Competitive landscape of Market
– Strategies of key players and product offerings
Reasons Why You Should Buy This Report:
To gain an in-depth understanding of Astrophotography Cameras Market
To obtain research-based business decisions and add weight to presentations and marketing strategies
To gain competitive knowledge of leading market players
It gives pin point investigation of changing rivalry elements and keeps you in front of contenders.
It helps in settling on educated business choices by having total bits of knowledge of market and by making inside and out investigation of market sections.
Customization services available with the report:
25% customization.
Five Countries can be added as per your choice.
Five Companies can add as per your choice.
customization up to 40 hours.
post-sales support for 1 year from the date of delivery.
Please contact our sales professionals ( [email protected]) and we will ensure that you get a report that suits your needs.
Recommended Readings:
Global Inverters for Battery Energy Storage Market
Adults frequently advise us to reach for the stars; what if you really, literally could? With astrophotography, you might be able to get closer than you think.
The image of a lone photographer with nothing between them and the elements as they document the galaxy is probably what most people imagine astrophotographers do. But, according to award-winning Hong Kong-based astrophotographer Timmy Wong, that’s only a part of the whole experience.
“Astrophotography is a very broad topic,” says Wong, but there are three main types: deep sky imaging, planetary imaging, and astroscape photography.
7 most Instagram-worthy spots in Hong Kong to take festive Christmas photos this year
Deep sky imaging involves taking photos of space and celestial objects like star formations. This form of astrophotography is very hard to do in Hong Kong as “the light pollution is severe” in most parts of the city. It also requires a lot of photography experience and skill in post-processing.
Wong often has to stay a while on-site to get the perfect shot.
Photo: Timmy Wong
Planetary imaging can be considered “ideal” for Hong Kong, given the city’s geographical location, but the equipment required is rather pricey and the techniques involved are advanced.
So, what we normally think of as astrophotography is astroscape photography; these are the typical photographs you see all over Flickr or 500px that feature a starry sky over a landscape. What makes it so popular, even in such a light-polluted city such as Hong Kong, is that it can be done anywhere.
“Astroscape photography can be done both in town and also in the countryside” with the only requirement being that the “night sky [must be] clean and clear”, explains Wong.
Forget rooftopping: the 7 best places for a bird’s eye view of Hong Kong
He says that while astroscape photography in urban areas isn’t difficult, he still prefers visiting the countryside on clear nights because it’s good for stargazing and also astroscape photography. That is, if you have the right tools.
Wong says astroscape photography can be done anywhere.
Photo: Timmy Wong
Care to give it a try?
To do astroscape photography, you’d need to use a DSLR (digital single lens reflex) camera with a wide-angle lens (around 14mm) and a big aperture (very small f-number, such as f/1.8). Another item you’ll need is a good sturdy tripod to keep your camera steady while you’re shooting.
The key is to know exactly when and where you’ll go; Wong says you should always “check your target with a star map, and decide the destination and departure time” for the best composition, and make sure you have a clear view of the stars.
It is also important to be dressed appropriately (as you might be there for a while), and that you know how to get to the location and back safely.
Now that you have a general idea of how to prepare for a shoot, check out some of the best places to do it
5 historical and Instagram-worthy spots in HK you’ll want to take your next selfie at
Shek O beach (Southern District, Hong Kong Island)
Pros: Here, you can enjoy the breeze at the beach while you’re carrying out your astrophotography. Transportation is convenient as you can get there by taxi, bus, minibus or private car. It’s an ideal location for people living on Hong Kong Island. Cons: The beach can be overcrowded on clear nights and there is a bit of light pollution.
Highland Reservoir (Sai Kung, New Territories)
Pros: Far away from city lights, the reservoir is an open area with a 360-degree view. It costs around HK$110 by taxi from the Sai Kung town centre to the East Dam of the Highland Reservoir. Cons: Can be quite crowded on clear nights. Transportation can also be a problem as only taxis can enter the reservoir, especially during peak hours. During the summer nights, fishing boats can cause a bit of light pollution that can ruin your shot.
Po Toi Island (Islands District)
Pros: Po Toi Island is a very remote place with almost no light pollution at all. Cons: Ferry services to the island are limited so it is important to check the schedule before you go. There aren’t many eateries on the island so you might want to bring a packed meal. Water taxis to the island can be arranged via booking but they are very expensive. Since it’s summer, fishing boats may cause a bit of pesky light pollution.
September 28-29, 2023 October 28, 2023 November 26-27, 2023 December 26-27, 2023
The Moon is one of nature’s wonders, but to photograph it successfully you first have to understand it.
Although astrophotographers specializing in the Moon usually photograph it through a powerful telescope, a telephoto lens of almost any focal length is good enough to get a good Moon shot. Making the Moon the sole focus of a shot, however, is only one way to approach lunar photography; another is for it to enhance a landscape photo, where it can provide a powerful addition to a wide-angle image.
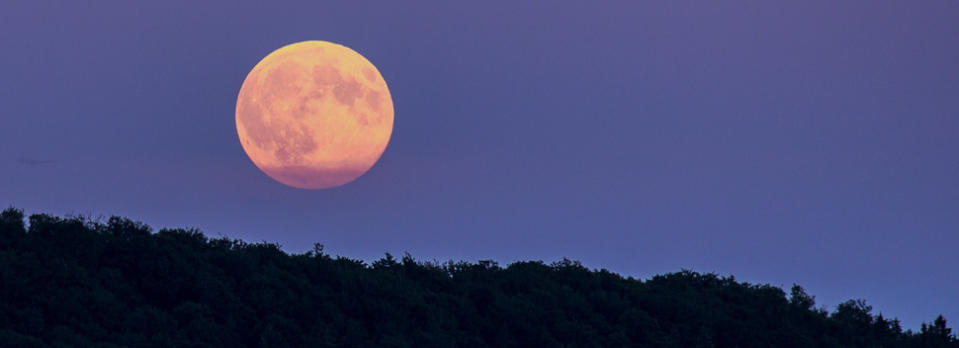
This month the full moon will occur on Friday 29 September – and is known as the Harvest Moon. The best time will be early in the morning in North America (5.58am ET). It is the last so-called supermoon of 2023 – as the moon is slightly closer than usual, so appears slightly larger in the sky.
Read more: Astrophotography tips
Equipment
The equipment you’ll need is the same as for wildlife or sports photography: a DSLR, mirrorless or bridge camera on a sturdy tripod, and either a wide-angle or any regular telephoto lens, such as one with a 70-300mm focal range. A remote shutter-release cable will also be useful so you don’t introduce vibrations, although you can also use the timer in your camera.
The Moon is a moving target; the combination of Moon’s 2,288 miles-per-hour orbit and Earth’s 1,000 miles-per-hour rotation makes our satellite a fast-moving target. However, it’s usually bright enough for a relatively fast shutter speed to yield good results.
How to focus on the Moon
Although you can autofocus on the Moon as it rises, or as it becomes visible just before sunset, it’s a good idea to focus manually. With your lens set to manual focus, set the the focusing ring to infinity. It takes some practice since most cameras can focus beyond infinity, and finding the exact point that works for your lens takes trial and error.
Take some test shots and zoom in on the result on your camera’s LCD screen to see which one works best. Don’t skip this step; only once you’ve done it correctly will your Moon photos be reliably sharp.
How to expose for the Moon
It’s a common mistake to overexpose the moon but it’s actually much brighter than you think. However, if you want to photograph the foreground and not just the moon by itself you will need to make sure your exposure works for both or use bracketing to take multiple shots with different exposures.
To get a great Moon shot and little else, set your camera to ISO 100 or ISO 200 and the aperture to between f/5.6 and f/11, and adjust your shutter speed to between 1/125sec and 1/250sec. The exact settings will vary depending on your camera and the brightness of the Moon, which depends on its exact phase, but these base settings will get you started.
Taking a landscape photograph that includes the Moon is more difficult because during that ‘blue hour’ after sunset the Moon is already too bright. So, if you take a longer exposure for the landscape, you’ll overexpose the Moon, and if you expose for the Moon, the landscape with be under-exposed. So what do you do?
The answer is either to photograph the Moon just before sunset when the light levels are higher (they drop-off so quickly at the point of sunset), or to take two exposures and combine them in photo-editing software. The latter approach, however, often looks fake. Another way is to expose for the Moon, and use a flash to light the foreground.
When to photograph the Moon
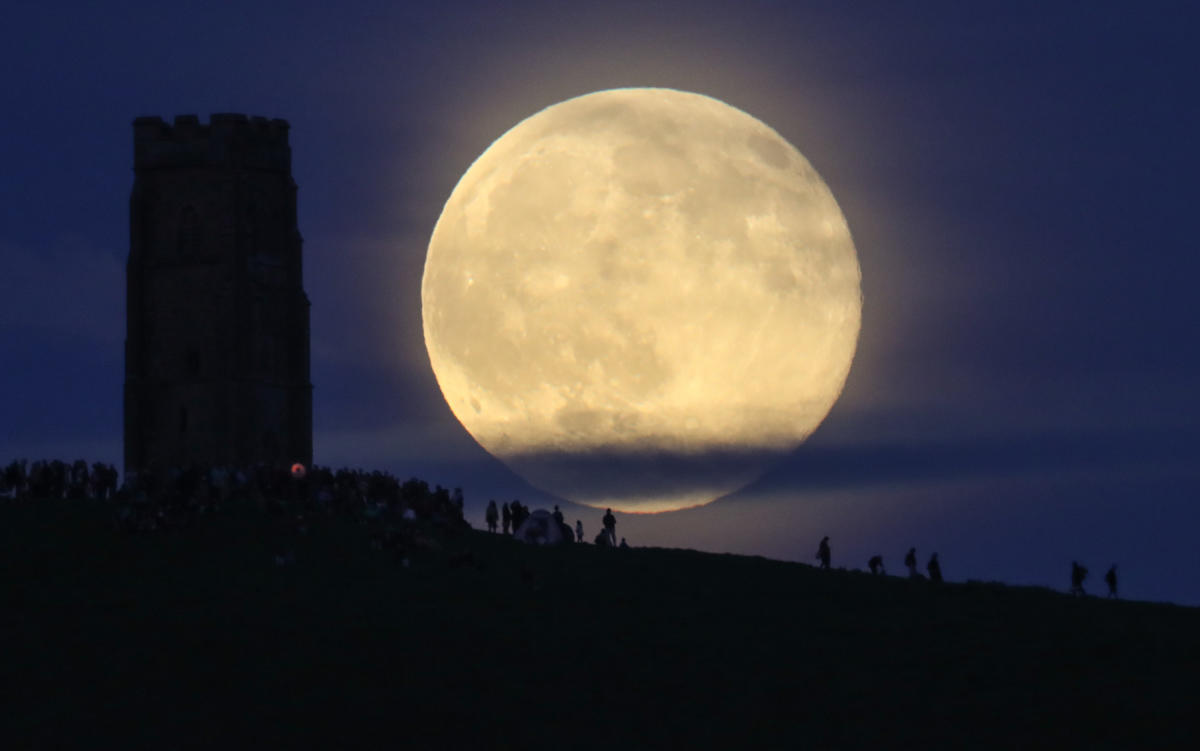
The full moon is probably the lunar event that most photographers will want to photograph first – but it is actually one of the most difficult due to the glare that this creates and July’s supermoon is the biggest and brightest of them all. Some of the most impressive shots of the full moon are those where it is seen behind a building or a natural structure – which makes the moon look much larger than it does to the naked eye.
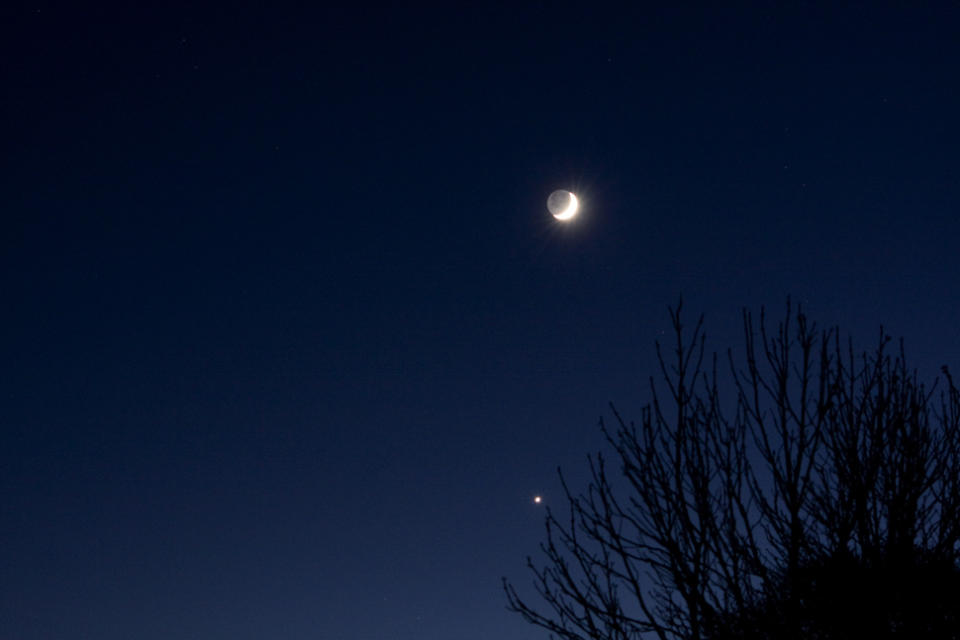
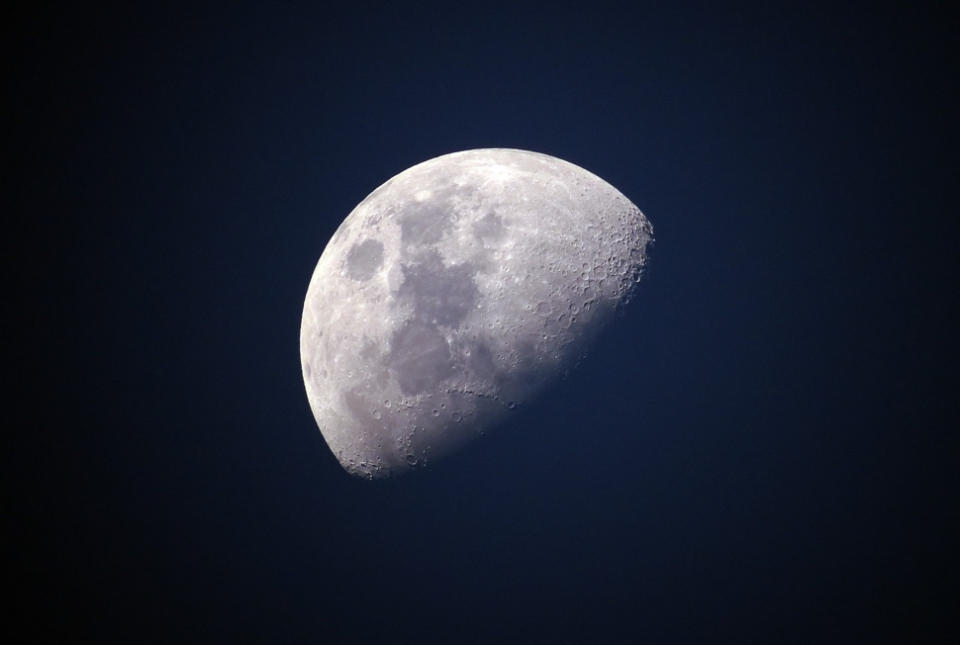
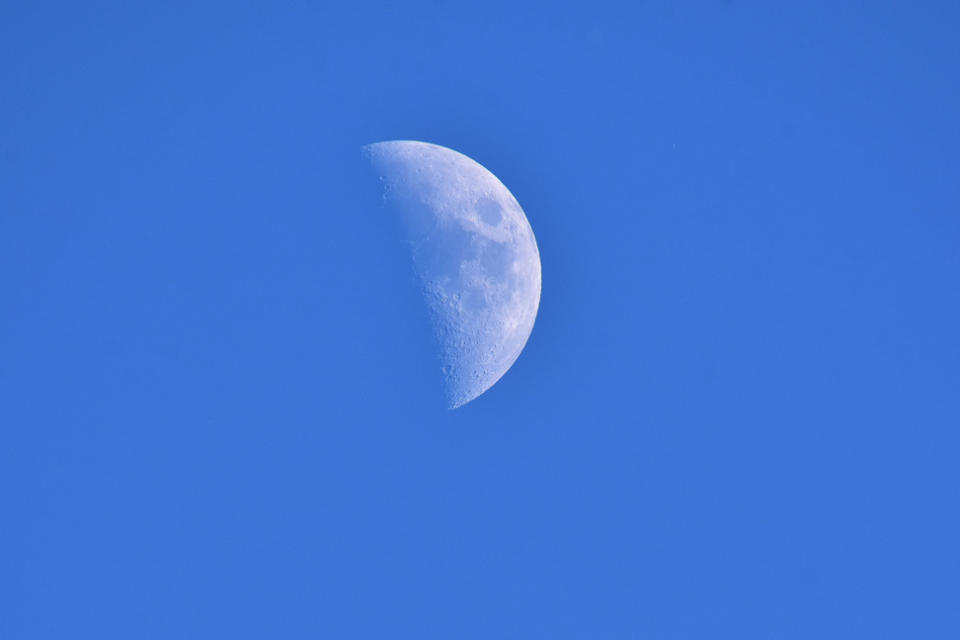
If you want less of a cliche, go for other phases of the Moon when you can see a line between the light and dark sides. This is called the terminator line, which is when the craters on the Moon throw shadows, particularly near its South Pole. You can see this most nights, but perhaps the most precious kind of Moon is visible only on the few days on either side of New Moon. At this time, you’ll also see a waxing or waning Crescent Moon close to the horizon, and it comes with the bonus of Earthshine.
How to capture Earthshine on the Moon
Although 50% of the Moon is constantly being illuminated by the Sun, there are a few days each month when the Earth gets involved – and it’s a beautiful event to capture.
Earthshine is a dull glow to the unlit area of the Moon that’s the result of sunlight reflecting off Earth’s surface and onto the lunar surface. Its subtle and mesmerizing, and easy to capture if you time it right.
Set up for the first (or, more likely, the second) sunset after New Moon. Using a lens with as long a focal length lens as possible, and with your camera on a tripod, dial in a sensitivity of ISO 400, an aperture of f/2.8 (or as wide as your lens aperture will go), and open the shutter for between one and four seconds.
See our guide to photography earthshine
In fact, Earthshine is always being reflected onto the Moon to some extent, but it’s only around New Moon that the crescent of sunlight is small enough for the camera to expose for both the lit and unlit areas.
This is also a good time to combine Moon photography with night-sky photography because the Moon will set soon after you’ve photographed it. You can then go looking for stars and the Milky Way.
How to capture a moonrise or moonset
There are two exceptions to the advice to avoid photographing the Full Moon.
The first is when there’s a total lunar eclipse, and the second is when a Full Moon as it rises or sets, as it’s a great alternative to a sunset. The sight of a Full Moon peeking above the horizon and turning from deep orange to pale yellow to bright white during twilight is a spectacular sight. It also presents an opportunity to get the Moon in the context of a beautiful landscape.
The colourful spectacle lasts mere minutes and is easy to miss, but, like everything else in the night sky, a rising Full Moon is predictable down to the second. Simply find out exactly on what day the next Full Moon is going to be where you are, and exactly what time sunset is on that date, then look to the east for the moonrise. Start-off with your camera set to ISO 100, f10 and 1/125.
If you’ve ever seen photos of someone or something silhouetted against a seemingly giant Moon, perhaps while standing on top of a hill, they were taken during a moonrise. They were also ruthlessly planned; The Photographer’s Ephemeris and PhotoPills apps are ideal for this kind of project.
To make the Moon look so large in the background, photographers need to use superzoom telephoto lenses of at least 1,000mm while being positioned a mile or so away from the all-important foreground subject that introduces that sense of scale.
Composites, moon-stacks and super moons
It’s possible to shoot the Moon and add it to another landscape shot using Photoshop. However, almost everyone who attempts this either makes the Moon look way too big, or they place it somewhere in the night sky that it doesn’t occur (such as in the norther hemisphere’s northern sky).
To anyone with a trained eye, most composites look like what they are: fakes. There is one exception; moonstacks, a lunar time-lapse, in which you take several photos of the moon as it moves through the sky, and then use Photoshop to composite them into a single image.
Read more: How to create a moonstack
Although it often grabs the attention of photographers and media alike, pay little attention to the term ‘Super Moon’. A recent term that merely means that the Moon is slightly closer to Earth than normal, it has little practical meaning or use. However, while a Super Full Moon does look larger as it rises above the horizon, it’s only by about 10%-15%, so it’s barely noticeable to eye or camera.
The very finest way of getting a close-up shot of the Moon – and the only way to get enough magnification for it to fill the entire frame – is to mount the body of a camera on a telescope using a cheap T-adaptor; it’s like having a very large telephoto lens. Try to find a telescope with a focal length of over 1,000mm, but under 2,000mm to capture the whole of the moon.
Whatever kind of Moon-shot you try for, photographing our satellite provides a good lesson in the role of precision timing in composing unique landscape and nature images.
Read more
• The best lenses for astrophotography • The best camera and gear for shooting the night sky • Best light pollution filters • The best telescopes for astrophotography
El próximo 12 de octubre el cometa periódico 103P/Hartley (también conocido como Hartley 2) alcanzará su perihelio, el momento de mayor proximidad al Sol. Esto le convierte en un cometa especialmente atractivo durante estas próximas noches ya que actualmente se encuentra en magnitud 8,8 con recorrido todavía para llegar a 8,5 siempre al alcance de telescopio y poco brillante para ser accesible con prismáticos pequeños.
Please check out this new shot of Comet C/103P Hartley taken yesterday by Chris Schur. It is currently in Auriga and glowing at about 9th magnitude, and may brighten from there. Take a look and let me know what you see! pic.twitter.com/K4YbVW3eTV
103P/Hartley fue descubierto en el año 1986 por Malcolm Hartley desde el Observatorio Siding Spring en Australia. Este cometa tiene un periodo muy corto, de tan solo 6,5 años, por lo que es un gran conocido entre la comunidad astronómica. Se calcula que tiene un tamaño de entre 1,2 y 1,6km.
En 2010, la sonda Deep Impact de la Nasa sobrevoló el comenta 103P/Hartley como parte de su misión extendida bautizada como EPOXI.
El cometa Hartley 2 fotografiado por la Deep Impact
¿Cómo ver el cometa 103P/Hartley en 2023?
Durante estos primeros días de octubre encontraremos el cometa 103P/Hartley en la constelación de Auriga y moviéndose hacia Géminis pero la presencia de la luna menguante será un obstáculo por su proximidad sobre todo los días 6 y 7 de octubre. A partir de las 2 de la madrugada el cometa empieza a estar a unos 15º sobre el horizonte pero a medida que pasen los días y se acerque más al Sol, en su descenso por Géminis, tendremos que esperar más y más tarde por lo que casi es más recomendable madrugar e intentar observarlo antes del amanecer, cuando se encuentra más alto. Para el 12 de octubre tendremos casi luna nueva, por lo que será un buen momento para intentar observarlo desde cielos oscuros.
A partir del 19 de octubre el cometa se irá adentrando en Cáncer y seguiremos teniendo buenas condiciones para intentar su observación hasta aproximadamente el día 25 ya que para entonces el brillo de la Luna volverá a molestar bastante.
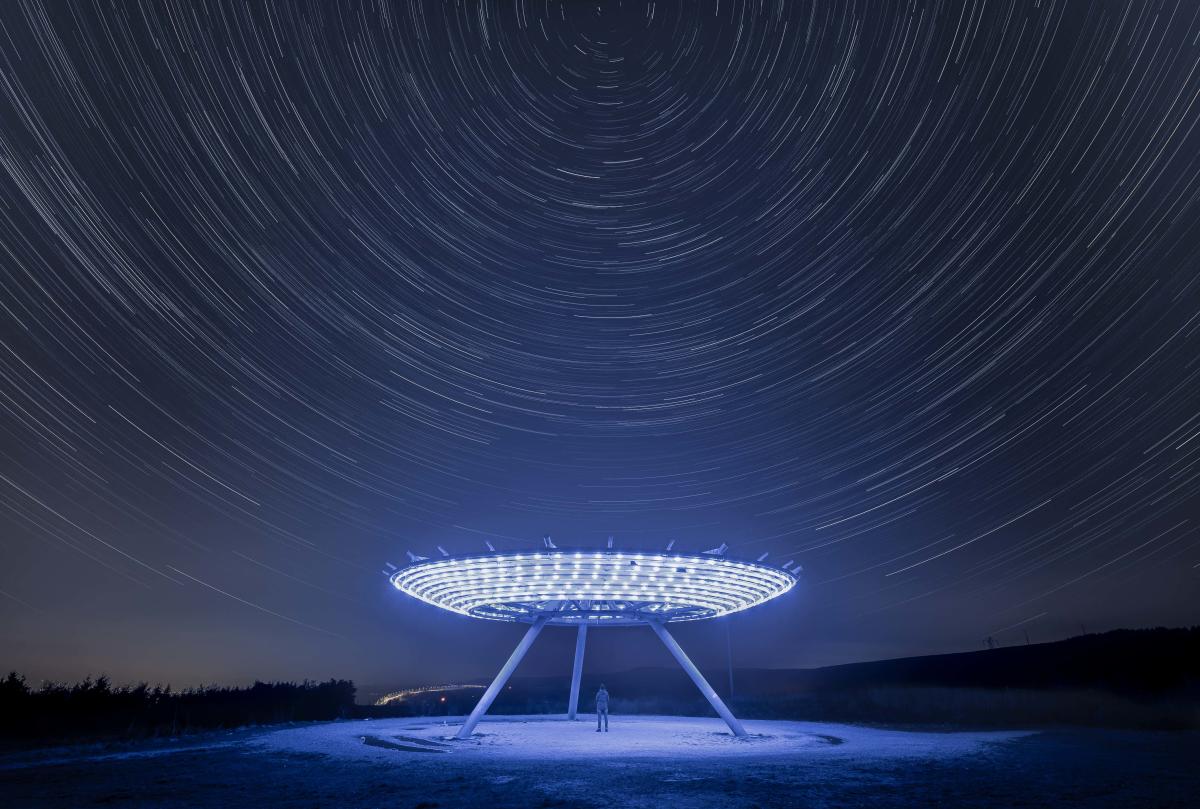
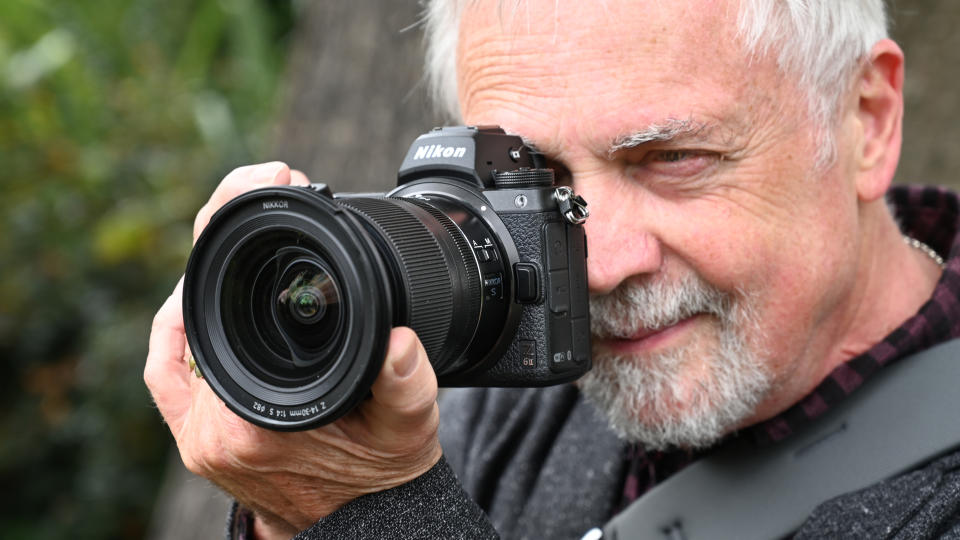
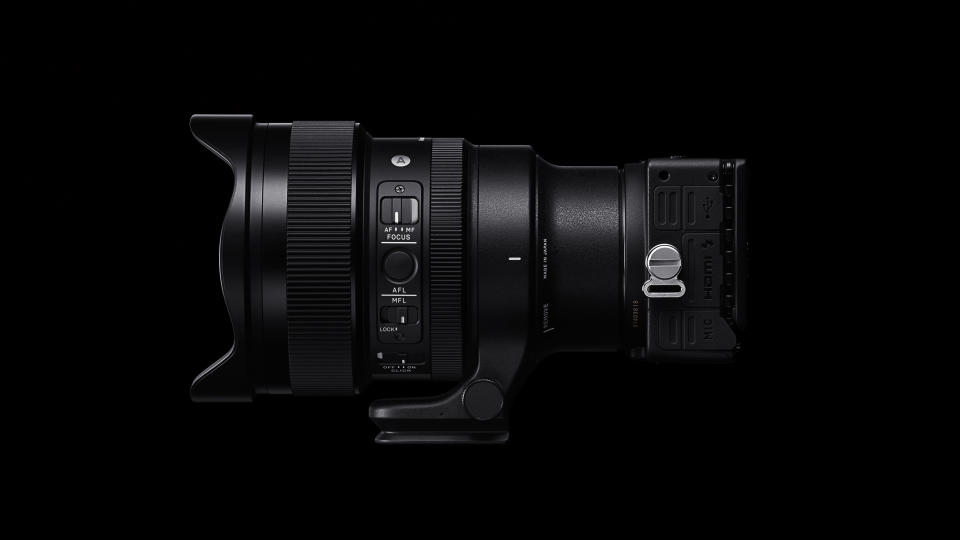
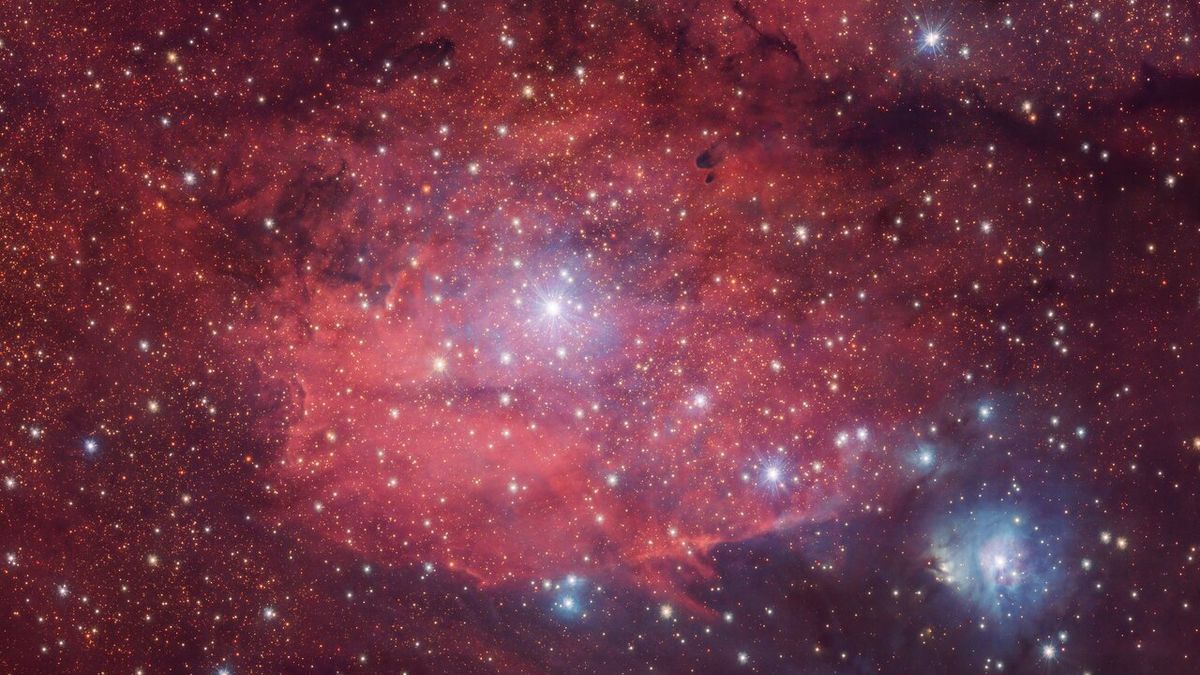


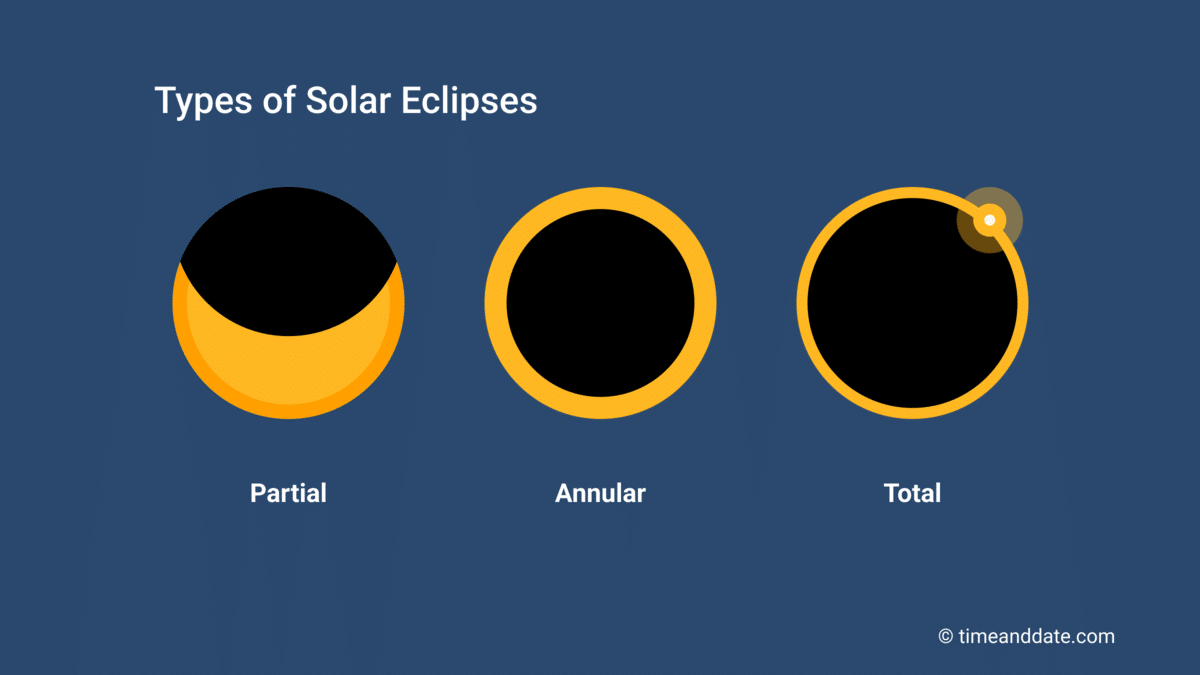
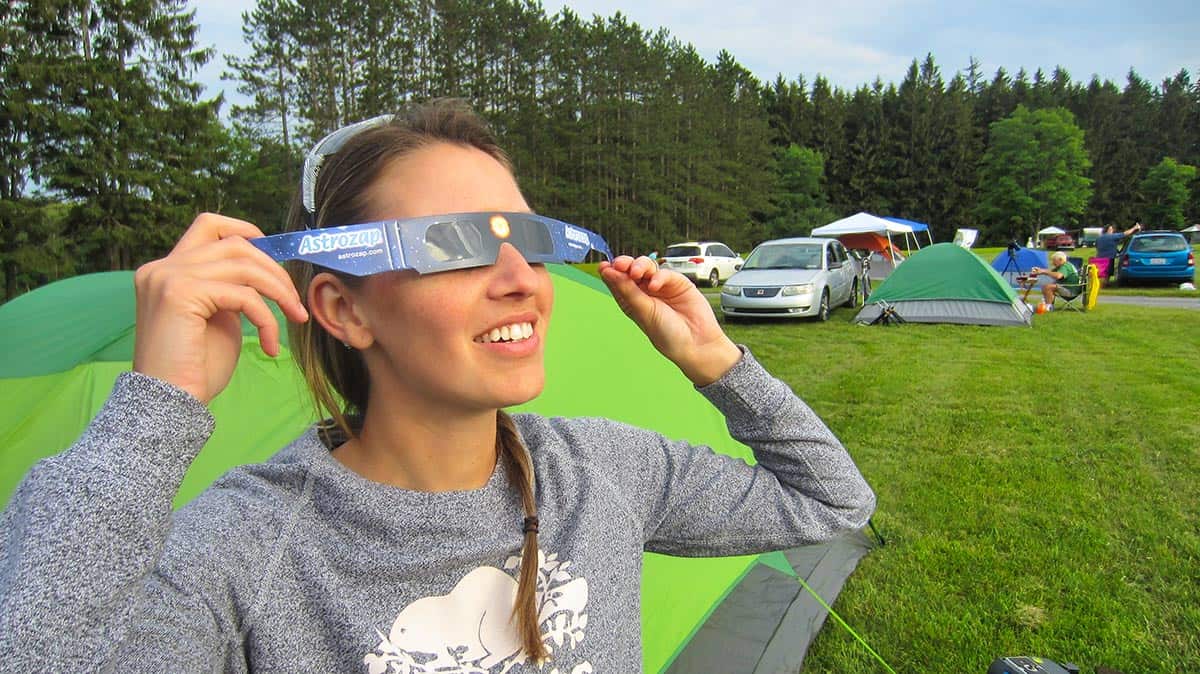 Viewing the sun through eclipse glasses

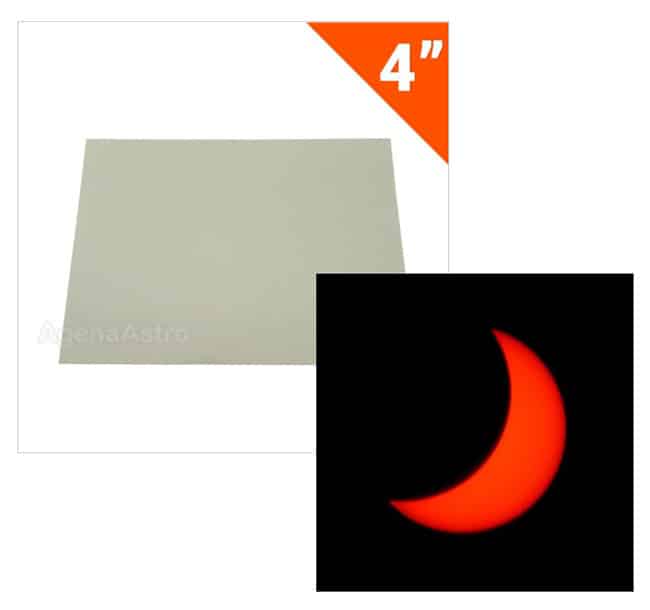
 DIY Solar Filter |
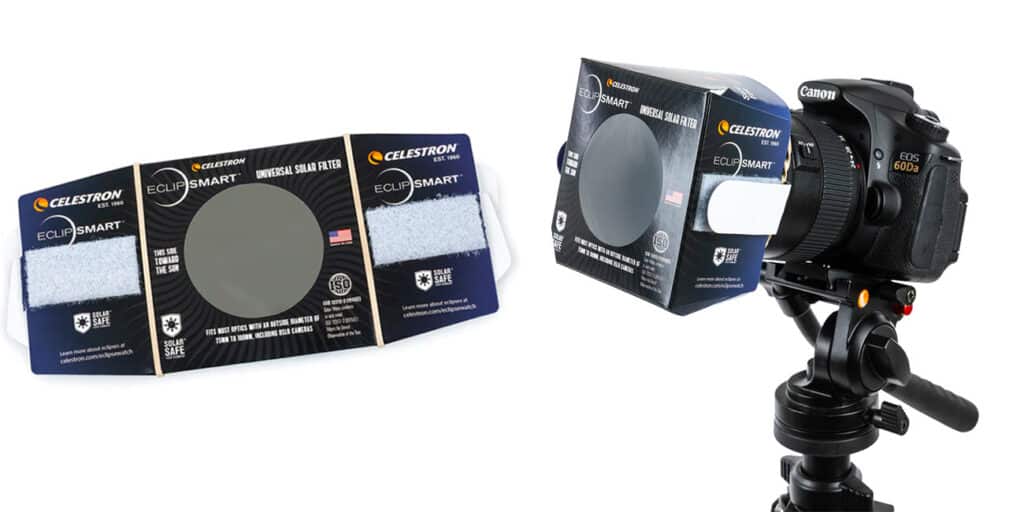 Universal solar filter made from solar film |
  EclipSmart Solar Filter – 6” SCT |