
[ad_1]
Photographing a solar eclipse can be a life-changing, yet challenging experience. This video (recommended to me by Fred Espenack) describes the incredible experience of a total solar eclipse.
You may only get a few chances in your lifetime to view or photograph this celestial event, so you want to make sure you have everything you need. It’s also important to be well-prepared and practice beforehand.
Check the specific safety and photography recommendations for the type of solar eclipse you plan to observe, as the precautions and techniques may vary.
While my personal solar eclipse photography experiences have been limited, I do have some practical advice to share with those preparing for the upcoming annular solar eclipse in October 2023, and the total solar eclipse in 2024.

The equipment I used to photograph the Annular solar eclipse in June 2021. Canon EF 300mm F/4 lens + Certified Safe Solar Filter.
Most importantly, never compromise on eye safety or equipment quality when photographing the Sun.
Here is a quick breakdown of how to photograph a solar eclipse, covered in more detail below.
- Research the date, time, and location of the solar eclipse, and look for an unobstructed view of the Sun
- Ensure you have all the right equipment, including a manual camera, tripod, telephoto lens, and certified eye protection and solar filters
- Attach your solar filter to your camera lens
- Set up your equipment, choose your camera settings, and find focus using live view mode only (do not look through the camera’s viewfinder).
- Compose your shot using live view mode only (do not look through the camera’s viewfinder)
- Take test shots before the eclipse begins to ensure your settings (particularly your exposure) are correct
- Start capturing the eclipse as soon as it starts. Include shots over and underexposed to capture all the details
- Review your images and adjust accordingly as the brightness will continue to change throughout the eclipse
- Take breaks to enjoy the eclipse visually with your solar glasses

Partial Solar Eclipse over Lake Ontario | Trevor Jones.
What is a Solar Eclipse?
As a review, a solar eclipse is a celestial event where the moon passes between the Sun and planet Earth, resulting in the moon blocking our view of the Sun (either totally or partially) from a particular point on Earth.
There are three different types of solar eclipses:
- Partial Solar Eclipse: a portion of the Sun is covered
- Annular Solar Eclipse: a ‘ring of fire’ shines around the moon, centered in front of the Sun
- Total Solar Eclipse: the Sun is fully covered by the moon
The type of eclipse depends on the alignment of the moon, Earth, and the Sun, and how far away the moon is from Earth.
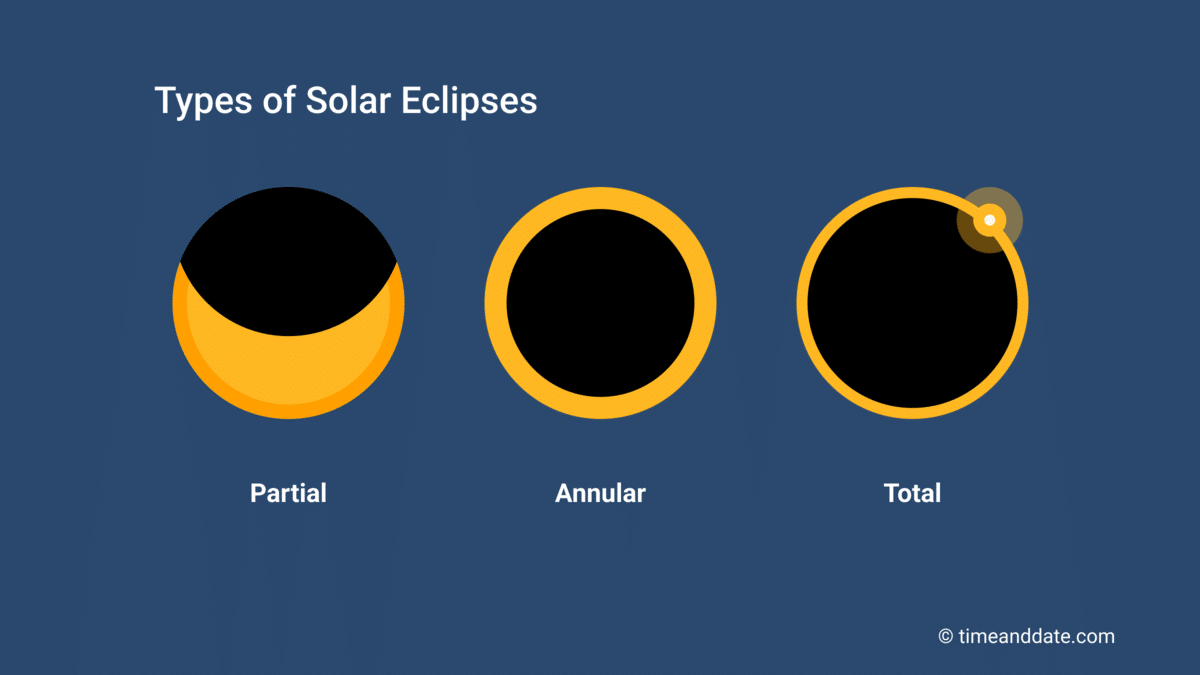
Types of Solar Eclipses. www.timeanddate.com.
When is the Next Solar Eclipse?
The frequency of solar eclipses varies due to the changing distances and angles between the Sun, Moon, and Earth over time.
The alignment of the moon, Sun and Earth takes place approximately every six months during a period of time known as eclipse season. This results in two to five solar eclipses each year, though they are not visible from every location on Earth.
Below is a table of the varying types of solar eclipses and their expected dates for the next few years. For more information and maps, visit Time and Date.
| Date | Solar Eclipse Type | Visibility Path |
|---|---|---|
| October 14, 2023 | Annular | The ‘ring of fire’ is visible along a narrow path that crosses the USA from Oregon to Texas. It passes over parts of Mexico, Belize, Guatemala, Honduras, Nicaragua, Costa Rica, Panama, Colombia, and Brazil. A partial eclipse will be visible in the Americas from Alaska to Argentina. |
| April 8, 2024 | Total | The narrow path of totality runs through Mexico, the USA (from Texas to Maine), and Canada (from Ontario to Newfoundland). A partial eclipse will be visible across nearly all of North America, and a small part of western Europe. |
| October 2, 2024 | Annular | Most of South America, Pacific, Atlantic, Antarctica. |
| March 29, 2025 | Partial | A partial eclipse will be visible in north western Europe, north in Asia, Africa, eastern North America, North in South America, Atlantic, Arctic. |
| September 21, 2025 | Partial | A partial eclipse will be visible in south-eastern Australia, Pacific, Atlantic, Antarctica. |
| February 17, 2026 | Annular | Partial eclipse will be visible in south Africa, Pacific, Atlantic, Indian Ocean, Antarctica. |
| August 12, 2026 | Total | Partial solar eclipse will be visible in most of Europe, northwestern Asia, northwestern Africa, Much of Canada and northeastern US, Pacific, Atlantic, Arctic. |
Eye Safety
The most important thing to remember is that it’s not safe to look directly at the Sun without eye protection made for solar viewing.
To prevent eye damage and to view/photograph a solar eclipse safely :
- Never view the Sun through a camera lens, telescope, or other optics without a proper solar filter over the front of the optics to avoid serious eye injury.
- Solar filters must be attached to the front of any telescope, camera lens or other optics. Do not use non-solar filter drop-in lens filters or place solar filters between your camera and lens.
- Do not use solar glasses as a filter for your camera or other optical devices.
- All filters should be ISO 12312-2 standard certified. Purchase from a reputable astronomy dealer or company (i.e. Celestron, Lunt Solar Systems, Astrozap etc.)
- Inspect your solar viewing gear (i.e. solar glasses, filters, etc.) for any damage before you use them. If there are holes (no matter how small) do not use them.
- Do not use the optical viewfinder on your camera (there is no solar protection there), opt for the live view mode on your screen.
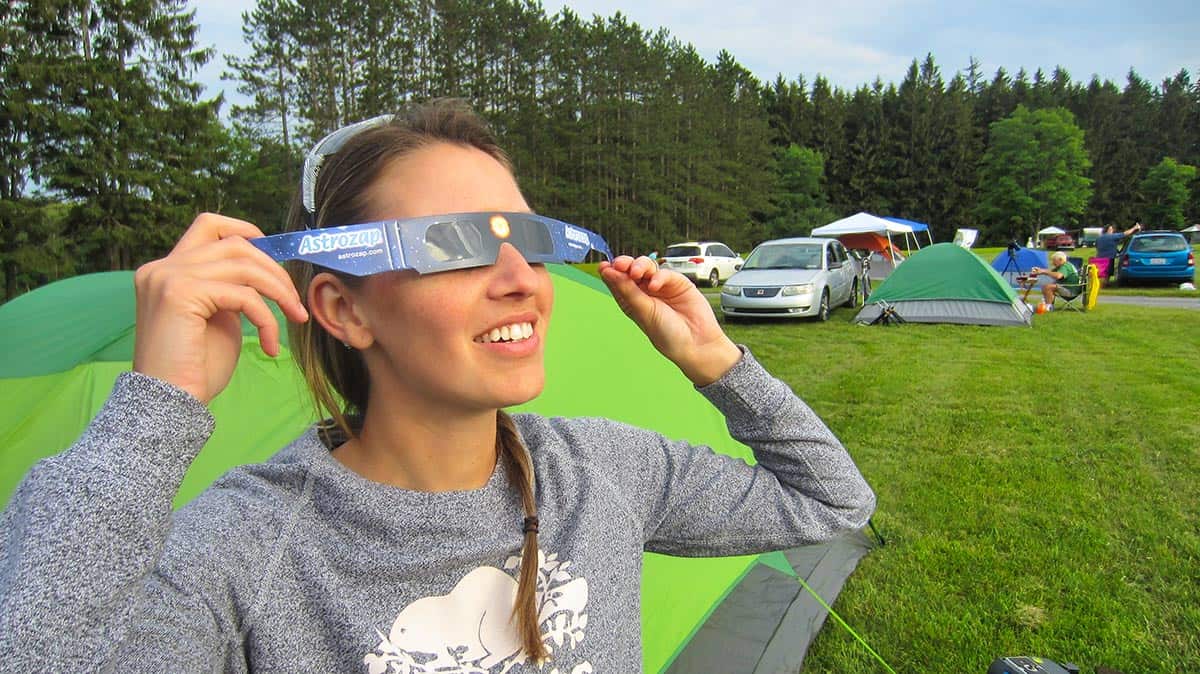 Viewing the sun through eclipse glasses
Equipment Needed
There are a few pieces of equipment you will need to photograph a solar eclipse.
You will want to practice setting up your equipment and taking test shots before the eclipse to help you become familiar with your gear and settings.
- DSLR/Mirrorless Camera: you will need a camera with manual settings. DSLR and mirrorless cameras are popular choices because they allow for manual control of exposure settings.
- Telephoto Lens: a camera lens with at least 300mm focal length, though 400mm – 500mm is better. You can look at renting one if you don’t have a lens this length.
- Solar Filter: a certified solar filter (ISO 12312-2 standard) is needed to protect your eyes, camera, and lens from the Sun’s harmful UV rays. Select a filter that fits the size of your lens and never photograph the Sun without a proper solar filter.
- Tripod: a stable but lightweight tripod will keep your camera steady, but also allow for easy transport if you need to travel to view your solar eclipse.
- Shutter Release Cable: this cable gets plugged into your camera to capture images without having to touch your camera and deal with camera shake. This will help produce sharper images.
- Eclipse Glasses: you will want to safely observe the eclipse while your camera is running.
- Memory Cards: be sure to have plenty of storage space for the large number of photos you may capture. It’s also a good idea to bring a backup.
- Fully Charged Batteries: be sure to fully charge your batteries beforehand, and have fully charged backups just in case.
- Solar Eclipse App: use a solar eclipse app to help you predict the timing and duration of the eclipse from your location. Plan your location in advance, while considering the direction of the Sun, to ensure you have an unobstructed view.

Reviewing my Solar Eclipse photos in Adobe Bridge.
Choosing a Camera Lens
The camera lens you choose is arguably the most important piece of gear when shooting a solar eclipse. Your focal length is going to be an important factor when deciding which lens to use.
If you want an up-close view of the Sun, you will need a high focal length. A 200mm lens on a full-frame camera will only produce a tiny view of the Sun, with the extreme of 2000mm potentially cutting off parts of the corona.
A lens in the 800mm – 1200mm range is ideal to get a close-up view and still capture all the details of the corona. Most people do not have access to lenses with such long focal lengths, so you can utilize a crop sensor camera and/or a teleconverter for some extra reach.

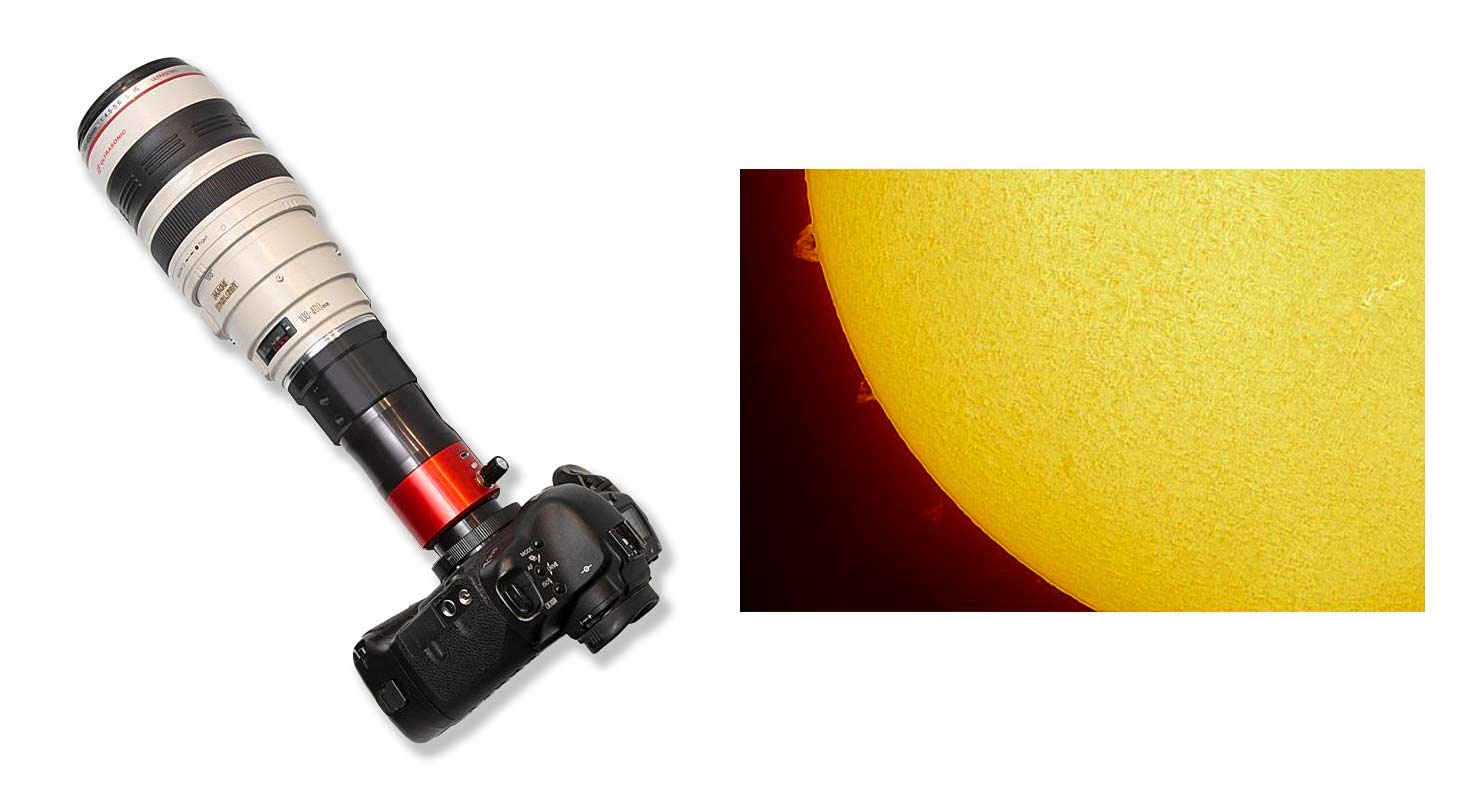
I used a Canon EF 300mm F/4 Lens with a 1.4X Teleconverter to photograph the Annular Eclipse in June 2021.
There is also the option to rent a camera lens if you are lucky enough to find a place that hasn’t already rented out all their longer focal length lenses.
Choosing a Solar Filter
As mentioned above, will need a solar filter to photograph a solar eclipse. To choose the appropriate solar filter, you will need to decide on the camera lens or telescope you will be using.
The diameter of your lens/telescope will affect the size of the solar filter since it needs to be placed on the front of the objective lens. If you are unsure of your lens diameter, you can measure across the front, from one side to the other.
The Thousand Oaks Optical SolarLite Solar Filter Film is a great option and allows you to safely cover your binoculars, telescope, or camera lens.
Ensure that the filter you choose is ISO 12312-2 certified. As mentioned above, it is best to purchase your solar filter from reputable sources, such as astronomy equipment suppliers or certified dealers.
It’s a good idea to read reviews and seek recommendations from experienced photographers or astronomers who have successfully used solar filters for eclipse photography. They can often provide recommendations for quality filters.
Types of Solar Filters
You do not have to sacrifice safety if you are on a budget. Solar filters come in a range of different types and prices, with affordable options that meet safety standards.
First off, you will need to consider how the filter will attach to your lens or telescope. Filters can be made with or without the option to firmly mount them to your camera lens or telescope.
Depending on which filter you choose, you will want to make sure you know how to clean it properly.
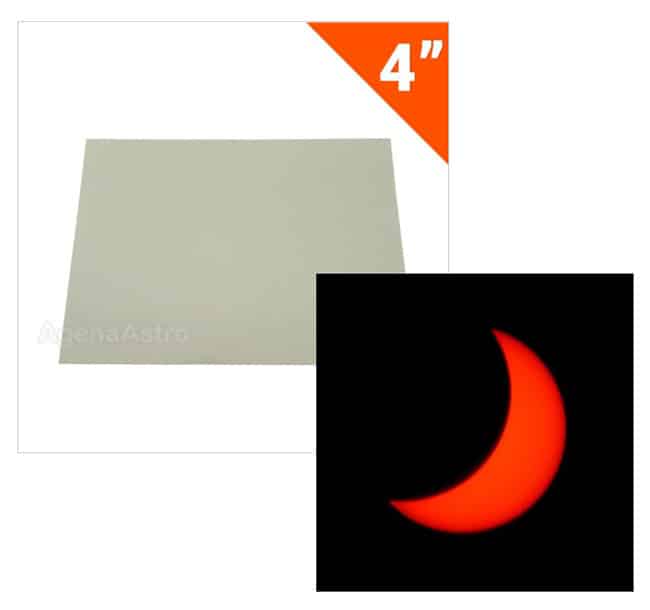
DIY Solar Filter
The cheapest option for solar filters is the ‘do-it-yourself’ option. You can make your own solar filter for your camera or telescope using solar film, a poster board, and a few other supplies.
For a detailed post about creating your own solar filter, click here.
 DIY Solar Filter | Agena Astro
- Solar Sheet Filters: a flexible material that can be cut to size to create a custom filter to attach to camera lenses, telescopes etc. Designed specifically for solar viewing and photography and is available in sheets or rolls.
 Solar Film Sheets/Rolls from Agena Astro
Universal Solar Filters
Universal filters are made to fit a wide range of camera lenses and telescopes, regardless of their size or diameter. They are adaptable and can be used of many different optical instruments, making them a versatile, and often an affordable option for solar photography.
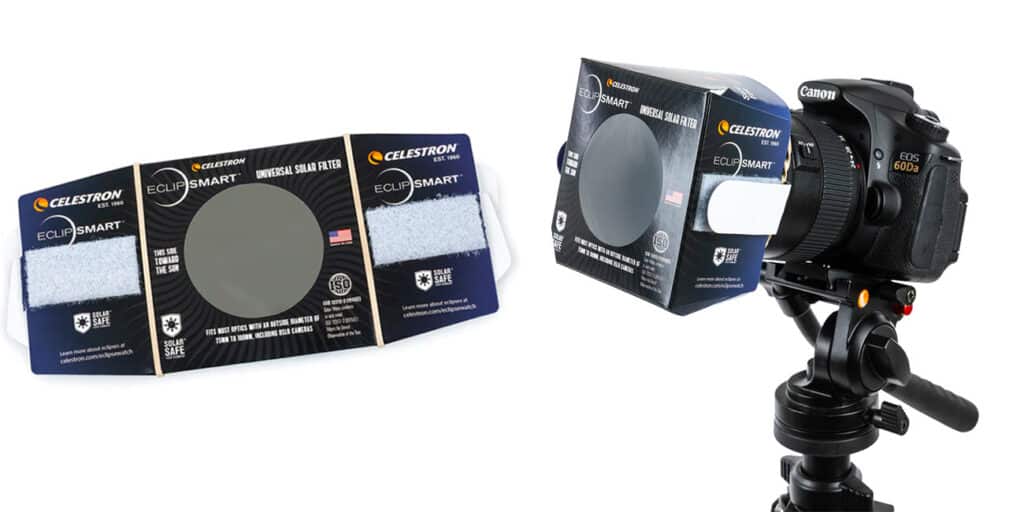 Universal solar filter made from solar film | Celestron
Fitted Solar Filters
These types of filters are designed for a specific aperture using a combination of flexible solar film or glass and a bracket. They will include a secure method for mounting it to your lens/telescope objective (i.e. hook and loop straps, bracket etc.)
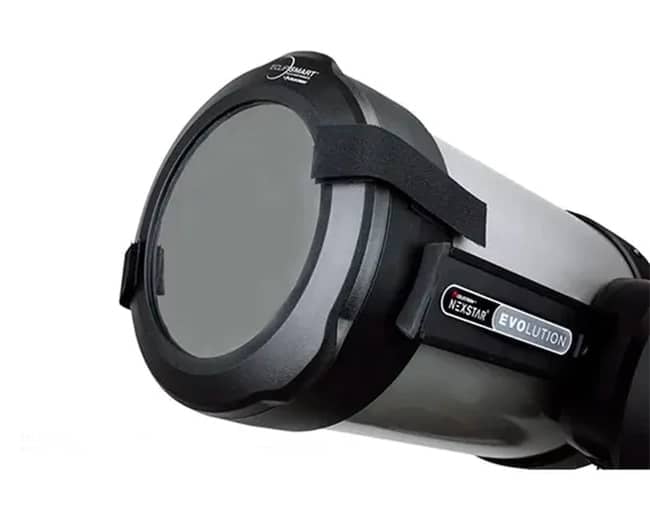 EclipSmart Solar Filter – 6” SCT | Celestron
Threaded Solar Filters
If you are looking to photograph the Sun with your camera lens, this is the best option. A threaded solar filter for your camera lens allows you to safely point your camera at the Sun.
Threaded solar filters are different in that they match the filter threads on your camera lens and are designed to be mounted by screwing directly onto the front of a camera lens or telescope.
They are designed to maintain image clarity and quality and are typically more expensive than universal solar filters due to their glass design and optical performance.
Examples of threaded solar filters include:
- Solar Glass Filters: high-quality, coated glass that provides excellent quality, durability, and protection. They are usually manufactured professionally and come in threaded or custom-sized versions to fit camera lenses and telescope apertures.

Thousand Oaks Optical 77mm threaded camera lens filter. Available at Agena Astro.
- Hydrogen-Alpha Filters: specialized filters for observing the Sun’s chromosphere. They are commonly used to observe solar prominences and other features in the Sun’s outer atmosphere.
These filters are typically more expensive. The example shown below is the chromosphere model, which is suitable for photographing surface details and broad prominences.
The DayStar Camera Quark Solar Filter with Canon EF Lens Mount. Available at Agena Astro.
How to Photograph a Solar Eclipse
You’re ready to get photograph a solar eclipse, here’s what you need to know.
- Plan your Location: before the eclipse, research the date, time, and location using astronomical apps or websites. Pick a spot with an unobstructed view of the Sun.
- Gather the necessary equipment: be sure to have the right equipment, including a DSLR/mirrorless camera, 300mm+ telephoto lens, tripod, and solar filter.
- Practice safety: when making any adjustments to your framing or focus, never look through the camera’s viewfinder. Use live view on the camera’s screen.
- Attach your solar filter: attach your filter securely to your lens, the filter should cover the entire front of the lens
- Set up your equipment: mount your camera and set it to manual mode to adjust your settings. Set your ISO, aperture, and shutter speed, and adjust focus. For tips on settings, see the section below.
- Compose your shot: using any foreground interest, compose your shot without using the camera’s viewfinder (use live view only). Plan your composition in advance, if possible.
- Test your settings: before the eclipse begins, take test shots to ensure your camera settings, particularly your exposure settings, are correct. You will want to expose the Sun’s disk.
- Capture the eclipse: start shooting the eclipse and adjust your shutter speed and exposure settings as the Sun goes through different phases of the eclipse. Consider over and under-exposing (i.e. bracketing) a range of frames to capture the disk and corona details of the eclipse for a full dynamic range image.
- Review and adjust: review your exposures on your camera’s screen and adjust according. Do not use the camera’s viewfinder.
- Enjoy the eclipse: Don’t forget to take a break from shooting to enjoy the event with your solar glasses and observe.
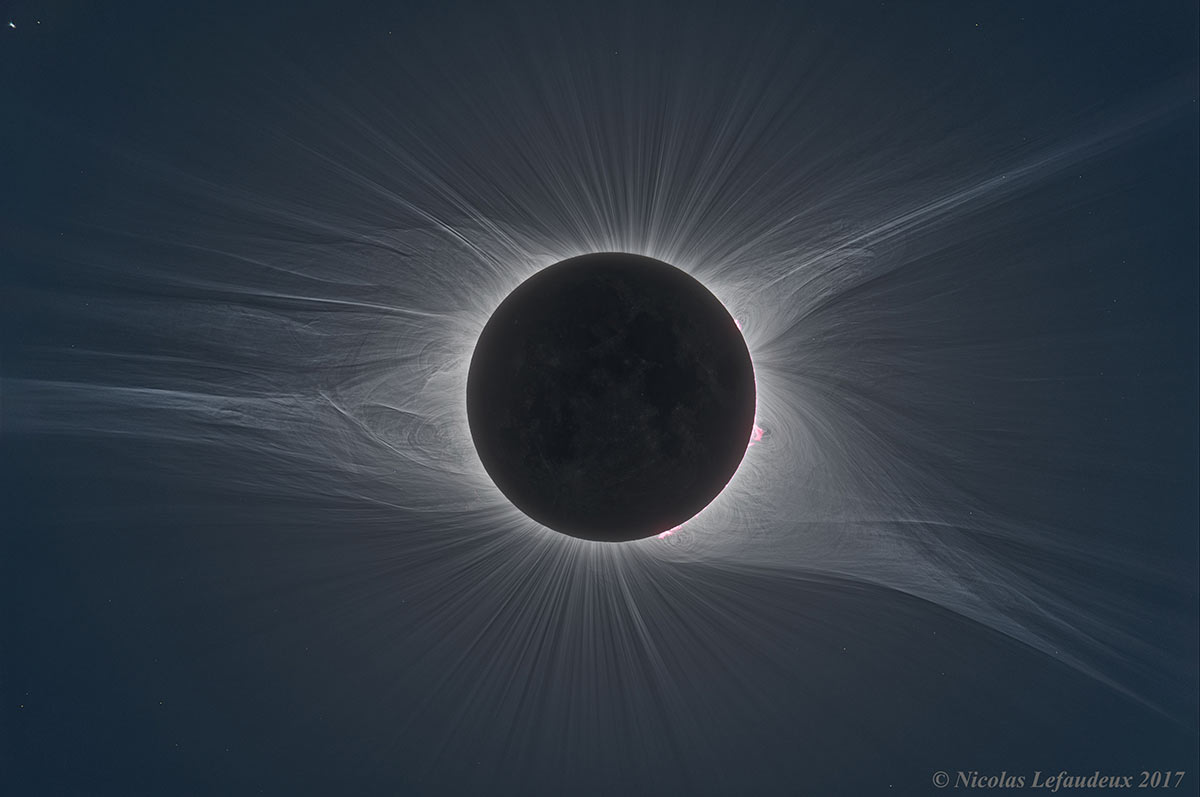
Total Solar Eclipse Corona in HDR. Astronomy Picture of the Day (APOD) Nicolas Lefaudeux.
Photographing a Total Solar Eclipse
When photographing a total solar eclipse, the process will change slightly.
First of all, it is safe to look at the Sun without eye protection when the Sun is completely covered by the moon during the total eclipse phase only. During this phase, solar filters must be removed to capture the details of the Sun’s corona.
Similar to a partial and annular eclipse, be sure to bracket the exposures over a range of shutter speeds (i.e. 1/1000 second to 1 second) to capture the details.
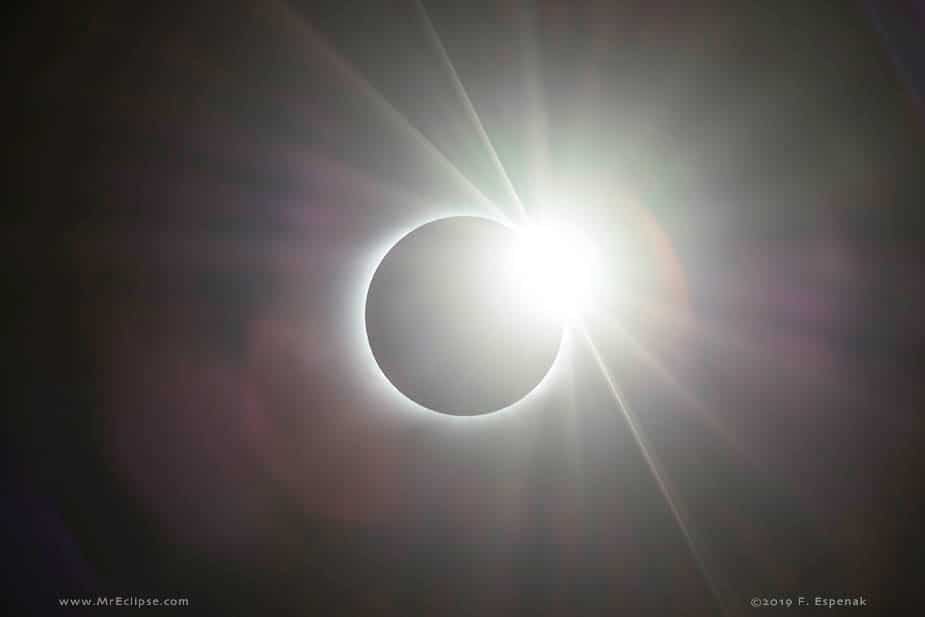
The Diamond Ring Effect during a Total Solar Eclipse | Fred Espenak
When photographing a total solar eclipse, you will want to look for the following effects:
- Baily’s beads effect: as the moon covers the Sun during a total solar eclipse, you can see the rugged topography of the moon that allows only sparse amounts of sunlight to shine through in certain areas. Look for these irregularities on the edge of the moon just before totality and immediately afterward.
- Diamond ring effect: happens right before or after the moon covers the Sun during a total solar eclipse. With only a small portion of sunlight remaining, it creates the appearance of a shining ‘single diamond’ on the edge of a ring.
- Prominences: with only a small portion of sunlight showing during a total solar eclipse, there is the chance to see gaseous formations on the surface of the Sun. They start on the surface and extend out into the Sun’s outer atmosphere (i.e. corona).
Camera Settings
You’re ready to photograph a solar eclipse, here are some settings to try:
- ISO: Unlike astrophotography at night, you do not need a high ISO setting to photograph the extremely bright sun. Start with ISO 100, and work your way up from there based on the following settings.
- Aperture: You can use your aperture to increase/decrease the amount of light you let into the camera body and onto the sensor. Start with F/4, and increase the f-ratio if your image is too bright.
- Shutter Speed: High shutter speeds are the name of the game when it comes to solar photography. 1/1000 is a great place to start. I don’t recommend shooting under 1/500, especially if you are not tracking the Sun.
- Focus: Use the edges of the disc of the Sun to focus your camera lens or telescope. From there, use prominences (if possible) or sunspots to dial it in even further.
You can find more information about camera settings in this guide developed by Fred Espenak (also known as Mr. Eclipse).
[ad_2]