[ad_1]
© James Abbott
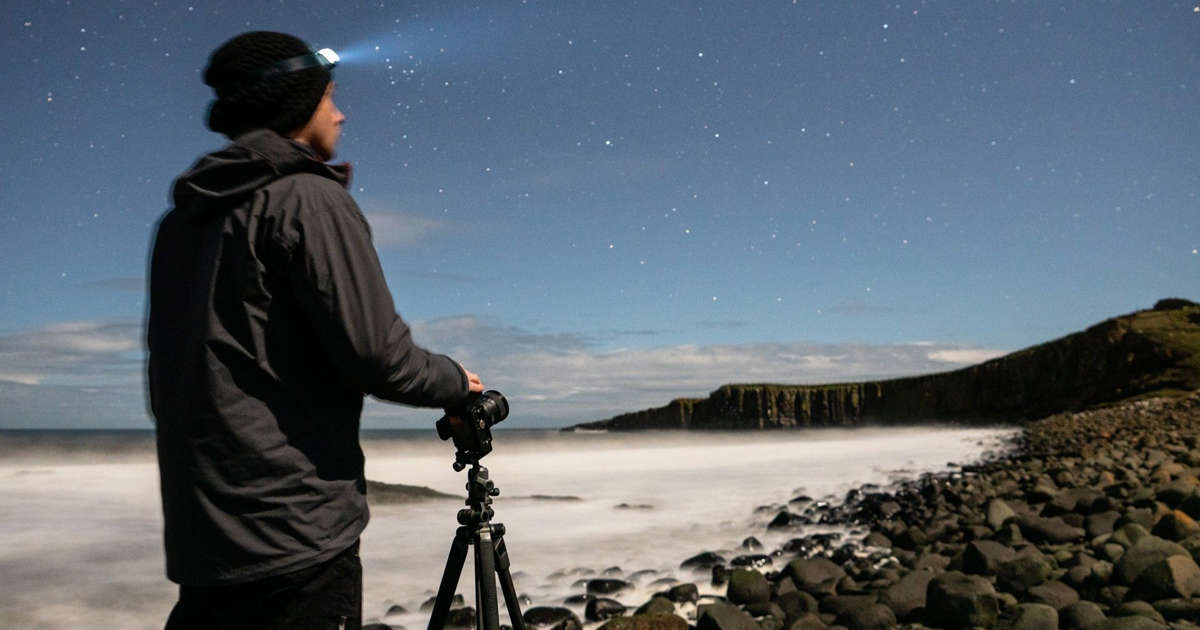
Night for day astrophotography is a great way to challenge your creativity.

Astrophotography is well-known for being difficult, but equally rewarding when you experience perfect conditions. For traditional astrophotography, several variables come into play; you need to find one of the best locations for astrophotography and skywatching, so a clear sky in a dark sky area with no moon would be ideal, and for the Milky Way it needs to be the right time of year for your location.
Moonlight is a serious problem that renders many nights unsuitable for this type of photography, but there is another approach that embraces the moon and is best shot when the moon is full. What’s more, it can hugely increase the number of times you can go out shooting every month.
Night for day is a surreal astrophotography technique where you use similar settings to traditional astrophotography, but you don’t need a star tracker. However, by shooting under a full, first, or third quarter moon, you can take advantage of the moonlight illuminating the landscape. A full moon and the four days around it are the best times, but you can extend the shooting period for increased chances of perfect conditions.

The result is cold but clear light on the landscape and a bright blue sky with stars visible. In some situations, it’s purely the latter that gives away that the photo was taken at night rather than in daylight. All the planning and the best astrophotography cameras to use are the same as any other type of astrophotography, but with night for day you have to think in a completely different way.
So, if you’ve already given our beginners guide to astrophotography a read through and are ready for your next challenge, then night for day astrophotography might just be for you.
To find your way around the night sky with ease, our best astronomy books will have you exploring the cosmos and finding your way around the universe in no time. And if you want to take your stargazing kit to the next level, you might be interested in our guides to the best binoculars for stargazing and the best telescopes too.
Check the moon phase
Being aware of the moon phase, alongside when the moon will rise, set, and its direction of travel are just as important for this type of astrophotography as it is for shooting the Milky Way. Where you’d typically want no moon in the sky for shooting traditional astrophotography, when shooting night for day a full moon is preferable because it illuminates the ground incredibly well.
A full moon means you can shoot at lower ISO levels when using a fast wide-angle prime lens. At a minimum you can, however, shoot under a first- or third-quarter moon where half of the moon is illuminated. In this kind of situation, you’ll need to use an ISO setting that’s roughly 1-1.5 stops higher than under a full moon. For example, under a full moon ISO 800 is often enough with an f/1.8 aperture, while under a first- or third-quarter moon this would need to be ISO 1600 – ISO 2000.
To check the moon phase for today and the rest of the month visit ‘What is the moon phase today?’
Use the 500 rule as a guide
The 500 rule is a rough guideline that you can use to calculate the longest shutter speed/exposure time you can shoot with to capture pinpoint stars rather than teardrop shape stars or star trails. Calculating the longest shutter speed that you can shoot with requires a simple calculation:
500 / (sensor crop factor x focal length of the lens being used) = maximum shutter speed
Here’s the calculation using a 20mm lens with a full-frame camera, an APS-C sensor, and a Micro Four Thirds (MFT) camera:
- Full-frame (1x): 500 / 20 = 25 seconds
- APS-C (1.5x): 500 / 30 = 16 seconds
- MFT (2.0x): 500 / 40 = 12 seconds
Shooting steps
1. Compose your shot
Once on location, position yourself with the moon to the side of the subject or behind you so it’s not visible in the shot. The position of the moon can be checked using apps including PhotoPills. If the moon is behind you, make sure you’re not capturing a shadow of the camera and tripod. Shoot in Raw because this will provide the flexibility and latitude required during image processing. Compose your image using the Live View and use the Virtual Horizon to make sure the camera is level.
2. Focus on the stars
With Live View active, zoom into one of the brightest stars in the sky. Set your lens to manual focus and rotate the focus ring until the star is at its sharpest (where it will appear at its smallest with sharp edges). If your camera has focus peaking, turn this feature on and set it to High/Red – this will show a red outline around the star when it’s in focus. You can now begin shooting, but you will need to refocus every time you move the camera, including changing composition by adjusting the tripod head.
3. Camera settings
Shoot in manual mode with aperture set to the maximum setting i.e. f/1.8 or f/1.4. Set ISO to 1600 with a shutter speed of 10 seconds. If shooting under a full moon, you will likely be able to reduce both of these settings, but if shooting under a first- or third-quarter moon, this will be close to correct although you may need to increase ISO to 2000 and/or shutter speed to 15 seconds. Take test shots to assess exposure, and use either a shutter remote or the camera self-timer to avoid camera shake.
Editing tips
1. Process images as normal
Night for day photos can benefit from some of the techniques used for processing ‘standard’ astrophotography images, such as using Luminosity Masks in photo editing apps (like Lightroom or Photoshop) to increase the brightness of just the stars – having one of the best laptops for photo editing will help too.
Since these images are generally well-lit by moonlight, normal landscape photography editing is all that’s required otherwise. White Balance is extremely important because if it’s not correct the image as a whole will exhibit a color cast.
2. Avoid Luminance Noise Reduction
When shooting at high ISO settings, Noise Reduction in Lightroom is a great way to reduce Color and Luminance noise in most situations. For astrophotography, Color Noise Reduction is fine and can often be set to a lower level than Lightroom’s default amount of 25. Luminance Noise Reduction should be avoided because although this will smooth grain in blue skies (blue is the noisiest RGB channel), dimmer stars will be lost and detail takes on a waxy appearance at high levels.
3. Export images as 16-bit TIFFs
After processing your Raw file in Lightroom or other Raw processing software, export the image as a 16-bit TIFF. Files of this bit depth have more colors so problems like banding in the sky can be avoided and tasks such as cloning are more effective. Once all editing is complete in Photoshop, if you would like to keep all of your Layers intact go to Image>Mode>8 Bits/Channel to downsize the bit depth to 8-bit and reduce the file size. Alternatively, if you don’t need the Layers, save as a JPEG.
And that’s it. Congratulations, you’ve learned everything you need to know to get started with night for day astrophotography.
[ad_2]