[ad_1]
© Provided by Android Police

Quick Links
- How astrophotography works
- Seek the help of weather and light pollution apps
- A bit of editing goes a long way
- Astrophotography on rival offerings
- The stars are ‘closer’ than they ever were
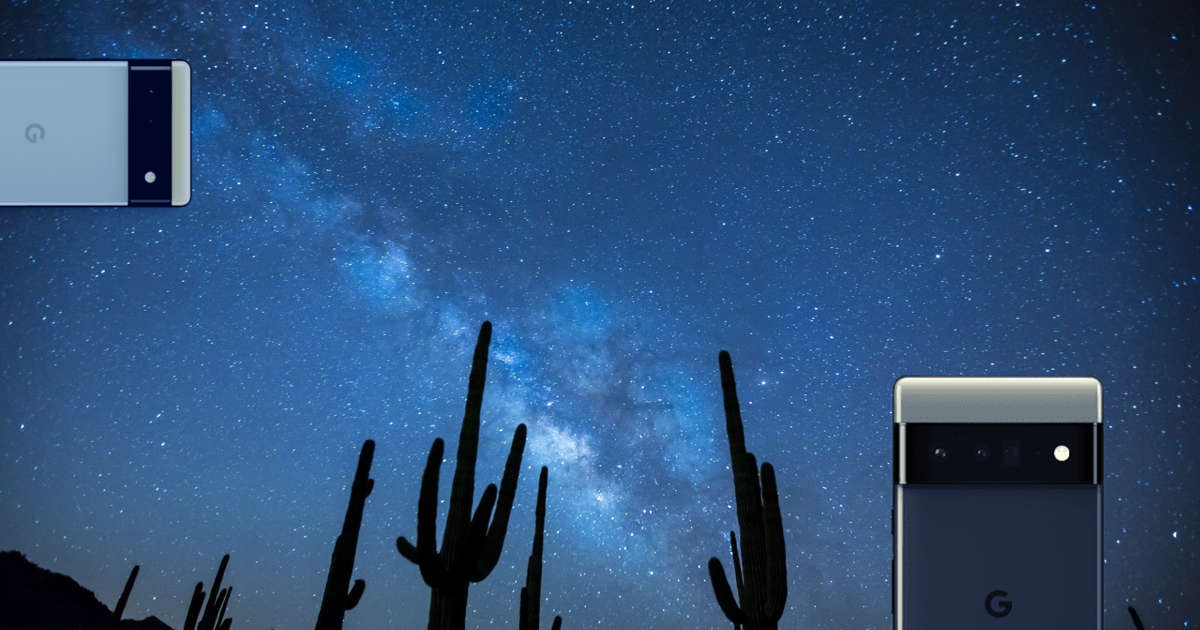
It’s incredible how much mobile photography has evolved in the last decade on the top Android phones. With Google’s astrophotography mode on the Google Pixel 3 and later, it’s easier than ever to capture constellations and even the Milky Way that were once only accessible with expensive gear and hours of editing.
How astrophotography works
Astrophotography involves capturing images of space objects and the night sky. You need some practice and experience to become an expert in this form of photography. Google’s Astrophotography mode simplifies the process, so you don’t have to tweak the ISO, exposure, or settings. Google uses a dollop of AI to handle things that would otherwise require a lot of deliberation from you and gives a polished result with no tweaking required.
It takes multiple 16-second shots and stacks them to compensate for the light a small smartphone sensor can capture. It removes artifacts that are an unwanted byproduct of long-exposure shots and uses AI to detect night sky components, which are then enhanced to make them stand out.
The over-simplification of shooting the night sky might be a letdown for semi-professional and professional photographers. Still, if you’re one, you probably have access to better gear and know your way around it.
Close
All pictures were shot using the Pixel 6’s Astrophotography mode and edited in Lightroom for Android.
While you can get some good shots without much preparation or additional accessories, the best results warrant efforts.
Get a tripod
You don’t need a tripod, as all you need to trigger astrophotography mode is to keep your phone stable. It is achievable by propping up your phone at an angle against a solid object like a rock or a brick. However, the setup gives you little flexibility in positioning, and you might block the display, making it difficult to frame the right shot.
It’s recommended that you invest in a reliable tripod so that you can set your phone at a desirable angle. After all, not everyone has steady hands. Instead of focusing on keeping your phone steady, you can attach it to a tripod and get stunning sky results.
As for getting a tripod, you don’t need to shell out much. An affordable one will do the trick. This $15 mobile tripod works just fine, and its flexible legs mean you can mount it on railings, fences, and branches, apart from using it on flat surfaces.
Seek the help of weather and light pollution apps
Even with all the right gear and Google’s AI smarts, you won’t get good results if you’re in an area with high light pollution or the weather is not on your side. It’s not difficult to get both of those aspects in your favor, and there are a few handy apps to help you nudge in the right direction.
Several weather conditions affect astrophotography, but the first thing you need to consider is clouds. A cloudy sky blocks you from viewing stars, and moving clouds often spoil long-exposure shots, resulting in hazy images.
Another thing to consider is the phase of the moon and whether to include it in the frame of your shot. A full-moon night proves to be a bright source of light and can make it challenging to pick up fainter stars. However, if you want to capture more than a silhouette of the landscape along with the night sky, your best bet is to go out when the moon is a waning or waxing crescent. Google recommends taking photos of stars at least 45 to 90 minutes after sunset.
There are plenty of weather apps to choose from, and you can’t go wrong with any of them. Just make sure they provide the information you need to identify a good time to go out shooting. We recommend Weather Underground. It provides useful information like AQI, wind speeds, and moon phases, and it’s fairly accurate with its weather predictions. However, feel free to try a few of them and see which one works the best for you.
Additionally, we recommend using Light Pollution Maps as it helps find the darkest areas around you, which is the ideal condition for astrophotography. It has additional paid features like a cloud cover map, an ISS tracker, and an aurora visibility map that you can unlock.
Unless you’re a learned person in astronomy, you may have a hard time figuring out what you’re looking at in the night sky. So, you might want an app to identify stars, constellations, and other celestial objects. Star Walk 2 uses AR to make identifying objects as easy as pointing the phone at them. If you’re looking for a particular constellation, star, or planet, the app offers guided navigation in AR.
Ready, set, go!
Now that you have a tripod, a fully charged Pixel, a clear night, and favorable weather conditions, it’s time to get snapping.
- Set up your phone on the tripod and make sure the grip is holding it tight. You don’t want the wind to move your phone while taking shots.
- Open the camera app, switch to Night Sight mode, and adjust the viewfinder to get the desired framing. While the Pixel can handle light sources without blowing them up, avoid light sources if you want to capture as many stars as possible.
- When your phone is stable, you’ll see the moon icon on the shutter button change to stars which means astrophotography mode is turned on.
Close
- If you don’t have a Bluetooth remote (that comes with many tripods) or a smartwatch to press the shutter button remotely, turn on the self-timer. Using a self-timer ensures the phone remains steady when the Pixel starts capturing. To turn it on, tap the Settings icon in the upper-left corner and choose the length of the timer (3s or 10s) from the pop-up menu.
- Now that you’re ready, click the shutter button and let the Pixel do its magic. Do not touch your phone during image processing. If you use a Pixel 4 or later, this process can take about four minutes, and a countdown timer on the display lets you know when it’s done capturing. Since it’s difficult to frame a shot in darkness, you might want to repeat the process several times until you get the shot you want.
If you have the newest Pixel 6 or Pixel 7 series with Tensor CPU, the process is quicker than on old Pixel phones. On Pixel 4 and later, your phone automatically clicks a timelapse of the night when you take a photo with astrophotography mode. You can turn off the feature using the steps below.
- Open the Camera app on your Pixel phone.
- Tap the down arrow in the upper-left corner.
- Open More settings.
Close
- Scroll to Advanced.
- Disable the time lapse for astrophotography toggle from the following menu.
Close
A bit of editing goes a long way
Google’s processing takes care of a significant part of the editing errands associated with astrophotography, but there’s always more you can do to make your shots look better. If you’re comfortable using desktop editing apps, feel free to use them, as they often give you more creative control over the process. However, you can get a better-looking image by toying around in a mobile photo editing app like Lightroom for Android. It’s quick and easy.
The first thing to do is reduce the exposure a bit and crank up the contrast. It makes the sky darker and helps the stars stand out. If the image has a distracting foreground, boost the shadows and use the healing tool to mask a relatively bright object. The tweak leads to more dramatic-looking shots.
You might notice that the picture can often turn out to be a bit warm or dull with Google’s processing. If you’re not a fan of this look, reduce the temperature of the image and increase the tint and saturation by a dash.
The last thing to engage in is noise reduction because there’s only so much light your phone’s small camera sensor can capture when the lights are out. Push the slider to the end, which often results in a much cleaner image. Play around with it to get the desired result.
Close
Unedited JPEG vs. edited
This isn’t an exhaustive rundown of the editing process and isn’t the only way to do it. Editing is a subjective process, so what works for you might not be the same. But following the few steps mentioned above results in a better image without putting in a lot of effort. While you’re at it, you might want to glance at these simple tips to improve your editing game.
Close
Unedited astro shot vs. Google Photos’ Astro Filter
If manually editing images is not your forte, plenty of Lightroom presets can take care of the process for you to deliver a better-looking image. There isn’t a one-size-fits-all because the changes you might want to apply depend on the image, so feel free to scour through Google and find a filter that achieves the look you want.
For the ones who don’t want to put in any effort, the Google Photos built-in image editor also has an Astro filter that can work like a charm at times (check out the result above). The app is packed with several image editing tools to get the desired results in no time. You can tweak brightness, contrast, HDR, white point, highlights, saturation, warmth, and black point.
You can also use the default AI-based suggestions option to improve space photos with a single tap.
Google locks several image editing features behind the Google One subscription. If you aren’t sure of what Google One is, check our dedicated guide to check monthly prices and benefits with each plan.
Astrophotography on rival offerings
Due to limited availability and Google’s shaky track record with Pixel hardware, most users prefer an iPhone or a Samsung Galaxy phone. Let’s take a quick look at Apple and Samsung’s take on astrophotography.
While Apple offers a Night Mode to capture dark scenes effortlessly, it doesn’t pack a dedicated astrophotography mode on iPhone. You need to use a tripod and a pro camera app. You’ll also need to tweak several options to get desired results. It’s limited to enthusiasts only.
During the Galaxy S22 launch event in 2022, Samsung announced massive improvements to the Night Mode on the latest flagship. But the company waited till October 2022 to release a separate Astrophotography mode on the S22 series.
However, there are several limitations. It’s not baked into the stock camera app. You need to use Samsung’s Expert RAW app, which lets you shoot photos in RAW format with HDR. The mode packs a guide to pinpoint the location of stars and the solar system. The minimum duration is set to four minutes and extends to 10 minutes for better results. As expected, don’t try astrophotography mode without a tripod.
The stars are ‘closer’ than they ever were
Few things in the world are as inspiring and breathtaking as the sparkling night sky, and it’s incredible to see that mobile photography has evolved to a stage where even a novice can capture these stunning moments without the gear or the know-how. If you want to get better at taking shots, our camera guide on the Google Pixel 7 is a great place to get started.
[ad_2]