[ad_1]
Watch video: Use digital backdrops for baby photography
Although sleep-deprived new parents might not agree at the time, babies grow and change incredibly fast. Before you know it, a newborn is a rampaging toddler. So, if you’re planning on arranging a baby photo shoot for friends or family, or for your own little bundle, now is the time to do it. But how do you approach a shoot like this?
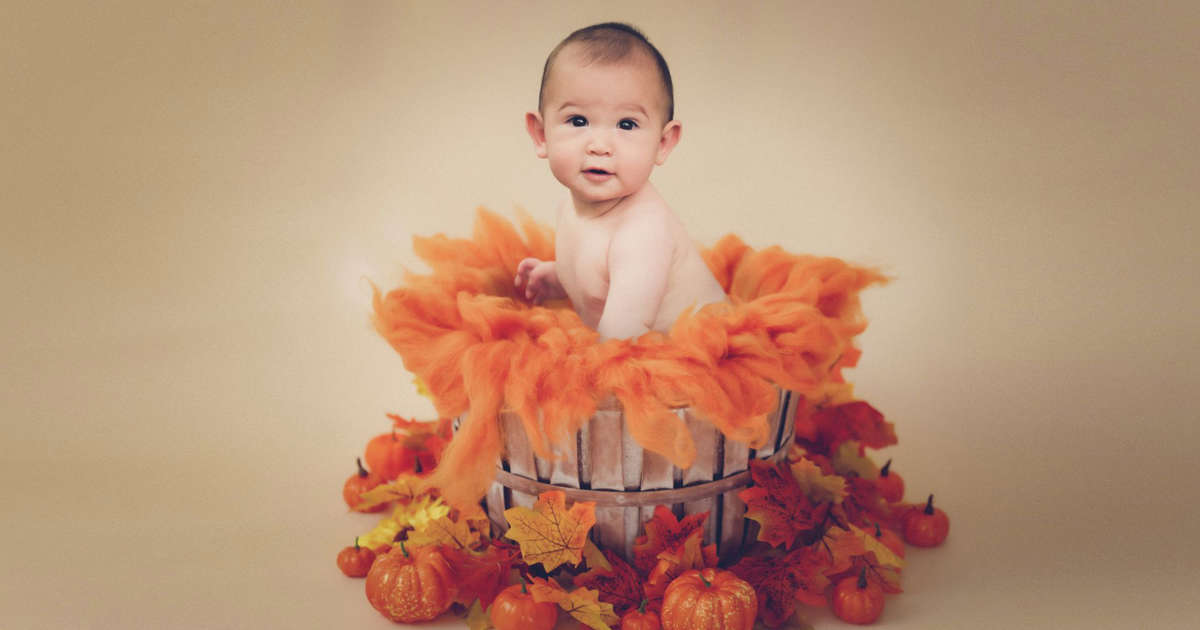
One technique is the baby composite. For this, we take a photo of the baby and then combine it with an eye-catching backdrop. You can find lots of stunning backdrops online, such as the autumnal setup we downloaded from Adobe Stock (free with an Adobe CC subscription).
• Prefer using a physical background? Check out the best backdrops for photography
Of course, if you prefer, you could always take the Anne Geddes approach and create your own intricate baby backdrops and costumes. But depending on the props needed, this could prove expensive. With a few simple camera and Photoshop skills, you can combine your subject with all kinds of ready made digital backdrops.
You don’t need loads of studio lighting kit, either; window light is perfect for baby portraits at home. A window with non-direct sunlight offers a bank of lovely soft illumination, and it costs nothing.
We’ll also show you how to get your camera set up for window-light portraits, which is invaluable whether you’re planning on shooting for a composite like this or for any kind of portrait.
Once done, we’ll take you step-by-step through the technique for combining your portraits with the stock backdrop. (You’ll find a full walkthrough of the Photoshop technique in the above video.)
1. Match the lighting
The key to composites is in matching the lighting. Our background image (a free Adobe Stock image – search for “Newborn Digital Background Autumn Pumpkin”) is lit with soft frontal light, so we lit our baby in a similar way, with a large bay window behind the camera.
2. Select the foreground
In the Photoshop Libraries panel (Window > Libraries), double-click to open your stock image. Select a part of the fluff to go in front of the baby. Hit Q, grab the brush and paint black to select. Hit Q again, go to Select > Inverse and press Cmd/Ctrl + J to copy to a new layer.
3. Cut out the baby
In the baby image, go to Select > Subject. Then Select > Select And Mask. Paint with the Refine Edge brush along the hair to improve the selection edge. Go to Output > Layer Mask and hit OK. Grab the Brush tool and perfect the mask by painting with black to hide or white to reveal.
4. Paste and position
Grab the Move tool and drag the cut-out baby into the background image. Hit Cmd/Ctrl + T to transform, then resize and position the baby. Drag the layer below the selection we made earlier of the front of the bucket so the baby looks like he’s behind the fluff.
5. Paint shadows
Make a new layer above the baby layer. Right-click and Create Clipping Mask. Grab the Brush tool, hit D for black and 2 for 20% opacity; now paint to add a shadow where the baby meets the bucket. Make another layer below the baby layer, and paint black to add shadow behind the baby.
6. Add a vignette
Press Cmd/Ctrl + Shift + Alt + E to merge all the layers, then go to Filter > Camera Raw Filter. Hit J for Radial filter and drag a circle, then hit X to invert and drag down on Exposure to add a vignette. Add grain in the Effects panel and choose a Profile to skew the colors.
7 Angle from above
Window light works best over faces when it comes from slightly above, which is why a high window or skylight works well. With babies, keep in mind that if they’re on their back, ‘above’ to them might be different from the camera position, so angle them so the window is above the face.
8. Try backlighting
As well as straight-on or side-on, you can get great light over a face by positioning the subject so that the window is behind and to one side. This way, the window backlights the subject. It’s usually best to have the face side-on in profile for this kind of portrait shot.
9. Check for catchlights
One of the great things about shooting with window light is the lovely catchlights that it usually creates in your subject’s eyes. If you’re not seeing catchlights, it might be because the subject is at the wrong angle to the window, so adjust the position until you see the eyes light up.
10 Create a Compilation of baby portraits
Once you get started taking window-lit baby photos, it’s difficult to stop, and you might find you end up with a whole memory card full of great portraits.
A wonderful way to display these is as a collection of nine images arranged in a square. This could then be printed on a canvas or put together using a large frame and a custom-made mount. You can combine the set of images with ease in Photoshop.
Begin by making a square document, then turn on the grid (View > Grid). Grab the Rectangle Shape tool and drag boxes for each image window. Once done, drag in your photos, position on layers above each shape and right-click to Create Clipping Mask. Clip each image to a shape, then fine-tune the positioning.

© Provided by Digital Camera World
PhotoPlus: The Canon Magazine is the world’s only monthly newsstand title that’s 100% devoted to Canon, so you can be sure the magazine is completely relevant to your system. View Deal
You might like the best photo editing software and the best photo-editing laptops. Check out these 10 landscape photography pro tips.
[ad_2]