[ad_1]
In this beginner-friendly image processing tutorial, we will use Adobe Photoshop to take an astrophotography image from its raw state to a finished master file for sharing. The image was captured using a color astronomy camera and a small, wide-field refractor telescope.
This is a step-by-step astrophotography image processing tutorial that will show you how to take your final stacked image from its boring, linear state, to a dynamic image full of color. Feel free to use this process on your own astrophotography images, or download this image data to practice on.
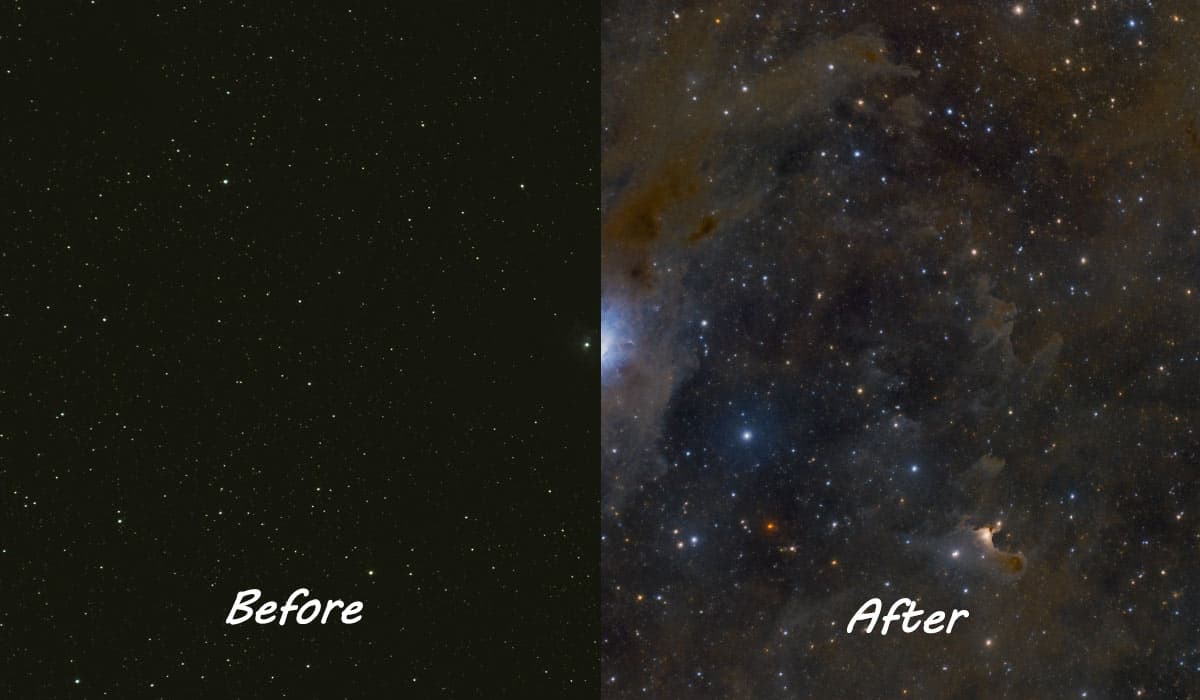
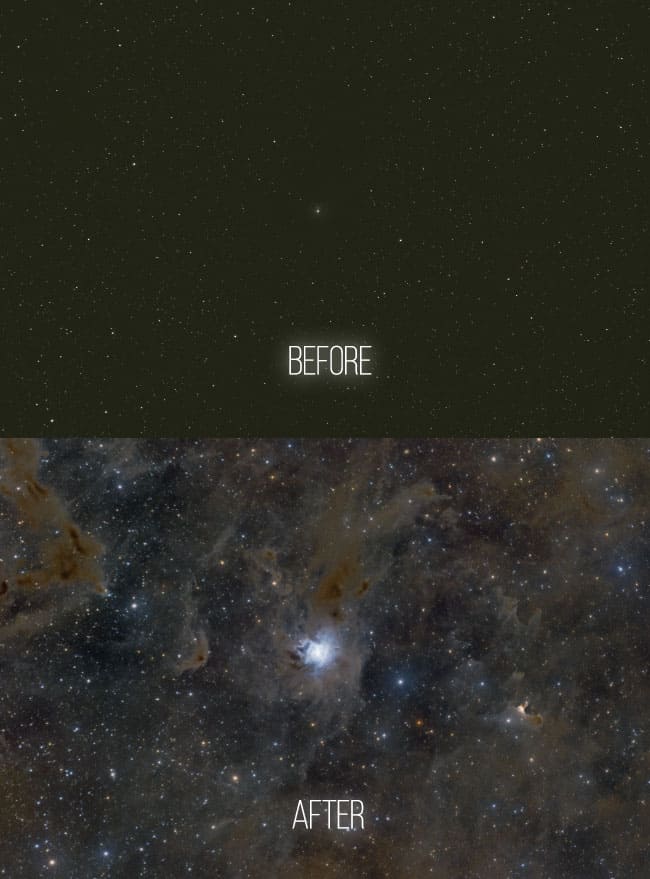
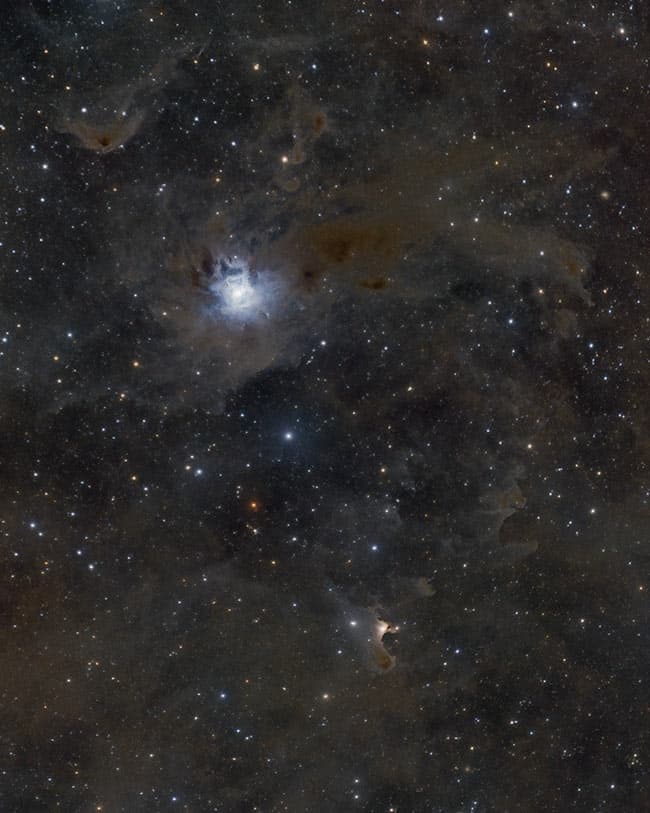
The image is of the beautiful Iris Nebula, a reflection nebula in the constellation Cepheus. This is a popular astrophotography target for many beginners, and it can be challenging to process correctly. I hope that this processing tutorial helps you create your best version yet.
Beginner-Friendly Image Processing Tutorial
This beginner-friendly tutorial will be most useful to those taking images of nebulae using a color camera, such as a DSLR, Mirrorless, or a one-shot-color dedicated astronomy camera. The process involves combining several hours’ worth of exposures into a single master file and performing specific image editing techniques to bring out the full color and details of the nebula.
Because everyone has their own tastes when it comes to how a photograph of space should look, you may choose to dial back certain settings to your liking. I personally enjoy images that are quite dramatic and punchy, and my image processing style reflects this. For a more natural look, you are free to skip certain steps, or simply not be as aggressive with your edits along the way.
Adobe Photoshop is an amazing image editing tool for astrophotography images. Many of the best astrophotographers in the world use this software to control every aspect of their photos. It offers a fluid interface that makes it easy to compare adjustments as they are made using layers and masks.
If you are new to Adobe Photoshop, don’t worry. I describe each step of the process in detail, including where to find each filter and adjustment slider. Because there are multiple ways to achieve a similar effect, you may choose to perform the action in the way that is most comfortable to you. For a much more in-depth look at the way I process my astrophotography images, be sure to check out my premium Premium Image Processing Guide (Over 100 Pages).
Recommended Add-Ons and Plugins
Although it is possible to edit a great photo of space using Adobe Photoshop alone, there are a few handy plugins that I recommend you install beforehand. These are paid tools, and I understand that not everyone will want to spend even more money on software, especially early on. However, if you plan on seriously pursuing astrophotography and getting the best images possible, I think you will get the full value out of the tools right away.
The first is an ‘action set’ called the Astronomy Tools Action Set. This paid plugin includes several key actions you will use over and over again while processing your images. An ‘action set’ in Photoshop is simply a recording of several steps, that you can run with a single button. This is also known as a ‘script’.
Another useful astrophotography plugin for Adobe Photoshop is Gradient XTerminator by Russell Crowman. This will handle important tasks like removing gradients from your background sky and balancing colors and noise reduction. These add-ons are not necessary for this tutorial, but they will save you time and probably produce better results.
This image processing tutorial will assume that you have installed these useful plugins to edit the image. If you do not have these plugins, I have included workarounds that can help you move on without them.
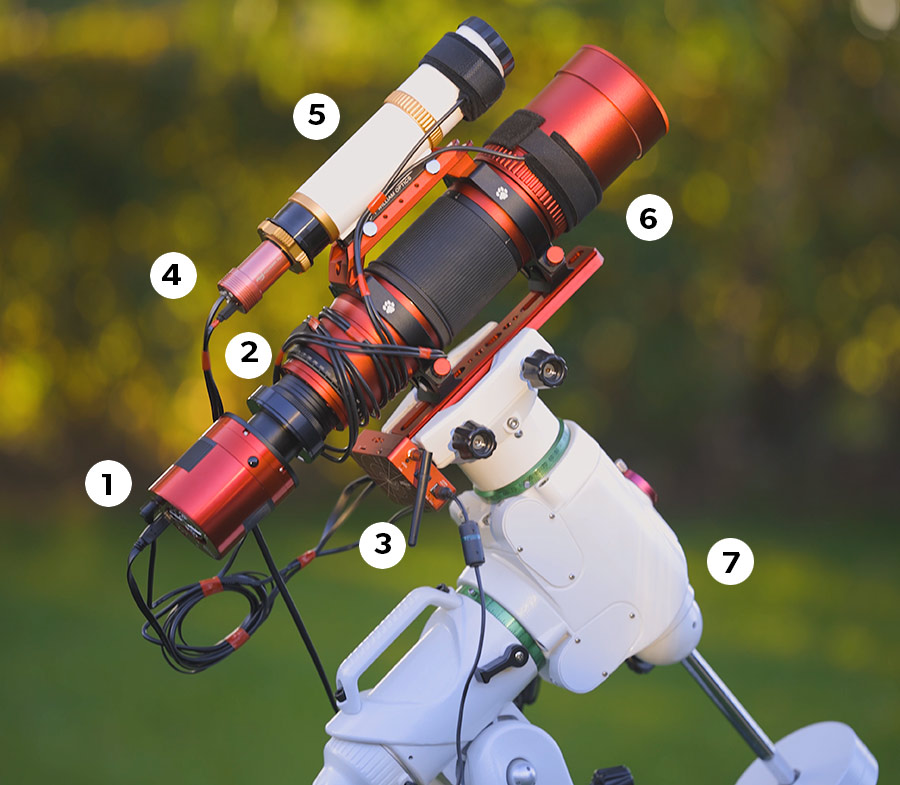
The Equipment Used
I have included a breakdown of the astrophotography equipment used for this image of the Iris Nebula. This may be useful to anyone looking to capture images of a similar quality, field of view, and style. The William Optics RedCat 71 is a fantastic wide-field refractor telescope. I did experience some issues with tilt during this project, which I was able to resolve (to a degree) later on using the tilt adapter on the RedCat 71.
- Camera: ASI2400MC Pro (Color)
- Filter: None
- Camera Controller: ZWO ASIAIR Plus
- Guide Camera: ZWO ASI290mm Mini
- Guide Scope: William Optics 50mm Uniguide
- Telescope: William Optics RedCat 71
- Tracking Mount: Sky-Watcher EQ6-R Pro
The Image Data
The master file includes 67 x 5-minute light frames (5 hours, 35 minutes total) captured using a Gain setting of 158. In retrospect, I would have captured these images using a slightly shorter exposure time (3 minutes), and even a lower Gain value. My goal was to reveal as much faint dust as possible, but in the process, I believe I oversaturated many of the brightest stars in the field.
In this tutorial, we will integrate and calibrate the images using image stacking software. There are many choices to consider for this task, so feel free to integrate your data using whichever software you feel most comfortable with. In this case, I used a free tool called DeepSkyStacker, which continues to deliver excellent results for me.
The Pre-Processing Stage
The first thing we need to do is create an intermediate file that combines all of our ‘good’ image data. This just means that we will integrate all of the image exposures that do not have issues in tracking (elongated stars), focus issues (bloated stars), or passing clouds. On a typical night of astrophotography, I’ll be able to use about 90% of all of the image exposures taken.
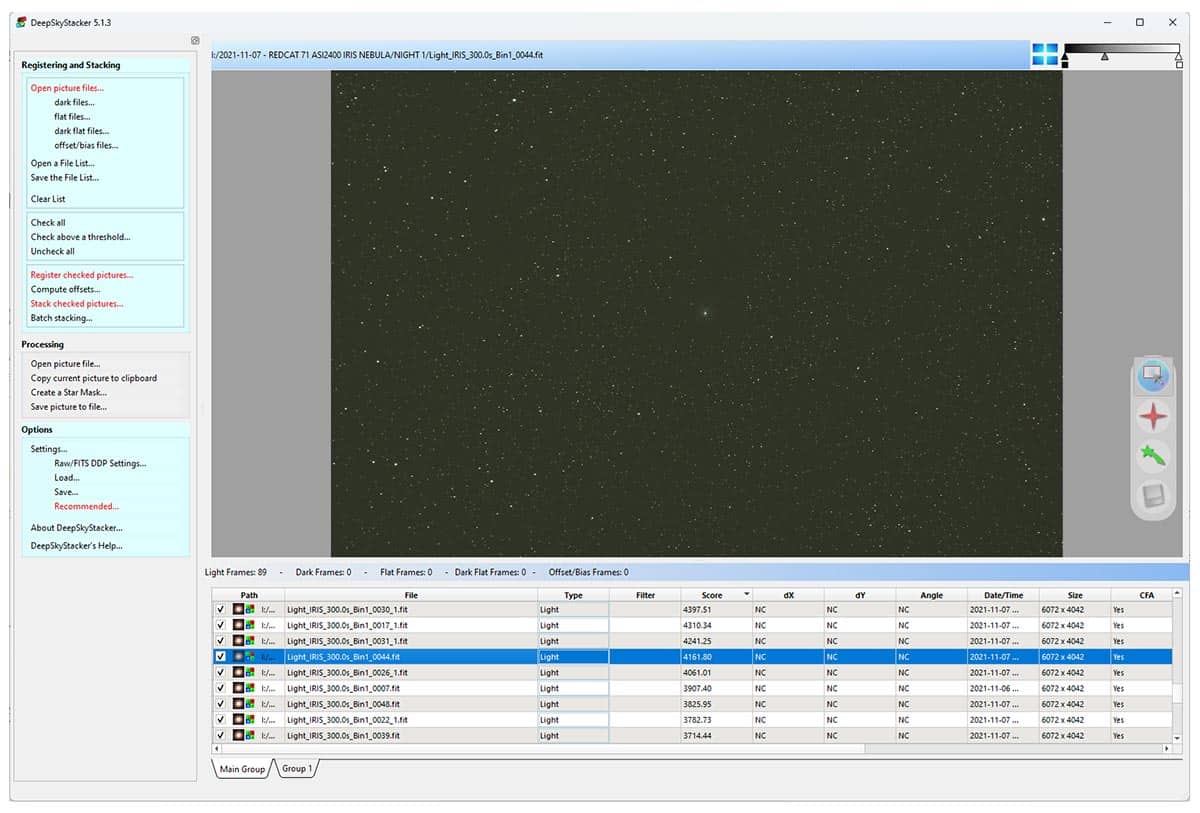
I will stack all of the light frames together in DeepSkyStacker, and use the scoring feature to ensure we are only stacking the best frames. This is a great way to quickly spot any outliers that should not be used in your final image.
I’ll use calibration frames (darks, bias, and flats) to create an image that is much easier to process. Dark and bias frames will help to reduce noise, while flat frames remove color cast, vignetting, and dust spots on the camera sensor.
Calibration and Stacking
You can use DeepSKyStacker to review and rate your individual sub-exposures. The software will analyze the images to determine image quality based on a number of factors. To see the scores, you need to open your light frames, check all of the exposures, and register the checked pictures. Make sure that the ‘stack after registering’ box is left unchecked.
You do not need to worry about the stacking settings at this point, as we are only interested in scoring the frames at this point. The software will also register the pictures, which just means that it will align them with each other before stacking.
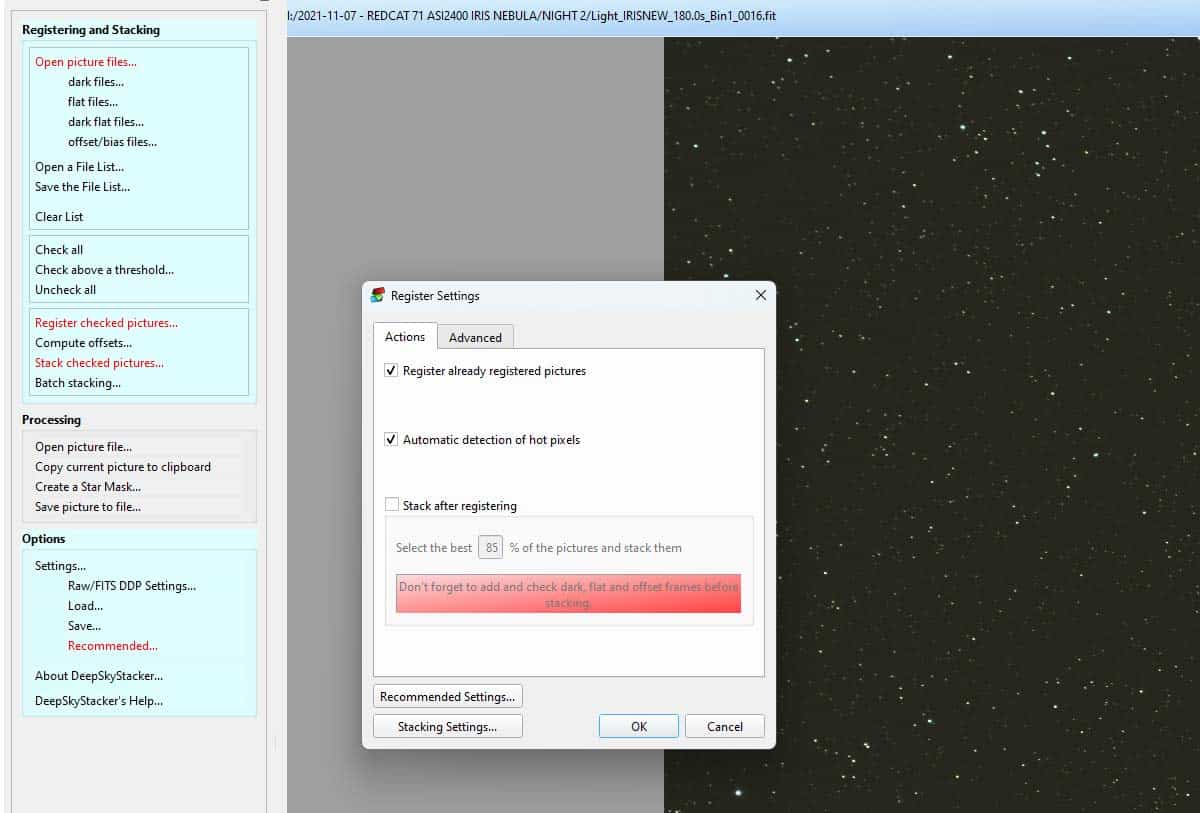
- Open Picture Files
- Select all of your light frames
- Check All
- Register Checked Pictures
- Uncheck ‘Stack After Registering’
The scoring feature in DeepSkyStacker rates each light frame based on star size and sky brightness. This is a great way to identify any of the poor-quality sub-exposures you have taken. You can either uncheck the frames you want to discard or remove them from the list entirely.
For my set of light frames, I removed a number of sub-exposures that were taken when some high clouds rolled in. The stars became bloated, and including them in the final integration would reduce the overall image quality. You can review the size of the stars using the FWHM column, and the lower the number, the better.
For my image of the Iris Nebula, I stacked 67 light frames, for a grand total of 5 hours and 35 minutes.
Stacking Settings
There are not a lot of parameters to change from the default stacking settings, but there are a few things to take notice of. I like to enable a 2X drizzle, which will double the size of your output image. This option will make the stacking process take longer but can make a noticeable improvement to your final image once scaled back down to the original size.
The standard settings in the light, flat, bias, and alignment tabs are fine.

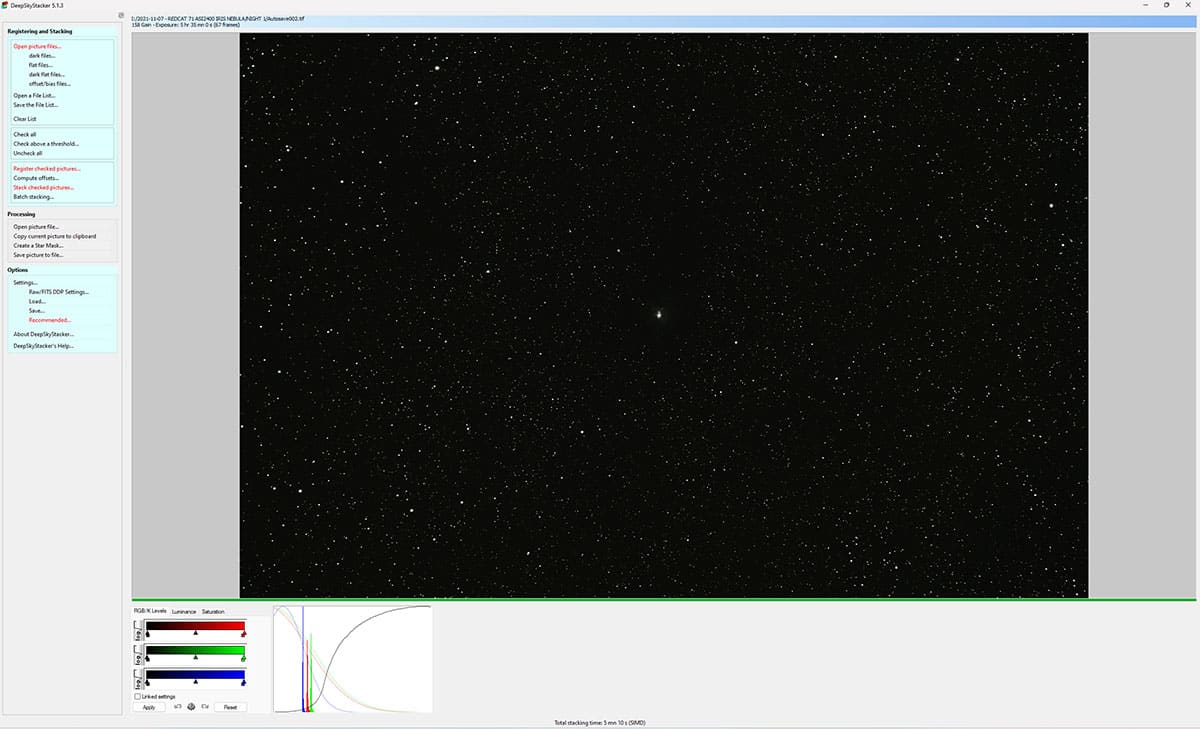
Image Processing in Adobe Photoshop
My goal for this Photoshop tutorial is to provide you with the tools and information you need to feel like you have complete control over your astrophotography images. Many of the techniques I will describe can be used on all types of images, from Milky Way Photography to high-magnification galaxy close-ups.
I encourage you to experiment with the tools I use, to fully understand what is happening to the image when you apply them. One of the reasons I enjoy using Adobe Photoshop to edit my astrophotography images is that you can easily go back and forth between your early adjustments and your latest ones.
By using layers for each step, you can make aggressive adjustments without worrying about ruining your current progress underneath. As a rule of thumb, you should make a new layer for each step of the process. Not only does this preserve your original image in case you need to go back a few steps, but it allows you to apply new adjustment layers with a custom opacity.
For example, if you have reduced the size of the stars with an aggressive adjustment, you may want to only apply that layer at 50% for a more natural look. If the Layers tab doesn’t give you enough control (which can be easy to get sloppy with), you also have the option of using the History tab to go back to a previous image state before things got out of hand.
Your Photoshop Workspace
This is the file that we can now bring into Adobe Photoshop for editing. Thanks to over 5 hours worth of total exposure time, this image will have a much better signal-to-noise ratio. It has also been calibrated to remove common issues such as gradients, dust motes, as well as hot pixels. You can open this file yourself if you want to follow along with the step-by-step image processing tutorial now.
The first thing I suggest you do is to make sure that your Adobe Photoshop workspace is prepared for astrophotography image processing. I recommend having the following windows available in your current workspace.
- Layers
- Channels
- Actions
- History
- Info
- Properties
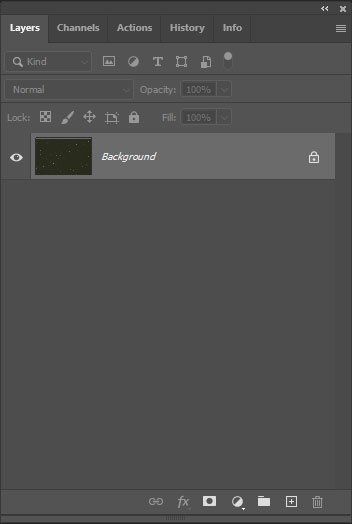
The recommended Photoshop tabs for astrophotography image editing.
Once these windows are open (and tabbed together as I have shown above), you can close all of the other default Photoshop tabs (swatches, paths, etc.) and save this workspace as ‘astrophotography’ for future use. This makes it easier to focus on your project without extra tools cluttering up your workspace.
Opening the File
The first thing I am going to do with my file is scale it down by 50%. This is because I enabled a 2X drizzle during stacking. By scaling it down by 50%, I will return the image back to its original resolution, with the benefit of a slightly improved image quality thanks to the drizzle algorithm. If you did not drizzle your image, you can skip this step as your master file is already at its native 100% resolution.
If you have downloaded my image data to practice on, I have already scaled the image down to 50% for you.
At this stage, it is normal for the image to appear very dark, and have a noticeable color cast over it. If you are using a dedicated astronomy camera as I did, there is a good chance your master file will look very green as mine does. Again, this is what your image is supposed to look like at this stage.
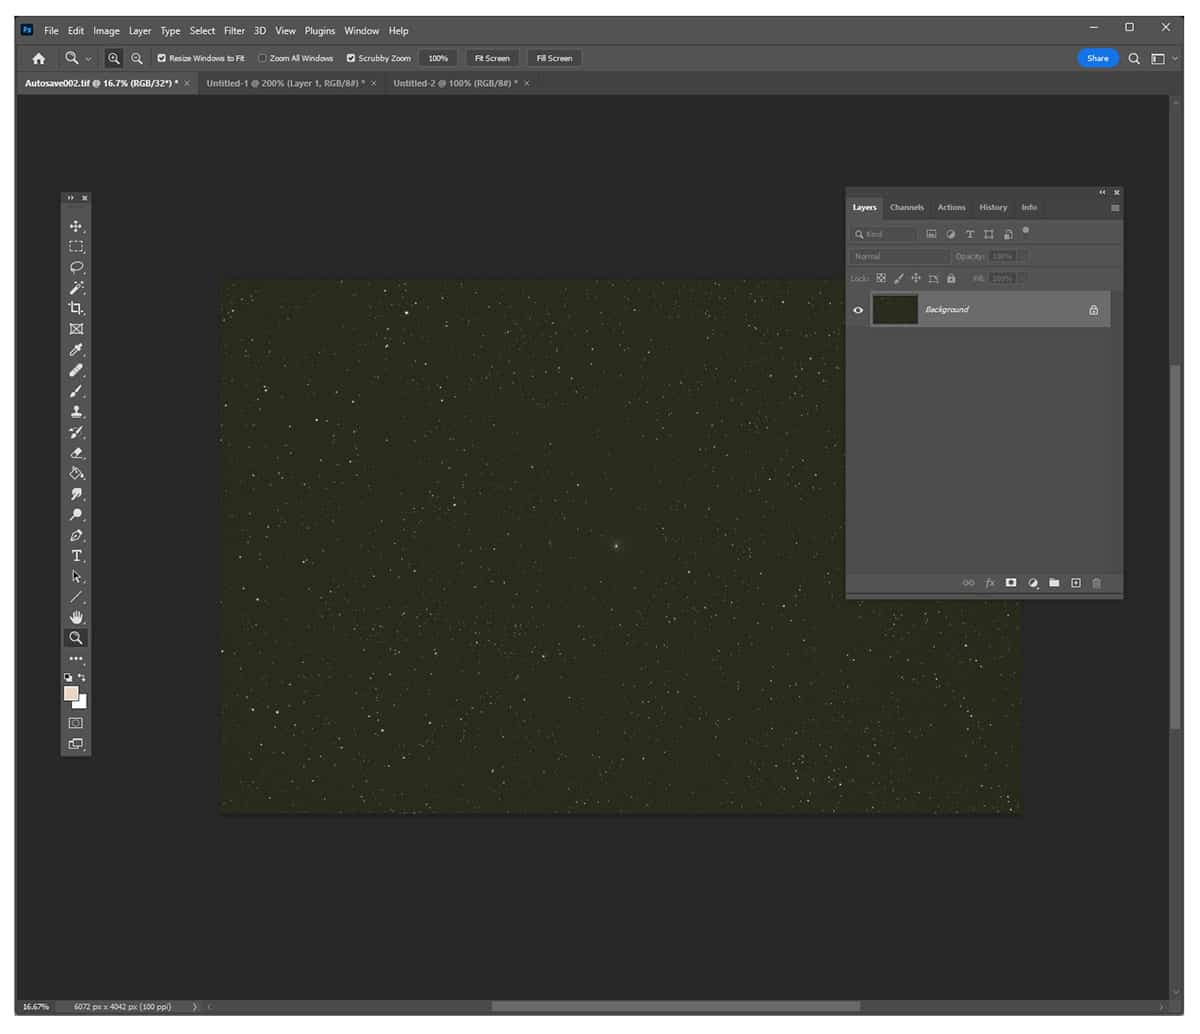
The linear master file appears dark and has a muddy green color cast.
Next, you’ll want to navigate the ‘Image’ menu at the top of the Photoshop workspace. Select Image, Mode, and 16 Bits/Channel. This converts the 32-bit image file into a 16 Bit image. After you do this, you should see a new window appear, called HDR Toning. In the ‘Method‘ drop-down menu, change the current selection from ‘Local Adaption‘, to ‘Exposure and Gamma‘.
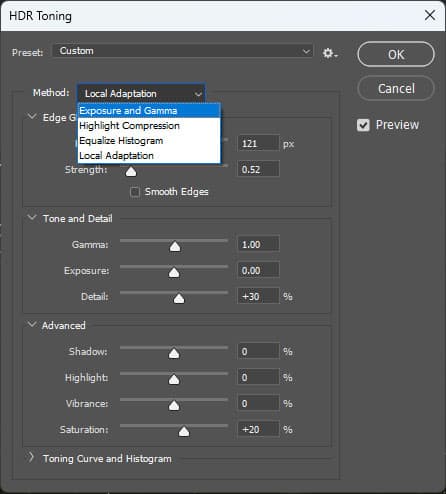
Don’t worry, you haven’t lost as much image information as you may think by converting the image to a 16-Bit file. This just allows you to leverage every feature in Adobe Photoshop to edit your image. Certain software (such as PixInsight) allows you to edit the image entirely in 32 Bit mode, but Photoshop does not (for now, at least).
Crop The Image
The first step we need to take is to crop the image. This is an important step to do early, as the stacking process may have created odd image information at the edges of your image including clipped blacks. We can not get a true reading of the image data until the crop has been performed.
The amount you need to crop will depend on the amount of overlapping between light frames, which will appear as odd-looking blurry edges on your image. You may also choose to crop in a little more, to creatively frame up your object.
I chose to crop the image down to about 90%, as the stars at the edges of the field do not look great. In fact, I will be cropping the image even further as we progress through the tutorial. This is a very common practice for me, especially for shooting with an unforgiving full-frame image sensor.
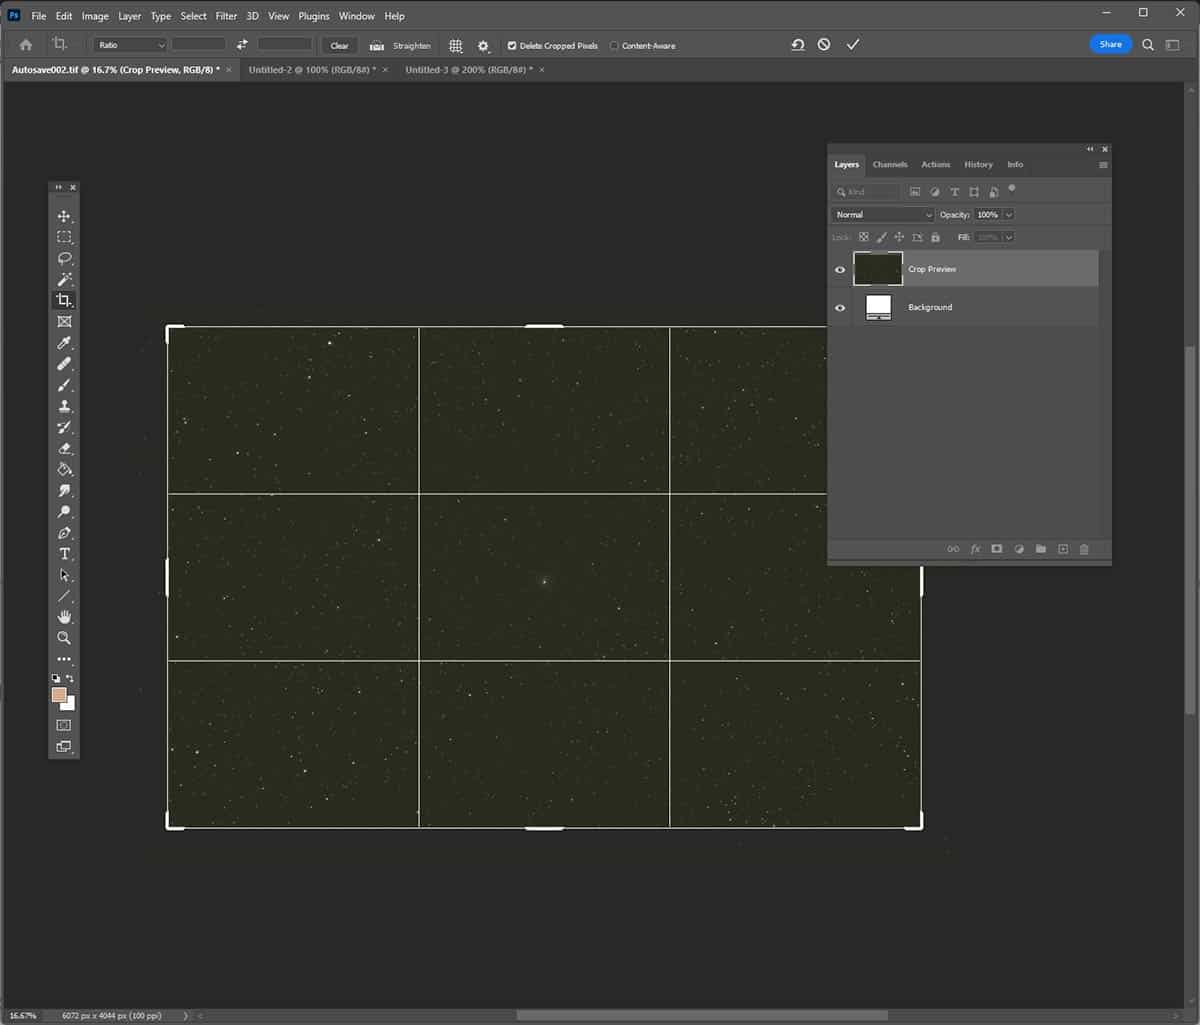
Crop the image using the ‘Crop Tool’ in Photoshop.
When you are happy with the amount of cropping you have made, we can move on to the next step. I generally try to keep the subject in the center of my crop but don’t worry about getting this perfect. We will have many opportunities to crop the image further, later.
Adjustment Layers
Adjustment layers in Photoshop are a type of layer that enables you to apply a ‘non-destructive’ image adjustment to your image. These layers can be used to modify the curves, color balance, hue/saturation, and many other aspects of your image without permanently changing the underlying pixel data of your original image.
When you create a new adjustment layer, it appears in the Layers panel, on top of the layer you want to adjust. You then use the Properties panel to adjust the settings of the adjustment layer. Adjustment layers can be edited and modified at any time throughout your processing workflow, allowing you to experiment with different settings and see the results in real time without affecting your original image.
Here are the Adjustment Layers we will be using on our image:
- Threshold
- Levels
- Curves
- Hue/Saturation
We will also create several selection masks to isolate the stars and the nebulous regions from the background sky. It is wise to build the image using separate layers for each process and save your image along the way.
Color Balance (Setting Black Point)
Like many other aspects of astrophotography image processing, there are many ways to set the ‘black point‘ of your image. The idea is to identify a neutral area of the background sky and make sure that all RGB color channels are aligned with this black point.
Seeing as how our image looks very green, it is no surprise that we will need to tone down the overall green color cast of this image at a minimum. Common color casts for astrophotography images to start out with are green, brown, or a shade of red. These ugly tones can be the result of the type of filter used, the Bayer pattern of the camera sensor (which is the case, this time), and/or light pollution in the sky.
Luckily, we can easily adjust the overall color balance of the image in Adobe Photoshop. I find the Threshold Adjustment Layer method to be reliable and effective. This layer will create a black-and-white reference image that displays the extremely bright and dark areas of the image. By carefully adjusting this mask, we can find a reliable area of pure black, background sky. We can also use this tool to help us set the white point of the image.
To start, create a new Threshold Adjustment Layer for your image. In the main menu, go to Layer, New Adjustment Layer, and finally Threshold.
The Properties window will appear. The image should now appear almost completely black. To change this we need to move the slider to the left, toward the main peak in the histogram.
This peak indicates where the majority of the light values are in the image. You should be able to get it to a point where the structure of your deep-sky target is noticeable, even in this weird black-and-white, exaggerated state. Use the image below as a reference of what this layer should look like.
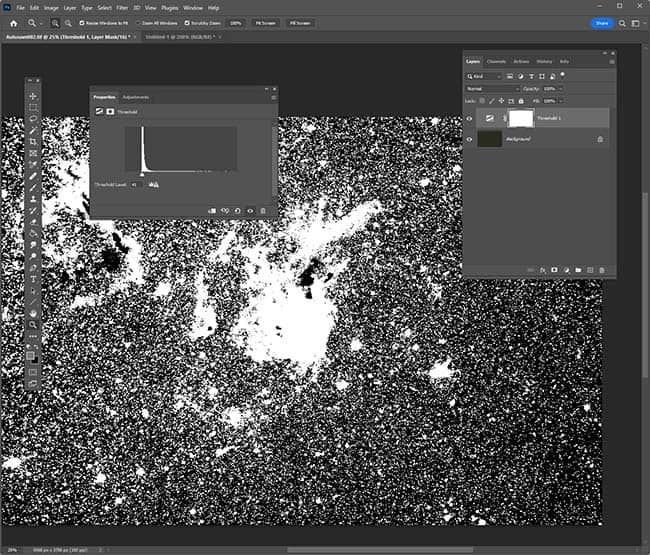
Create a Threshold Adjustment Layer to find the darkest and lightest areas of the image.
When you are happy with the Threshold mask, you can close the Properties window. For the next step, we will need to use the Color Sampler Tool. The Color Sampler Tool can be found in the Eyedropper Tool dropdown menu, it is the third one down in the list.
Before we plot our first point, make sure the ‘Sample Size‘ is set to 5 by 5 Average. You can change this setting in the top menu bar that appears when you have the Color Sampler Tool selected. Now, zoom in on the image and find an area of the background sky between the many stars, and your subject. When you have found a good spot, use the Color Sampler Tool to plot a single point in this black area.
We will now open the Info Tab to provide us with the exact color values in our image. If the Info window is not already open, you’ll find it under the Window menu at the top of the screen.
This is one of those steps that sounds much more complex than it actually is. To clear up any confusion, please see the key points of this step in the screenshot below.
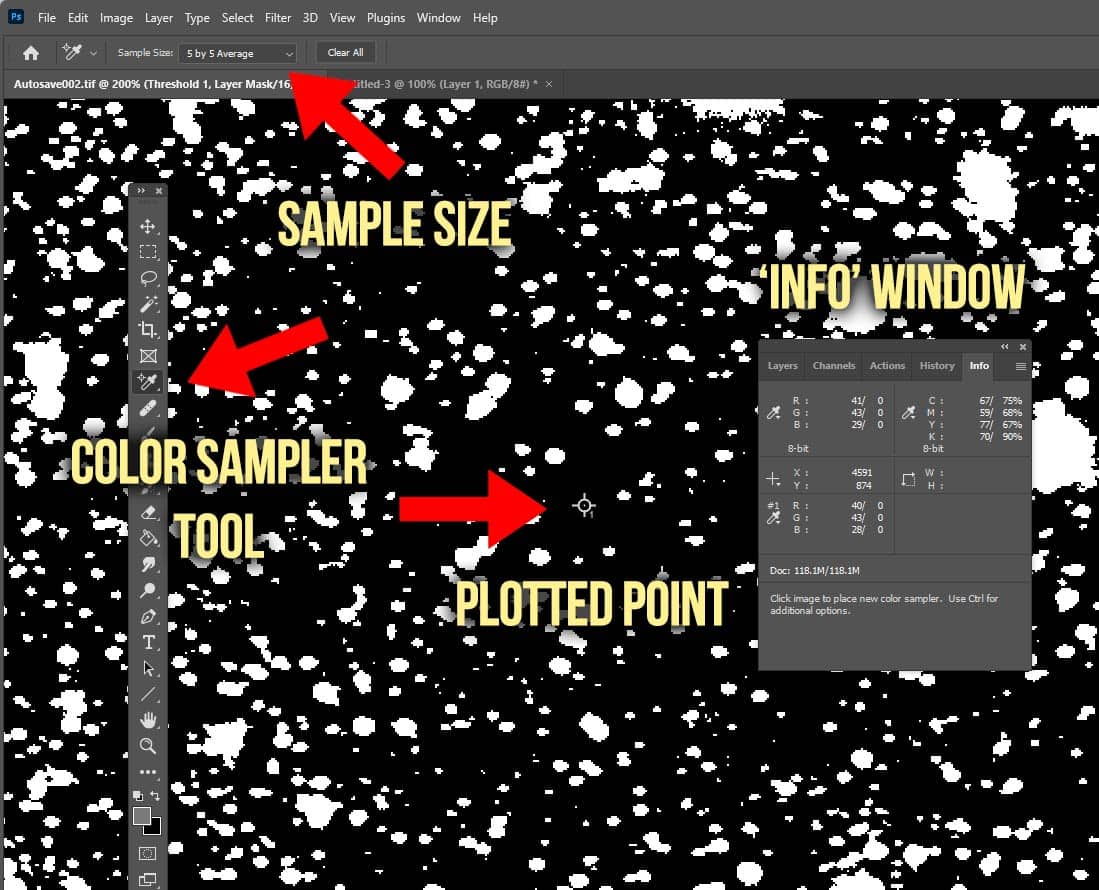
Plotting our black point in a neutral area of the background sky.
When you have successfully plotted your black point in an area of the background sky, you can delete the threshold adjustment layer, as it was only there as a reference point.
Now we need to adjust the black point of the image by matching the color values of our plotted point. Because our image has an ugly green tint to it, it is not surprising to find that this neutral area of the sky has a higher green value than the other channels.
To start, create a New Adjustment Layer, Levels. Now, with the Info window open, adjust the individual RGB channels of the image until they match the lowest value. By default, the histogram shows the RGB data, but you can choose the specific color channel you want to adjust in the dropdown menu (see below).
Since we are setting the black point of the image, we need to slide the shadows slider on the left inward, while paying attention to the numerical values in the Info Window. You should see the numbers changing for your selected channel in the #1 Color Sampler box of the Info Tab. As you can see, the values for each RGB channel are now 29, 28, 28 (close enough).
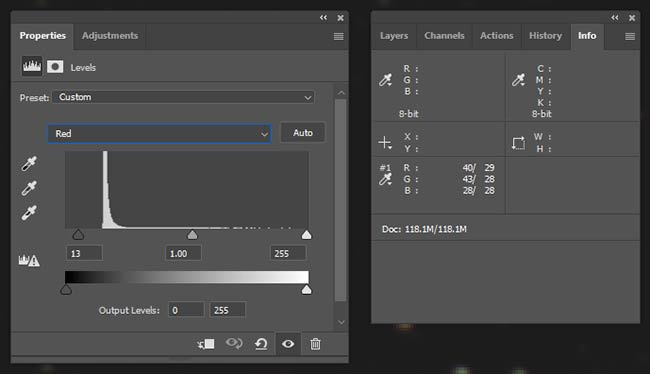
Adjusting the shadows slider for each RGB channel until they are the same value (28, 28, 28).
Don’t worry if your black point level is lower or higher than the example above. Yours may have RGB values of 8, 8, 8, and appear much darker. The important thing to keep in mind is that you never want to push the shadows slider past the wall of data. Doing so means that you are now clipping the black point of the image, and losing data in the darkest areas of the image.
Keep your Color Sampler point on the image, as we will likely need to reference our black point again later. Better yet, create a second (or even third) Color Sampler point in another area of the background sky in the image. This allows you to achieve an even better color balance throughout the image by finding the middle ground between each sample point.
At this point, you should notice that the image has a more natural color and that the sky is now grey/black, instead of green. As laborious as this process may have seemed, it is an important step toward processing an image with accurate, beautiful colors.
The green color cast has been corrected, and the overall color balance has improved.
Levels Adjustment
Next, we will go back to the Image menu, navigate to Adjustments, and finally, Levels. This opens up a histogram window, which tells us what is going on in the image from a data standpoint. In the levels window shown below, you’ll notice that the data in the histogram is concentrated to one sharp peak.
You should also notice that the far left side (shadows) of the histogram includes no picture information whatsoever. This means that we can safely bring the left-hand shadow slider to the right, without losing any picture information. This will make the image appear darker, but we will know that we are not losing any faint details of the nebula.
Carefully slide the shadows adjustment arrow to the right, just before it hits the first peak of data in the histogram. You will notice the overall image get darker as you move the slider. This is a good first step to make when adjusting your Astro images in Photoshop.
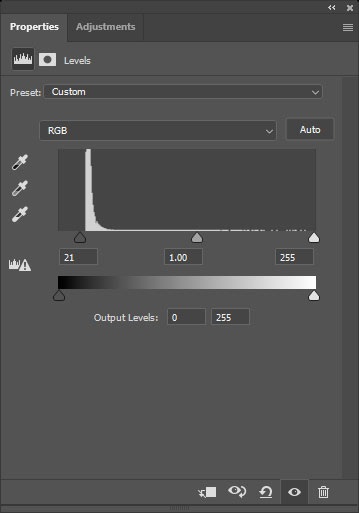
The histogram window in the levels window includes shadows, mid-tones, and highlights sliders.
For this image, you may have noticed that there is a gap on the right side of the Histogram as well, in the highlights area. This means that we can carefully pull the highlights slider in (to the left) to brighten the image, without worrying about clipping the highlights of the image.
Now, we will create another Adjustment Layer, providing a fresh start on our next edit. The original image file and all of its important information will be left alone underneath. We use a tool called Curves to transform the image into a non-linear image. This is where things really start to get interesting.
Curves Adjustment Layer
Navigate to the Layer menu in the main menu, then New Adjustment Layer, and finally, Curves. Adobe Photoshop will prompt you to name the new adjustment layer, which I usually just leave at the default ‘Curves’. Taking the time to label your adjustment layers can make it easier to go back and make subtle changes later on in the process.
After naming the layer, you will see the Properties window pop-up, with a histogram, and several options for adjusting curves. If you lose or close this window by mistake, you can find the Properties window in the main menu under ‘Window‘.
Creating a New Curves Adjustment Layer.
I find that it is better to do several iterations of smaller stretches, rather than one big one. You can create as multiple Curves Adjustment Layers, and bring the image brightness up to where you want it.
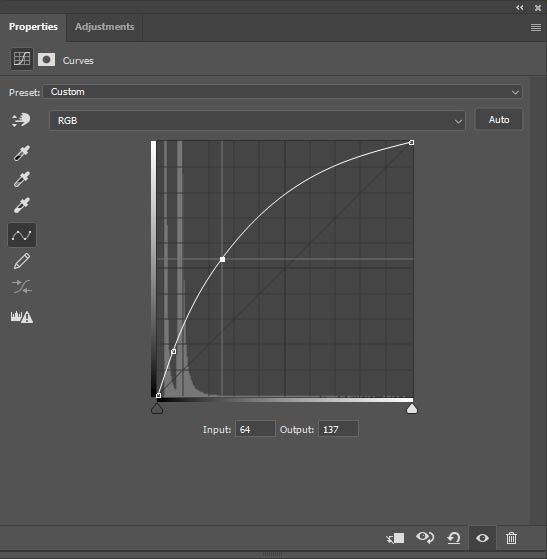
The main thing to keep in mind while performing a curve stretch is that you do not want to clip the highlights (the absolute brightest parts of the image). These areas will be the brighter stars in the field, and in this case, the bright core of the Iris Nebula.
In the image below, I have shown what a ‘good’ curve stretch should look like for an astrophotography image. It is not overly aggressive, but it rises through the peak of data in the histogram and tapers off at the top to protect the highlights. As you can see I have created two points on the graph, and pulled the curve line into a hyperbolic shape.

An example of a good curve stretch for an astrophotography image.
For your next iteration, you can also pull the start of the curve inward towards the edge of the data on the left (shadows). This time, experiment by creating multiple points on the graph for even more control over the data. This allows you to create more of that hyperbolic shape, and we have now significantly pulled up some of the fainter areas of the nebula and surrounding dust.
You may notice that the image is starting to show a noticeable color cast again, but that is totally normal. We can apply a color balance to the image by adjusting the levels of each RGB channels the way we did the first time.

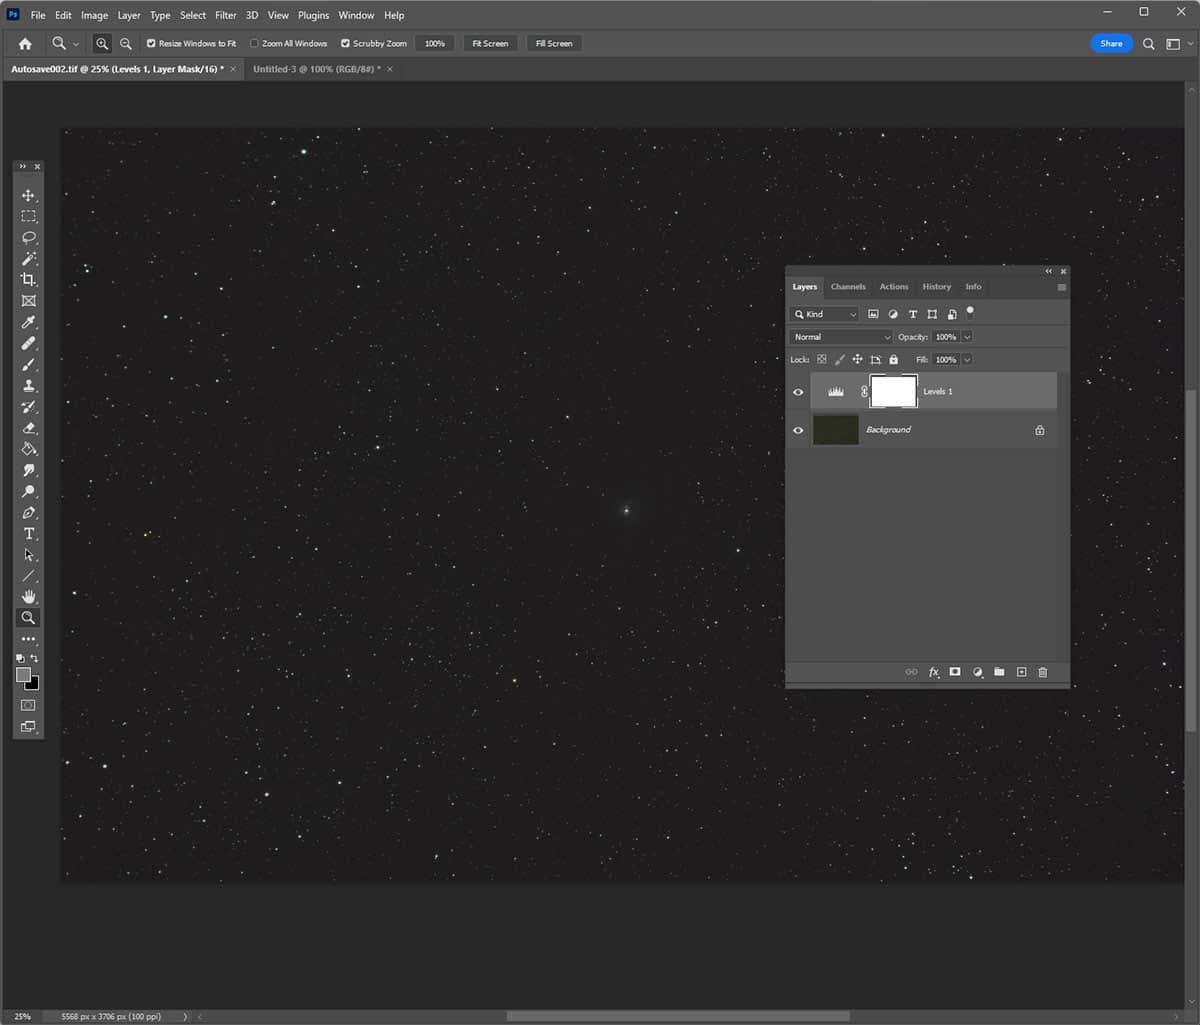
At this point in the astrophotography image processing workflow, I wanted to share my Layers panel so you can see the adjustment layers piling up. You can rename each layer to whatever you want to keep track of your progress. As you can see, I have created a new base layer that combines all of the changes we have made to the image. To create this layer (a merged copy on a new layer), press Shift+Ctrl+Alt+E. On a Mac, press Shift+Command+Option+E.
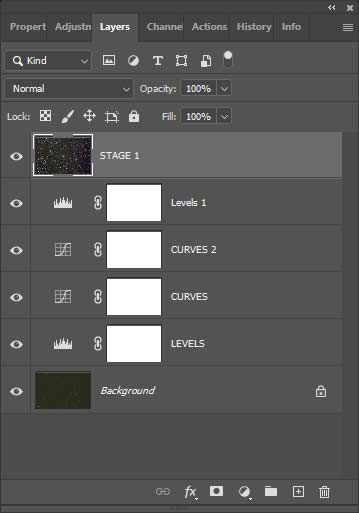
This is a good time to save the image. I usually save a working copy (as a Photoshop File or TIFF file with layers) after each major adjustment layer.
Gradient Removal
Now that we have stretched the image, the darker shadows and mid tones have revealed a subtle, underlying gradient to the image. This gradient can be removed manually in Photoshop, but it is much faster if you use a dedicated tool.
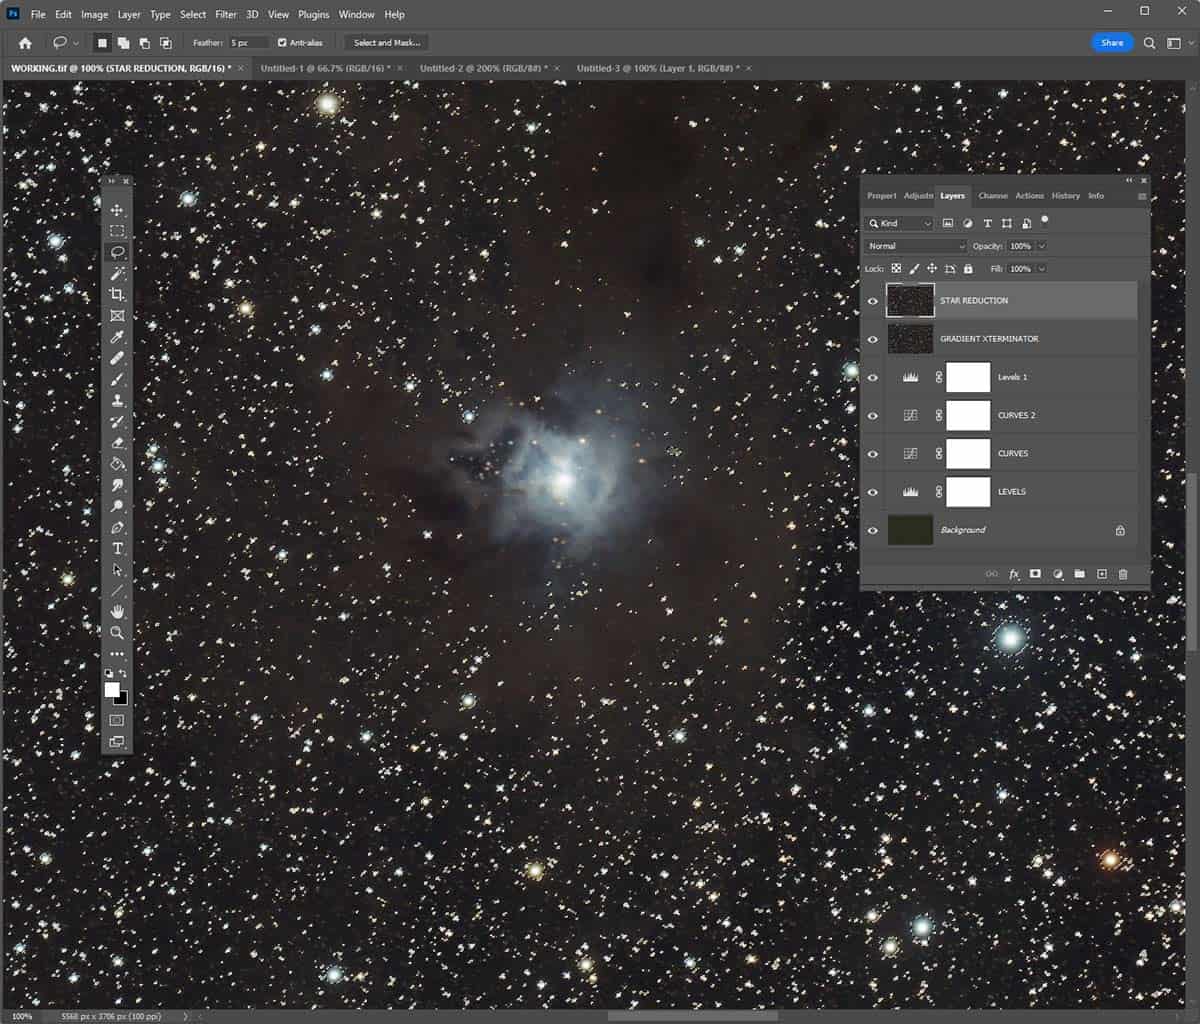
One of the easiest ways to remove gradients from your astrophotography image in Adobe Photoshop is to use the Gradient XTerminator plugin. This tool allows you to select the area of the sky you want to extract gradients from and choose the aggressiveness of the tool. For this image, I found it did a great job by applying the gradient removal process across the entire image (see below).
Start by creating a new merged layer on top of your existing project, and name it ‘GRADIENTS’, or whatever else you want to describe the action taking place. This way you can easily compare the before and after images with one another. Now, go to Filter, RC Astro, and finally, Gradient XTerminator.
Here are the gradient removal settings I used to create the result shown below.
- Detail: Medium
- Aggressiveness: Medium
- Balance Background Color: Yes
Before/After using the Gradient XTerminator Photoshop Plugin.
If you want more control over the gradient extraction process, you can use the Magic Wand Tool to select a specific area of the sky to apply gradient removal to. This is handy when a global application changes the color of your nebula or galaxy, which you typically want to leave untouched.
Minimizing Star Size
Reducing the size of the stars in your image has a way of making the nebula or galaxy stand out more. By stretching the image using curves, we have also increased the brightness and intensity of the stars and we need to reduce their impact. There are many ways to reduce the size of the stars in your astrophotography images, but this is one of my favorites.
Start by creating a new layer, and name it ‘STAR REDUCTION’. Again, we can easily go back to the original and see if we have improved the image with this action. Now, navigate to the Select menu in the main Photoshop menu, and then press Color Range. In the window that opens up, change the default selection of ‘Sampled Colors‘ to ‘Highlights‘.
Now, adjust the Fuzziness and Range sliders until you feel confident that the majority of the bright stars have been selected. For this image, the sliders appeared in the location shown in the screenshot below. Don’t worry about the fact that we have also selected the nebula yet.
Selecting the Highlights of the Image (The Stars).
After you click OK, you’ll see the ‘marching ants’ of your selection surrounding the many stars in the field. You may also notice that the brightest areas of your subject have been selected, and we will need to remove them from the overall selection. To do this, you can manually draw around the areas you want to deselect using the Lasso Tool.
To remove a portion of the selection, hold down the alt key (option key on a Mac) before drawing around the nebula. In the top menu of the Photoshop workspace, make sure that your Feather selection is set to about 5 (or below), for a clean edge around the section. This is what the selection should look like after you have successfully removed the nebula.
Deselecting the bright core of the Iris Nebula from our Star Selection.
Now, we are almost ready to minimize the stars across the field, but first, we need to feather the edges of the selection to make sure that there isn’t a hard edge between the stars and the sky. A quick and easy way to do this is to click Select, Modify, and then Feather, from the main menu.
Depending on your original settings, you may want to expand the selection before feathering the edges. To do this, go to Select, Modify, and then Expand, from the main menu. For my image, I expanded the selection by 2 pixels and feathered the edges by 2 pixels. The exact values to use here will depend on the resolution of your image.
If you really want to get specific about your selections, you can also check out the Select and Mask tool for complete control. We have successfully created a ‘star mask‘, and it is one of the most important steps to take when processing an astrophoto. You can save this selection as a mask for later use in the editing workflow.
Now that we have carefully selected the stars, we can go ahead and minimize the size of the stars to our liking. With your star selection still active (the ants are still marching), click on Filter, Minimum, and then Other. This will open up the Minimum Filter window and you have a few options to play with.
First off, make sure the Preserve setting is set to ‘Roundness‘. The best part about this filter is that you get a real-time preview of the image as you adjust the slider. For this image, I was pretty aggressive with the star minimization. You can see the settings I used in the screenshot below.

Using the Minimum Filter to reduce the star size in the image.
If you run the Minimum filter and notice that you have destroyed the shape of the stars, you need to go back and run it again using a less aggressive setting. In this case, I was able to use a Radius of 1.2 pixels, and it worked very well. The Iris Nebula and dusty clouds that surround it now look much more pronounced, yet the image still looks natural.
Curves Round 2
Next, we will perform another curve stretch, but this time it will be a little more specific. To make sure that we are pulling up the midtones of the image, and not making the stars any larger/brighter, we can create another mask using the Select Color Range tool.
This time, after the stars have been selected, we need to Invert the selection to edit everything BUT the stars. Follow the steps to create a star mask like we have previously done, and then navigate to Select, and then Inverse. Now, create a New Curves Adjustment Layer, and pull the curve upward, paying attention to the mid-tones of the image.
If all goes well, you should see a noticeable separation between the nebula and the sea of stars surrounding it. Here is a look at my screen after this adjustment for reference.

A selective Curve stretch is applied with the star size preserved.
The image is starting to look great now, and to retain a natural look, you may choose to end your image processing journey here. If you want to increase the color of the nebula and surrounding stars, read on.
Noise Reduction
Photoshop includes some powerful. built-in noise-reduction filters. For an astrophotography image, I find it best to use the ones found within the Camera Raw Filter. Create a new layer called ‘NOISE REDUCTION’ before applying the next edits.
To get to this window, click on Filter, and then Camera Raw Filter. From here, navigate to the Detail Tab, and notice the 3 sliders you can use to reduce noise and sharpen the image. In the screenshot below, you can see that I used very moderate noise reduction settings, as this data was quite clean to begin with.
The color noise reduction filter can be very helpful when trying to clean up noisy images captured with a DSLR camera. It is especially useful for images that suffer from a prominent amount of green color noise.
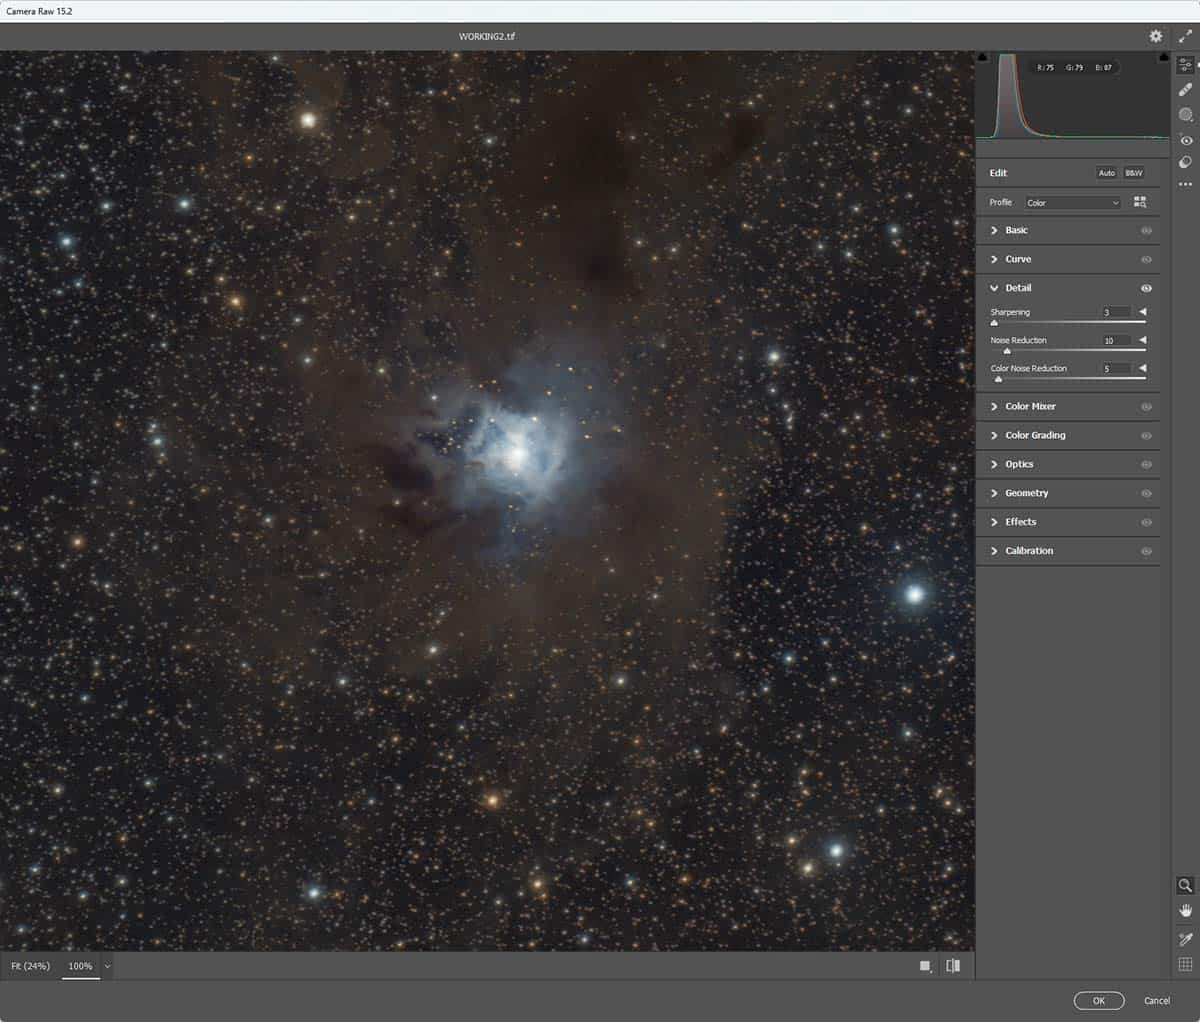
You’ll find the Noise Reduction filters in the Detail Tab of the Camera Raw Filter.
You may choose to run a noise reduction filter earlier in your astrophotography image processing workflow. I prefer to apply this filter near the middle to end of my process, but others insist that it is done much earlier.
Color Enhancements
At this stage, the image should look much more dramatic than it did in its original, linear state. The stars have been reduced, and there is much more separation between the deep-sky object and the sky. To me, all that is left is to intensify the beautiful colors of our subject, and the most vibrant stars in the field.
When it comes to increasing the saturation of an astrophotography image, the key is to mask and isolate the areas you want to adjust. You want to avoid increasing the saturation of the dimmest stars, and the neutral background sky. The first step is to create another layer mask using the Select Color Range tool.
This time, instead of selecting the Highlights, choose Sampled Colors and use the Eye Dropper to select the color you want to adjust. For my image, I chose to increase the saturation of the yellow/orange stars in the field to contrast the cool blues of the Iris Nebula.
Take care in the creation of your star mask, as this one is even more specific than the one we used to minimize the stars. In this case, we need to make sure that it is only selecting the warm-colored stars, and not the cool ones. Once you are confident with the selection, create another New Adjustment Layer. This time, we’ll use Hue/Saturation.
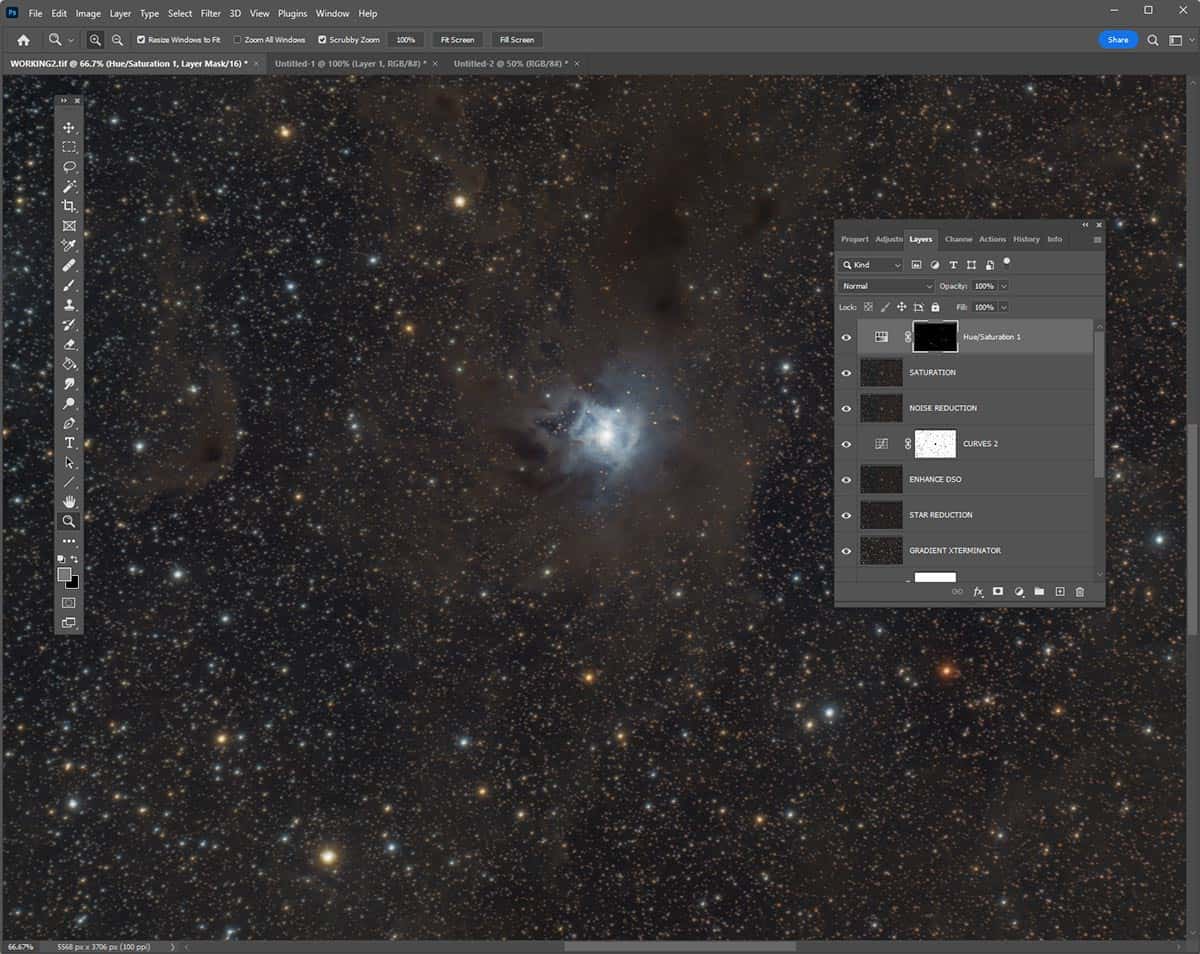
A Hue/Saturation Adjustment Layer is used to enhance specific colors.
Increase the saturation slider while paying attention to the live preview of the image. Pay attention to the color of the stars you are adjusting, and ensure that are no surprises in terms of your selection. As long as your star mask was targeted, you should see a pleasing increase in the warmth of the yellow/orange stars in the image.
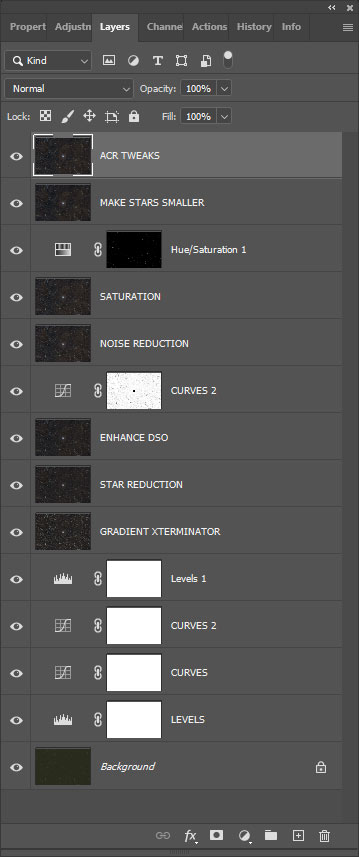
You can use this same technique to control and enhance the color of any element of the image. Here is another overview of my layers tab, showing all of the steps we have now taken.
Final Tweaks
Depending on your tastes, you may consider the image in its current state to be ‘done’. I have chosen to take it one or two steps further, in hopes of creating an even more dynamic image. One of the best places to make final tweaks to your image is the Camera Raw Filter. Here you can do a little more noise reduction, a subtle sharpening, and even experiment with the additional hue/saturation boosts via the color mixer.
You can also try out some of the great actions (or scripts) found within the Astronomy Tools Action Set. Some of my favorite tools include the Enhance DSO and Reduce Stars action, and the Make Stars Smaller action. For my final image, I ran two iterations of the Make Stars Smaller script and applied it as a new layer at 50%.
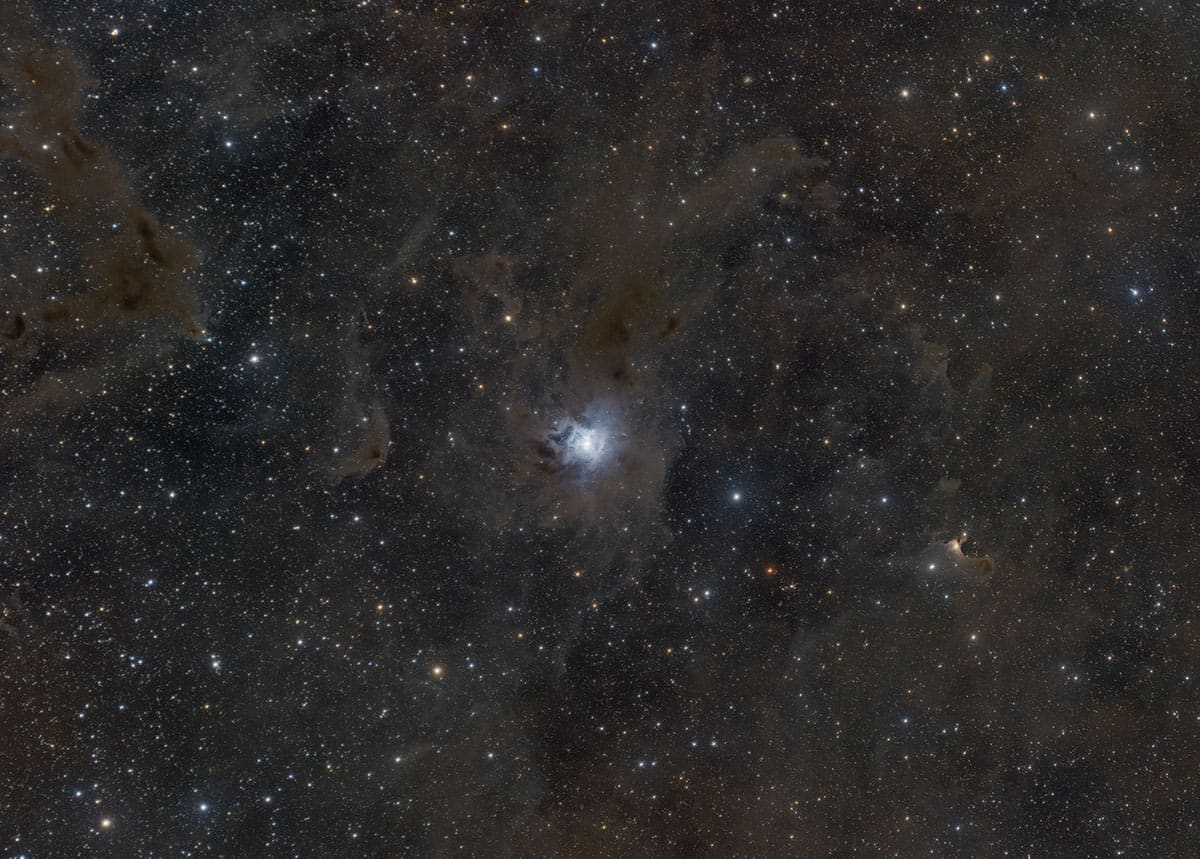
When you’re happy with the color enhancements made, you can review the image as a whole. It is best to view the image up-close for quality, but also from a glance for impact and aesthetics. The best astrophotography images look great at any magnification.
Saving and Sharing the Image
When you have settled on your final edits, you can flatten and export a high-resolution copy of the photo to your computer. I suggest saving the image in its current TIF format, or a PNG. Exporting the file as a JPG will compress the image, which is not what you want for your final edit.
With the ‘large’ version of your image saved, you can now export various versions of the photo in different sizes and framing to display on your website, Instagram, Astrobin, and more. I like to upload a large version of most of my images to Flickr so I can redownload them in the future for quick reference.
I hope that this image processing tutorial helped you produce a great-looking photo. More importantly, I hope that it provided you with a better understanding of some of the key Photoshop tools astrophotographers use to create stunning images of the night sky. Once you know the basics, you are free to experiment with different values and settings until your image reflects your personal artistic vision.
Helpful Resources:
[ad_2]