Photography In The National Parks: Death Valley Days

[ad_1]

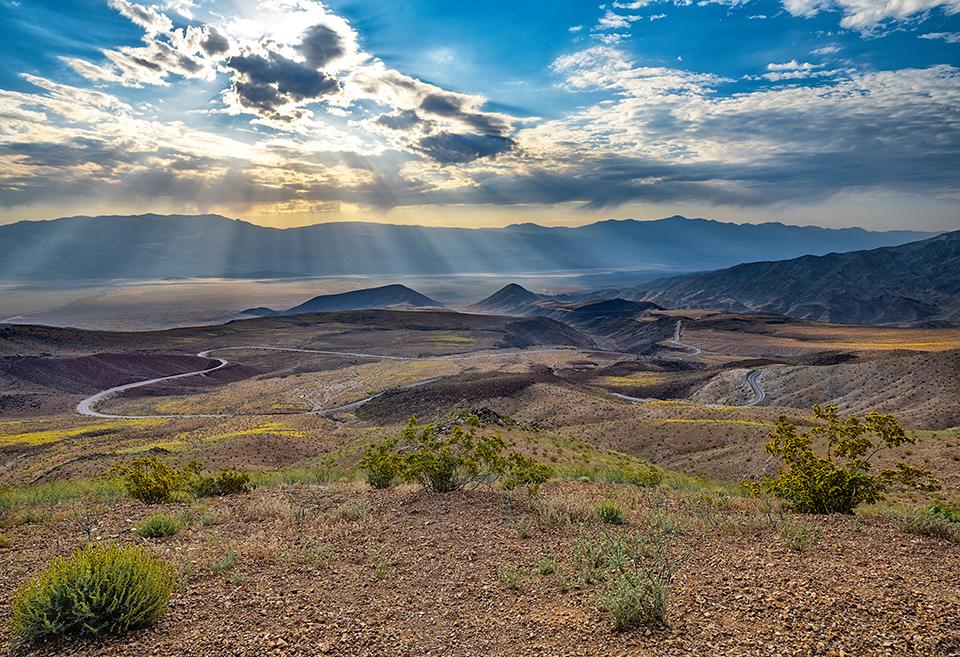
A morning view at Father Crowley Vista Point, Death Valley National Park / Rebecca Latson

“I had absolutely no idea Death Valley National Park was so beautiful,” my amazed sister told me after looking at a few photos I’d emailed her from my May trip to this national park. Truth be told, I had no idea, either, of the beauty, color, and depth of the landscapes I would photograph. Even after poring through Flickr photos of Death Valley, I still envisioned a washed out, hazy, dusty panorama (including a cow skull or two) over which a blindingly bright sun produced furnace-hot air shimmers while sucking the moisture from everything it touched. Yes, it is dry, hot, and dusty out there, especially if you visit May through September. But everything I experienced and photographed, from the geology to the terra cotta colors of the corrugated hillsides, to the crazy slapdash look of the mountain rocks, to the sunrises, sunsets, and brilliant stars, to the quirky history of the park, people and land, won me over completely.

A visit to Death Valley with your cameras will reward you with awesome shots and teach you something about handling cameras and capturing photos in 114-degree F heat. Yes, I know, winter is the best time to visit for cooler temps and less haze, but sometimes, the only time you are free to travel to Death Valley is during the summer season. You go when you can go. A visit in the summer will also teach you about handling yourself under constant heat. It’s all about water, water, and more water … plus sunglasses, light clothing, a little sunscreen, and common sense.

Park staff, signs, and other printed materials cautioning the Death Valley visitor to restrict or even curtail their activities after 10 a.m. during the summer season are spot on – especially for photography. Morning and late afternoon / evening times are best for saturated light, shadows, and depth anyway, so you might as well heed those cautions. Besides, from 10 a.m. until 5 p.m., the sun is, indeed, bright, sharp, and harsh. It’s also quite hazy (actually, it’s hazy by 8 a.m.). And it’s hot, hot, hot. The hotter it gets, the hotter your camera will feel to the touch. The late afternoon heat remained so intense one day that my medium format camera registered a yellow thermometer warning icon on the LCD screen. First time I’d ever seen that! I put that baby back into the backpack pronto, returning to the air-conditioned comfort of my rental truck quickly thereafter.

In addition to the heat, you should remember to affix the lens you wish to whatever camera you have and leave it on. It’s sandy and dusty (especially near the dunes), often quite windy, and if you are at Badwater Basin, there’s salt in the air. Dust and salt can finagle their way onto your camera’s sensor and into your camera’s system a bit or a bunch whenever you switch lenses out in the field. Even when the camera is “weather resistant.” Sometimes, the lens switching can’t be avoided, but try not to do this too much, if possible, and keep your back to the wind.

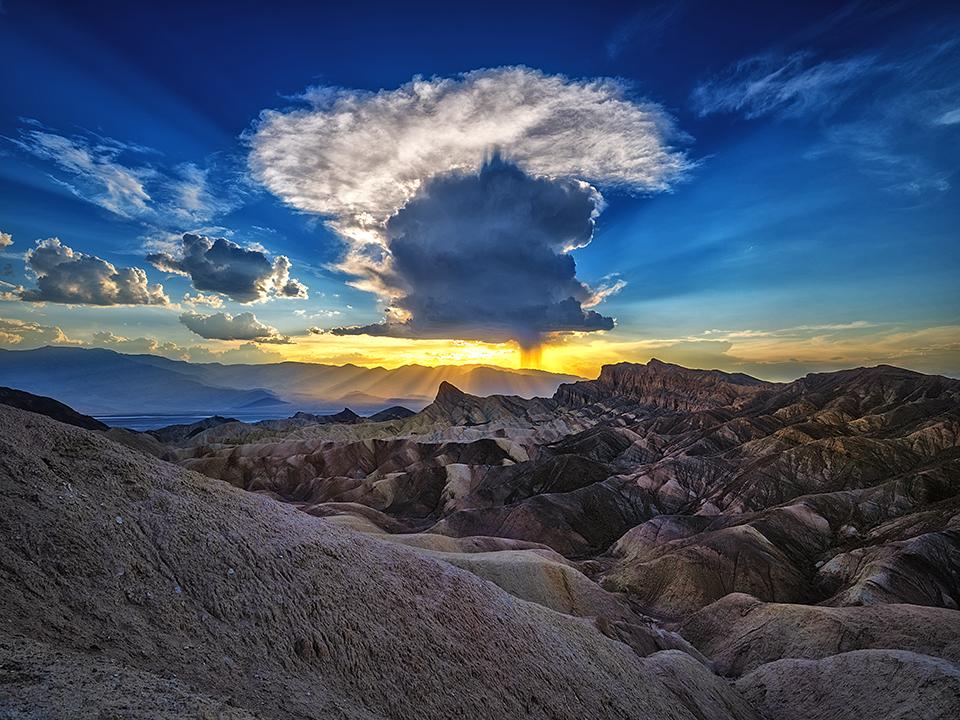
Ok, so what kind of images can you get, aside from the iconic shots? Well, I strongly advise getting those iconic shots. Why, when a gazillion images exist out there of those places already? Because your image is going to be different from those gazillion others. The change in seasons, the size and shape of the clouds, the quality of the light, the time of day – all these together create a unique image specifically yours captured at that one moment in time. Yes, even if you are standing next to a person aiming their camera in the same general direction. So go ahead and click that shutter button at Zabriskie Point, Dantes View, Badwater Basin, Mesquite Flat Sand Dunes, Father Crowley Vista Point, and all those other famous spots.

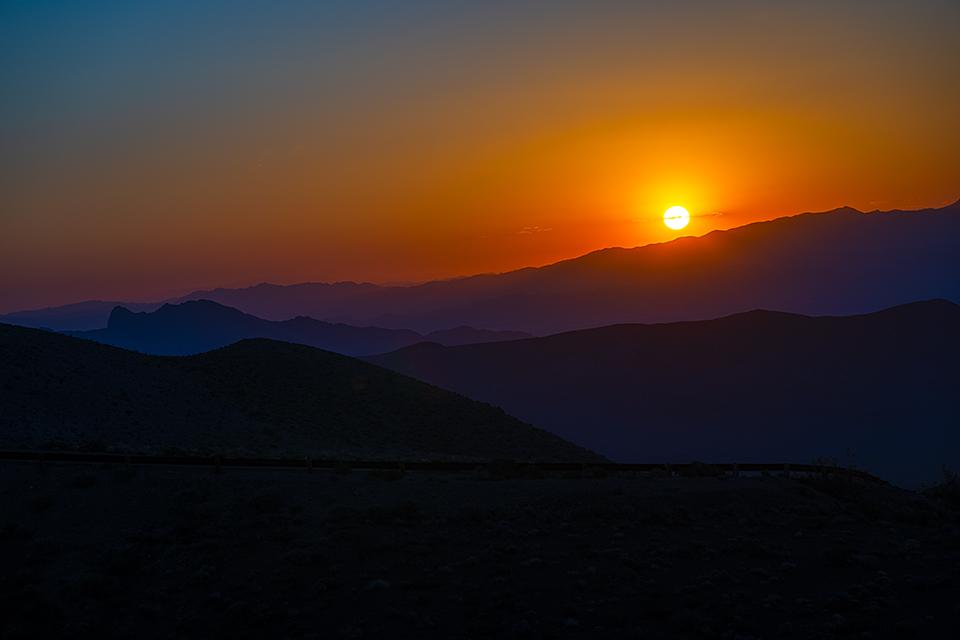
Oh, speaking of iconic spots and sunrises, sunsets, and star shots: the views at Zabriskie Point and Dantes View look west, so sunrise will bathe the Panamint Mountains across the valley, eventually moving over the valley and ultimately immersing the nearby hills with golden light. If you wish to photograph the actual sun rising above the mountains, you’ll need to turn your camera and face the landscape behind you.

Sunrise over Manly Beacon at Zabriskie Point, Death Valley National Park / Rebecca Latson

Watching the sun rise behind me at Dantes View, Death Valley National Park / Rebecca Latson

In my opinion, you’ll get more sunrise bang for your buck at Zabriskie Point. Ditto for “blue hour,” which is that time of morning and evening when the landscape and sky are colored with shades of purple, blue and pink prior to sunrise and just after sunset.

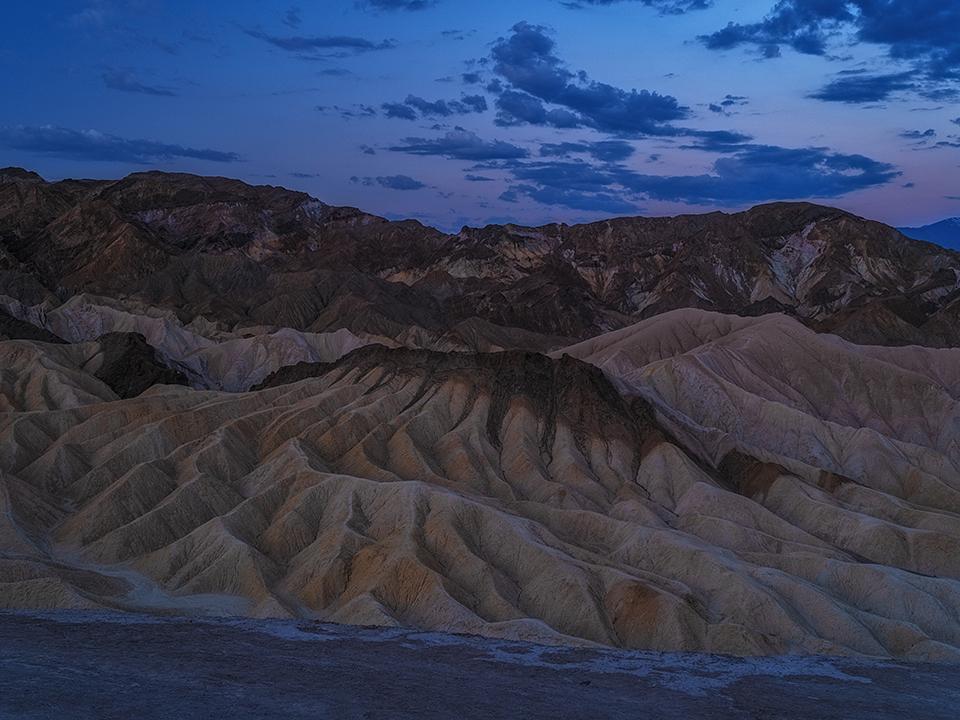
Blue hour at Zabriskie Point, Death Valley National Park / Rebecca Latson

Dantes View and Zabriskie Point are both great for sunsets and star shots. I’m a sunrise kind of gal, but I photographed more sunsets than sunrises in this national park.

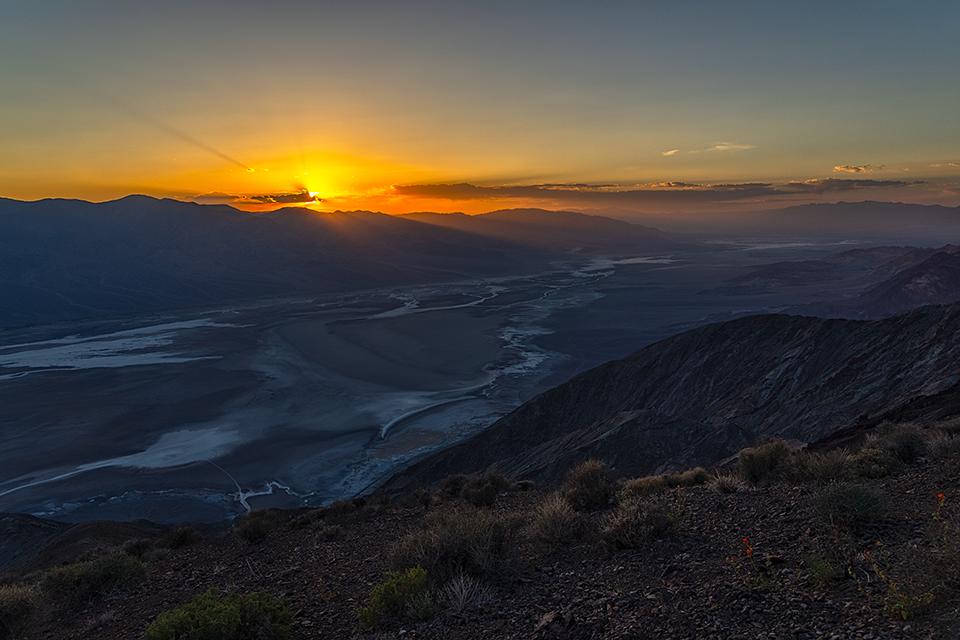
Sunset at Dantes View, Death Valley National Park / Rebecca Latson

I did also manage to stay up late enough to capture a starry night at Dantes View. The next time I visit Death Valley, I’m going to try and photograph sunset and stars at Badwater Basin.

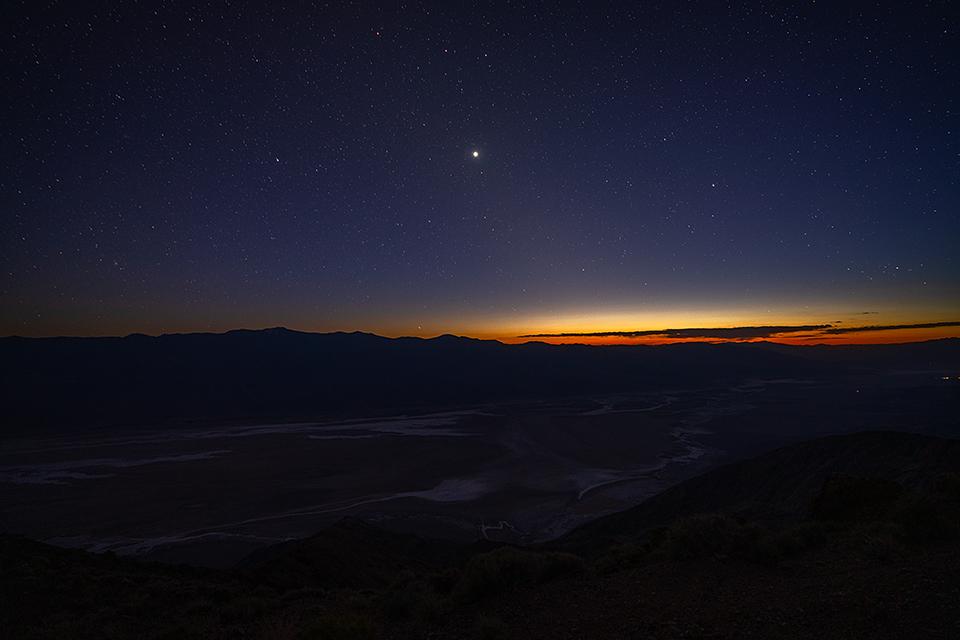
Sunset’s afterglow and the beginning of night at Dantes View, Death Valley National Park / Rebecca Latson

Look for interesting shapes, patterns, and textures. The polygonal salt patterns reflecting the mud cracks beneath at Badwater Basin make amazing compositions.

Salt flat and storm clouds at Badwater Basin, Death Valley National Park / Rebecca Latson

Heck, even the geometry of a view area is great for a photo.

The curvy pavement to and from Zabriskie Point, Death Valley National Park / Rebecca Latson

A salt flat seen from the height of Dantes View, Death Valley National Park / Rebecca Latson

Why on earth would you want to photograph a view area or a building or something manmade? Well, aside from the fact that most of the infrastructure in the park has some sort of history associated with it, those objects flesh out the story of your Death Valley experience. If you can see the beauty in something like the curving pavement from parking lot to Zabriskie Point view area, and even compare it to a salt flat out on the valley that looks eerily similar in shape, then you’ve got great powers of photographic observation. Remember, capture shots of what interests you, be it a view area, a close-up of salt on a salt flat, or the mud cracks of an ancient lakebed. All these images tell your personal park adventure story.

A delicate crust of salt, Death Valley National Park / Rebecca Latson

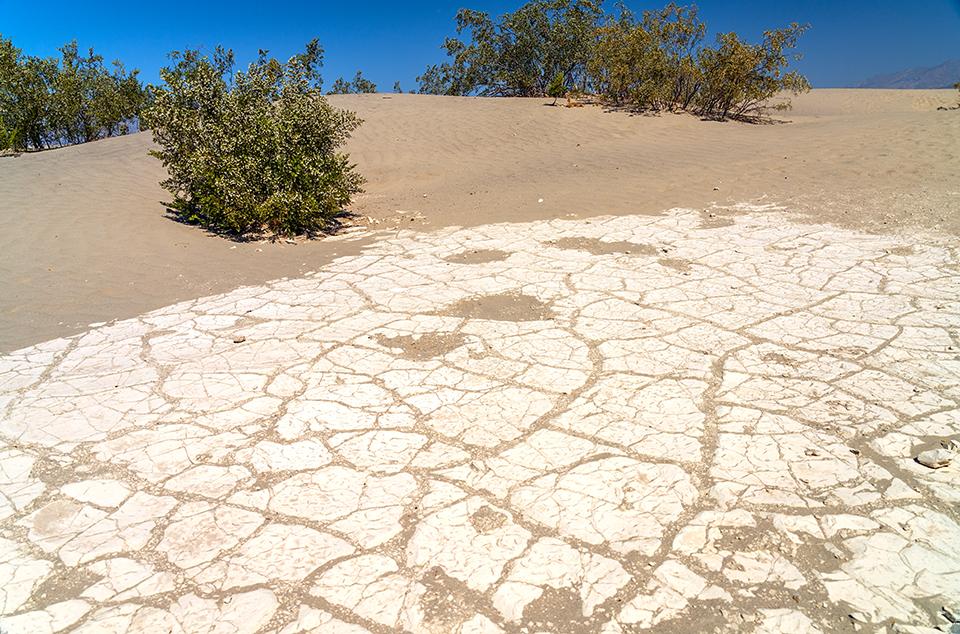
Creosote bushes, sand, and an ancient lakebed at Mesquite Flat, Death Valley National Park / Rebecca Latson

Death Valley is a great national park in which to include shots of people. Really? Yes, really. The people you see in the images below are great scale and reference.

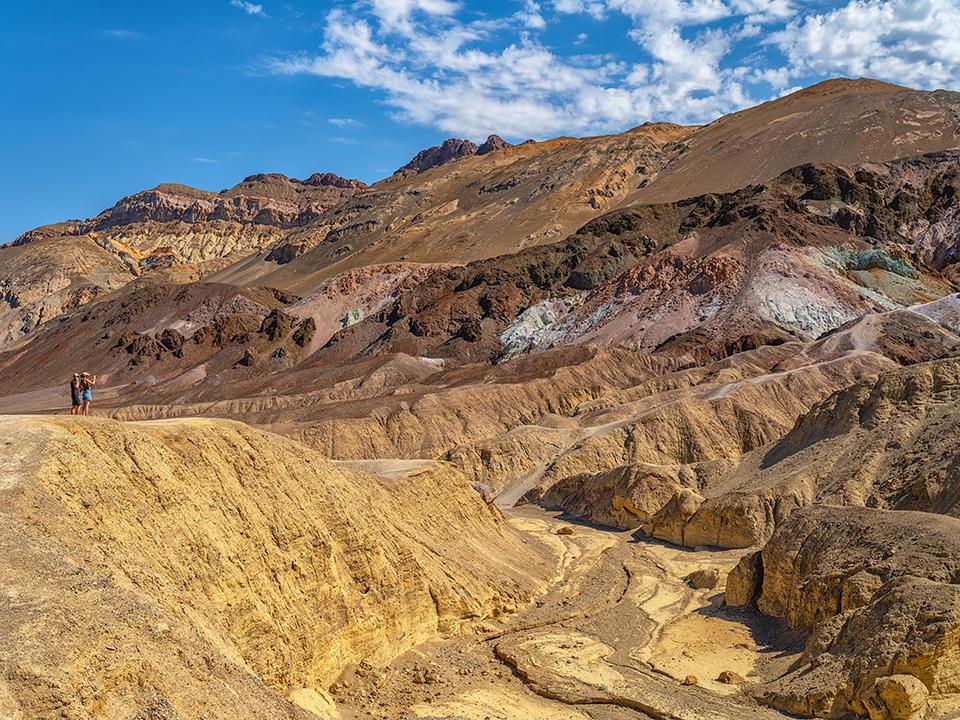
Viewing Artists Palette, Death Valley National Park / Rebecca Latson

Walking back to the parking lot at Badwater Basin, Death Valley National Park / Rebecca Latson

These landscapes are much larger / broader / taller than you’d think, and without some frame of reference your viewers can apply to the landscape, they won’t know the width and breadth of a feature. Humans, vehicles, buildings, anything else man-made helps your viewer get a sense of the size and provides that frame of reference for comparison.

Plus, people can add a bit of human interest.

Waiting for sunrise at Zabriskie Point, Death Valley National Park / Rebecca Latson

Speaking of people, don’t forget to include yourself in some shots. You provide as much scale and reference as the next person, you know.

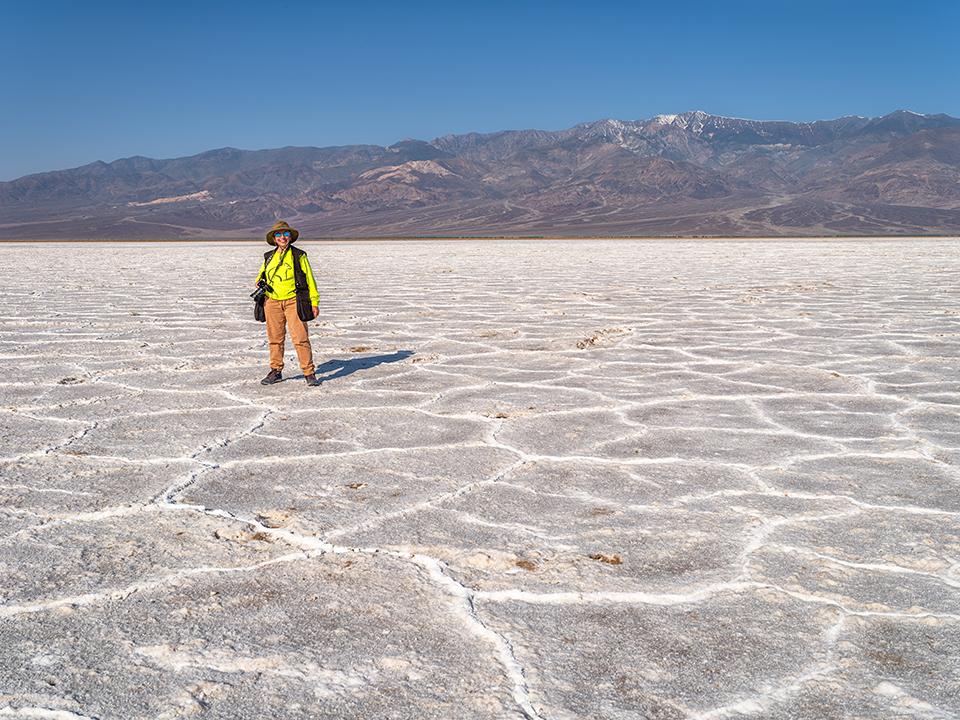
Becky at Badwater Basin, Death Valley National Park / Rebecca Latson

If you’ve read any of my other photo columns, you’ll know I’m a huge proponent of the leading line technique. It’s my favorite theme, and Death Valley provides plenty of leading line photo ops guiding the viewer’s eye from one part of your image to the other while allowing them to take in every detail of your composition. The road across the Panamint Valley is a fantastic leading line subject, as is Badwater Road and Artists Drive leading to Artists Palette.

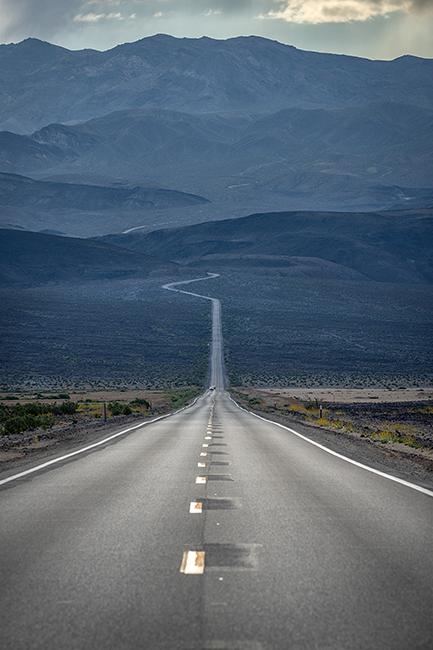
The road across Panamint Valley heading east, Death Valley National Park / Rebecca Latson

Don’t forget to experiment with your shots. For instance, I never created many panoramic shots consisting of multiple images stitched together using a photo editor like Adobe Photoshop. Dantes View provided the perfect opportunity for me to try my hand at this technique. The image below is a panorama of seven combined images.

Dantes View morning panorama, Death Valley National Park / Rebecca Latson

Any broad landscape provides great panoramic material. You can take as many or as few shots as you wish. Just remember all the images should be at the same level (no moving the tripod up and down for different shots for your panorama). Handholding your camera is not really a good idea for this technique, although you can do it. Even your smartphone creates panoramas. Bear in mind a panorama created from multiple images will take up quite a bit of space on your computer.

Converting a color image to monochrome is a fantastic experiment producing dramatic compositions emphasizing texture, pattern, light, and shadows. Death Valley, in addition to being a land of extremes, is also a land of contrasts: sharp, textured clarity versus soft, shadowy curves. Black-and-white imagery highlights these contrasts without the distraction (if you can call it that) of added color, allowing your viewer to concentrate on those textural and light differences.

An oncoming storm over Badwater Basin in black-and-white, Death Valley National Park / Rebecca Latson

A monochrome morning view toward the Badwater Basin parking lot waaay in the distance, Death Valley National Park / Rebecca Latson

I know I’ve already stressed how hot it can get during the summer months (which includes late spring and autumn). What I have not yet mentioned but what you will see for yourself – usually after uploading the file to your computer – is product of the heat out there – a wavey, almost unfocused appearance to your images when using a telephoto lens. This issue is known as “heat shimmer” or “heat haze” and I noticed this with photos I’d taken of Mesquite Flat Sand Dunes using my 100 – 400mm lens. Heat shimmer occurs when you look at objects (or photograph them) through a layer of heated air. Quora.com writes that heat changes the air density and thus its index of refraction (i.e., how much the light bends between your eye and the object). A further search on Google indicates this issue may be mitigated to a certain extent by using a lens hood and polarizing filter. I used both, but my sand dune images still show heat shimmer. Maybe the effect would have been greater had I not used a hood and polarizer filter – I don’t know. Even if your image displays a little heat haze, doesn’t it shout out to you “it’s HOT here”?

An example of heat shimmer effect on an image, Mesquite Flat Sand Dunes, Death Valley National Park / Rebecca Latson

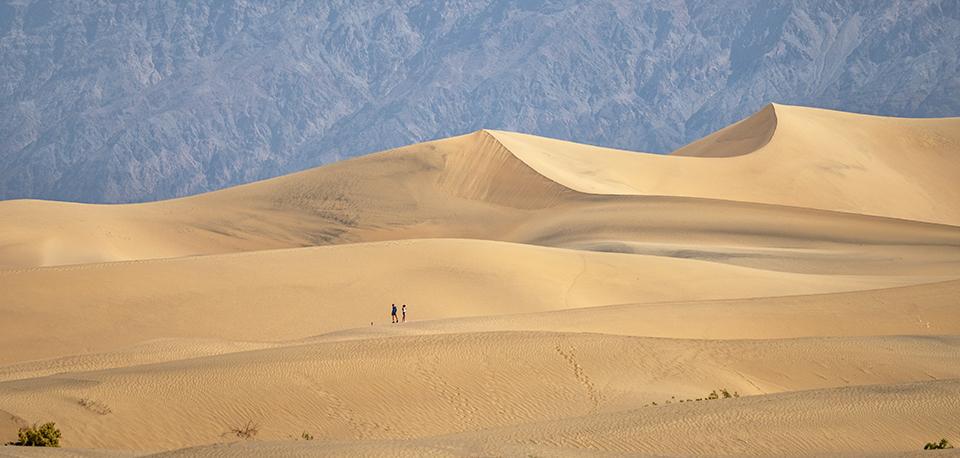
Exploring the Mesquite Flat Sand Dunes – the full view, Death Valley National Park / Rebecca Latson

A caveat of visiting Death Valley during the summer season (aside from the heat) is that your backgrounds will be hazy. According to the NPS, pollutants blow into the park “from metropolitan areas, industrial areas, and transportation corridors from the west.” Nature also adds its own two-cents’-worth of haze by “blowing dust into the air. But humans increase the amount of dust available to be blown by the wind when they drive on unpaved roads or break up the salt crust by walking on it.”

Can you mitigate haze in your images? Sometimes, a circular polarizing filter diminishes some of that haze, as does a grad ND filter. There is also a fix you can apply while processing your hazy images, depending upon what your photo editor offers. It’s called “dehazing.” I use Adobe Lightroom for a first pass at editing and there’s a dehaze slider on that program. Judicious use of that slider helps reduce or eliminate atmospheric haze. On the other hand, sometimes haze makes for a nice effect to tell your photographic story. To see less haze in your landscapes, Death Valley during the winter is the ideal time because of improved air quality since the winds and air mass originate “in a less developed area,” as opposed to LA, San Francisco, Sacramento, and all those other West Coast big cities.

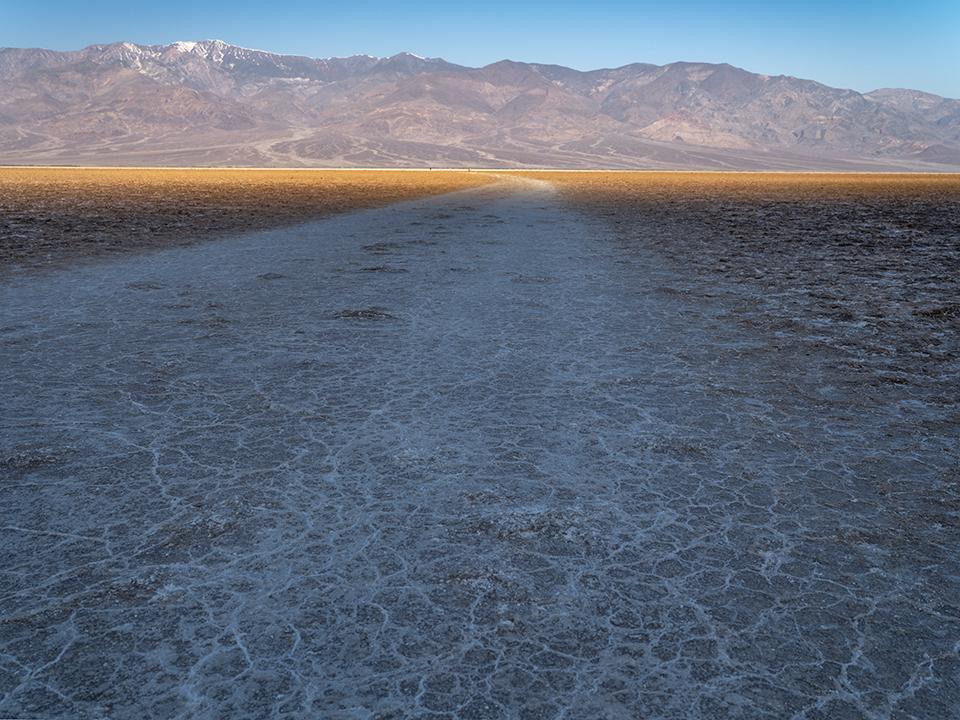
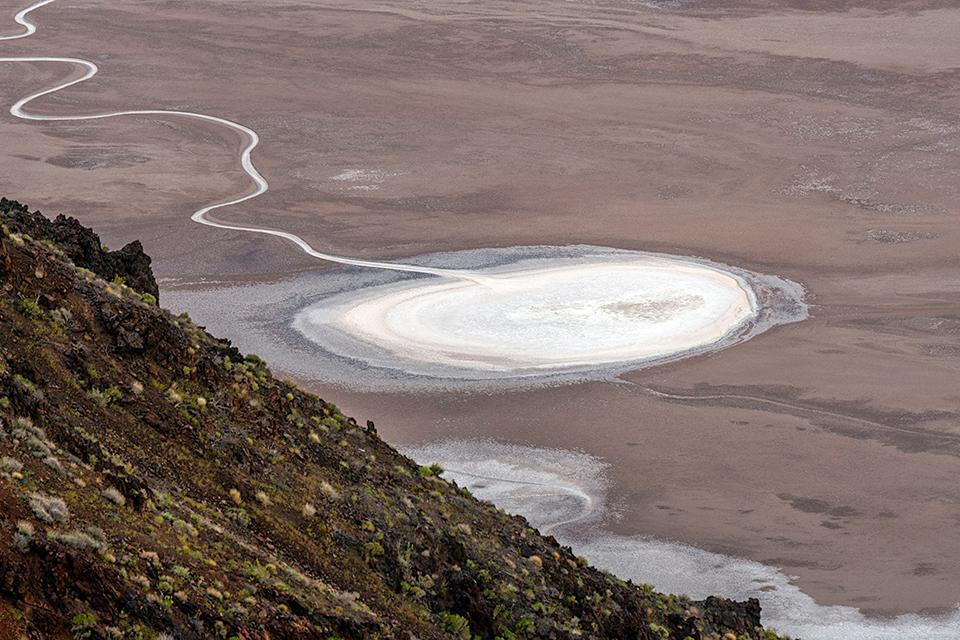
The salt trail to a salt flat at Badwater Basin – original view, Death Valley National Park / Rebecca Latson

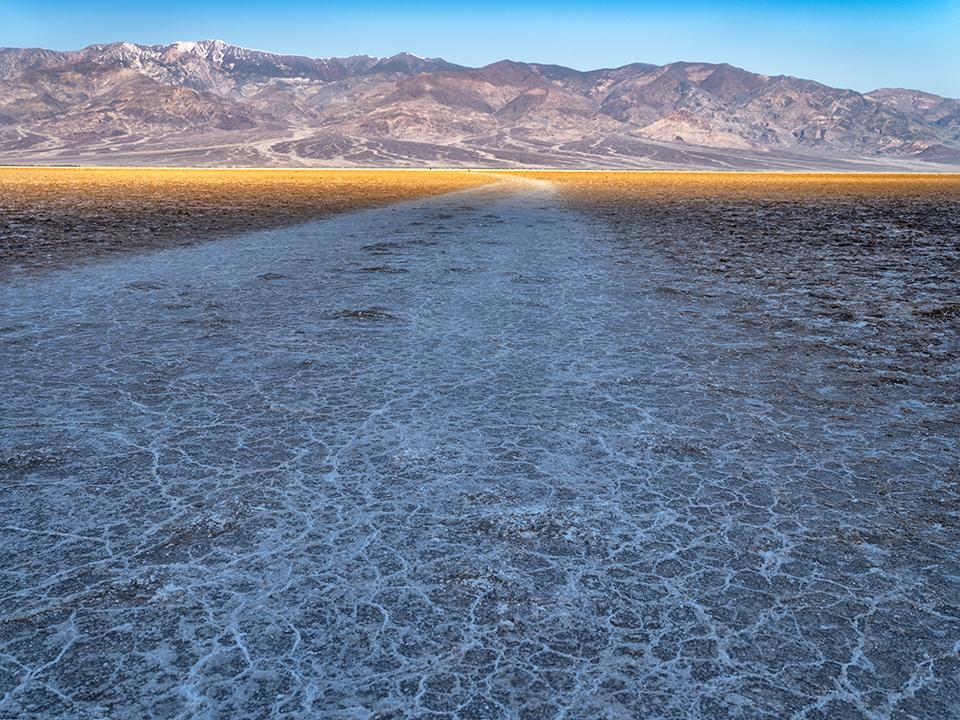
The salt trail to a salt flat at Badwater Basin – dehazed mountains, Death Valley National Park / Rebecca Latson

Despite the haze created by mid-May heat, this hottest, driest, lowest national park provides photographic surprises around every corner. A visit to Death Valley National Park, no matter what time of year, will win you over as completely as it’s done me. And like me, you might even wish to return for a second visit.

That one moment in time at Zabriskie Point, Death Valley National Park / Rebecca Latson

[ad_2]

It’s a great time for CT residents to view the night sky

[ad_1]

If you are interested in astronomy, there will be some excellent opportunities for viewing and photographing the night sky in the coming months. Spring (March – May) is known as “galaxy season” to amateur astronomers, with a greater number of galaxies visible in the night sky than any other time of year.

Many amateur astronomers take advantage of this time to observe and photograph these amazing objects.

Galaxies are huge swirling masses of stars, cosmic gas and dust held together by gravity. With the recent deployment of the James Webb telescope, we are learning much more about their age and origins. There are estimated to be billions of galaxies in the universe, each containing billions of stars. They are present in a variety of shapes and sizes, and typically span light years across. The galaxies we can observe are millions of light years away, and it is really amazing that we can see them at all at that distance, even with a telescope.

The Andromeda Galaxy is the closest galaxy to our Milky Way, at a distance of 2.5 million light years away.

Most of us have seen the amazing photographs of galaxies taken with the James Webb telescope, either in the news, on-line or in astronomy magazines. However, you may not know that a photograph taken from your own back yard with only amateur equipment can also reveal some excellent detail of deep sky objects, including the glowing stars present within the massive spiral arms of galaxies, and the regions of new star formation or “nebulosity” interwoven between them.

Unlike other forms of photography, astrophotography involves taking a series of long exposures or videos, and then processing them digitally afterward with a technique known as image “stacking.” This results in a much brighter composite final image with greater detail than would otherwise be possible. After capturing and saving the desired images on a laptop computer, image stacking can be done with a variety of different astronomy-specific software applications, and additional software can be used to give the photos their final touches.

When taking photos of galaxies or any other deep sky objects, selection of the right equipment is key. As far as the telescope itself is concerned, telescopes with shorter focal lengths and a wider field of view (such as a small refractor or reflector telescope) are best for beginners to learn on. As you gain expertise, telescopes with bigger apertures, longer focal lengths and a narrower field of view can also be used.

Cameras used for astrophotography have extremely sensitive optical sensors, specialized to gather dim light from distant objects, and are usually electronically cooled to reduce optical noise. A standard 35mm camera can also be used instead of an astronomy camera, but modifications may need to be made to achieve good results. The camera is typically connected to the back of a telescope and to a laptop computer, where images can be downloaded and viewed on the computer screen while capturing them. In addition, one of the most important pieces of equipment needed for astrophotography is a sturdy equatorial telescope mount, which automatically tracks the movement of the stars to allow in-focus images without star trails.

What is the best way to learn astrophotography? The most important thing you can do is to join a local amateur astronomy club, where you can go to observing events (aka “star parties”) and meet other like-minded amateur astronomers. Most clubs have members with a wide range of expertise and interests, and you can learn a lot in a very short time. I belong to the Thames Amateur Astronomical Society in southeast Connecticut, but there are also others in the state including the Astronomical Society of Greater Hartford and the Astronomical Society of New Haven. No matter where you are located, there is likely to be an amateur astronomy club in your area.

When learning this hobby there is also a lot of information available from various on-line forums such as the “Cloudy Nights” forum, where you can find others with the same equipment you have and post your questions. Other on-line resources that I have found useful for learning this hobby include web sites or you-tube channels for Heavenly Backyard Astronomy, Astroforum, Star Stuff, Martin’s Astrophotography, AstroBackyard and Late Night Astronomy. Last, I have found Astronomy Magazine to be a great source of information as it provides equipment reviews, good articles, and tips on what to look for in the night sky each month.

Whether you are an experienced or beginning amateur astronomer, I encourage you to try your hand at astrophotography, and galaxy season is a great time for that. Starting out in this hobby can be expensive, and can have a large learning curve, especially for those with little or no background in photography or astronomy. However, if you if you have the time and patience to learn, it can be a very rewarding and enjoyable hobby.

John Natale is an amateur astronomer and resident of East Haddam. For additional information on amateur astronomy or astrophotography, he can be contacted at [email protected].


[ad_2]

Summer travel: NZ’s best places for stargazing and sleeping under the stars

[ad_1]

Suspended high over Lake Wakatipu, Jagged Edge is just a 10-minute drive from Queenstown. Photo / Supplied

Balmy temperatures and no work to get up early for the next morning are the perfect combination for sleeping under the stars. Here are some of the best places in New Zealand to marvel at the night sky.

Stargazing

Aotea Great Barrier Island

Good Heavens offers cosy and light-hearted experiences for small groups, with “moon chairs”, hot drinks and blankets. Suitable for all ages, a guide uses a laser pointer to identify constellations, everyone has binoculars to gaze at middle-distance objects and an 8-inch telescope allows a closer view of faraway stars and planets. Great Barrier and Stewart Island (see below) are two of the world’s 15 Dark Sky Sanctuaries.

Good Heavens will guide you through our solar system from a beach on the Dark Sky Sanctuary, Aotea Great Barrier Island. Photo / Carmen Bird

The Coromandel

Advertisement

Advertise with NZME.

Stargazers Lodge guests and visitors can book a night-sky tour of the observatory and planetarium in the light pollution-free zone overlooking Kuaotunu. Its solar-powered, rotating-dome observatory houses a research-grade set-up, perfect for the astro-curious and photographers.

Wairarapa

Just an hour north of Wellington, Wairarapa wants to become the world’s largest and most accessible dark sky destination. Here you’ll find Stonehenge Aotearoa, built on the same scale as some other place on Salisbury Plain in England.

Advertisement

Advertise with NZME.

It’s not a folly. Open-air, hands-on Stonehenge Aotearoa is a modern observatory connecting people with the sky and cycles of nature, covering solstices, equinoxes, Matariki, ancient Egyptian, Babylonian and Indus Valley astronomy, Polynesian navigation, as well as Celtic and Māori lore.

Under the Stars runs bespoke events for schools or house parties, and every weekend, Star Safari opens the universe with powerful telescopes, planetarium tours and space science communicators. It’s a social enterprise from Milky-Way.Kiwi, an online platform for space and astronomy news with a New Zealand flavour.

Mackenzie

At 4367sq km, Aoraki Mackenzie International Dark Sky Reserve is a master of the universe, covering Aoraki Mt Cook National Park and the Mackenzie Basin, the townships of Tekapo, Twizel and Mt Cook. This rugged, isolated land, dominated by large sheep stations for more than a century, has some of the world’s clearest, most spectacular night skies.

As well as a great camping spot, Lake Tekapo is in the Aoraki Mackenzie International Dark Sky Reserve, making it one of the best spots in the world for stargazing. Photo / Miles Holden

Scientifically, it’s important because it protects the University of Canterbury’s astronomy research at Mt John Observatory.

Advertisement

Advertise with NZME.

A world leader in astro-tourism, there’s no end of inventive ideas here.

Alpha CruX provides private astronomy tours and astrophotography lessons throughout the region.

Big Sky Stargazing’s tour uses the naked eye, astro-binoculars and state-of-the-art telescopes, delivered from an outdoor viewing platform or, if the weather’s unkind, New Zealand’s first 360-degree digital Dome Planetarium at the Sir Edmund Hillary Centre in Mt Cook Village.

Here, science meets entertainment. Families “leave Earth, fly to the edge of our galaxy and far beyond to the reaches of our known universe” and get home in time for supper.

Chameleon Stargazing is a more budget and family-friendly tour in a near-zero light pollution location in Tekapo (with hot chocolate and a fire bowl with roasted marshmallows).

Ngāi Tahu Tourism’s Dark Sky Project is the best-known experience. Its observatory tours are boosted with explanations of Māori navigation, planting, significance of lunar cycles and observations.

Advertisement

Advertise with NZME.

West Coast

It’s fair to stay the West Coast’s skies are stunning on a clear night. Paparoa Nature Tours in Punakaiki take guests to explore the Milky Way and southern constellations through a computerised 260mm telescope while being serenaded by great spotted kiwi, morepork and weka from nearby rainforest.

Queenstown

A Starry Nights Queenstown photography tour with astro-photographer Simon Williams includes a trip around spectacular Whakatipu Basin locations in a Land Rover, a professionally curated photo session and tips on shooting stars.

Dark skies, southern lights - Rakiura Stewart Island is now a sanctuary for stargazing. Photo / Supplied
Dark skies, southern lights – Rakiura Stewart Island is now a sanctuary for stargazing. Photo / Supplied

Rakiura Stewart Island

A Unihedron Sky Quality Meter reading of 16 indicates a light-polluted city and 21 a very dark sky. Stewart Island’s readings have ranged between 21.51-21.93 since 2017. Twinkle Dark Sky Tours are one of several local operators helping you see everything from craters on the Moon to the centre of the galaxy.

Advertisement

Advertise with NZME.

Accommodation

PurePods

These luxury cabins can now be found in nine locations, stretching from Banks Peninsula to the newest on Rakiura Stewart Island. Each off-grid cabin has uninterrupted views of the night sky, but you don’t have to worry about people looking in — they’re all in secluded spots far from light pollution, with the exact location revealed only after you book. purepods.com

Night skies over the Manakau Purepod at Kaikōura. Photo / Supplied

Galaxy Boutique Hotel

Tekapo’s Galaxy Boutique Hotel is a traditional hotel with some stand-out features — namely, large splayed skylights that allow views of the mountains and night sky beyond. Make sure to nab a room on the upper floor for the best seat in the house. galaxytekapo.co.nz

Skylark Cabin

Hidden in the foothills of the Ben Ohau range is Skylark Cabin, which quietly opened in 2020, yet is the type of place that visitors can’t stop talking about. Designed by award-winning architect Barry Connor, it boasts a huge circular window directly over the bed, positioned so guests can spend a night under the stars. An outdoor stainless steel bathtub with gas-heated hot water can also be found on the property, making it possible to soak while you soak it all in. skylarkcabin.co.nz

Advertisement

Advertise with NZME.

Wai Dome O, Waikato

Wai Dome O (a play on “Waitomo”) is one of Canopy Camping’s properties — and it’s only a few minutes away from Waikato’s famous glowworm caves.

The geodesic dome is positioned at the top of a steep hill with views over rolling farmland, meaning it’s in a prime position for stargazing. But if you want to be even more immersed in the landscape, it also has an outdoor tub. canopycamping.co.nz/wai-dome-o

Nightsky Cottage

Side-by-side soaker tubs at Horopito’s award-winning Nightsky Cottage are positioned to look out a large window. The aptly named two-bedroom cottage also has skylights, so you can find constellations without stepping outside. But if you’re keen to get outdoors, there’s a clearing just 50 metres from the cottage, where you can watch the sun go down over Mt Ruaephu. nightskycottage.co.nz

Jagged Edge

Advertisement

Advertise with NZME.

Suspended high over Lake Wakatipu, the ultra-modern Jagged Edge is all sharp lines, softened by its use of floor-to-ceiling glass. The glass walls jut out from the base at an 18-degree angle rising to over 9 metres, resulting in 270-degree views of the night sky in each of the luxury retreat’s three bedrooms. But that’s not the end of your stargazing options. There’s also a heated infinity pool hanging over the lake, alongside numerous outdoor seating areas. It’s just a 10-minute drive from Queenstown.

This is an amended version of previously published stories by Ewan McDonald and Jessica Wynne Lockhart from Herald Travel. For more great travel inspiration, go to nzherald.co.nz/travel

[ad_2]

Astrophotography brings out passion and a feeling of permanence for this Colorado Springs woman

[ad_1]

Storing telescopes, mounts, tripods and cameras inside their home, the couple takes out all the heavy equipment to their backyard to try and capture an element in our universe not seen by the naked eye. This method of photography is called astrophotography — it goes beyond landscape photography to use a combination of lenses, computers and telescopes to capture a moment in deep space.  

You can go out in the summer and set up a tripod and a camera and a wide angle lens and do a long exposure … and get to see the stars in the Milky Way in the core and some beautiful details of the sky,” Marcus explained. “I would say the biggest difference between that and deep space astrophotography is with deep space astrophotography, you’re looking way closer in on a target.” 

To do that, Marcus and Miles must understand and keep track of what is happening in the sky above and when. Then given those parameters, they pick a target or two for the night, set up their equipment to get it polar aligned and then take long-exposure pictures for as long as possible — often lasting throughout the whole night.  

The idea is to capture a series of long-exposure images, which invite more light into the lens, to gather as much visual data as possible. Marcus and Miles’ equipment keeps them on the target throughout the night as the subject moves across the sky. The series of photos, which will be later layered on top of each other, add more detail to the image.  

As one might imagine, this hobby isn’t best served by partial commitment.  

“If you meet anybody in the astro[photography] community, they’re going to talk about the time that they spent on this,” said Marcus with a smile.  

On top of the time it takes to capture the images overnight, it takes about an hour to set up the equipment and a little bit less than that to take it down. While a lot of technology helps Marcus and Miles, they still must constantly check on the equipment throughout the night.  

“We got up to the observatory property last Friday night at about 7:00 and we left the next morning at 7:30. So, we were there for 12 and a half hours,” said Marcus.  

Marcus and Miles often take the deep space photos from just their backyard, but they also have connected with a person who has an observatory near Florissant, about 11 miles west of Pikes Peak. There they have access to power to operate their equipment, and it’s under a dark sky protected area and at high elevation. These conditions give Marcus and Miles an even better chance of capturing the beauty of the stars above.  

“When I go to a dark sky and I look up and I see these things, these stars, these brighter stars, it’s like I reaffirm that they’re still there as am I. Me and the universe, we’re on the same terms,” said Marcus.  

When Marcus returns to inside her home, she then has the immense task of stacking the images and pulling out the beauty from them. A single image can look like a smattering of stars, but as she is able to put several images together, nebulas, galaxies and other targets really start to take shape.  


[ad_2]

Travel trend: Why Astro Tourism is growing among domestic travellers in India? | Travel

[ad_1]

Travel enthusiasts, who crave a holistic astronomy experience to give voice to their curiosity about the vast skies beyond our stratosphere, can gain an integrated astronomy experience through Astro Tourism, a trend that has seen an increasing number of travellers who are keen to get to experience activities such as stargazing, sun observations, stargazing parties with friends, experiential science activities and much more. The spike in Astro Tourism could be a result of the post pandemic world where many people are looking for less crowded and nature driven experiences or the offer of a sense of discovery as when you look up at the sky, you may see a big white moon or two bright stars that never twinkle but when you look at them through the telescope, the moon suddenly has massive features (craters, flat grey surfaces, highlands, etc.) of varied colours and the two bright stars are no longer stars – one is Jupiter, a big disc with a giant red dot on it (which in itself is a storm three times the size of the Earth) and the other is Saturn, with many rings around it.


You literally cannot believe your eyes and you realise that the universe is so much more complex than what you see, with so much left to discover hence, a number of resorts and hotel chains are now offering stargazing as one of the activities for their guests to treat them to a flashback to their childhood. For a large number of people, the last time they looked at the skies and enjoyed the stars was when they were kids and ever since they turned into adults, they moved to a city and neither got the opportunity nor the time to experience the cosmos but looking up at the skies lets them relive their childhood.

In an interview with HT Lifestyle, Paul Savio, CEO and Co-Founder of Starscapes, revealed that Astro Tourism is seeing a spurt for three reasons:


(1) With higher disposable incomes and a more liberal view of living a wholesome life, people are on the lookout for new and exciting experiences that are beyond the usual offerings available. Anything new piques a huge interest, and today people are more willing to try them out than before.

(2) Millennials have, due to access to the internet in their formative years, a much more global exposure to life and career than previous generations. As parents, this demographic is open to encouraging their kids to look at radical career options, and therefore get exposed to such experiences that could kindle an interest in the kids becoming astrophysicists, aerospace engineers or even astronauts.

(3) Space is in the news, with NASA going back to the moon (Artemis), India sending humans to space (Gaganyaan) and space tourism kicking off with private enterprise (SpaceX, Virgin Galactic, Blue Origin). So it is currently top of mind.


He shared, “Lots of people, especially in metros, are beginning to step out to nearby dark sky locations to get a glimpse of the starry sky. Apart from the usual suspects (Ladakh, Spiti, Kodaikanal, Kutch, Coorg, Jaisalmer, etc.), myriad sites exist within 2 hours of all metros which can give a great dark sky experience. However, daytime astronomy as a concept is slowly picking up too.”

According to Neeraj Ladia, CEO of Space Arcade, there is a lot of interest in Astro tourism all over India. He said, “One major reason is social media. More and more people are showing people where they can travel. Places which were accessible for very few people earlier, like mountaineering and trekking, are now common among people. There are videos, reels on social media accounts where there is a lot of conversation around offbeat activities such as astro tourism. People have become more aware of these kinds of things. Astro tourism has gained more popularity post lockdown mainly because people want to be closer to nature and want to do something new and offbeat. Similarly, like wildlife photography/nature photography, people are developing an interest in astro photography too.”


Talking about some of the common activities under astro tourism, Paul Savio highlighted stargazing, sun observation, astrophotography (where you learn how to photograph the night sky and even deep sky objects using different cameras and mounts), astro tours (trips to dark sky locations for an enhanced night sky experience), workshops and activities to understand different phenomena associated with astrophysics and space exploration.

For a person who has never experienced astro tourism, Neeraj Ladia suggested stargazing as one of the most exciting activities to do. Secondly, he recommended, “If it is a starry clear night, guided telescope view of planets and deep sky objects along with an astrophotography session can be quite exciting. With astro tourism, people have an opportunity to see and learn the names of the stars and constellations. They can also go much deeper into understanding these concepts.”


Paul Savio concluded, “Astro Tourism is the sunrise segment of the experiential tourism industry. Massive interest is being shown by luxury resorts across India to incorporate astro-experiences in the bouquet of offerings for their guests. Today, the customer base is overwhelmingly of people who are looking for a new experience and not necessarily an astronomy experience. We expect this to flip in the next 3 years – people will travel with an intent to have an astronomy experience. This will be driven by the springing up of dark sky parks (the astronomy equivalent of national parks) and other dark sky places equipped to service this interest.”

[ad_2]