A photo collage app hidden inside Samsung smartphones by Jose Antunes

[ad_1]

A photo collage app hidden inside Samsung smartphonesThe photo collage app included in Samsung smartphones could mean the end of third-party apps, but it doesn’t work if you need large files as it only saves low-resolution files good for social media.

Samsung has a collage app hidden inside its smartphones… something I only discovered after a recent update. I’ve always use third-party collage apps and I have a third-party gallery – named… Gallery – that I use, so I never looked at the Gallery app from Samsung inside my S22 Ultra. It was only after a recent update that I looked at the gallery in more detail, as some of the new features interested me. To my surprise, after opening the “Create” tab, there was a Collage option. I had to check it!

The January update for my Samsung Galaxy S22 Ultra prompted me to check the new features and, curious about the changes, I checked them, only to discover what others have probably known for a while: OneUI 5.0 introduced collages that move, by mixing stills and videos from the gallery. It’s something I’ve tried in the desktop app Canva but never in my phone. Just checked it and it works but need some more time to try it before writing about the feature.

For now, I want to share my experience with the collage app in the Samsung Gallery. As I noted, I’ve used third-party photo collage making apps, a whole series of them, Polish, InCollage and Pixlr being names I remember using in my Xiaomi RedMi Note 10 Pro. I never felt compelled to buy any of them and in the Samsung S22 Ultra I’ve one installed that I find quite interesting, Ribbet, which apparently also has a desktop version. I’ll have to try that someday.

A photo collage app hidden inside Samsung smartphonesA version of my past self

I am not sharing content on social media, which may be one use for photo collages, but I like to explore designs and, when needed, a suitable selection of images is much more captivating than a single photo and may help a client go ahead with a project. Building narratives with collages is a good exercise and something I always tell people to do, whether they use a conventional camera or a smartphone. With the advantage, in a smartphone, that you can capture images, edit them and share them with family, friends, your social media followers… or clients in a matter of minutes.

Last Monday, for the first time since August, I headed out for a true photo session. The illness of my cat companion and model Yellow kept me home most of the time, without any desire or inspiration to do anything beyond the strictly necessary. I had to put Yellow to sleep on December 26, and it’s now, three weeks later, I find the time and courage to search for inspiration outdoors. With Spring coming around it’s time for flowers and that means a busy period of the year in terms of photography and video.

Armed with my Samsung Galaxy S22 Ultra, which I continue to use as a camera, I visited one of my regular outdoor spots, only to find a version of my past self: I came across a photographer carrying a heavy and long white lens and what looked like a heavy bag. Holding my smartphone on a ShoulderPod G2 grip and with my MindShiftGear belt pack – part of the Rotation 180 – packed with a small tripod, a power bank, connection cable and little more, I could not resist to say, “that looks heavy”, to what he replied a “yes, it is” that made me smile. It really felt like looking at a version of me in the past.

A photo collage app hidden inside Samsung smartphones

Smartphones for sundials

While photographing with a smartphone does create some challenges, I find that once you understand the limitations – and the kind of work you do allows to use a smartphone as a tool – it’s “business as usual”. One of the advantages, for editorial work, if you’ve access to the Internet, is how easy it is to send a series of photos right after taking them, to share ideas about a project while you’re in the field. I remember those old days, back in the early 80s – of last century – when I would phone back, from a phone booth to the newspaper desk to discuss aspects of a shoot that would take hours, as films had to be developed and printed after the images were captured. Now you’ve everything in a small device you carry in your pocket: camera, editing tools and ways to send images directly to editors.

Today’s images are good examples of how versatile a smartphone can be for outdoor photography and to show nature around you in detail. The focal range of the S22 Ultra, which goes from 13 to 230mm (with 13, 23, 70 and 230mm optical lenses) does help a lot. I’ve a lady friend who photographs sundials all around the country – some on top of church towers –  for a book and some other projects. Since I told her about the S22 Ultra she stopped using her Canon cameras most of the time, and she is happy with the results… and not having to carry too much gear. But I digress… let me get back to the collage app.

A photo collage app hidden inside Samsung smartphonesSamsung’s photo collage app

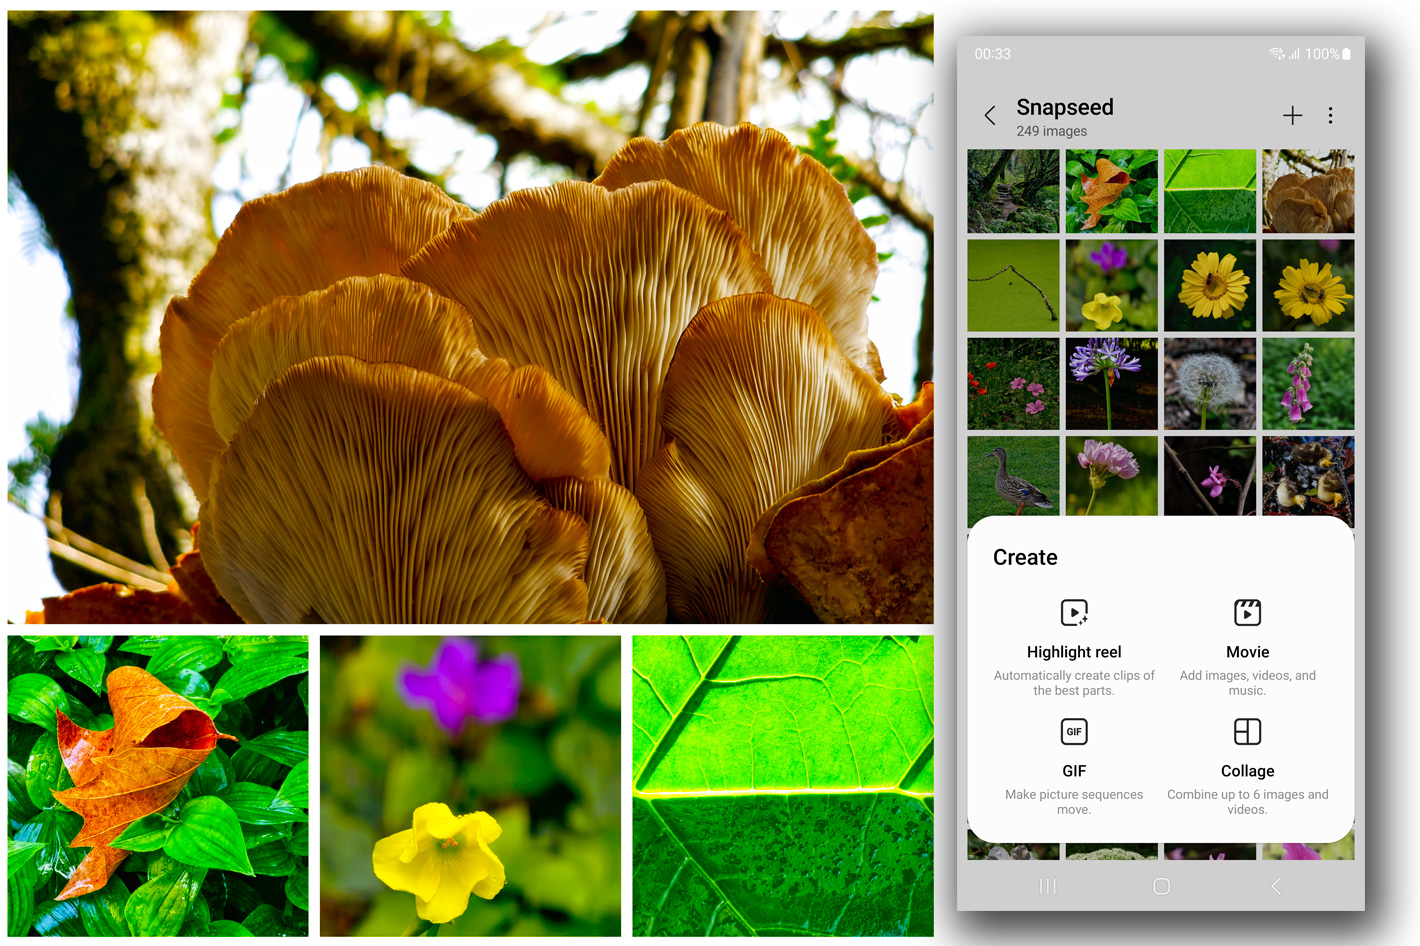
From the photographs created last Monday I picked six to create collages that illustrate this period of the year, Winter and the first signs of the coming Spring. These examples, from which I specially like the mushroom on a tree trunk, with the detail on the underside, show how smartphones are good for close up photography – and I am not talking macro – and to show textures, light and color. The resulting collages easily captivate viewers, with their boldness.

Workflow was simple: a quick edit in Snapseed, which, despite not begin updated in a long time, continues to be the app I prefer, even more than Lightroom, to edit the RAW images from the S22 Ultra, followed by a selection of the images for different collages in Samsung gallery. The app is simple and does not offer the options of most third-party apps, but I felt I had enough there to create the photo collages I wanted. It even has an option to adjust freely the size of the different containers within the collage, something not always present in this type of software.

I was so fascinated with the options that I grabbed multiple screen shots of the interface and a variety of layouts, to show the app, and saved some of the resulting collages. Then I decided to open them to see how they looked, and reality hit me: the collages from Samsung’s Gallery app are all low-resolution, good to share on the web but not usable for much more.

A photo collage app hidden inside Samsung smartphonesThird-party software is better

One example: the mushroom collage made using Ribbet has 3000×3000 pixels size and 4.79MB while the one from Samsung’s app has 2880 x 2880 pixels but only 0.97MB. Pixlr, another photo collage app I’ve used, goes even further: it allows you to define the size of the final collage. I opted for 5000×5000 pixels and got a final mushroom collage image with 12.47MB.

Ribbet also allows you to define the format to save the file – JPG or PNG – and the quality ( up to 100) besides offering the option to save the project, which generates a larger file (sometimes 40MB or more, depending on originals) and accepts RAW directly to the collage, something not possible with Samsung’s app. Another limitation is that Samsung’s apps only allows you to use up to six photos – and videos – per collage. So, despite all my initial excitement with Samsung’s collage options, I’ve to tell those interested that they should remember the app is only good for social media posts.

The files created with Samsung’s collage app are good enough for smartphone viewing and easy to share, but if you intend to do more with your collages – even open them on a computer screen – you may be better of using apps like Ribbet or Pixlr. Now you understand why they have a subscription model if you want more than the basic features. But even with the basic features, they do offer more than Samsung.

[ad_2]

Beginners guide to astrophotography

[ad_1]


null


© Merrillie/Getty Images
null

This beginners guide to astrophotography will show you everything you need to know to start photographing the night sky, from which camera and lenses to use, finding the best locations, and which celestial objects to look for.

While astrophotography can be one of the most rewarding styles of photography, it’s also one of the hardest, and most frustrating and time consuming. You definitely need to do your research before you head out into the field, so we’ve put together this guide on everything you’ll need to know to get you started and get the results you’re hoping for. 

In this guide we are going to cover what to look for in a camera, which lenses suit astrophotography best, what settings to use to get epic results, as well as other must-have accessories. We’ll also offer tips on finding a good location and recommend good targets for beginners to look for in the night sky, plus handy apps and software to use to be able to find them. You may also want to check out the best astronomy books to learn more about the cosmos.

My first attempt at astrophotography was, in short, a complete disaster. After speaking to other photographers, it turns out that a bad astro shoot is a bit of a rite of passage. So, don’t get disheartened if it doesn’t quite work out the way you want at first. On my shoot I’d left the quick release plate on a different camera at home, which rendered my tripod completely useless, and I had to balance the camera on a blanket on the ground. We also didn’t scout our exact composition beforehand, so we got lost on a golf course and ran into a herd of cows in the dark, and, as it was a coastal location, I ended up with half the beach in my shoes. 

Thankfully, the shot turned out well despite all of that, but it’s often the small things you tend to not think about which end up having a big impact, so it’s best to plan for all scenarios if you want a successful shoot. With that in mind, let’s dive in and run through our top tips for astrophotography.

Choosing the right camera

When it comes to choosing equipment for astrophotography, generally speaking, the lens is usually more important than the camera. The main factors to consider in a camera when it comes to doing astrophotography is its ISO sensitivity, sensor size, and megapixels. The camera’s size and weight should also be something to consider if you’re going to be hiking to certain locations.

ISO can be a tricky one here, as you need to be able to crank the ISO up high enough so your shots aren’t completely dark. However, setting it too high can result in too much noise that will ruin your shot. Finding a camera that has a good ISO sensitivity and performs well in low light situations is a big advantage for astrophotography – take a look at our guide on the best astrophotography cameras for some top recommendations.

Full frame cameras are preferable for astrophotography as they have the bigger sensor and a higher megapixel camera will give better quality, more detailed images, but they are obviously at the pricier end of the spectrum. If you want to take a lot of shots and stack them to create more detailed images, choosing a camera that has “interval shooting” will save you a lot of time and stress when you’re shooting.

Lenses

Lens choice is an important one for astrophotography, and you really do get what you pay for here. What lens you choose Your really does depend on what kind of astrophotography you want to do, because that will determine which focal length you should go for. If you want to do deep sky photography of nebulas, galaxies, planets, etc., then a longer focal length is better for that, but for milky way shots with a bit of foreground, you want as wide as possible. Sadly, there isn’t a lens out there that can do both well. 

Aperture is also important when choosing a lens, as you want as wide an aperture as possible (aka a lower f number). Prime lenses with a fixed focal length are usually preferable for astrophotography because they have wider apertures than zoom lenses, and you can get more detailed shots with them. For wide prime lenses, Sony’s 20mm f/1.8 is a very popular lens for astro, or if you have the budget for it, the Sony 14mm f/1.8 is also fantastic. For longer lenses, anything above 200mm will perform well – you can also attach them to a telescope if you have one. Sigma and other third parties also do some great lenses for astrophotography if you don’t have the budget for native lenses.

Camera settings

It’s all well and good having a great camera, but it won’t be of much use if you don’t know which settings to use for astrophotography. There is a certain degree of trial and error involved here depending on what you want to capture, plus the light levels in your chosen location will also have an effect. You’ll want your shutter speed to be long enough to let as much light in as possible, but not too long where everything starts to trail (unless star trails are what you’re going for). 

How do you figure out where the sweet spot is, you ask? By using the 500 rule: you divide 500 by the focal length of the lens you’re using, and that will give you the amount of time you can have your shutter open for before everything starts to trail. So, if you’re using a 20mm lens, 500 divided by 20 is 25, so your shutter speed can be up to 25 seconds. 

For aperture, you generally want it as low as it can go to let as much light into the lens as possible – this is why prime lenses are better for astrophotography as they generally have lower apertures. With ISO, it largely depends on your camera’s capabilities and the ambient light levels – somewhere around 1,600 is usually a good place to start, then you can adjust it as necessary by taking a few test shots.

Locations and how to find them

While you may be thinking that the location for astrophotography is, well… the sky, there’s a little more to it than that. Particularly if you want some sort of landscape or vista in your shot as well as the starry sky, you’re going to need to pick your location wisely. You want to select somewhere where there’s as little light pollution as possible – think national parks and big natural spaces, far away from towns and cities.

To get an idea on good dark sky locations in your area, check out this light pollution map and dark site finder before you plan your trip so you can make sure your shot isn’t ruined by excessive light.

In terms of finding a composition in your location, try going there before it gets dark to work out a composition you like, then once its dark you’re already in the right place. You can also check out Google Maps to scout a location before you go to give you a general idea of where you want to be.

Other accessories

As I found out the hard way, a tripod is pretty necessary for a successful astrophotography shoot. As the shutter needs to be open for anywhere up to 25/30 seconds, it’s simply impossible to use it handheld, and even my blanket-on-the-ground method involved a certain amount of problems. As the camera needs to be as still as possible, a sturdy tripod is your best bet, or one that has a weight hook on the central column so you can hang your camera bag on it to weigh the tripod down. 

Having a remote shutter release also makes life a lot easier when shooting the night sky, as you eliminate the risk of moving the camera slightly when pressing the shutter button on the body. These are very affordable and easy to keep in your camera bag, although you can just use the timer on your camera if you don’t have one. Once you get a bit more advanced you could also invest in a star tracker, particularly if you want to take a lot of shots to stack them, as it will be able to track and follow the stars as they move without you having to readjust your composition.

Targets in the sky

Now that you’ve got your gear and your location sorted, you can start finding things in the sky to photograph. If you’re wanting to shoot wide angle, shooting the milky way can be a great way to hone your astro skills. For longer focal lengths you could try the Orion Nebula, Andromeda galaxy, or even just the moon and other planets. 

This aspect of astrophotography is what takes planning, as you need to know when a certain object is going to be visible in the sky, and at what time of night (or even what time of year). There are a ton of great smartphone apps out there that are good for this, such as Stellarium (free), The Photographer’s Ephemeris (sign up for free), and PhotoPills ($10.99, but jam-packed full of handy features) to name a few.

Once you find an object you want to shoot, these apps can show you where exactly it’s going to be over the course of the night, so you can plan your composition accordingly to get it in the right place in your image. Milky Way season is usually somewhere between late February to late September (weather you’re in the Northern or Southern Hemisphere), so make sure you check how high in the sky it’s going to be in your chosen location.

In general, you want to make sure you’re shooting on a clear night, at either a new moon or when the moon isn’t visible in the sky as that will create more light – unless the thing you want to shoot is the moon! So be sure keep tabs on the upcoming phases of the moon so you can get that perfect picture.

[ad_2]

Artists Nadya And Olga Creates Beautiful Miniature Ceramic Sculptures

[ad_1]


Russian artists Nadya and Olga creates beautiful miniature ceramic sculptures with lovely details. They love to create ceramics ornate with enchanting figure sculptures in miniature that look like characters from children’s storybooks. Nadya and Olga, both of them are 37. They are best friends since childhood. They are different, but united by love with ceramics and art.

Scroll down and inspire yourself. Check Carlos Cabo’s Website and Instagram for more information.

You can find more info about Nadya and Olga:

#1

Decorated Ceramics By Nadya and Olga

#2

Decorated Ceramics By Nadya and Olga

#3

Decorated Ceramics By Nadya and Olga

#4

Decorated Ceramics By Nadya and Olga

#5

Decorated Ceramics By Nadya and Olga

#6

Decorated Ceramics By Nadya and Olga

#7

Decorated Ceramics By Nadya and Olga

#8

Decorated Ceramics By Nadya and Olga

#9

Decorated Ceramics By Nadya and Olga

#10

Decorated Ceramics By Nadya and Olga

#11

Decorated Ceramics By Nadya and Olga

#12

Decorated Ceramics By Nadya and Olga

#13

Decorated Ceramics By Nadya and Olga

#14

Decorated Ceramics By Nadya and Olga

#15

Decorated Ceramics By Nadya and Olga

#16

Decorated Ceramics By Nadya and Olga

#17

Decorated Ceramics By Nadya and Olga

#18

Decorated Ceramics By Nadya and Olga

#19

Decorated Ceramics By Nadya and Olga

#20

Decorated Ceramics By Nadya and Olga


Related Articles:


[ad_2]

Royal College of Physicians Museum archives in photography

[ad_1]

Showing at the Royal College of Physicians Museum, London, from 23 January 2023, photography exhibition ‘Unfamiliar’ frames clinical objects from the museum’s archives in a compelling new light.

‘Unfamiliar’ at Royal College of Physicians Museum 

Photographer Theo Deproost’s take on the historic clinical tools carefully selected by physician associate Debbie Jegede brings art and science into one common realm, and places unlikely objects at the core of an exhibition. The photographs see snuff boxes, stethoscopes and items unidentifiable to the clinically uneducated eye suspended in an otherworldly cloud of colour and contrast. 

Clinical glass vessel with stoppers photographed in abstract way for 'unfamiliar' at the royal college of physicians museum in london, by theo deproost

(Image credit: Photography: Theo Deproost)

The original objects, from the museum’s clinical and fine art collections, are displayed alongside the images. As co-curators, Deproost and Jegede have ensured they ‘honour the historical significance of the objects whilst also transporting them to a realm beyond any specific time period’, says Deproost. In doing so they have created ‘a new, undefined space for the viewer to study and re-interpret the items’.

‘This exhibition presents something very different for the Royal College of Physicians Museum,’ says Lowri Jones, senior curator of the museum. Using the unfamiliarity of the items as an obvious starting point, Deproost’s photographic style introduces further layers of intrigue. 

Clinical glass vessel photographed in abstract way on purple background

(Image credit: Photography: Theo Deproost)

Jones considered the unique nature of the exhibition in comparison to previous shows at the museum, valuing the chance to be able ‘to bring together Debbie and Theo’s contrasting medical and artistic backgrounds’. She adds that the exhibition ‘demonstrates how effective collaborations between the arts and sciences can be’.


[ad_2]

See the Gamma Ursae Minorid meteor shower peak on Thursday (Jan. 19)

[ad_1]

The annual Gamma-Ursae Minorid meteor shower peaks on Thursday (Jan.19), offering eagle-eyed skywatchers who are willing to brave the cold the opportunity to view meteorites through the night. 

The shower, which this year is active between Jan. 15 and Jan. 25, will peak at 11:00 a.m. EST (1600 GMT) so the best time to spot meteors is in dark skies either before dawn or after dusk on Thursday.


[ad_2]

Disrupting the photography landscape

[ad_1]

“We’ve just been through this huge global upheaval – we can’t really expect audiences and people in society to go back to the way it was. So what does that mean for museums and public spaces?”

Asking this question is Shoair Mavlian, who is joining the Photographers’ Gallery in London as its new director at the end of the month. “The pandemic feels like it’s a long way behind us, but actually, we’re just beginning to see the changes from that now.” To her, the gallery’s long-term success will be an exercise in “keeping an open mind and asking questions: what kind of museum do we want to build for the future?”

Openness and reinvention aren’t often associated with arts institutions, which can be steeped in history and legacy to their own detriment. But the Photographers’ Gallery, which turned 50 in 2021, is no dinosaur. The organisation is known for its somewhat radical approach to running a gallery – both for daring to position photography as an art form when the gallery was first founded, and in the more recent launch of its digital programme, which boldly questions the medium in today’s society.

Shoair Mavlian

[ad_2]

Inverness Camera Club president’s wife bitten on African safari

[ad_1]

Owen and Evelyn Cochrane.

INVERNESS Camera Club president Owen Cochrane’s wife Evelyn took him on an African photo safari to celebrate a big birthday – and was bitten by the photography bug to the extent she is now also winning prizes for her pictures.

Owen has been club president for seven years, and ordinarily enjoys photographing nature, landscapes and rugby.

But for his landmark 60th birthday, Evelyn helped him celebrate with a Pangolin Photo Safari on ther River Chobe in Botswana.

As part of the trip, Evelyn received expert photographic tuition, and on her return joined Inverness Camera Club – winning first and second place prizes for her images.

She said: “I wouldn’t say I was a photographer just yet, but I enjoy the creative aspect of the camera.

“Two of my African images won prizes as well another on the theme of power where I took a shot of a battery made from two limes. It’s probably not that good technically, but it was a bit off the wall.

“I think we have been bitten by the safari bug as we are now planning a third African trip.”

Owen, a global IT leader for Johnson & Johnson, said: “My parents gave me a camera for my 21st birthday, but it was only when we came to live in Inverness 10 years ago that I really took up photography seriously.

“Evelyn has always referred to herself as a ‘photography widow’ and has been known to sit in the car with a book while I go out taking pictures. But thanks to this trip she now loves it, and is taking some amazing photographs.”

In Botswana the Cochranes were able to get close to animals such as baboons and giraffes on the Chobe River including one encounter that was just a bit too close for comfort.

Owen said: “An elephant decided to wander in our direction. The guide told everyone not to move, but I had my camera trained on the elephant in silent mode.

“The elephant came closer and closer to the Jeep, to the point where it was so close that my camera could no longer focus about a metre away.

“The elephant nudged the vehicle a little bit, enough to make it move, flapped its ears and wandered off. We could all breathe again!”

Tusker gets close...
Tusker gets close…
Closer...
Closer…
A bit too close...
A bit too close…

Following the couple’s first trip in June, they again travelled to Botswana to attend the Chobe Birding Festival.

Owen added: “Since the first trip I have done lots of presentations at different camera clubs, and have recommended this experience. We were treated so well and the tuition was exceptional.”


Do you want to respond to this article? If so, click here to submit your thoughts and they may be published in print.

[ad_2]

How to Find and Photograph Comet C/2022 E3 ZTF: Your Once in a 50,000 Year Chance

[ad_1]

Astrophotographers and even regular photographers have a chance at a comet that is now appearing in our early morning, pre-dawn skies. I’m talking about Comet C/2022 E3 ZTF, rapidly approaching its closest encounter with our sun. It hasn’t been to our part of the solar system for about 50,000 years. It’s a striking green in color, and not all comets are, so it’s created a stir among astrophotographers.

It could be the first naked eye comet since Neowise, which graced our night skies in the summer of 2020.

Comet C/2022 E3 ZTF was discovered in March of last year by the f/2.4 Schmidt telescope at Mt. Palomar. It was very dim then, but as it approaches the sun it is steadily brightening. 

Where Is C/2022 E3 ZTF?

For the next couple of weeks, observers in the Northern Hemisphere can spot it in the Northeastern sky. The BBC Website has some good info on finding the comet.

Look for the comet above the northeastern horizon after midnight between the constellations of Hercules and Bootes.

By the third week of January, the comet will become circumpolar for mid-northern latitude viewers. Then, the comet will be visible after sunset and all night long for viewers in the Northern Hemisphere. On January 29, it will pass close to Polaris, the North Star. If it brightens up to say, the 5th magnitude, it should be visible to naked eye observers away from city lights. 

By February, the Moon will be growing brighter, making observations difficult. Here’s a chart from NASA that will help you locate the comet.

If you want to capture it, you can probably do it with a medium to long lens (80-200mm) because the object is small. Don’t expect a dramatic tail on the comet, but that could change. You’re looking for basically a smudge.

Capturing the Comet

If you’re going to give the comet a go in the Northern Hemisphere, try around the 25th of this month, after 10 pm. The moon won’t interfere on that date. Using the chart below, point your DSLR or mirrorless camera to the area shown that matches the date. You’ll want to be at least ISO 400 or higher, but you’ll get more noise as the ISO increases. A tripod, of course, will be required. About 15 seconds, is the maximum exposure to avoid star trailing, unless you have a tracking mount.

By some reports, it’s approaching Magnitude 7, not a naked eye object, but visible with a longer exposure.

I gave the comet a try on January 13 from Arizona. Sadly, there were a lot of high clouds. 

I wasn’t too impressed with what I got by stacking 10 30-second exposures on a tracking mount. There was only a hint of a tail, but I expect the comet to become brighter with more of a tail as the month progresses.

Comets are somewhat unpredictable, so it may get a lot brighter or fade. Still, naked eye comets are rare, and this one won’t be back for another 50,000 years, so the next couple of weeks are your only chance.  

If you get some worthwhile shots of our cosmic visitor, please send it along in the comments. Good hunting.


[ad_2]

Ranbir Kapoor’s Forever Muse Alia Bhatt Reviews His Photography Skills

[ad_1]

Ranbir Kapoor with Alia Bhatt. (courtesy: aliaabhatt)

New Delhi:

Alia Bhatt and Ranbir Kapoor attended a calendar launch event at the Mumbai Press Club on Wednesday night. During the event, Alia Bhatt talked about husband Ranbir’s photography skills and said, “Pehle toh chhupa rustam, bahut achhe photographer yahan hain ( first of all, a very good photographer is here).” She added, “He isn’t on Instagram but the best pictures I have ever seen in my life anybody take is Ranbir. He always says that for you to take a good picture, you need to love the object more than you love yourself. That’s what he keeps telling me.” She added, “I can’t take good pictures.”

Alia Bhatt, Ranbir Kapoor’s forever muse, loves to “casually flex” Ranbir Kapoor’s photography skills. Back when the Dear Zindagi actress and Ranbir ushered in 2022 together, she shared shots from their holiday and she wrote: “Casually flexing my boyfriend’s photography skills.”

“All I need is sunsets and you…. Taking my pictures,” wrote Alia Bhatt, sharing this picture clicked by Ranbir Kapoor.

In pics: Alia Bhatt through the eyes of Ranbir Kapoor.

“Credit to my all time fav photographer RK,” read the caption on Alia’s post from 2020.

Alia  Bhatt and husband Ranbir Kapoor welcomed their first child, a daughter in November last year. They named her Raha. Alia Bhatt married her Brahmastra co-star Ranbir Kapoor in April last year at their house Vastu, in front of a few family members and close friends. The star couple had been dating for over 5 years before getting married.


[ad_2]

GUMMERSON, Rachelle (née Poitras) – Obituary – Guelph

[ad_1]

Passed away peacefully with her family by her side early afternoon Monday, January 16th, 2023. She is predeceased by her loving parents, Georges Poitras, Françoise Gagné, her stepfather Eugène Gagné, sisters Lucie, Pauline, Annette, Carmen, Simone, brothers Paul, Maurice, Henri, Raoul, Gérard.

She leaves behind her loving husband Richard Gummerson, daughters Samantha Smith (Shayne), Laura Pollock (Logan), Allison Smith (Shawn), Leahan Gummerson (Daniel), stepson Ryan Gummerson, sisters Michelle Lawrence (Larry), Diane Bourgon (Reynald), Judith Rouleau (Jean-Guy), and her grandchildren, Shea, Iris, Leo, Charlie, Ella, Scott, Marshall, Myles and Georgie and many beloved nieces, nephews and cousins.

Rachelle was a teacher for 20 years and formed many lifelong friendships during her career. In the last few years she was able to enjoy a short but fulfilling retirement with her husband, in their dream home in Southampton. She loved walking on the beach collecting rocks and was passionate about nature photography. Her daughters share many fond memories of camping trips, beach days and loud singing in the car. She always enjoyed playing games, especially Trivial Pursuit with her twin sister and their husbands. She was always exploring her creativity through watercolour painting, colouring, drawing and textile art. She took pride in turning houses into warm and welcoming homes. You could often find her gardening, caring for her houseplants, reading, or cooking from her favourite recipe book.

She will be fondly remembered as a mother, wife, sister, grandmother, friend and teacher. She shaped the lives of those around her with her kindness, empathy, and big heart. She found a friend in everyone. She is deeply missed.

The family wishes to thank the incredible staff at Southampton Hospital, and her oncology team in Owen Sound for their outstanding care, compassion and support.

Family and friends will be received at the WALL-CUSTANCE FUNERAL HOME & CHAPEL, 206 Norfolk St., Guelph, Sunday January 22, 2023, from 1-4 pm. A private funeral service will be held in the funeral home chapel.  

In lieu of flowers, the family asks for donations on Rachelle’s behalf to the Breast Cancer Society of Canada, or the Saugeen Memorial Hospital Foundation.


A tree will be planted in memory of Rachelle Gummerson in the Wall-Custance Memorial Forest.


[ad_2]