Longer exposures versus multiple shorter exposures

[ad_1]

Which is better: many short exposures or fewer long exposures? 120 x 1 minute exposures or 10 x 12 minute exposures? Questions similar to this one get asked really often and they probably receive all kinds of different answers. People talk about the camera, faintness of the signal, dithering, stacking, light pollution etc. etc. So many factors creep into the discussion that sooner or later it will seem like a personal choice, almost like a matter of opinion. Is this really a matter of opinion and/or complicated? Or can we find some definitive answer to the question if more shorter exposures are better than fewer longer exposures?
Actually, it turns out that although there are formulas for ideal (theoretical!) exposure times, personal preferences and opinion and practicality will come into play in reality when determining the exposure you want to be using.
Knowing how the subexposure time will impact the SNR of your stacked image will help you to determine the exposure time you choose to use. Please bear with me while we explore the way to determine this optimum exposure time, which will include quite a bit of math. I find that going over the math and actually calculate the SNR for a few different scenarios helps greatly in my understanding of this matter. So I encourage you to follow along with the math. For those who are mostly interested in the key take aways I’ll start with those in a short summary, before diving into details and the math further on.

Key take aways

When you are imaging under light polluted skies, you should not worry about your exposure times. It will make very little to no difference if you are using subexposures of 30sec. or 3minutes. It’s the total integration time that matters.
If you are imaging under dark skies, you will benefit from longer exposures in terms of SNR. However, it’s not worth it to go to extremes and keep in mind the cost of throwing out a subexposure due to poor tracking for instance. Only increase exposure time if you can reliable track accurately for that long.
If you don’t use darks and/or want to use dithered (bayer) drizzel integration, make sure you get at least 10 to 15 subexposures.

Now that we’ve learned not to worry about subexposure time under light polluted skies and give subexposure time priority under dark skies, let’s see why this is the case and how we arrive at these conclusions.

Read noise and background sky flux

To determine the optimum exposure it basically comes down to these two factors; read noise and the background sky flux.
The read noise is the noise that occurs within the electronics of the camera when we convert the electrons coming from the sensor into digital units (ADU) and store them. The background sky flux is the signal coming from the light pollution, moon light and/or air glow. The background is never completely black and the value of the background signal is the background sky flux.

If the read noise is swamped by sky background noise it becomes irrelevant and it doesn’t matter how long our subexposures are

If we wouldn’t have read noise, it wouldn’t matter if we take one very long exposure or many shorter exposures with the same total integration time. If we wouldn’t have background sky noise but do have read noise, the longer exposure would always have better SNR than many shorter exposures.
In reality we always have to deal with some sort of mixture of these two scenarios. There will always be some background sky noise and read noise is always a factor to take into account. Especially for us DLSR users. So how should we take those two factors into account? Well, it comes down to determining the point where the sky background noise will make the read noise irrelevant. Whenever this is the case, it doesn’t matter any more if we take many shorter or fewer longer exposures.
So if you are imaging under strong light pollution this probably applies to you. Alternatively, if you are using narrowband imaging and/or if you are under truly dark skies, it will be practically impossible to reach this point and so the longer exposures will always be better.
Now let’s research why this is the case and look at some test results;

Adding multiple exposures and SNR

Let’s look at what exactly happens to the SNR when we add multiple exposures and when we expose longer. We will dive into some math here and I will try to do this step by step and as clear as possible. I know lot’s of articles will skip steps and rewrite formulas without explaining how or why which I’ll try to avoid.

The SNR is simply the Signal divided by the noise. Sounds simple, but with different noise sources we need to dive in a bit deeper and see how we add noise. But first let’s define the term Signal exactly: S = signal per second (s) * time of the exposure (t) * number of exposures (N). So
To be clear; this is the total amount of signal recorded over multiple exposures.
Next let’s consider the noise sources we are dealing with here: Object shot noise, sky (shot) noise, dark current noise and read noise. Whenever we are dealing with detecting photons we deal with shot noise. This shot noise is the square root of the number of photons. This noise is also building up over time just like the signal. So in terms of the object shot noise, it is the noise associated with the signal of the object(s) we are imaging and is the square root of the signal.

For sky shot noise it is the square root of the background signal coming from the sky over time.

For the dark current noise it is the square root of the thermal signal (dark current) build up.

The read noise is different in the sense that this doesn’t build up over time but it does occur once for every exposure. This is important to realise. The total read out noise (RonTot) is:

We can sum random, uncorrelated noise by adding them quadratically so we get the following formula for the total amount of noise:

Remember the fact that the shot noise is the square root of the Signal source. So if we add this quadratically we can rewrite the Noise in terms of the signal like this:

Since the number of exposures (N) is present in each term we can rewrite this as:

or

So the formula for the SNR is:

Notice we have N as a term present in both parts of the division. Since we can rewrite the above formula into:

Now we have written the formula down for SNR in this useful format, we can explore what the impact of the background sky flux and the read noise is on the SNR.

Scenario with no read noise

Maybe you start to see now what we said earlier; if we wouldn’t have read noise it wouldn’t matter how long we expose as long as the total exposure time is the same. Let’s just take out the read noise (RN) out of the above equation. Without read noise the SNR will be:

Since we have t present now in every term we can group it:

which is the same as

and as we’ve seen before we can write this down as

Now we can see it doesn’t matter for the SNR how we fill in values for N and t as long as N*t = the same value. So only total exposure time matters (N*t) and not how we divide it in subexposures.
But wait, what about really faint signal? Don’t you need very long exposures for that? Well, not in this case where we don’t have read noise. You just need (very) long total exposure time. If we look at the above formula this is clear, but if we think of stacking and consider that we are averaging there this might seem less intuitive all of a sudden. Because, the average of a few electrons collected by many frames is smaller than the average of a few electrons in one frame right? Well, sure that is correct of course. However, this is only considering signal. And it is not useful to talk about signal alone, we always need to talk about SNR. That alone determines if you will have detected signal that will stand out in an image or not.
And if we consider the fact that SNR = simply signal / noise you’ll realise it doesn’t matter in how many frames we detected the signal, since we’ll only end up dividing both terms of the division which doesn’t change anything ((a*b)/(a*c) = (a/a) * (b/c) = 1*(b/c) = (b/c))
So yes, it’s true that if read noise wouldn’t exist it doesn’t matter what exposure time you use and how many exposures you take, all that matters is the total integration time. And even with read noise included in the formula, you can see that once the other values are much much bigger than the read noise, the same will apply; the read noise becomes (almost) irrelevant and we are left in the situation where it doesn’t matter what exposure time you use.

once the other noise values are much much bigger than the read noise, the read noise becomes (almost) irrelevant and we are left in the situation where it doesn’t matter what exposure time you use.

Scenario with little to no sky noise

Alternatively, consider the scenario where we are under a truly dark sky with no light pollution, no moon light and only a little sky glow; we have very little background sky signal (Sky_s). Let’s consider the SNR formula again:

Now let’s say the DarkCurrent_s = 0.15e-/sec (which I found reported for the Nikon D7000), Sky_s = 1e- / sec and read noise = 3e- (Nikon D7000 @ ISO200). If we take a very faint signal that’s similar to the sky flux we will see the following SNR values for different number of exposure times but same total exposure time:
Let’s compare scenarios with a total integration time of 120 minutes and compare 120x1min and 12x10min.

120x1min:

12x10min:

Ok, so SNR is higher indeed as expected. What if we take this to the extreme and just take 1 image of 120min?

1x120min:

Hmmm, that’s a really small improvement over the 12x10min exposure. Clearly this is a case of (quickly) diminishing returns. I made a graph showing the SNR gains compared to a 30sec exposure SNR for exposures between 30sec and 120min to show the benefit of exposing longer in this scenario:
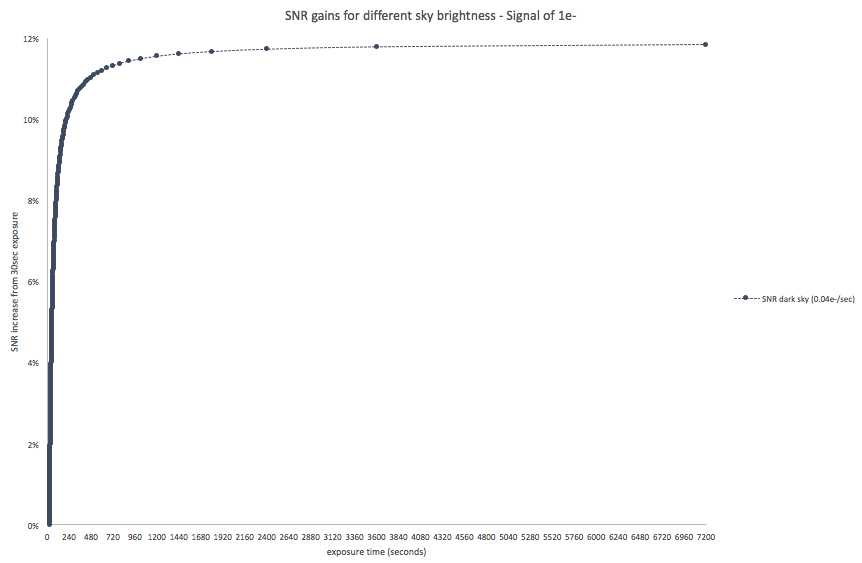
This graph paints quite a clear picture I’d say. In case of a dark sky, the gains in SNR while exposing longer is quite big in the beginning and reaches a 10% improvement already at 3,5minutes exposures compared to 30sec exposures. The improvements tail off quickly as well though, reaching only a further 1% improvement at 8 minutes compared to the 30sec exposures. To be clear; in this scenario, the difference between exposing 3.5minutes and 8 minutes (with the same total integration time) is even slightly less than 1% improvement.
Please note that these gains are dependant on the signal coming from our target object as well. So if we would take a much fainter object with a flux of only 0.2e- compared to the 1e- we just saw, we get the following graph:
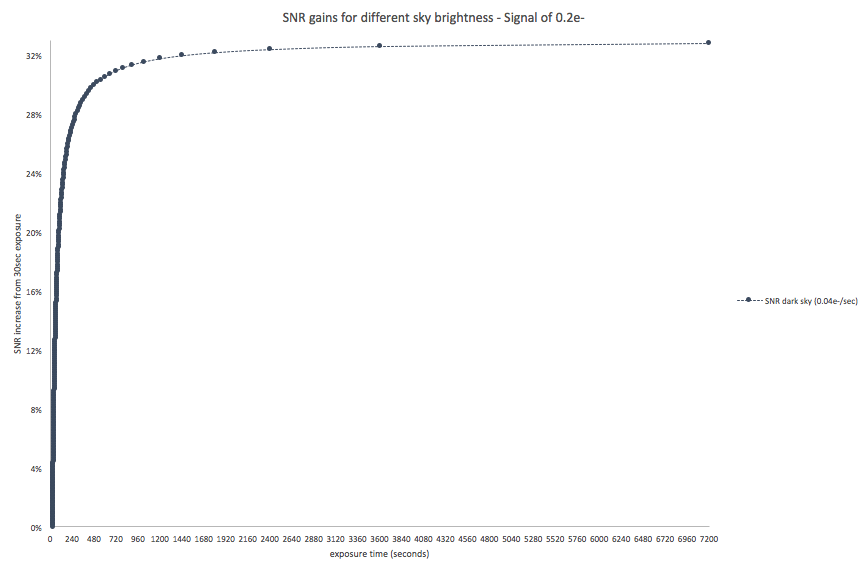
Wow! we can see the same strong curve with diminishing returns, but the SNR improvements for a fainter signal are clearly much much higher! Let’s look at the same minute marks as before: using 3.5 minutes exposures compared to 30sec exposures gives you an SNR improvement of 26.3%. Going from 3.5 minutes to 8 minutes gives you a further improvement of 2.86%. So even though we still see strong diminishing returns, the improvements remain significant up till longer exposures as before.
In this scenario, the improvement in SNR between 8 and 15 minutes still is 1%.
Please note that we’re talking about signal coming from the sensor here. So this includes scenarios with slow optics as well as using fast optics on very faint signal.

The role of read noise in SNR
To make it really clear what the role is of the read noise in the scenario’s we just ran through, let’s take a look at the role of read noise specifically and how it adds up when we add more exposures.
Let’s look at the SNR again for the same situation as described before, 12x10min subs versus 120x1min subs and rewrite it a bit just to see what is happening to the noise terms:
For the object shot noise, sky noise and dark current noise we get the following:
12x10min:

which is;
=

and for the 120x1min this then is;
=
So you see this is exactly the same, just as we could expect and have seen before in the scenario without read noise.

Now, let’s see what is happening with the read noise; which is simply
12x10min:
120x1min:

So the read noise is growing with the square root of the number of exposures in our integration, while all the other terms simply grow by total exposure time alone. So for a given fixed total exposure time, the read noise will be smallest with the least number of exposures.

Read noise is growing with the square root of the number of exposures in our integration

To see it’s impact in the total noise let’s run the actual numbers. Remember, uncorrelated noise adds up quadratically, so the total noise we get in these situations is;
12x10min:
120x1min:

Now we can clearly see how big the impact is of the read noise in this scenario.
Next let’s see what these numbers and the impact of read noise looks like in case of a bright sky. Let’s say sky background flux is 50e-.
For the time dependant noise sources we get:
=

If we add the read noise:
12x10min:
120x1min:

This is a totally different situation and the read noise could simply be considered irrelevant.
In fact, this looks very much like the hypothetical situation without any read noise we saw earlier.

So we can conclude that the exposure time only is relevant when the read noise is relevant. And the read noise is only relevant if the sky is dark enough.

The exposure time only is relevant when the read noise is relevant. And the read noise is only relevant if the sky is dark enough.

Determining optimal exposure time

Now we’ve seen the scenarios above you might wonder what would be applicable to your specific situation. As we just concluded this will be dependant mostly on the brightness of the sky you are imaging under.
There are formulas to determine the optimum exposure using the read noise and sky flux as input. There is also a script in PixInsight which you can use to give you an ‘ideal exposure length’. (Scripts->Instrumentation->CalculateSkyLimitedExposure)
However, as we’ve seen in the graphs before the benefit in SNR is one of diminishing returns. This means it is not possible to give one absolute answer to the question what the optimal exposure time is. Assumptions need to be made about how much contribution of read noise to the total noise you will tolerate. And the differences in this assumption is often huge (factor 2 differences). Furthermore they don’t take practicalities into account. So I’d like to just show you a few more scenarios and the SNR corresponding gains for longer exposures compared to using 30sec exposures in a situation where we use a total exposure time of 2 hours. I’ve listed the ‘95% improvement mark’ for exposure time for each sky brightness.
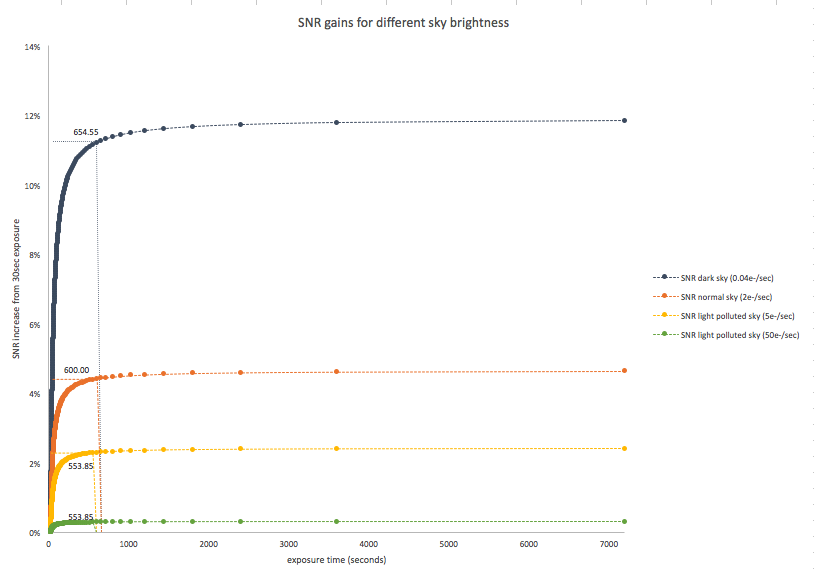
The most obvious thing we can learn from this chart is that there is a huge difference how much you benefit from longer exposures under a dark sky versus brighter skies. Furthermore, the 95% improvement mark seems to be awfully close for all scenarios. However, I’m not sure how useful this number is since the next step up in exposure after this mark under a dark sky will still give you 0.05% increase while this improvement is only 0.0012% in the brightest scenario. To make this even more clear; for the brightest scenario the SNR for 30sec. exposure was 11.83, while all the way at the end with one exposure of 120 minutes the SNR was 11.86. So we could safely consider this a scenario where subexposure length is completely irrelevant.

Remember we saw earlier that the SNR improvements were much larger if we are dealing with faint signals. So let’s look at the SNR improvements for different sky brightness with the previously used faint 0.2e- signal
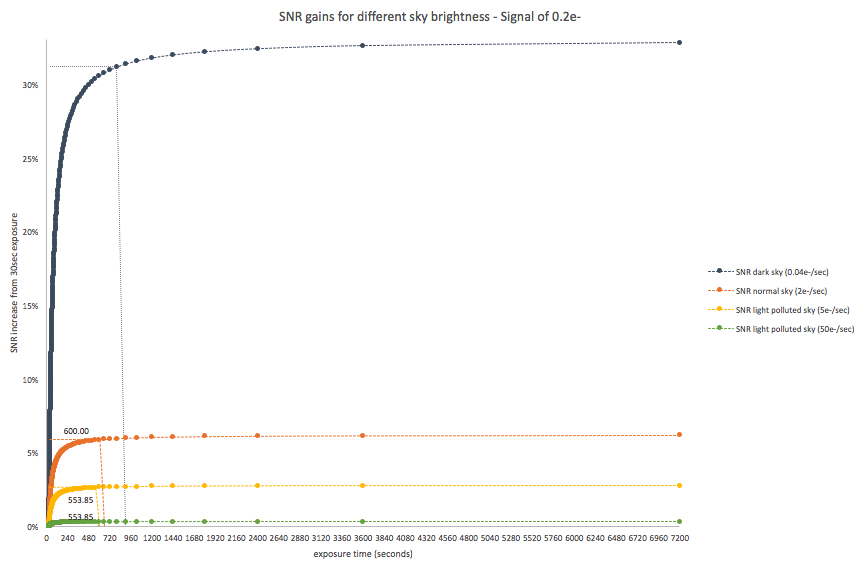
The impact of the sky brightness is very clear again in this chart. Although we do benefit more from longer exposures when dealing with fainter signal also from brighter skies, the difference is negligible for very bright sky and is really huge for the really dark sky.

Based on these graphs we can conclude that if you are imaging under a light polluted sky you should not worry much about your exposure length. Every sky brightness between 5e- and 50e- basically has a total SNR improvement between 0.2% and 2% for which you’ll reach 80% of maximum SNR increase already at 3 minute exposures.

Other practical considerations to take into account

Next to the read noise and background sky flux, we need to take some practical factors into account as well when we want to determine the optimal exposure length. The ability to guide accurately for longer exposures for instance is of course really important, as well as the cost of loss of data if you need to throw out a subexposure. Remember that the total integrated exposure time is most important for SNR, so there is a real significant cost when you need to throw out subexposures.
Furthermore you might want to use (bayer) drizzle integration, which will need a minimum amount of (dithered) subexposures to give proper results.
These are all very important things to consider which might change things completely in terms of the optimal exposure time for you personally.

Light pollution and narrow band filters

I got asked a lot about the influence of filters. I haven’t tested this out myself, but the book The Astrophotography Manual covers a comparison between different light pollution filters and concluded that in his test it didn’t effect the background sky flux all that much (which was surprising). As always, test it out to know for sure, but I think the effect of light pollution filters is minimal on the read noise contribution to the overall noise.
Narrowband filters on the other hand will basically change even a light polluted sky to a dark(er) sky in general. So with narrowband filters you will benefit a lot from longer subexposures.
Of course there will always be exceptions to this, like OIII imaging with full moon, and exact details will depend on the speed of your scope and the quantum efficiency of your camera for instance. However, the generalisations will hold true in most situations.

A comparison from a dark site

Let’s look at the following data that I shot while I was in Namibia. There is practically no light pollution there and this was shot without the moon present. The only bit of background sky flux was the sky glow and perhaps a bit of zodiacal light.
The data was shot during 3 different nights so some variation is to be expected based on conditions for that particular night. There were no noteworthy differences between those nights so I have no reason to believe this is influencing the comparison much.
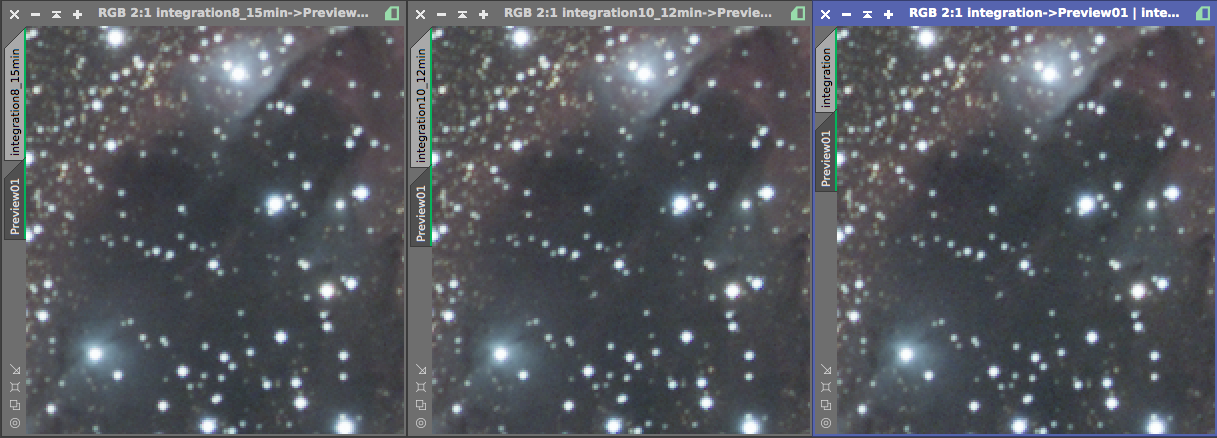
I had used different exposure lengths: 8, 12 and 15 minutes. For this comparison I made three integrations that all had the total integration time of 120minutes. So 15 frames of 8 minute exposures, 10 frames of 12 minute exposures and 8 frames of 15 minute exposures. No processing is done to these integrations. Just a STF applied to make the data visible.
Based on what we learned before we would expect the fewer but longer exposures will have the better SNR. Let’s see if this was the case:
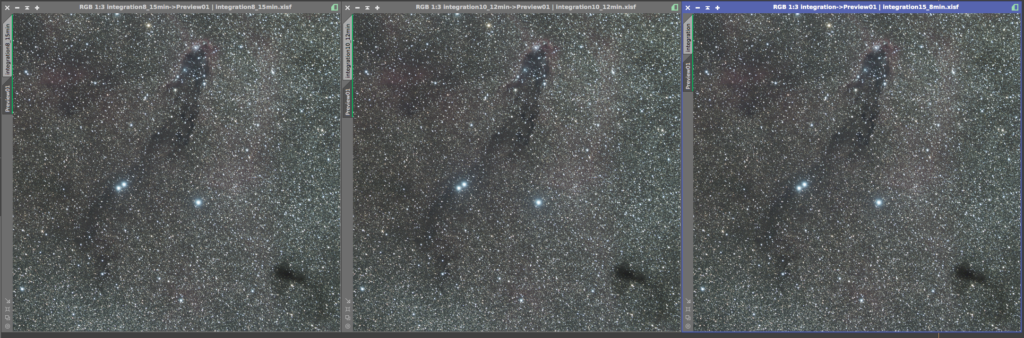
Hard to tell from this wide shot, so let’s zoom in a bit.
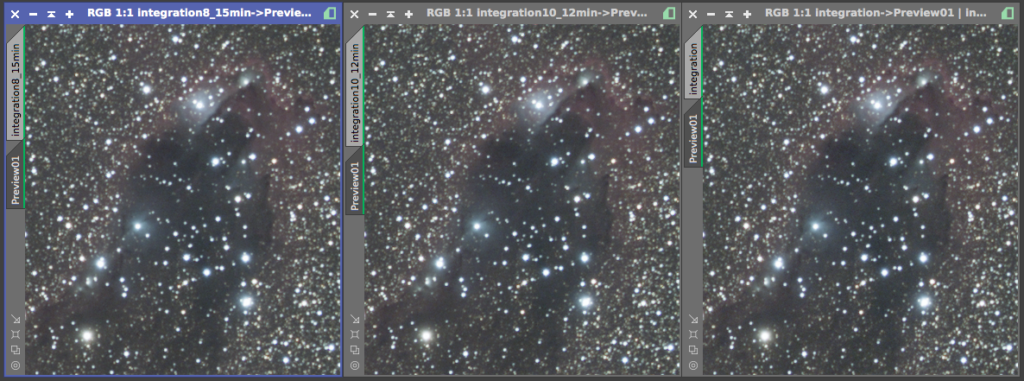
Here we can already see some difference in the amount of noise. Let’s zoom in further to have a better look.
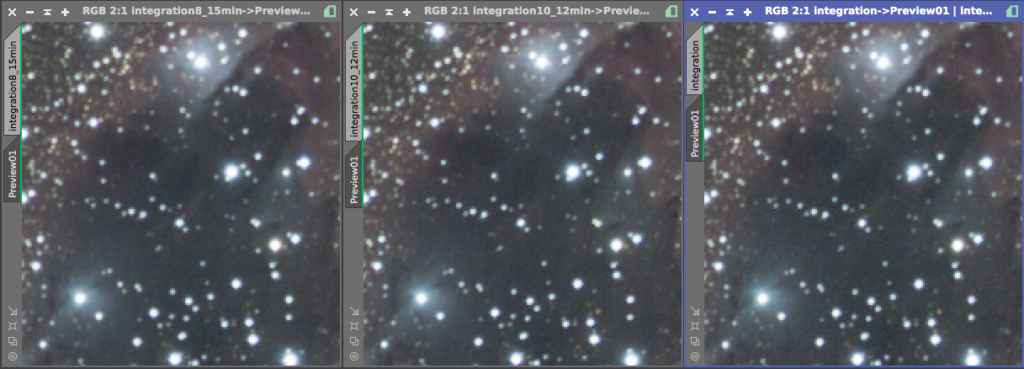
The differences in SNR are clearly visible now and we see indeed what we expected: the 8x15min. integration looks (much!) better than the 15x8min. integration.
This is even better visible in the dark region of Barnard 44A:
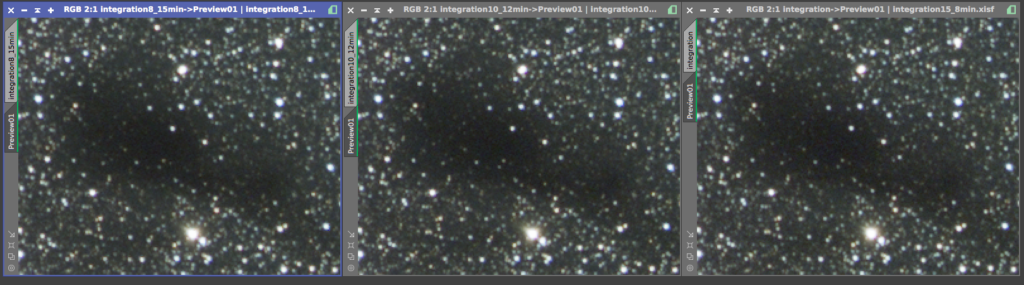
So visually we can already draw the conclusion that we were right: longer exposure has better SNR in this situation where we are clearly read noise limited. Now let’s check the numbers to confirm.
First let’s look at the amount of noise:
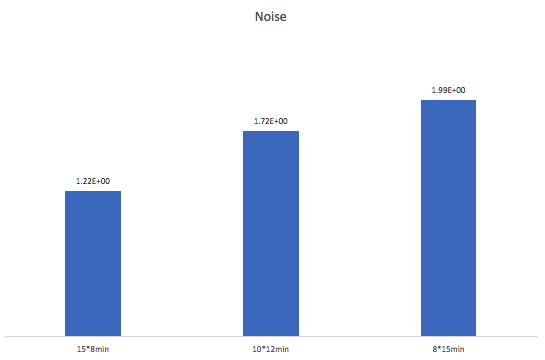
Noise is higher in longer exposures which is expected. The question is; did the signal grow more than the noise?
The SNRWeight measure (to be clear; this is a relative measure and not reflective of the actual SNR differences)
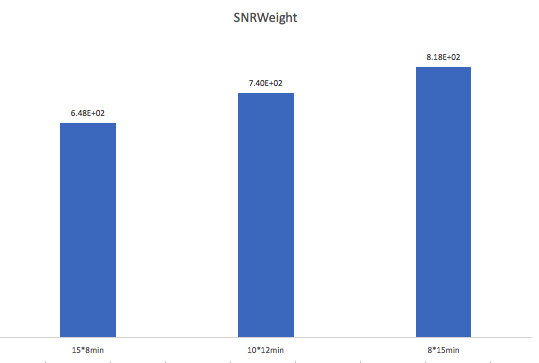
So yes, it clearly did.

Unless you are under dark skies, the subexposure length won’t matter much once you are using 2 to 3 minute exposures.

Conclusion and final considerations on sub exposure time and number of exposures

With all that we learned and the simulations we looked at and the real world dark site test we have quite some information about the optimal subexposure length. However, I bet you still are wondering how this impacts your particular situation and what the optimal subexposure length is. That will remain difficult to answer exactly, and much of the details go right out of the window if we need to take other factors like drizzle integration and guiding errors into account. However, I feel the most important conclusion probably is the fact that the exposure length is only relevant when the read noise is relevant. And the read noise is only relevant when you are imaging under a dark sky.
With most moderately to strong light polluted skies, the subexposure length won’t matter much once you are using 2 to 3 minute exposures.
Let me know in the comments below if you agree or disagree or still are left with questions at this point!


[ad_2]

Grand Opening of new photography studio in Richlands

[ad_1]

RICHLANDS, Va. (WVVA) -A new photography studio had its grand opening in Richlands Friday. Magic Moments Photography is one of the winners of Richland’s Pop-up Business campaign where hopeful entrepreneurs can pitch their business ideas to the town. Sharon Horton, the owner of Magic Moments says this business has been her dream since she was around seven.

“It’s had a really good response. Lots of people are, like, excited, and they love the pricing and the fact that we’re offering other retail items like pillows and canvases and Christmas cards, stockings, Christmas ornaments,” says Horton

Horton also says the grand opening was a success with people from all over the county coming to ribbon-cutting.

[ad_2]

Story Behind the Image “Interested” – Barger Nature Photography

[ad_1]

Polar Bear mother with her two month old cubs curiously surveying the area as they prepare to make the trek from Wapusk National Park to Hudson Bay.

It is three o’clock in the afternoon, I have been waiting four hours for a polar bear with her cubs to emerge from their den. I have three more days left until they close the backcountry lodge where I have been staying the past two weeks. The lodge that has been home these two weeks is called Watchee, a Cree word for forested ridge, located just outside Wapusk National Park located 30 miles south of Churchill, Manitoba in Canada. This will be my fifth visit to Wapusk, primarily to photograph polar bear mothers with their newborn cubs.

This type of photography requires an extreme amount of patience. Days can go by waiting for an opportunity to photograph polar bear mothers and their newborn cubs. This year has been unusual in that we have photographic opportunities almost every day. One day we stayed in the lodge and didn’t go out due to wind chill temperatures around -50 degrees C. It would not be unusual to spend two weeks here and have one or two sightings during the entire two weeks. This year has been, without question, the best year I have had for polar bear photography.

Wapusk is a denning site for polar bear mothers who come to the area in the fall to give birth to their cubs and leave their dens during February and March. Therefore, the middle of February to the mid-March is the prime time to photograph these polar bear mothers with their cubs.

This polar bear mother with her two cubs was photographed after leaving her den and preparing to make the 30 mile trek to Hudson Bay with her three month old cubs in tow. I had been photographing them for three hours as she rested on the snow with her two cubs nestled against her. It was approximately 2:00 in the afternoon when they began to move. She sat up and stretched and watched intently as the cubs played near her side. When playtime was over, she nursed the cubs directly in front of us. All during this time, the mother knew we were watching, but showed no signs of concern or stress. This is mainly due to the park regulations which require that everyone maintain a 100 yard distance from the bears and keep talking, movement, and noise to a minimum. This image was captured just as she was preparing to leave the area. She stood facing us with her two cubs on either side interested to see what we were doing. I hope you enjoy the image. More images to follow.

[ad_2]

Comprar una estrella es caer en un fraude

[ad_1]

A lo largo de mis años como astrónomo aficionado son muchas las personas que me han preguntando dónde comprar una estrella o peor aún, me confiesan que han pagado dinero para comprar una. Lo cierto es que detrás de la venta de estrellas hay un intento de estafa.

Muchos de los anuncios de empresas que venden estrellas incluyen un certificado de autenticidad pero lo cierto es que el único organismo con potestad para poner o cambiar nombre a una estrella es la Unión Astronómica Internacional (IAU) y ésta se rige bajo criterios científicos sin ánimo de lucro así que olvídese de que pongan el nombre de su persona amada a una estrella, no va a pasar. Como explican en su página web son muy estrictos con la forma de nombrar objetos celestes y se desvinculan totalmente de las practicas comerciales que consisten en vender nombres de estrellas ficticios.

Si quieres regalar una estrella a una persona querida puedes hacerlo por tu cuenta con un folio y una foto o un dibujo de la estrella que tu quieras, será igual de original y tendrá la misma validez legal que ese supuesto certificado expedido por una empresa privada en Internet, pero mucho más barato.

No se puede comprar una estrella ni el nombre de una estrella. Este tipo de prácticas son fraudes.
Las estrellas pertenecen a toda la humanidad. No se puede comprar ni vender una estrella.

El timo de la venta de estrellas comenzó en el año 1979 cuando apareció la primera empresa que ofrecía estos servicios, la International Star Registy (ISR). En su página web afirman ser los únicos que tienen registro en la oficina de derechos de autor de los Estados Unidos como si eso fuera algo que les diera relevancia o autoridad. Lo cierto es que nosotros mismos podemos crear el «Atlas de estrellas de Cielos Boreales» y registrarlo como un libro más en tal registro y apuntar los nombres ficticios de nuestro catálogo como cualquier otra publicación de ciencia-ficción. Nadie, excepto nuestra propia conciencia, nos impide cobrar 100 o 200€ por añadir tu nombre al de una estrella en nuestro catálogo personal, no estaríamos haciendo nada ilegal.

Estas empresas ofrecen todo tipo de merchandising para aumentar sus beneficios; cuadros, pulseras, colgantes, tazas… durante estos últimos 40 años han ganado millones de dólares aprovechándose de los incautos que se dejaron engatusar. A menudo han usado incluso a populares actores de Hollywood para promocionar sus servicios.

Otros regalos con estrellas más éticos

Hay otro tipo de regalos basados en las estrellas que son un poco más éticos. Es lo que hacen algunas empresas y creadores particulares al vender cuadros con la representación de la esfera celeste en un día determinado para conmemorar una fecha especial como un aniversario, por ejemplo.

En este caso no te están ofreciendo ningún certificado ficticio, es solo una imagen de cómo se veía el cielo en una noche determinada. Puedes hacer esto tu mismo ayudándote de programas como Stellarium o hacer un planisferio fijo para una fecha determinada.

Otras empresas más originales venden productos que han estado casi en el espacio. Es lo que hace EarthtoSky, que pone colgantes y otros avalorios en globos de helio que llegan a la estratosfera para luego caer de nuevo.

En cualquier caso ¿Por qué regalar una sola estrella si puedes regalar millones de ellas? Regala un telescopio y estarás haciendo el mejor regalo posible para cualquier amante de las estrellas.

[ad_2]

Retired Freeman photographer Bob Haines dies at 82 – Daily Freeman

[ad_1]

KINGSTON, N.Y. — Retired Freeman photographer Bob Haines died Friday, Nov. 4. He was 82.

Haines retired from the Freeman in 2006 after a 39-year career capturing the ups and downs both in Kingston and the Mid-Hudson region, starting in 1967 when the newspaper was still headquartered in a historic building at the foot of Broadway that now houses Mariner’s Harbor Restaurant and apartments.

During his career, Haines photographed everything from local business ribbon cuttings to the Bill Clinton-Boris Yeltsin mini-summit in Hyde Park in 1995. He shot photos of movie stars including Dustin Hoffman and Jessica Lange who were in Ulster County filming the movie “Tootsie”, and of Barbra Streisand and Walter Mathou, during the filming of “Hello Dolly.” He even got the opportunity to photograph his childhood idol, Mickey Mantle, lamenting that he didn’t think to ask anyone to take a photo of him with the baseball great.

[ad_2]

Alpine Lagoon ~ Desolation Wilderness

[ad_1]

It’s been a busy few months since moving to Reno, starting a lab at UNR, making friends, skiing, biking, and welcoming a small dinosaur (parrot) into our home, but at long last Aubrey and I finally had a chance to do some backpacking over the past two weeks. Here’s a few images from our first trip.

To get back into the swing of hiking and camping we decided to take a short warmup trip to the Desolation Wilderness, an area I’ve heard of often, and probably visited many years ago, but have few memories of. The Desolation Wilderness is southwest of Lake Tahoe (just an hour from our home!), and is mostly known for the plentiful lakes. The largest and most famous, and in many ways most beautiful, is actually a shallow reservoir called Lake Aloha. I’m not sure who decided on the name, but it inspires a tropical hawaiian feeling that is surprisingly appropriate. Aubrey brought along an inner tube floaty and we took turns paddling among the many granite islands. The pine trees almost looked like palm trees, and despite the snowy backdrop, it almost felt like floating in a tropical lagoon.

Sierra Nevada, Snow, Melt

Summer greenery impatiently appears as the winter snow finally begins to melt away in mid July in the Sierra Nevada.

Lake Aloha, Sierra, Desolation Wilderness

The warm(ish) waters of lake Aloha and plentiful granite islands make for an almost tropical experience in the Sierra alpine. To get this view point I scrambled up to an overlook of polished granite.

Pollen, Desolation Wilderness, Lake Aloha

Pollen collects along the shores of Lake Aloha in California’s Desolation Wilderness, arranging itself in gentle curves on the calm water. 

Tags: desolation wilderness, lake aloha, sierra

[ad_2]

ZWO’s ASI1600GT Camera – Astroniklas

[ad_1]

I remember in my early days my old astronomy club had a monochrome CCD camera from SBIG, which was used for scientific projects. The club opened its doors to students allowing them to discover new supernovae and other cool features in the night sky involving photometry.

Years passed by and as an amateur astronomer I’ve dealt with DSLRs for the most part of my observing sessions. While DSLRs can be suitable for using them both at day and at night, unfortunately they can’t compete with dedicated astronomy cameras.

CMOS technology has advanced more and mover over the years as well, bringing their sensors to a very competitive level vs. CCD.

In a market the recipe to success is very simple and that comes with manufacturing cost. While CCD manufacturing has struggled enormously to lower its costs, CMOS has prevailed in the technology area and made itself more dominant over the years. Availability and cost efficiency are the two major factors in its success. Both sensors eventually convert light to electrons so the end result will be the same.

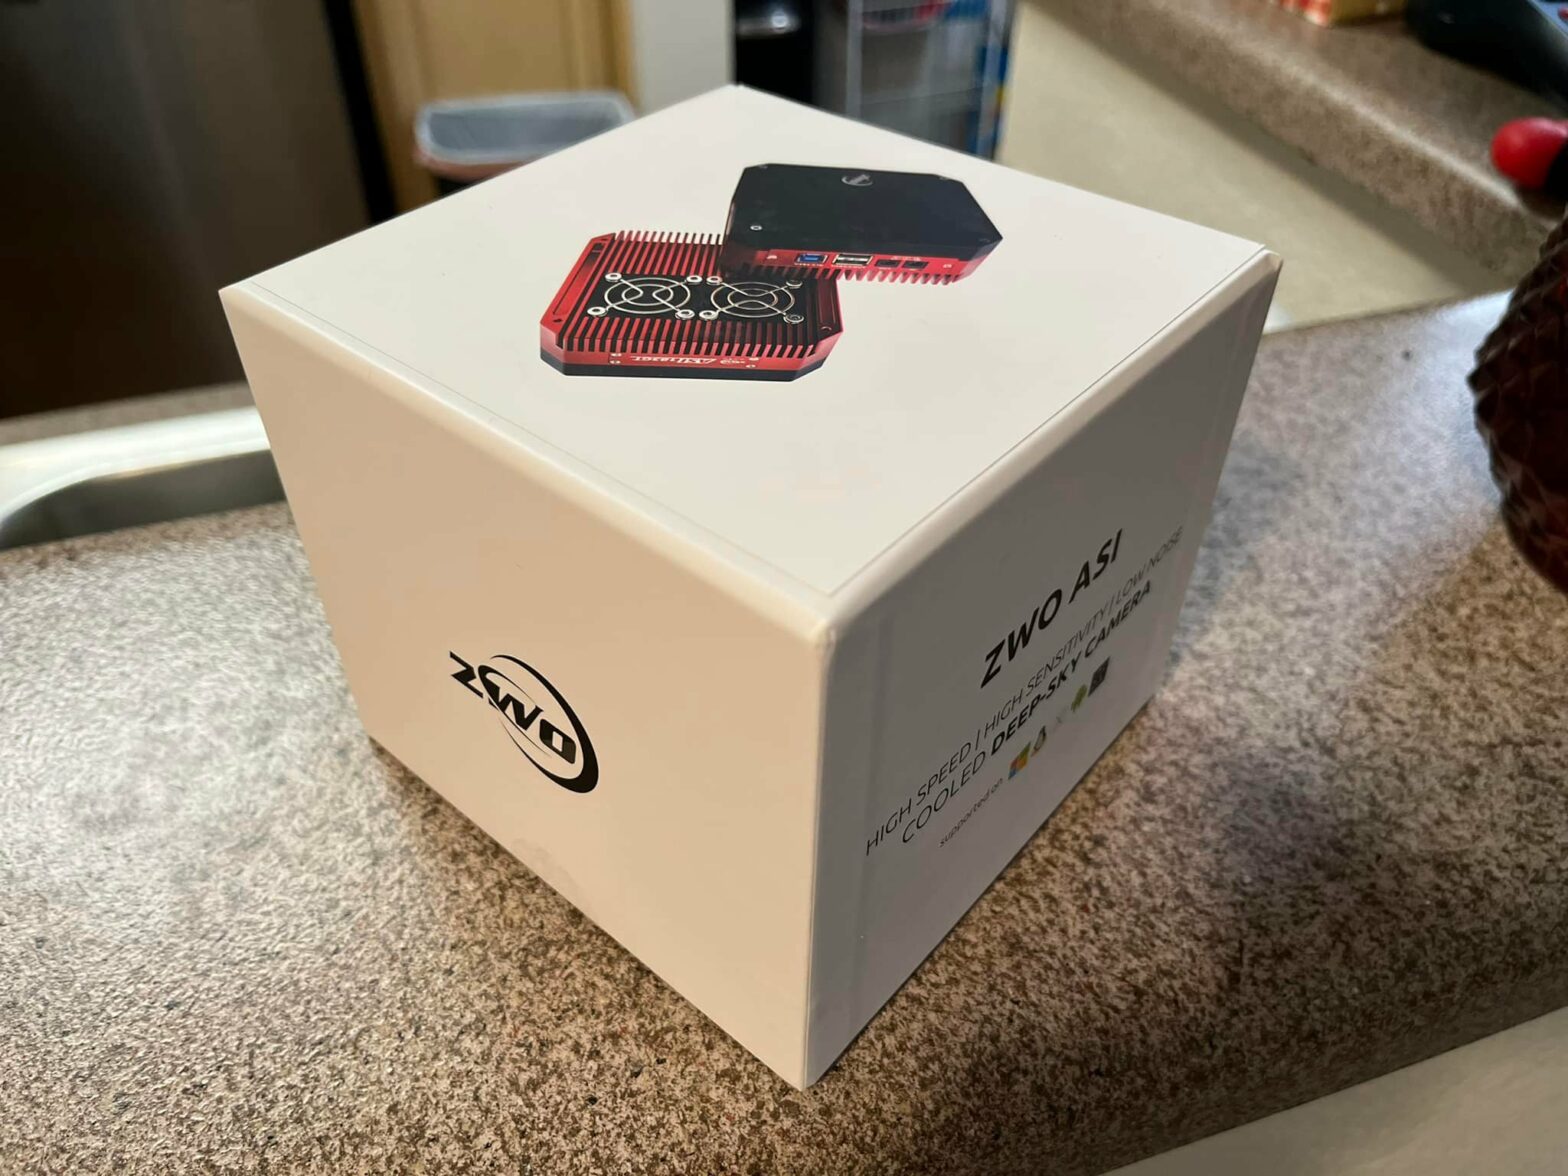
Thus, it brings us to the point of my blog entry here. I’ve recently acquired ZWO’s monochrome ASI1600GT. A camera that has a very effective cooling capability, high reliability, built-in filter wheel and lightweight. ZWO has done an awesome job and provided amateur astronomers with a very competitive and strong camera. I can’t wait for the California weather to offer me the chance to try it out very soon!

With my purchase I’ve also acquired a set of OIII (Oxygen), SII (Sulfur), H-alpha (Hydrogen) 7nm narrowband filters with a set of LRGB filters from SVBony as well.

[ad_2]

Guadeloupe 2019 | Caroline Logan Photography

[ad_1]

Fb-Button

It all started one night when we heard of cheap flight deals expiring at midnight. After a few minutes spent googling things like “Where is Guadeloupe” “Is Guadeloupe safe?” we were somehow on the phone with Norwegian Airlines confirming our booking. Shocked by our own spontaneity and still in disbelief IT WAS HAPPENING (and still not even 100% sure how to pronounce it), we immediately marked our calendars for Guadeloupe and started counting down!!!

Things I never wanna travel without: Perfect Bars. @vanessashenk. (The 50 lbs on my back I could do without though…)

Other things I don’t wanna travel without: A straight from HEAVEN open middle seat on our flight that had us momentarily feeling like we weren’t the cheap travelers we truly are.We arrived late that night to our Airbnb, thanked the Lord for safe travels and complimentary bathrobes/hotel slippers to call our own (practically wore them the whole week straight)… and went to bed completely oblivious to what awaited us the next morning…… The viewzzzz that *nearly* made a morning person out of me.Wanted to be besties with our Airbnb host Murial from the moment she willingly stood out by the road late at night to help us find our way there (lol). But the best part: her place is brand new so she deeply discounted our stay in exchange for a good review. SIGN US UP and yes we still talk weekly about this place we miss sooo much.Considered bringing goat cheese in our backpacks bc we’d miss it that much (don’t worry we refrained). The first day we’re gathering food for the week at a tiny grocery store and nearly fell to the floor when we spotted a block of cheese with a ???? on it… GUADELOUPE WE LOVE YOU.Glad we rented a car because you’ll wanna have the ability to pit stop for all the *local attractions.*… TAKE OUR WORD FOR IT. (And also don’t miss Pointe des Chateaux !!)Always the girls hiking in sandals. Maybe we’ll learn by our next trip??I’m having a moment bc these pics make me so nostalgic!!!!!!!!!!!!!!Seeing Guadeloupe for the first time made me view God’s glory in creation in a completely renewed way… and made me excited to get home to the land I *already* know and love, and notice the things that may have grown mundane around me as ACTUAL real life miracles and artwork right before my very eyes.Pictured below is the photo that was *almost* our last alive here on this earth… you think I’m being dramatic… read on in Vanessa’s words…

“We were walking back to our car from the beach when Caroline and I see a large stray dog (take our word for it) following closely behind us and as it picked up it’s pace so did we… I’m telling Caroline (and myself) to stay calm, just ignore it, but it keeps getting closer as Caroline keeps turning around and looking at it while I’m now YELLING at her “Don’t make eye contact!!! It will think you wanna play!!!” Too late… Caroline is darting back and forth on the road (said she was trying to “lose” the dog) then next thing I know she’s running up to a car full of people who don’t speak English saying “CAN YOU HELP ME? I’m kind of afraid of dogs!!!” To which they shrug, most likely confused by her panic as I’m now hunched over and losing it. Happy to report we’re fine and the dog was most likely harmless but… American girls will be American girls. ¯\_(ツ)_/¯”

But we lived to tell the tail. (Hahahaa aren’t you glad you’re reading this blog post right now.)Thankful for: a BFF who’s willing to fill her backpack with the important things like: endless snacks, a portable DVD player, and her collection of One Tree Hill DVDs from high school. Because these are the memories I wanna remember forever.Also thankful for: the best quiche maker in the world as my travel companion.… Aaand an Airbnb we loved so much we had to convince ourselves to venture out of every day… #homebodiesAsked around town for directions to the nearest currency exchange (picture this: me holding up a twenty dollar bill, smiling, and saying “EURO??” … like any tourist would) we were told in broken English to go down to the “PMU.” Following direction and hoping for success, we arrived… once again holding up our $20 and repeating the process. Next we were met with a firm no and stern head shake. And of course being as desperate as we were, I smiled kindly and said… “Mmm… yes??” But again, met with a “no” more loudly and inconvenienced this time. We were sooo sure that we were sent to the right place and wondering why this man at the currency exchange refused to help us, we asked one last time as we turned to the left to see a group of people huddled around what we *thought* was a currently exchange machine but immediately realized what we were actually sent to use our money for was to bet on horse races. Americans………. ¯\_(ツ)_/¯Honestly expected Tarzan to come leaping out at any second when we were at Cascade aux Écrevisses.Back to civilization/sweat dripping down my back.And back to loading on the goat cheese/never wanting this week to end.Plz note Vanessa wiping away the laughter tears when recounting our memories from the day. (At least *we* think we’re funny.)We really fell into a routine at this place and my only complaint is that we couldn’t stay for longer (ok and that these chairs didn’t fit in my backpack home).The kind of drives you actually never want to end, where every convo is interrupted with a “LOOK AT THAT VIEW.” (Or… “Watch out for that car!!!!!!”)Love u bff <3This is the point of the blogpost where I really have to squint my eyes as I write these captions because I can’t look through these pics without my heart aching a little. (I’m a drama queen, I’m well aware.)Though it was nearing the end of our trip, the biggest adventure awaited!! …Not pictured: Hugo, our fearless boat captain. Who 30 minutes prior was probably chilling at home with his feet up thinking he was in for the night, when his phone lit up and his buddy asked if he was available to take two random American girls on his boat.

Flash back to that afternoon, we were combing the entire town (sweating and sulking) desperately trying to find a sunset tour, but NOTE TO ALL: they do not exist. Thought it was a lost cause until we asked one last person… “for sure no.” they said. But our follow up “You don’t even have a friend that could take us?” was the ticket to the best memories and our forever favorite Guadeloupean: Captain Hugo <3 (Read the whole story here.)LOVE U MISS U HUGO !!Thanks for forcing us to be brave and showing us the Guadeloupean sea-life…And for being a great paparazzi.We owe it all to you for the best memory of our trip (no, our LIVES).A memory we’d be shocked to hear our *own* daughters live someday but PROMISE WE WERE SAFE, MOM!And hereeee I thought I was your favorite, Hugo…Still in shock we got the boat ride of our dreamz and that we somehow managed to communicate our “GOAT CHEESE” pizza order to our waitress… hand signals/goat sounds and all.Sat out here on our last morning and genuinely thought about supergluing our rear ends in these chairs so we were stuck here 4evz.And our Airbnb host Murial once again wowed when she told us she wanted to meet us at 6am to “see us off” … <3 (Probably to make sure we didn’t try the superglue idea, let’s be real.)Thanks for the mems, Guad…… and Lucas.The one thing that kept the tears from flowing… the hope of CHIPOTLE when we landed on U.S. soil.Little did we know, one final adventure awaited us… I’ll let Ness tell that story though…

“Just another reason I will remain loyal to Apple until my dying day. On our train ride home from JFK to Lancaster, I left my phone on the seat as the train took off (along with visions of finally sleeping in my own bed after 13 hours of travel) and we found out it would be stopped 45 minutes away, so we frantically and very safely drove to Harrisburg, using the Find My iPhone app on Caroline’s phone to see it was stopped at that train station. Picture two girls (one on the verge of tears??) running inside a very quiet train station asking if anyone found a phone. An *angel* officer helps us search the train and no luck. I’m about to break down and accept the defeat, coming to the realization that I’ve probably just lost all my pictures along with my Chipotle app login, when I hear him tell me “it’s probably stolen” as Caroline whispers “it is NOT stolen” so I open the app again and see that my phone is ON THE MOVE. We find out it’s on a different train (apparently in a kind-hearted effort to help us, this angel officer had us searching the wrong train) and my phone was “on the train back to Lancaster.” Long story short (oh wait lol) our new friend asked police at the Lancaster station to search the train for my phone in the 60 seconds it was stopped, and you can imagine the uproar and obnoxious scene Caroline and I caused when we heard through the phone “touchdown!!!” and we drove back to Lancaster to find my phone, just where I left it.”Gotta close this post with the video Vanessa made that I can’t stop watching. <3333


[ad_2]

Complete guide to outdoor light in photography

[ad_1]

August 1, 2022

Understanding light is an essential skill when it comes to mastering your photography, and in this complete guide to outdoor light, professional photographer David Noton guides us through the importance of light in photography, as well as some of the best times to shoot. 


Welcome to the AP Improve Your Photography Series – in partnership with MPB – This series is designed to take you from the beginnings of photography, introduce different shooting skills and styles, and teach you how to grow as a photographer, so you can enjoy producing amazing photography (and video), to take you to the next level, whether that’s making money or simply mastering your art form.

Improve your photography from AP and MPB

Each week you’ll find a new article so make sure to come back to continue your journey, and have fun along the way, creating great images. If you’ve found these articles helpful, don’t forget to share them with people you know who may be interested in learning new photography skills. You’ll find a whole range of further articles in this series.


My college lecturer used to assert that a good photographer could make a lump of coal look appealing with the skilful use of lighting. I never felt the need to prove his point, but my subsequent decades behind the lens have convinced me he was right. Even the Grand Canyon can look uninspiring under the flat grey light of an overcast day, whilst a view of some flat Essex fields can be transformed into a breathtaking vision by evocative dawn light.

What is the importance of light in photography?

Light is our raw material; the building block that makes or breaks our pictures. In fact, lighting is so important to the finished image that I often feel I photograph the light more than the subject.

We photographers need to see the light, and I mean really see it, feel it and understand it in all its endless forms and subtleties. When contemplating a scene the first thing to do is consider where the light is coming from. And beyond seeing what is happening now we need to predict the light that will best illuminate the picture we have in mind at different times of the day and year.

Anticipating what could happen with the light in a few minutes, an hour, later the same day, the next morning, in a few months or next year is a fundamental photographic skill. It comes with experience and is the product of every photographic vigil, productive or otherwise. Standing by the tripod watching the light paint a landscape is never time wasted.

We have the obvious time options – daylight, dawn, dusk or night. Beyond those we have the directional aspect to consider; do we want the main light to come from the front, back, side or above the subject, or a combination? Then there’s the nature and colour quality of the light: high or low, hard or soft, warm or cool? In truth, most lighting situations in the natural world are a subtle fusion, and the permutations are endless.

Guide to outdoor light – Colour temperature

All light sources have a colour temperature, expressed in Kelvin. The light our planet receives from the sun is constant, but as the Earth rotates what we receive on the surface goes through radical daily transformations.

What are the different types of light called?

  • Daylight
  • Golden hour
  • Twilight
  • Blue hour
  • Night

All have their appeal, but atmospheric conditions, the weather, our position on the globe and the time of year are all factors affecting the nature of the light painting the landscape. That’s why, after a lifetime behind the lens, I still feel I’m only beginning to appreciate the endless subtleties of natural light.

Take any photo group out at sunset or sunrise and most will be transfixed by the sun peeping over the horizon. It takes mental effort to turn away and observe the far more subtle lighting effects playing on the landscape and sky to the north or south, but that’s where the photographic gold dust lies.

Seeing it is one thing, predicting it is something else. Our ability to pre-visualise these lighting situations is what sets photographers apart. It’s a skill to be honed, so read on for details on how to shoot using various types of natural light.


Guide to outdoor light – Daylight

Outdoor light Chocolate Hills

Chocolate Hills, Bohol, The Visayas, Philippines. Canon EOS 5D Mk II, 24-70mm, 1/40sec at f/5.6, ISO 100

At noon the overhead sunlight has had the shortest passage through the atmosphere so it is neutral in colour balance; what we term daylight, with a colour temperature of 5200K, give or take a few Kelvin. Generally speaking the hard vertical light of midday is the least favourable to work with.

Shadows are hard, contrast is high; time was I wouldn’t touch the camera after 10am and before 4pm. But ideas change and I’m confronting some of my more entrenched assumptions. Sometimes the skies in the middle of the day have billowing cumulonimbus and streaking cirrus clouds that beg to be captured.


Guide to outdoor light – The golden hour

Outdoor light Loch Maree and Slioch

Loch Maree and Slioch, Wester Ross, Scotland. Canon EOS 5DS R, 24-70mm, 1sec at f/11, ISO 100

The contrast between the warm highlights and the cool shadows enhances the scene with the complementary colours of orange and blue. The last golden light of a crystal-clear evening after a rain shower is perfect for revealing all the form, texture and scale of a landscape. How soft the light of the golden hour is depends on the clarity of the atmosphere. Light that is too soft can be too insipid for big views but perfect for details.

When is the golden hour in photography?

The golden hour is the “hour” just before sunset, or just after sunrise, known as the golden hour, or sometimes the “magic hour” and gives a warm glow to objects in your scene lit by this light. You can see it clearly on light buildings, where the orange contrasts beautifully with the blue sky. The length of time this lasts will change depending on the time of year, so may last less time than a full hour.


Guide to outdoor light – Night photography

Outdoor light Milky Way

The Milky Way and night sky over Lago Roca, Patagonia. Canon EOS -1D X, 14mm, 20 secs at f/4, ISO 12,800

The night sky is an enticing subject, and we have the ability to capture it in all its glory. Including a landscape in the scene as well as being in the right place at the right time takes planning, and a truly clear night is essential. The capability of modern DSLRs to work with minimal noise at high sensor speeds makes this possible.


Guide to outdoor light – Twilight

Outdoor light Malham Moor

Malham Moor, Yorkshire Dales at dawn. Canon EOS-1Ds, TS-E 24mm, 5 secs at f/13, ISO 100

Minutes before the sun rises and after it sets, the light reaching Earth goes through some great transformations. Whilst direct rays are absent we are still bathed in twilight from the sun below the horizon. That twilight reaches us as the last rays of sunlight bounce off the bottom of clouds and down into the landscape, and as residual ambient light that the atmosphere has scattered. The two combine, which is why this time of day is so special and worth rising before the crack of dawn or lingering as dinner beckons to witness.

When is twilight in photography?

Twilight happens in the minutes before the sun rises, and the minutes after the sun sets, just after the golden hour. As the amount of light reduces, you’ll be able to see the colour of the scene change before your eyes.


Guide to outdoor light – The blue hour

Outdoor light, dawn at Loch Maree

Dawn, Loch Maree, Scotland. Canon EOS 5DS R, TS-E 24mm, 6secs at f/16, ISO 100

The residual ambient half-light that either brightens as dawn approaches or dims as dusk settles has had all of the warmth stripped from it after being bounced and scattered through the atmosphere. Its colour temperature is sky-high, well in excess of 10,000K, resulting in a very blue light, and virtually non-directional. This cool monochromatic twilight is a favourite for those hooked on seascapes with slow exposures of swirling water. It’s also the perfect light for night shots of illuminated landmarks, when the artificial lights of our towns and cities perfectly match the lingering tones of the twilight sky.

When is the blue hour in photography?

The blue “hour” is again, not necessarily a whole hour long, depending on the time of the year (and where you are located). It happens after sunset, and before sunrise, and covers the scene with a blue light. As there isn’t much light, it can stretch your camera’s low-light performance, but can give your images a beautiful look that’s different to the norm.


Guide to outdoor light – Direction of light

With such wide discrepancies dependent on our location when planning a shoot we need to know when the sun is due to come and go, and where in the sky it will rise and set. I have to admit I rely on experience, but it pays to be precise. Apps such as The Photographer’s Ephemeris and PhotoPills are handy, but I’m cautious of relying on them. We still need to ascertain which direction we want the light to be coming from to paint the landscape best – front, back, side or above.

Side lighting

Outdoor light, Malham, Yorkshire Dales

Late-afternoon cross lighting reveals all of the detail and form in the landscape at Malham in the Yorkshire Dales. Canon EOS-1DS Mark III, 70-200mm, 1/6sec at f/11, ISO 100

Side lighting is my favoured default for landscape work. The low rays of a rising or setting sun slanting across a scene reveal every shape, texture and contour in the landscape. Shadows provide strong shapes and every detail from the poppies in the foreground to the distant mountains beyond is apparent.


Backlighting

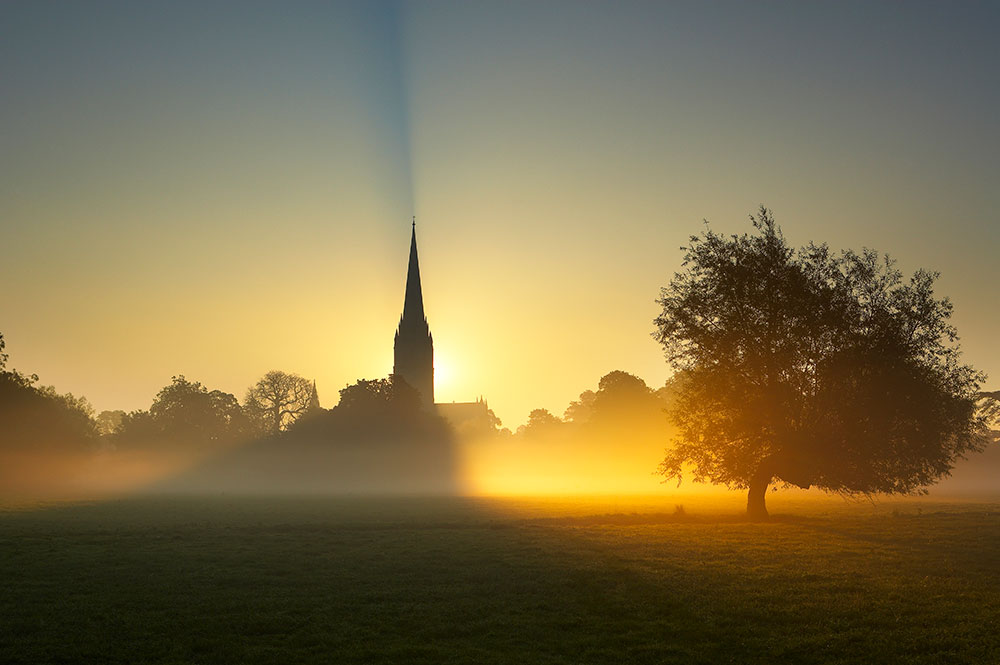
Outdoor light sun rising behind Salisbury Cathedral

Sun rising behind Salisbury Cathedral, Wiltshire. Canon EOS-1DS Mark II, 24-100mm, 1/100sec at f/11, ISO 100

Backlighting can often be the route to graphic impact. Shooting into the light is beset with problems – flare, exposure and contrast to name a few, but strong shapes backlit and silhouetted against a dramatic sky often have a bold simplicity that can be very powerful.

The big drawback though is any tantalising detail in the shadowy foreground will be lost. How much detail is sacrificed depends entirely on the contrast range between the rocky vegetation and the bright sky; softer light allows us to retain more foreground detail, whilst stronger more dramatic light renders silhouettes and foregrounds black.

We have strategies for tackling that immense contrast range; namely graduated filters or exposure merging, but there is a limit to what can be achieved without the loss of all credibility. In my book any such wizardry needs to be done with subtlety if believability is to be retained.


Front lighting

Outdoor light Snowdonia

The exception to the rule: front lighting on Llyn Dinas at dawn, Snowdonia, Wales. Canon EOS 5DS R, 24-70mm, 1/125sec at f/8, ISO 200

Full frontal light from directly behind the photographer leaves little to the imagination; all is revealed with maximum stark illumination, usually with the photographer’s shadow thrown in, but the harsh flattening effect and lack of shadow/highlight contrast rarely shows a landscape or indeed any subject off to its best; it’s an unappealing light that I avoid like the plague.


Top lighting

Outdoor light Lison

Diffuse top lighting is perfect for shooting woodland and water. Canon EOS 5D Mark III, 24-70mm, 1.6sec at f/16, ISO 100

When the clouds coalesce into an oppressive grey ceiling the low-contrast diffuse top lighting can be just the job for woodland and canyons. When the clouds close in there’s also the option of turning the camera on faces; it’s the perfect light for portraiture.


Guide to outdoor light – Light on my local patch

Outdoor light Durdle Door

Durdle Door and St Oswald’s Bay, Jurassic Coast, Dorset. Canon EOS 5D Mark IV, 100-400mm, 13secs at f/32, ISO 100

Dorset’s Jurassic Coast is my home patch where I have the luxury of being able to choose precisely the best time of year to shoot a specific location. The east-west aspect of the coastline makes shooting most locations between the spring and autumn equinoxes unfeasible; the sun is rising and setting over the land to the north, which casts its shadow across the cliffs and beaches. In the short days of winter though, when the sun is rising to the southeast and setting in the southwest, tantalising side lighting bathes the white cliffs and coves. It’s a view I never tire of, and one that provides endless inspiration.


David Noton is recognised as a leading landscape and travel photographer. His passion for photography, travel and the world’s beautiful places are the defining influences that have shaped his life, work and his creative approach to photography. His images sell all over the world – both as fine-art photography and commercially in advertising and publishing. Visit davidnoton.com.


Tune in next week, for the next article in the series of the AP Improve Your Photography Series – in partnership with MPB.

Find the latest Improve Your Photography articles here.


Follow AP on Facebook, Twitter, Instagram, and YouTube.

SubscribeSubscribe


[ad_2]

How To Photograph the Total Lunar Eclipse

[ad_1]

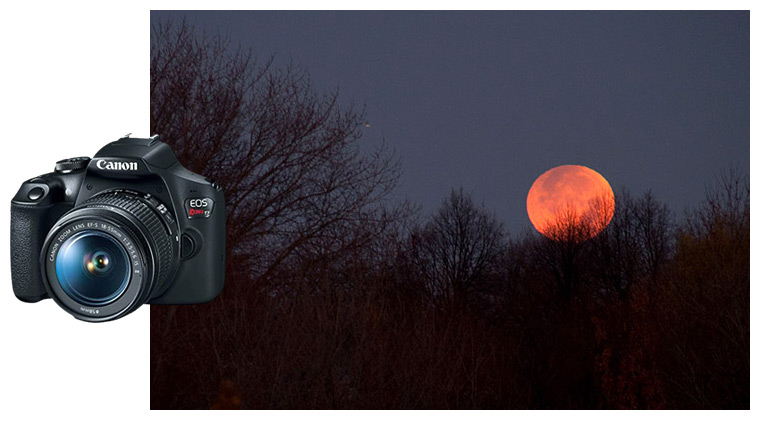
Are you hoping to capture a photo of the upcoming total lunar eclipse on November 8th? If so, you are not alone. Amateur photographers and astrophotography enthusiasts around the world will do their best to take pictures of the upcoming lunar eclipse using a wide variety of camera equipment.

A total eclipse of the moon is a truly breathtaking astronomical event that anyone can appreciate. The best part about it is that you do not need expensive astrophotography equipment or special filters to take a great picture of the total lunar eclipse. It’s all about using the best settings on the camera you are using (even if it’s a phone).

I recommend practicing your moon photography skills before the night of the upcoming lunar eclipse, so you don’t waste precious time fiddling with camera settings during the celestial event. With that out of the way, let’s get to the key information you need to take a great picture of the total lunar eclipse. 

camera settings for a lunar eclipse

Fast Tips:

  • Practice your camera settings on the moon before the night of the lunar eclipse 
  • If you are using a smartphone through a telescope, use a smartphone adapter to hold it in place
  • Use your cameras manual or ‘pro’ mode for full control over settings like ISO, Aperture, and Exposure
  • Capturing the moon during totality is often easier to accomplish due to less extreme lighting variations
  • Use a tracking equatorial mount when shooting at high magnification (star trackers work great)

How to Photograph a Lunar Eclipse

Over the years, I have photographed a number of total lunar eclipses using a variety of cameras – from my smartphone to a dedicated astronomy camera. The key to a great image isn’t the specific camera you use, it’s all about magnification and the correct settings. 

Without enough ‘reach’, the moon will appear small and lack the details you are hoping for. I recommend capturing the lunar eclipse with at least 300mm of focal length or more, which means an astronomical telescope or telephoto camera lens is best.

Then, it’s all about choosing the best camera settings to capture such a challenging subject in terms of light conditions. The moon will change in brightness as it goes through the different stages of the eclipse, and you must adjust your camera settings accordingly. 

What about those of you that don’t own a telescope or a long lens? The good news is you can still capture a great nightscape-style shot at a wider field of view. However, these types of photos look best if the moon is closer to the horizon while eclipsed. 

lunar eclipse photography

A total lunar eclipse captured in the early morning hours using a DSLR and standard kit lens. 

Wide-angle nightscape images that include a large portion of the night sky including an eclipsed moon can be done using a DSLR and tripod. For a 30-second exposure, a tracking mount is not necessary. At a focal length of 18mm or wider, star trailing will begin to show after about 20-25 seconds, so just keep that in mind. 

To capture the stars and constellations in the night sky, an ISO of 800 or above is recommended. However, this exposure will likely record the eclipsed moon as a featureless ball of light.

To properly capture both the starry sky and a detailed moon, you will need to capture exposures of varying lengths and blend them together into a composite image. This is because the moon is much brighter (even while eclipsed) than the surrounding starry sky.

A composite image can be made by masking the area of your night sky exposure and blending in a shorter exposure of the moon with surface details. This technique will take some time and experience to master, but the results can be amazing.

When and Where is the Lunar Eclipse Happening?

For a celestial event like this, a little planning goes a long way. You’ll definitely want to know exactly when the lunar eclipse is taking place, and where it will be in the sky from your location. 

For example, you may have to travel to a location with a low western horizon for a total lunar eclipse occurring in the morning if your backyard is full of tall trees.

Lunar eclipses are visible from different parts of the world at different times. There are many times when a lunar eclipse is taking place on the other side of the earth that you are unable to observe.

Here are some helpful resources to help you plan for the lunar eclipse:

lunar eclipse photography methods

Upcoming Lunar Eclipses (NASA)

Date Eclipse Type Visible From
November 8, 2022 Total Asia, Australia, Pacific, Americas,
May 5, 2023 Penumbral Africa, Asia, Australia
October 28, 2023 Partial Americas, Europe, Africa, Asia, Australia
March 25, 2024 Penumbral Americas
September 18, 2024 Partial Americas, Europe, Africa
March 14, 2025 Total Pacific, Americas, Europe, Africa
September 7, 2025 Total Europe, Africa, Asia, Australia

The 7 Stages of the Lunar Eclipse

There are 7 stages of a total lunar eclipse, and many amateur photographers like to capture the event in each stage. This can later be made into a composite photo showing the transition of the moon as Earth’s shadow covers it. A time-lapse video is another excellent way to capture each stage of the eclipse.

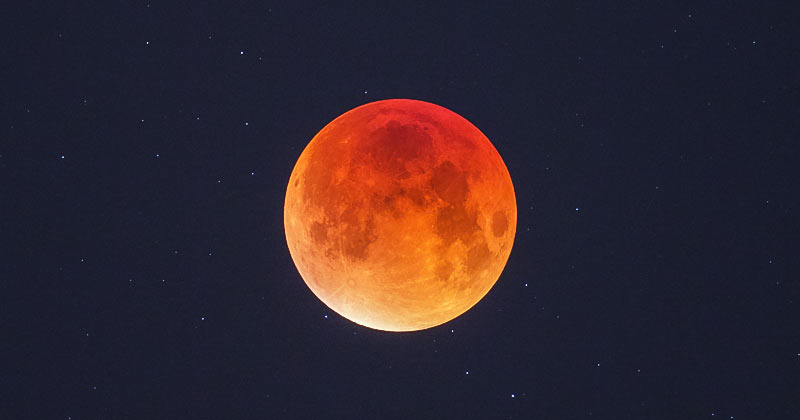
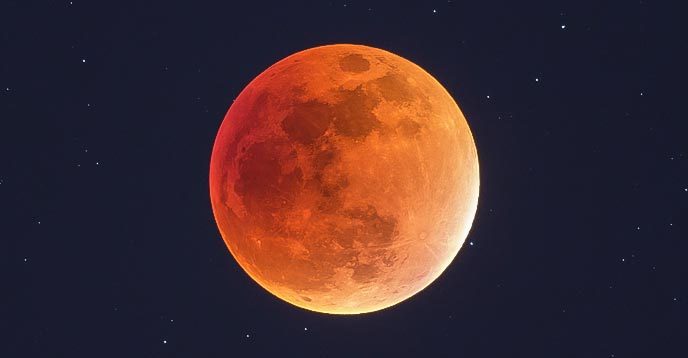
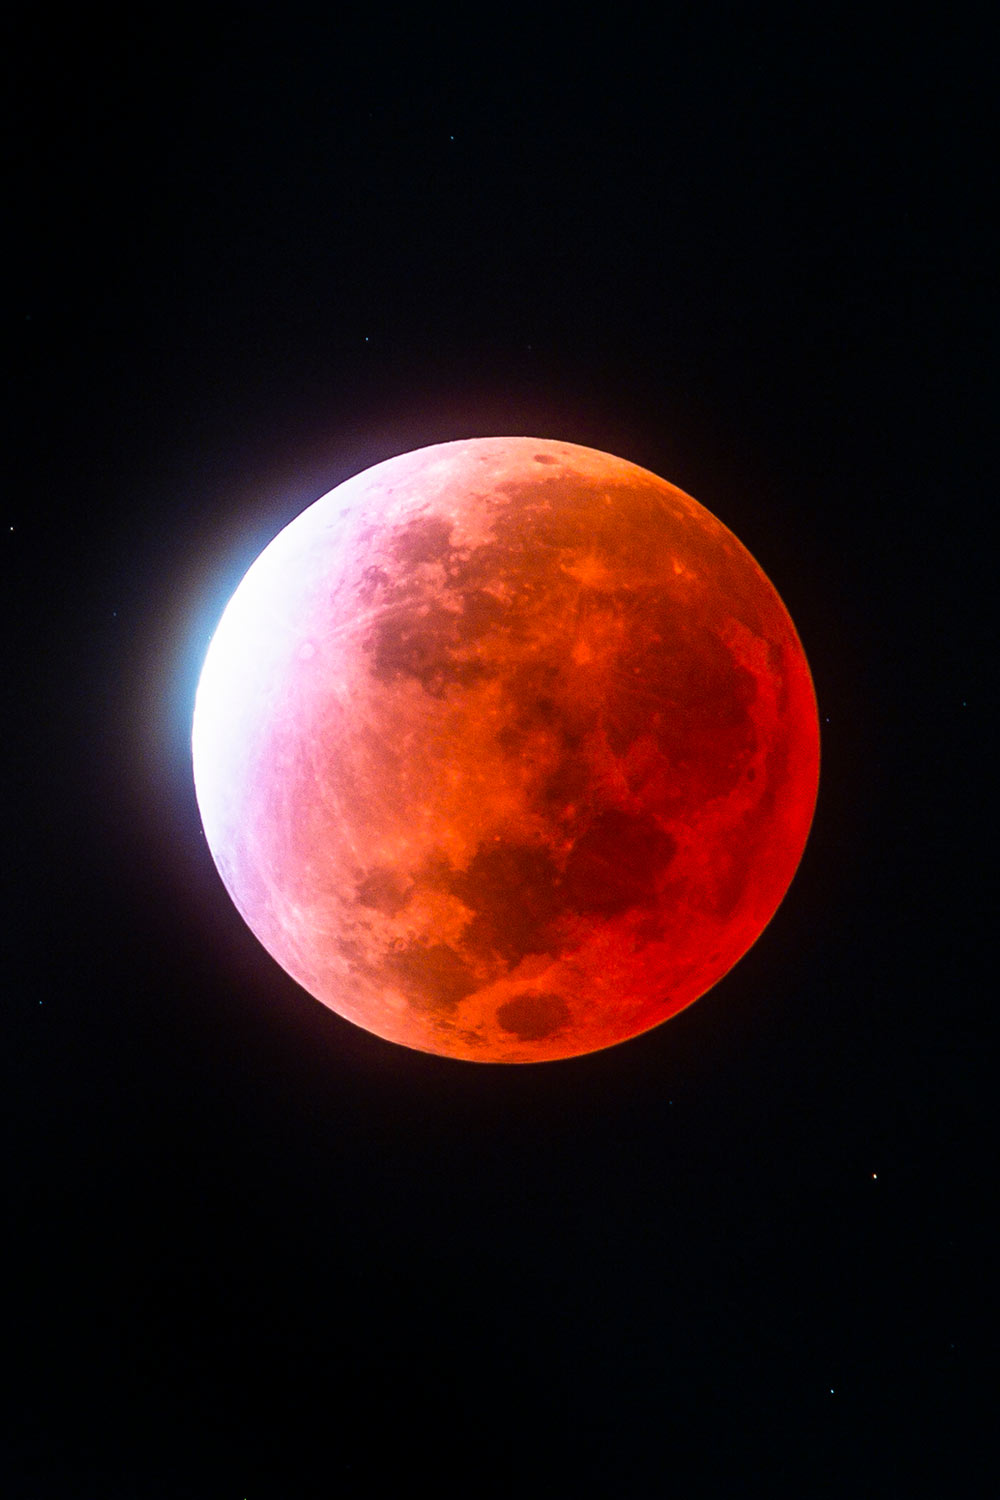
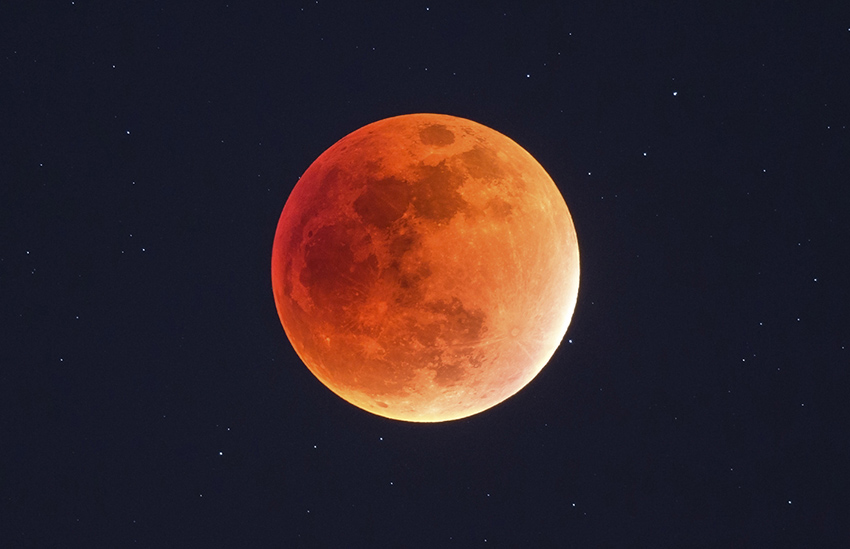
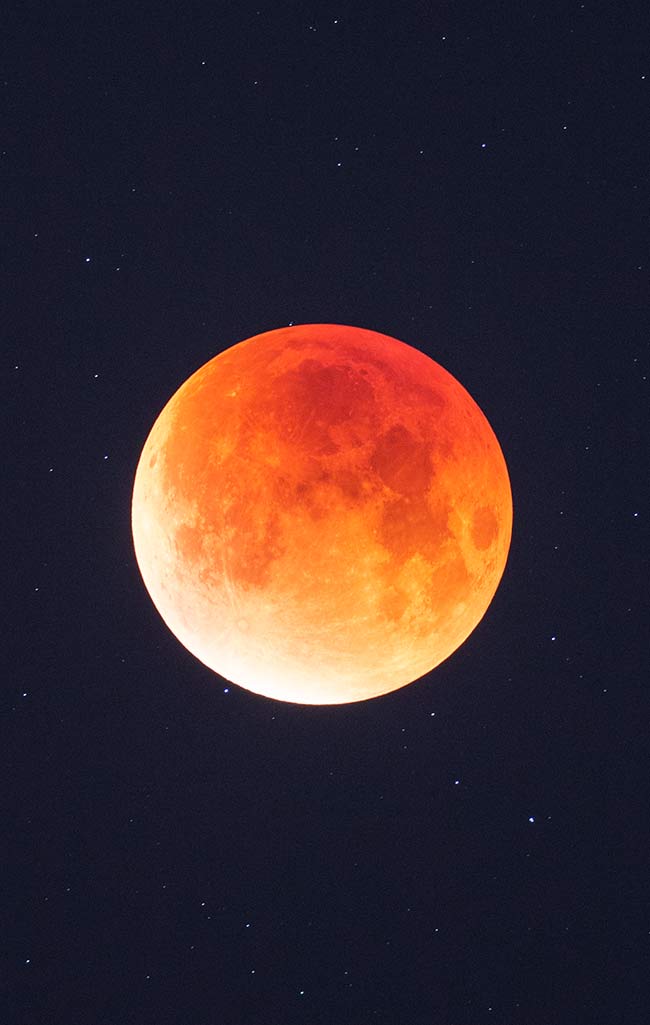
The maximum eclipse stage is when most photographers want a great shot. This is when the moon turns “blood” red and the surrounding night sky becomes much darker from our point of view on Earth. It is an unforgettable experience for those lucky enough to witness this moment.

Stages of the total lunar eclipse:

  1. Penumbral Eclipse begins
  2. Partial Eclipse begins
  3. Full Eclipse begins
  4. Maximum Eclipse
  5. Full Eclipse ends
  6. Partial Eclipse ends
  7. Penumbral Eclipse ends

An interesting thing happens when the moon is completely eclipsed by the shadow of Earth. Not only does the moon turn to an eerie reddish hue, but the stars and constellations surrounding the moon begin to appear as they would on a moonless night. Capturing a scene like this requires careful planning and execution.

Ways to Photograph the Total Lunar Eclipse

Here are 6 different ways to photograph the lunar eclipse, depending on the equipment you own:

Examples and Best Practices

There are many ways to photograph the total lunar eclipse, but for the best results, I recommend using a DSLR camera and a small refractor telescope on a tracking mount. 

This will allow you to get an up-close shot of the moon in each of its phases in detail. Some of the most incredible images of the lunar eclipse I have ever seen were captured this way. 

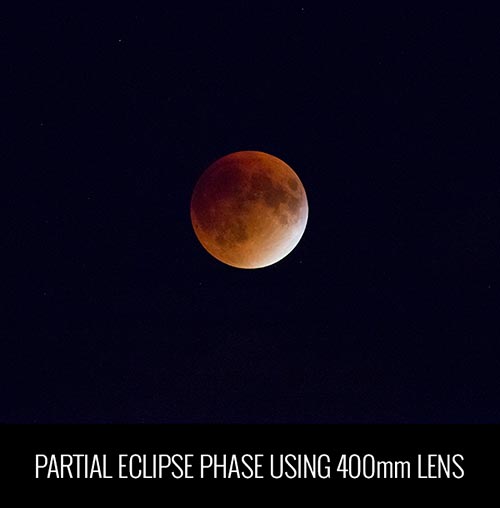
If you do not own a telescope, you can use your longest focal length camera lens to pull the moon in close. For the photo of a nearly total lunar eclipse below, I used a Canon EF 400mm F/5.6 telephoto lens. 

lunar eclipse

The 2021 Partial Lunar Eclipse on November 19, 2021. DSLR and 400mm lens. 

An equatorial tracking mount, such as a star tracker is the best way to take a clear photo of the moon during an eclipse when using high-magnification optics. This essentially freezes the moon in place for an extended period of time.

When you have compensated for the rotation of the earth, your subject is no longer moving, and you have many more options to choose from in terms of camera settings. Now, you can dial back ISO settings and f-stop if necessary and let a longer exposure time collect the light. 

This makes everything easier because the Moon will stay ‘still’ in the image frame while you adjust your camera settings based on the current stage of the eclipse. During the first stage of the eclipse, the moon will be very bright, whereas, during totality, it will be much dimmer. 

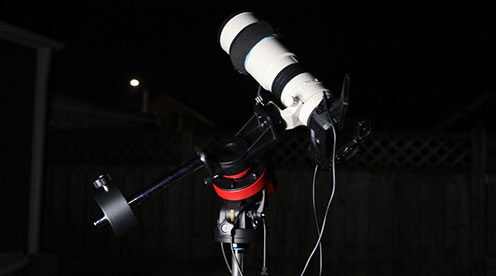
Below, you will see the camera and telescope I used to take a crisp photo of the total lunar eclipse that occurred in September 2015. This telescope has a focal length of nearly 500mm, which was enough to reveal some amazing details on the lunar surface.

Basic astrophotography setup

Moon photography

The camera and telescope used to capture a total lunar eclipse. Canon EOS 70D and Explore Scientific ED80. 

Using a DSLR and Telescope

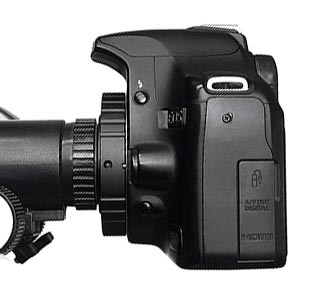
A DSLR camera (or mirrorless camera) and telescope can provide an up-close view of the eclipsed moon in detail. The prime focus method of astrophotography is best, as the camera sensor’s focal plane is aligned with the telescope. You can directly attach a DSLR camera using a T-Ring adapter (see below) to utilize the telescope’s native focal length.

The prime focus method requires that the telescope tracks the apparent rotation of the night sky to avoid any movement in your shots. To learn more about the process and equipment involved in deep-sky astrophotography, have a look at a typical DSLR and telescope setup.

t-ring adapter

A DSLR camera and T-Ring Adapter attached to a telescope

If your goal is to capture an up-close view of the moon during the eclipse, there are many benefits to this technique. A small refractor telescope will have an adequate amount of focal length (magnification), offer precision focus, and have a stable base to attach to an equatorial telescope mount. 

With the camera connected to the telescope, experiment with different exposures and ISO settings in manual mode, using live-view to make sure you have not under/overexposed the image.

The shortest exposures will only be useful during the partial stages of the lunar eclipse, as the lunar eclipse is beginning and ending. This is a challenging phase of the event to capture in a single shot, as the shadows and highlights of the image are from one end of the spectrum to the other.

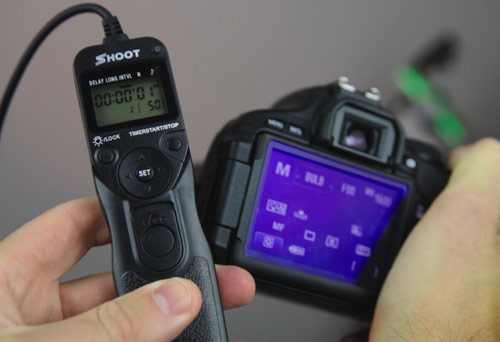
Remote shutter release cable

A remote shutter release cable will help to avoid camera shake in your image. 

When the moon enters totality, you will need to bump up your ISO, and/or your exposure length to reveal the disk of the moon as it becomes dimmer. Use a timer or external shutter release cable to avoid camera shake if possible.

Ideally, you’ll keep the ISO as low as possible for the least amount of noise. With an accurately polar-aligned tracking mount, exposures of 2-5 seconds will work great.

To record the lunar eclipse with a DSLR camera, no filters are necessary. A stock DSLR camera is best as the additional wavelengths available with a modified camera are unused in moon photography.

total lunar eclipse photo

Canon EOS 7D, Explore Scientific ED80 Refractor, Sky-Watcher HEQ5 Tracking Mount.

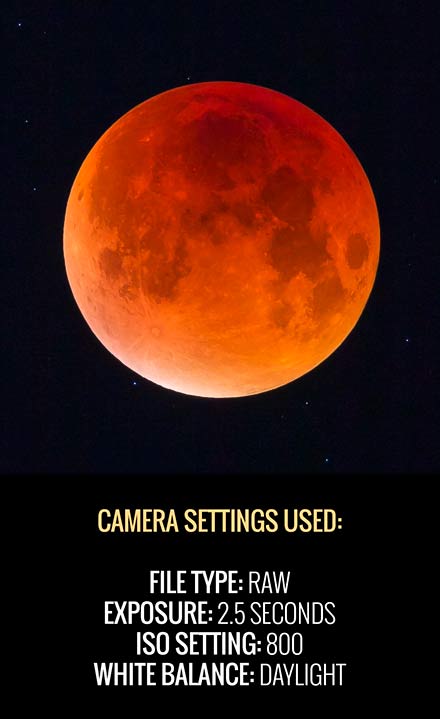
Without a tracking equatorial mount like the Sky-Watcher HEQ5, a 2.5-second exposure like the one above is impossible. Even 1-second of movement at this focal length will record a blurry image if the telescope or lens is not moving at the same speed as the moon.

The benefit of shooting a long exposure during the maximum eclipse (totality) is that you also record the starry sky behind the moon. To do this in a single exposure on a normal full moon is not possible as the dynamic range is too wide.

A dedicated one-shot-color astronomy camera is more than capable of taking a brilliant photo of the eclipse as well. The computer software used to control these devices have countless options to control the Gain and exposure settings of these cameras. 

For projects like this, I personally enjoy the freedom and simplicity of a DSLR. Camera settings such as ISO, exposure, and white balance can easily be changed on-the-fly as the eclipse is taking place.

Without A Tracking Mount

Since the moon is very bright, it is possible to take a fast exposure (1/500″ or faster) of the moon without tracking. You will still want to use an optical instrument such as a telescope or long lens, and without tracking, it will be tricky. 

Even at 10X magnification, the moon will slowly move across the eyepiece as you look at it through the telescope. This a subtle reminder that the earth is always spinning, and why astrophotography is so challenging overall. 

Thankfully, unlike dim deep-sky objects like nebulae and galaxies in the night sky, solar system subjects like the moon are incredibly bright. You can take an ultra-fast exposure of the moon through a telescope that is still sharp, without tracking. 

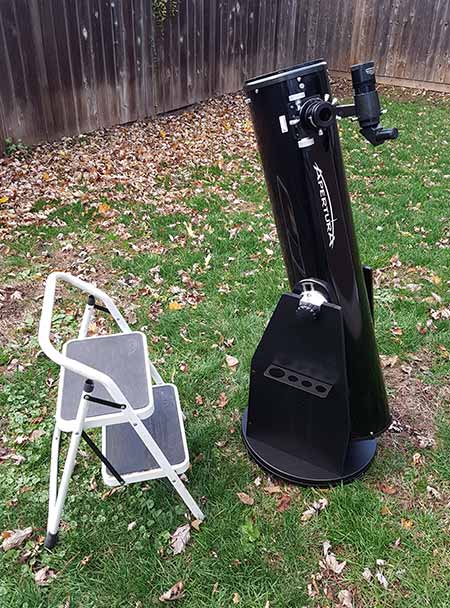
Many visual observers enjoy the affordability and performance of a Dobsonian Telescope like the one shown below. They are a fantastic choice for anyone interested in astronomy, and why I consider them to be the best telescope for beginners. 

Apertura AD8 Dobsonian Telescope


It is possible to produce a comparable close-up image using a digital camera or smartphone through the eyepiece of a non-tracking telescope such as a Dobsonian, using the eyepiece projection method. For the best results, use a smartphone adapter that allows you to secure your phone to the telescope.

Photographing a Lunar Eclipse with Your Phone

This type of astrophotography is often referred to as the eyepiece projection method. To do this, you’ll simply position your digital camera or smartphone into the eyepiece of the telescope. This method usually requires a fair amount of trial and error, but you may be quite surprised with your results.

An eyepiece smartphone adapter may help to steady your shot of the lunar eclipse. Although you’ll have much less control over exposure and record less detail, this technique can be used with a non-tracking telescope as a traditional Dobsonian telescope like the one pictured above, or a smaller tabletop model. 

The moon is one of the few subjects that are relatively easy to photograph with a non-tracking mount compared to deep-sky astrophotography. However, the transition phases of the eclipse can be difficult due to the changing lighting conditions and exposure levels.

I recommend capturing the lunar eclipse during its maximum phase if you’re using this method. You likely won’t be able to capture a well-exposed image using the camera’s auto-exposure mode. Experiment with your camera’s manual settings that allow for variations in shutter speed. 

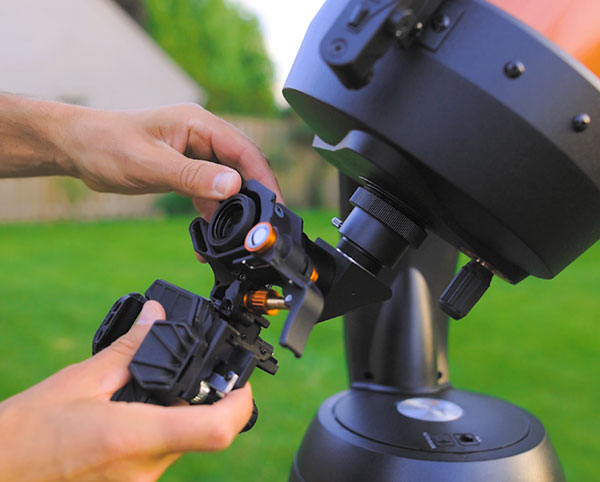
I have had great results using the Celestron NexYZ smartphone adapter when photographing the moon. This model features a 3-axis design that allows me to line up the camera on my bulky Samsung S21 Ultra phone with the eyepiece. It clamps onto the eyepiece itself and is much more secure than models I have used in the past. 


smartphone adapter

Use a smartphone adapter to line up your camera lens and secure your phone. 

Camera Settings

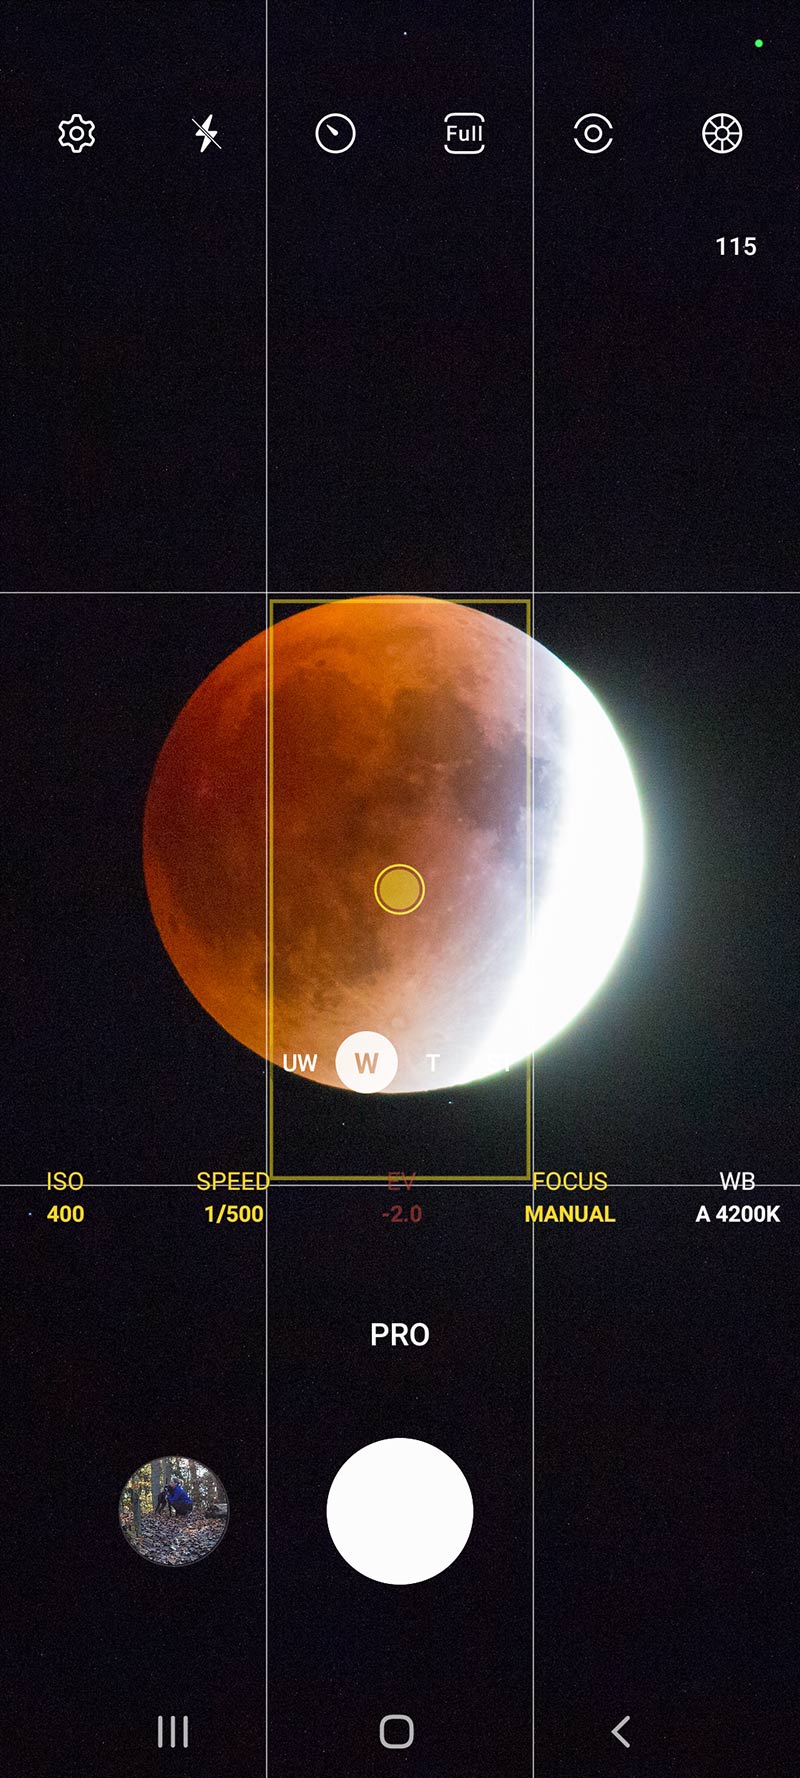
Once you have secured your phone in the adapter, and the camera lens is lined up with the eyepiece, you can start experimenting with settings. To fully control the exposure, it is best to use manual mode (often called ‘pro’ mode) rather than the standard auto setting. 

Chances are, when you are pointing at the moon with your smartphone and telescope, it will appear very bright, and your camera will have trouble finding the correct exposure to show the lunar surface details. To fix this, adjust the basic camera settings like exposure length, ISO, and f-stop to properly expose the bright moon through the eyepiece. 

A shorter exposure time 1/500′ and a moderate ISO setting of 400 is a good place to start (see below). If the moon looks too bright or too dim using these settings, make small adjustments to the exposure time until it is well exposed to reveal the moon’s surface. 

Use manual focus mode to ensure that the moon is in critical focus, rather than relying on the autofocus capabilities of your phone camera. This can be tricky to get right, but keeping the camera steady via the smartphone adapter will make this a lot easier.

how to photograph the lunar eclipse with your phone

Capturing the lunar eclipse using the ‘pro’ mode on my smartphone. 

Using a Telephoto Camera Lens

If you don’t own a telescope, a telephoto camera lens with at least 300mm of focal length will work well. At longer focal lengths like the ones necessary for a close-up of the moon, you must use fast exposure to capture a sharp photo of the moon. This is because the Earth is spinning, so you’re essentially trying to photograph a moving target. 

The image below was captured using a Canon EOS 70D and a Canon EF 400mm F/5.6 Lens. 

partial eclipse phase

The final stages of the partial eclipse phase are challenging to photograph because there is a bright highlight on a small portion of the moon. For the photo below, the camera settings included an ISO setting of 6400 and a shutter speed of 1/8.

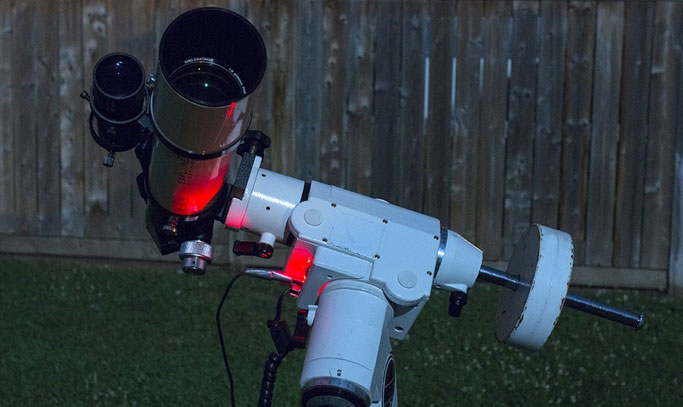
A tracking telescope or camera mount such as the iOptron SkyGuider Pro (pictured below) is recommended. An equatorial mount that is polar aligned with the rotational axis of the Earth will allow you to take longer exposures, and get more creative with your camera settings.

Owners of astronomical telescopes for astrophotography usually own an equatorial telescope mount, and this is an ideal configuration for moon photography. This allows the user to enter any celestial object into the hand controller, and the mount will automatically slew to that object once it has been properly star-aligned.

An iOptron SkyGuider Pro camera mount with a DSLR and 300mm Lens attached

The key to capturing details of the moon’s surface in your lunar eclipse photo is reach and exposure. By this, I mean that you need enough magnification to show the detailed craters of the moon’s surface, and a fast enough shutter speed to not blow out any of the highlights in your image. 

To do this, a precise exposure length must be used. One that preserves the data in your image while also bringing enough of the shadowed areas forward is ideal. For my photos, I found an ISO of 200 and an exposure of 1/200 to work quite well. This was enough to showcase a starry sky behind the eclipsed moon.

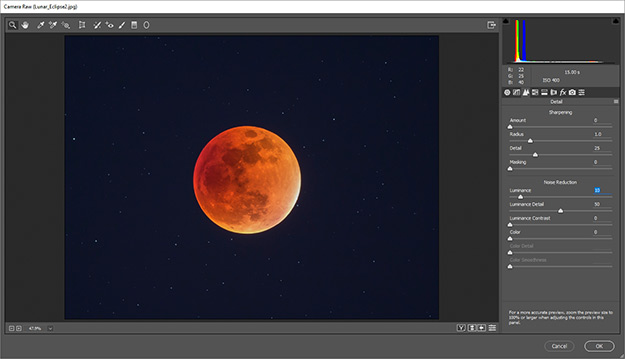
I use Adobe Photoshop to process all of my astrophotography images, including photos of the moon and our solar system. Adobe Camera Raw is a fantastic way to edit your images of the lunar eclipse because it gives you complete control over the highlights and color balance of your image. 

Adobe Photoshop

Adobe Camera Raw offers powerful tools to edit your photos of the Total Lunar Eclipse

Capturing a Lunar Eclipse Without a Telescope 

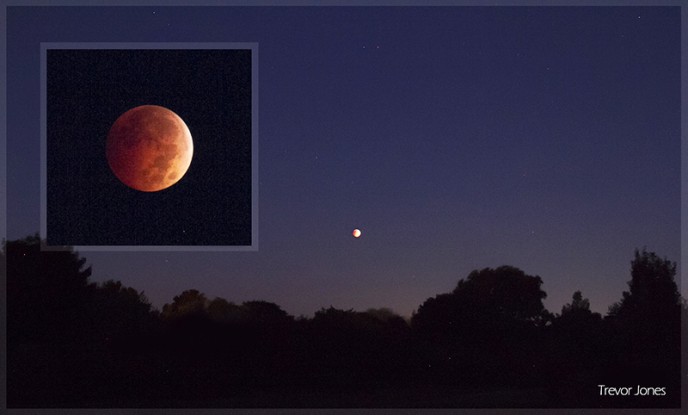
If you are simply using a point-and-shoot camera or a DSLR and lens on a stationary tripod, you can still take an amazing photo of the lunar eclipse. This is often a great way to capture the landscape and mood of the moment. The photo below was captured back in October 2014 using a Canon EOS 7D and an 18-200mm lens on a tripod.

This is a wide-angle shot captured at 18mm, while the inset image was captured at the lens’s maximum focal length of 200mm. A zoom lens is handy for photographing the moon at varying magnifications. 

Total Lunar Eclipse - Moon Photography

When capturing the lunar eclipse without a telescope, you’ll want as much manual control over the camera settings as possible. “Auto” mode, flash, and autofocus won’t work on a photo of the total lunar eclipse. Adjusting individual parameters such as exposure length and ISO is essential to properly expose the moon. 

Practice taking shots at night beforehand, so that you are ready when the eclipse happens. Ideally, find a location that includes some interesting foreground and background details to capture a dramatic scene on the night of the event. In the case of the lunar eclipse shown above, it took place in the early morning hours as the moon was setting. 

What is Happening During a Lunar Eclipse?

Do you understand why a lunar eclipse happens? There are two types of lunar eclipses: partial and total. As you know, the Earth orbits the sun, and the moon orbits the Earth. During a total lunar eclipse, the Earth is sitting directly between the sun and the moon.

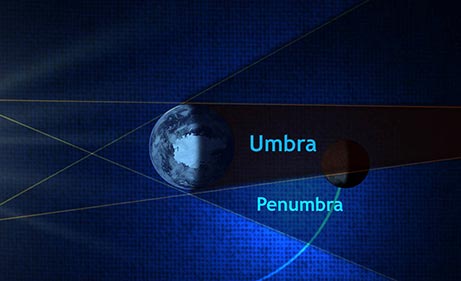
Although the moon is covered in Earth’s shadow, some sunlight still reaches the moon. When the moon enters the central umbra shadow of the Earth, it turns red and dim. This distinctive “blood” color is due to the fact that the sunlight is passing through Earth’s atmosphere to light up the disk of the moon. 

What is a lunar eclipse?

A diagram of what happens during a total lunar eclipse – NASA

Unlike a solar eclipse, observing a total lunar eclipse is completely safe to do with the naked eye. This natural phenomenon can be enjoyed without the aid of any optical instruments, although binoculars can really help to get an up-close view of the action.

camera settings for lunar eclipse

Camera settings used for my lunar eclipse photo

This article was originally posted in January 2019, and updated on November 4th, 2022. 

Related Posts:

Related Posts

Share This

Related Tags

[ad_2]